
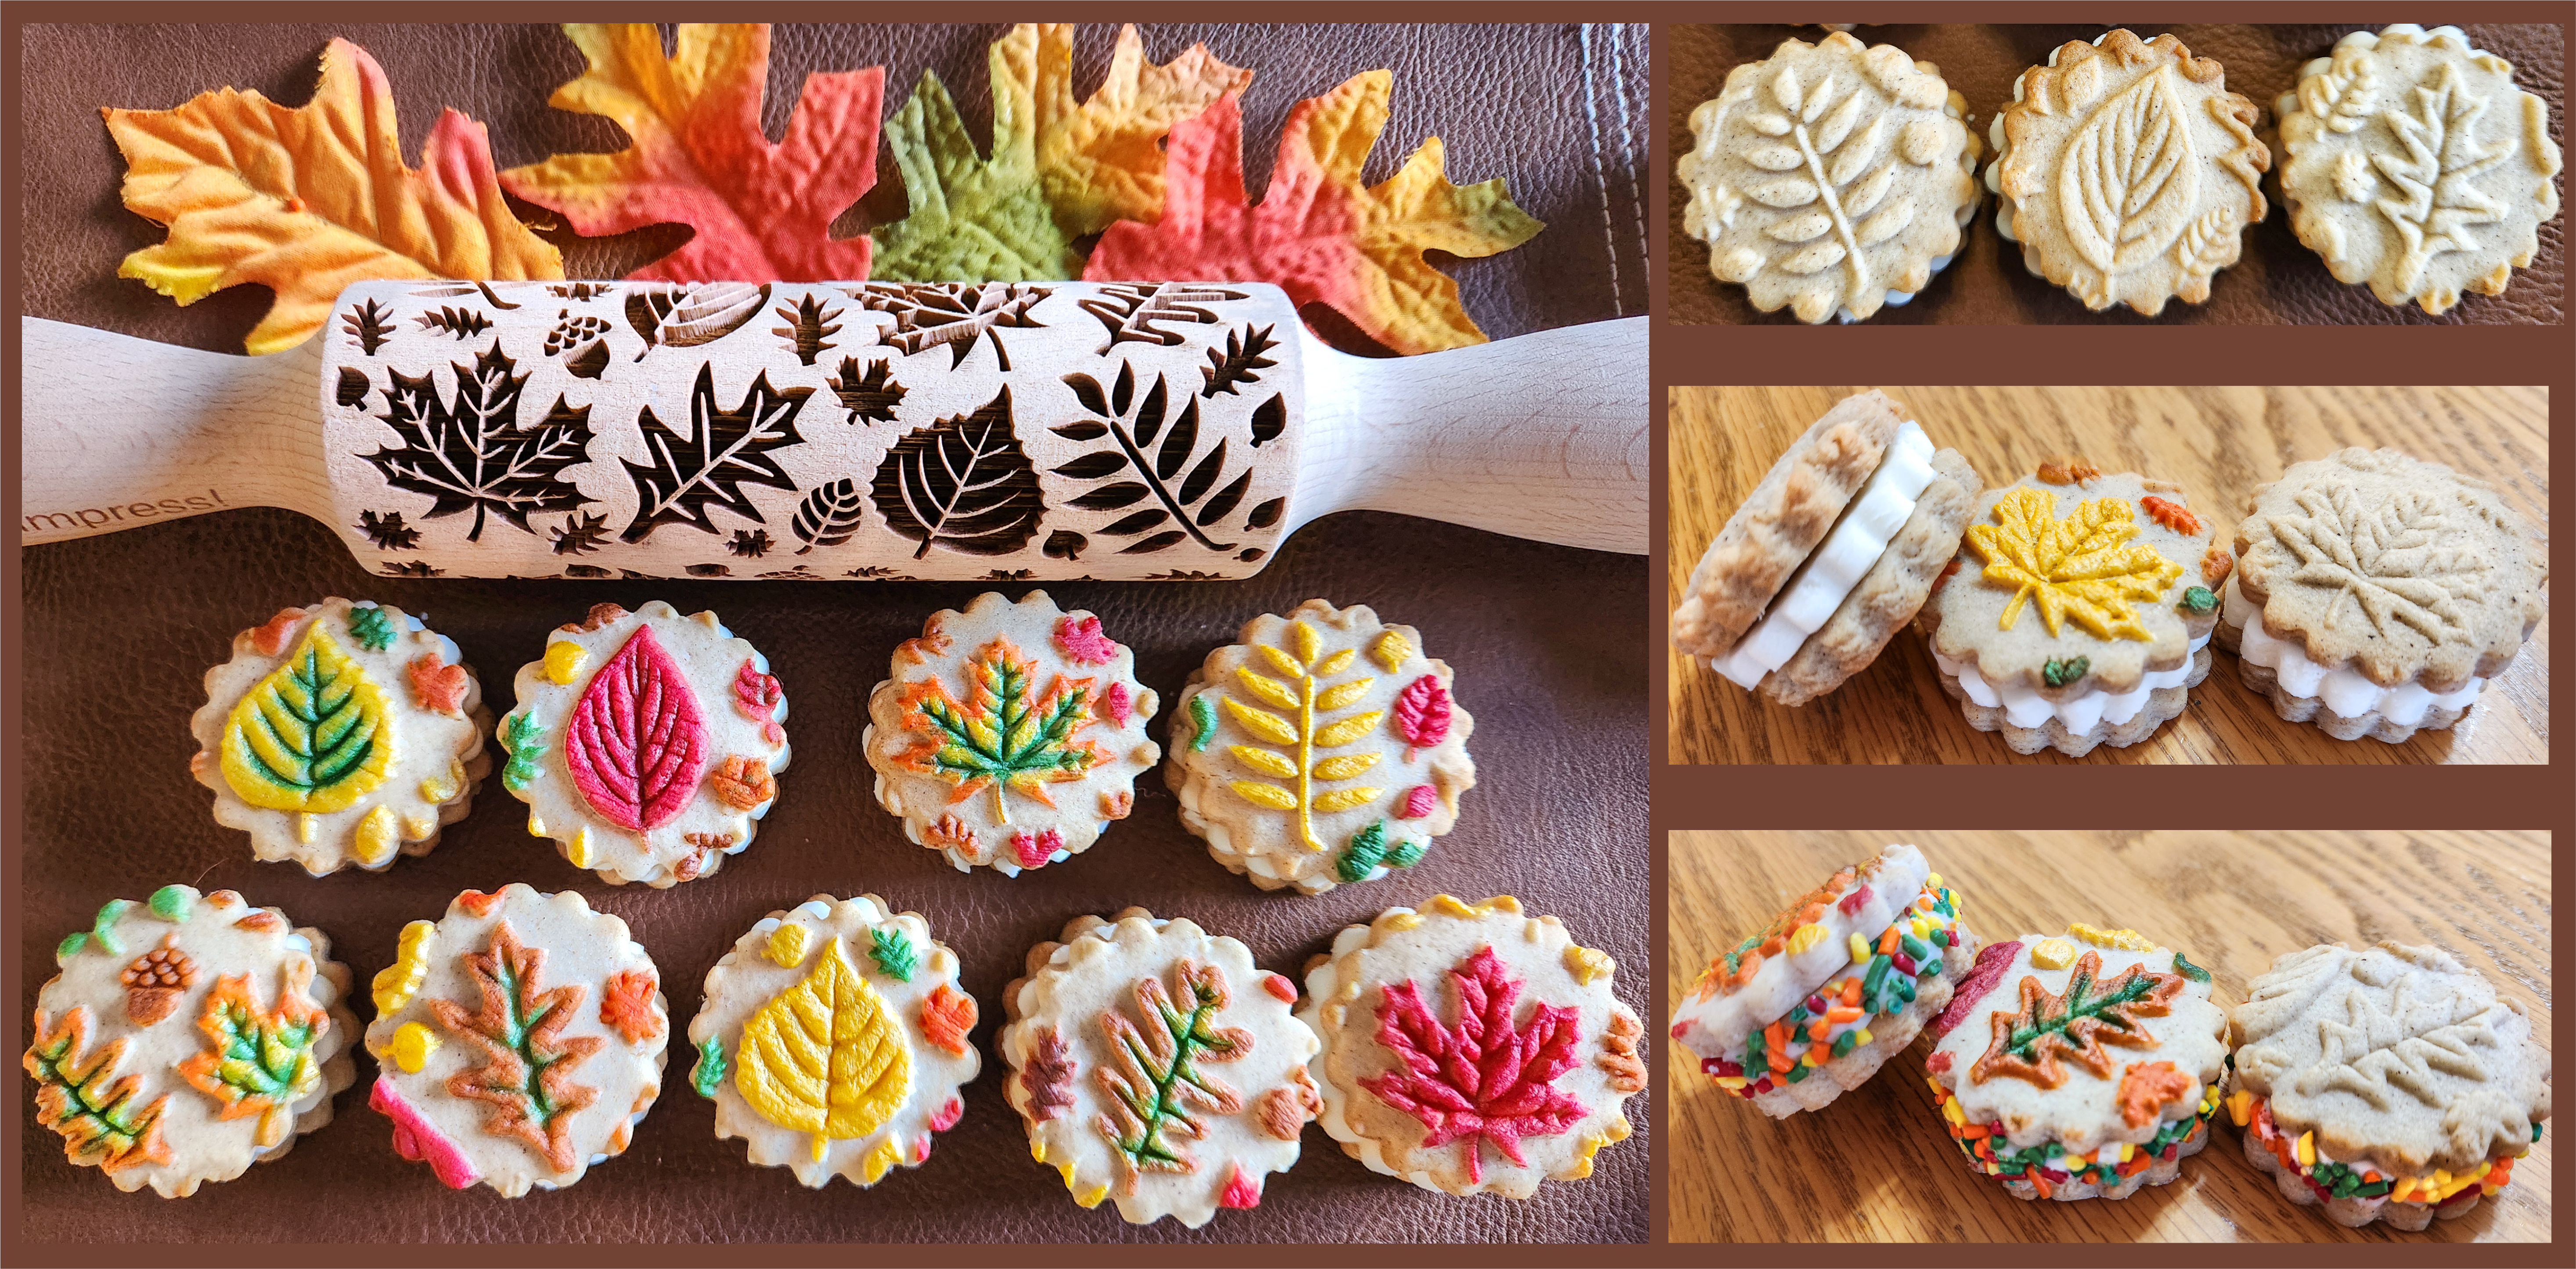
Hello Autumn! Our Fall Leaves Large Designs Embossed Rolling Pin brings you the stunning beauty of leaves! You can make this recipe as easy or as fancy as you want! Either way, your whole house will smell like warm pumpkin spice as you bake! ❤
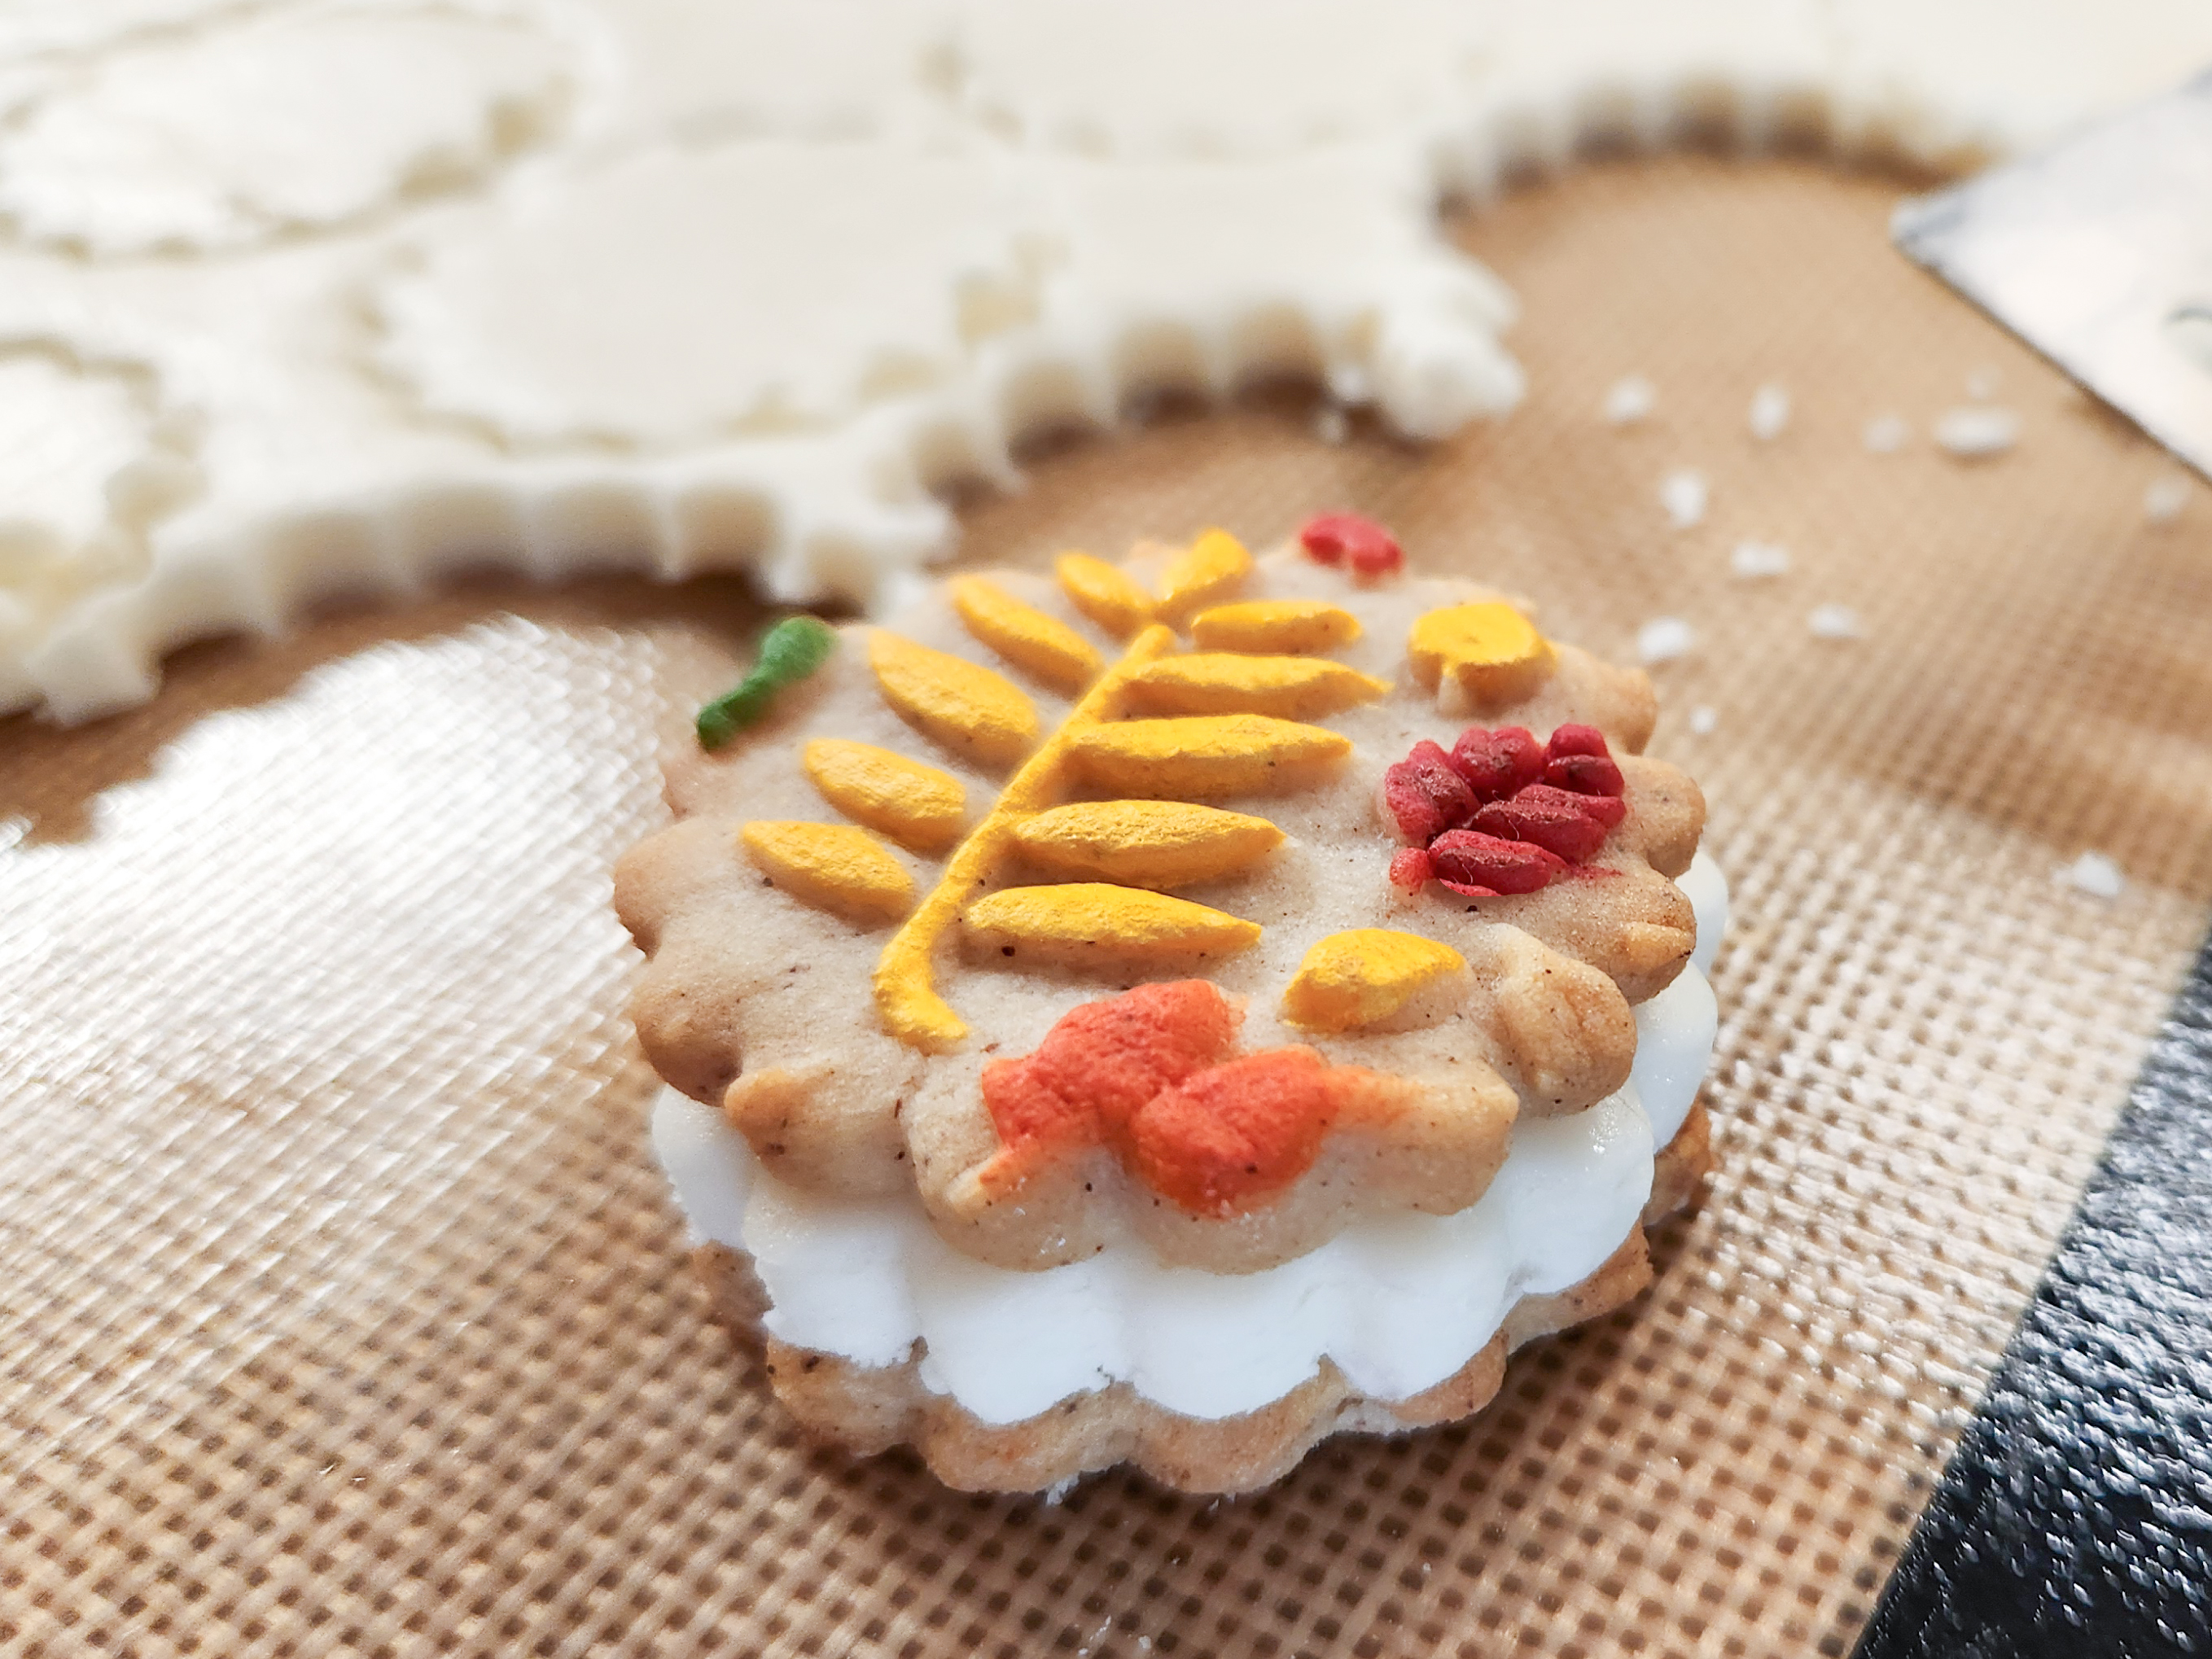
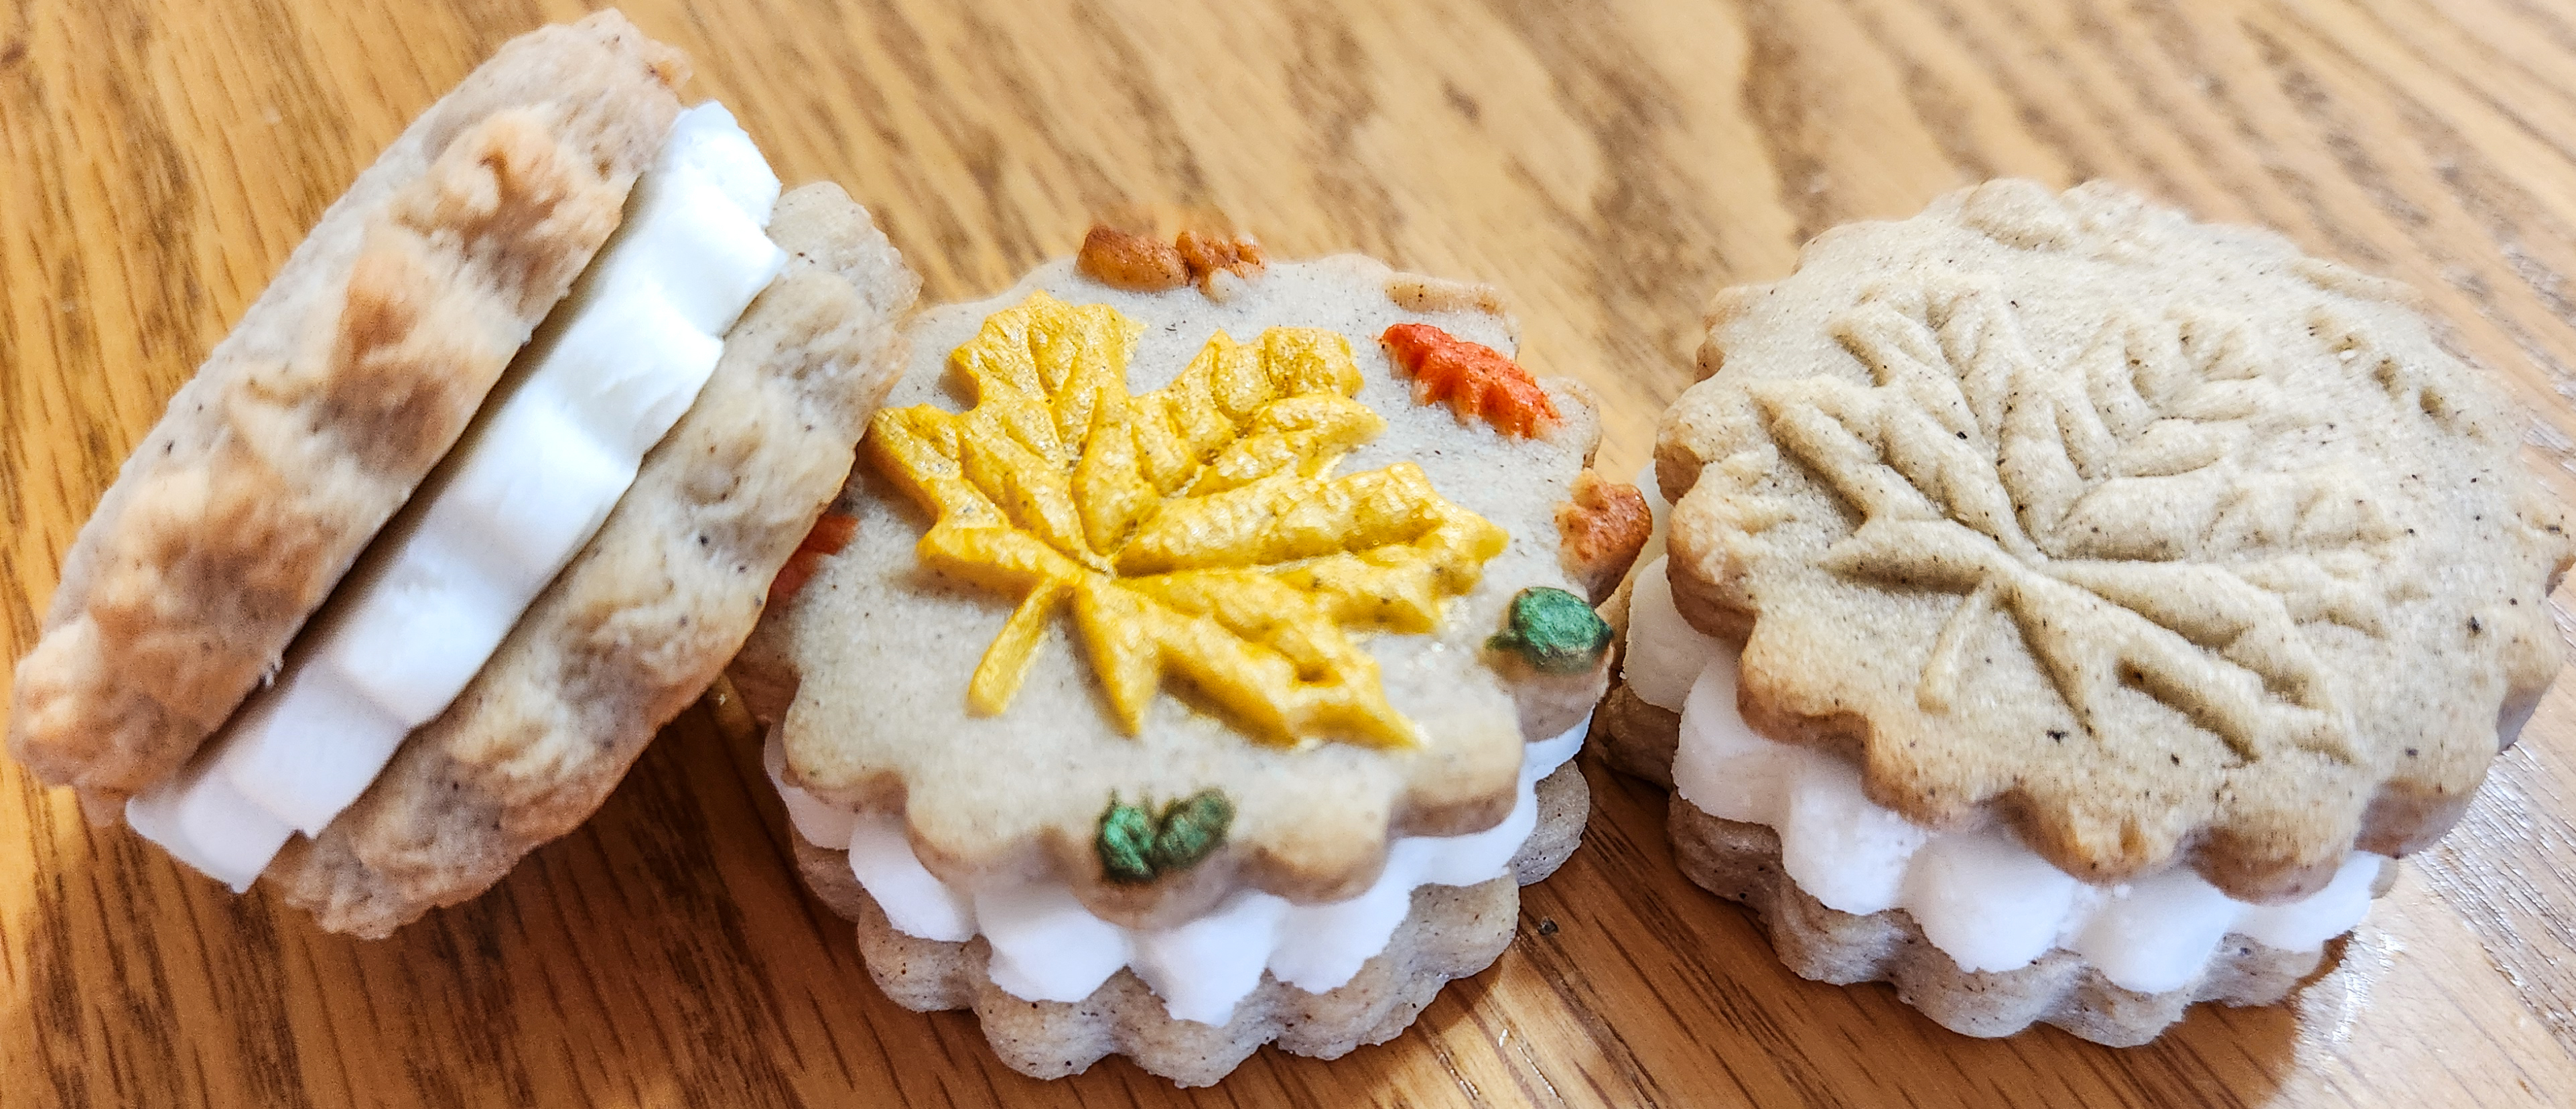
These cookies are lovely simply patterned on top and sandwiched with a rich vanilla buttercream. Make them this way for a treat that’s quick, easy, and delicately pretty.
Or take a little “me time” to paint them! Add some flair to these beauties and experience the soothing calm of painting. It’s like a coloring book or a paint-by-number. The pattern is already there, you’re just coloring in a mindful way. Truly fun and the result is gorgeous!

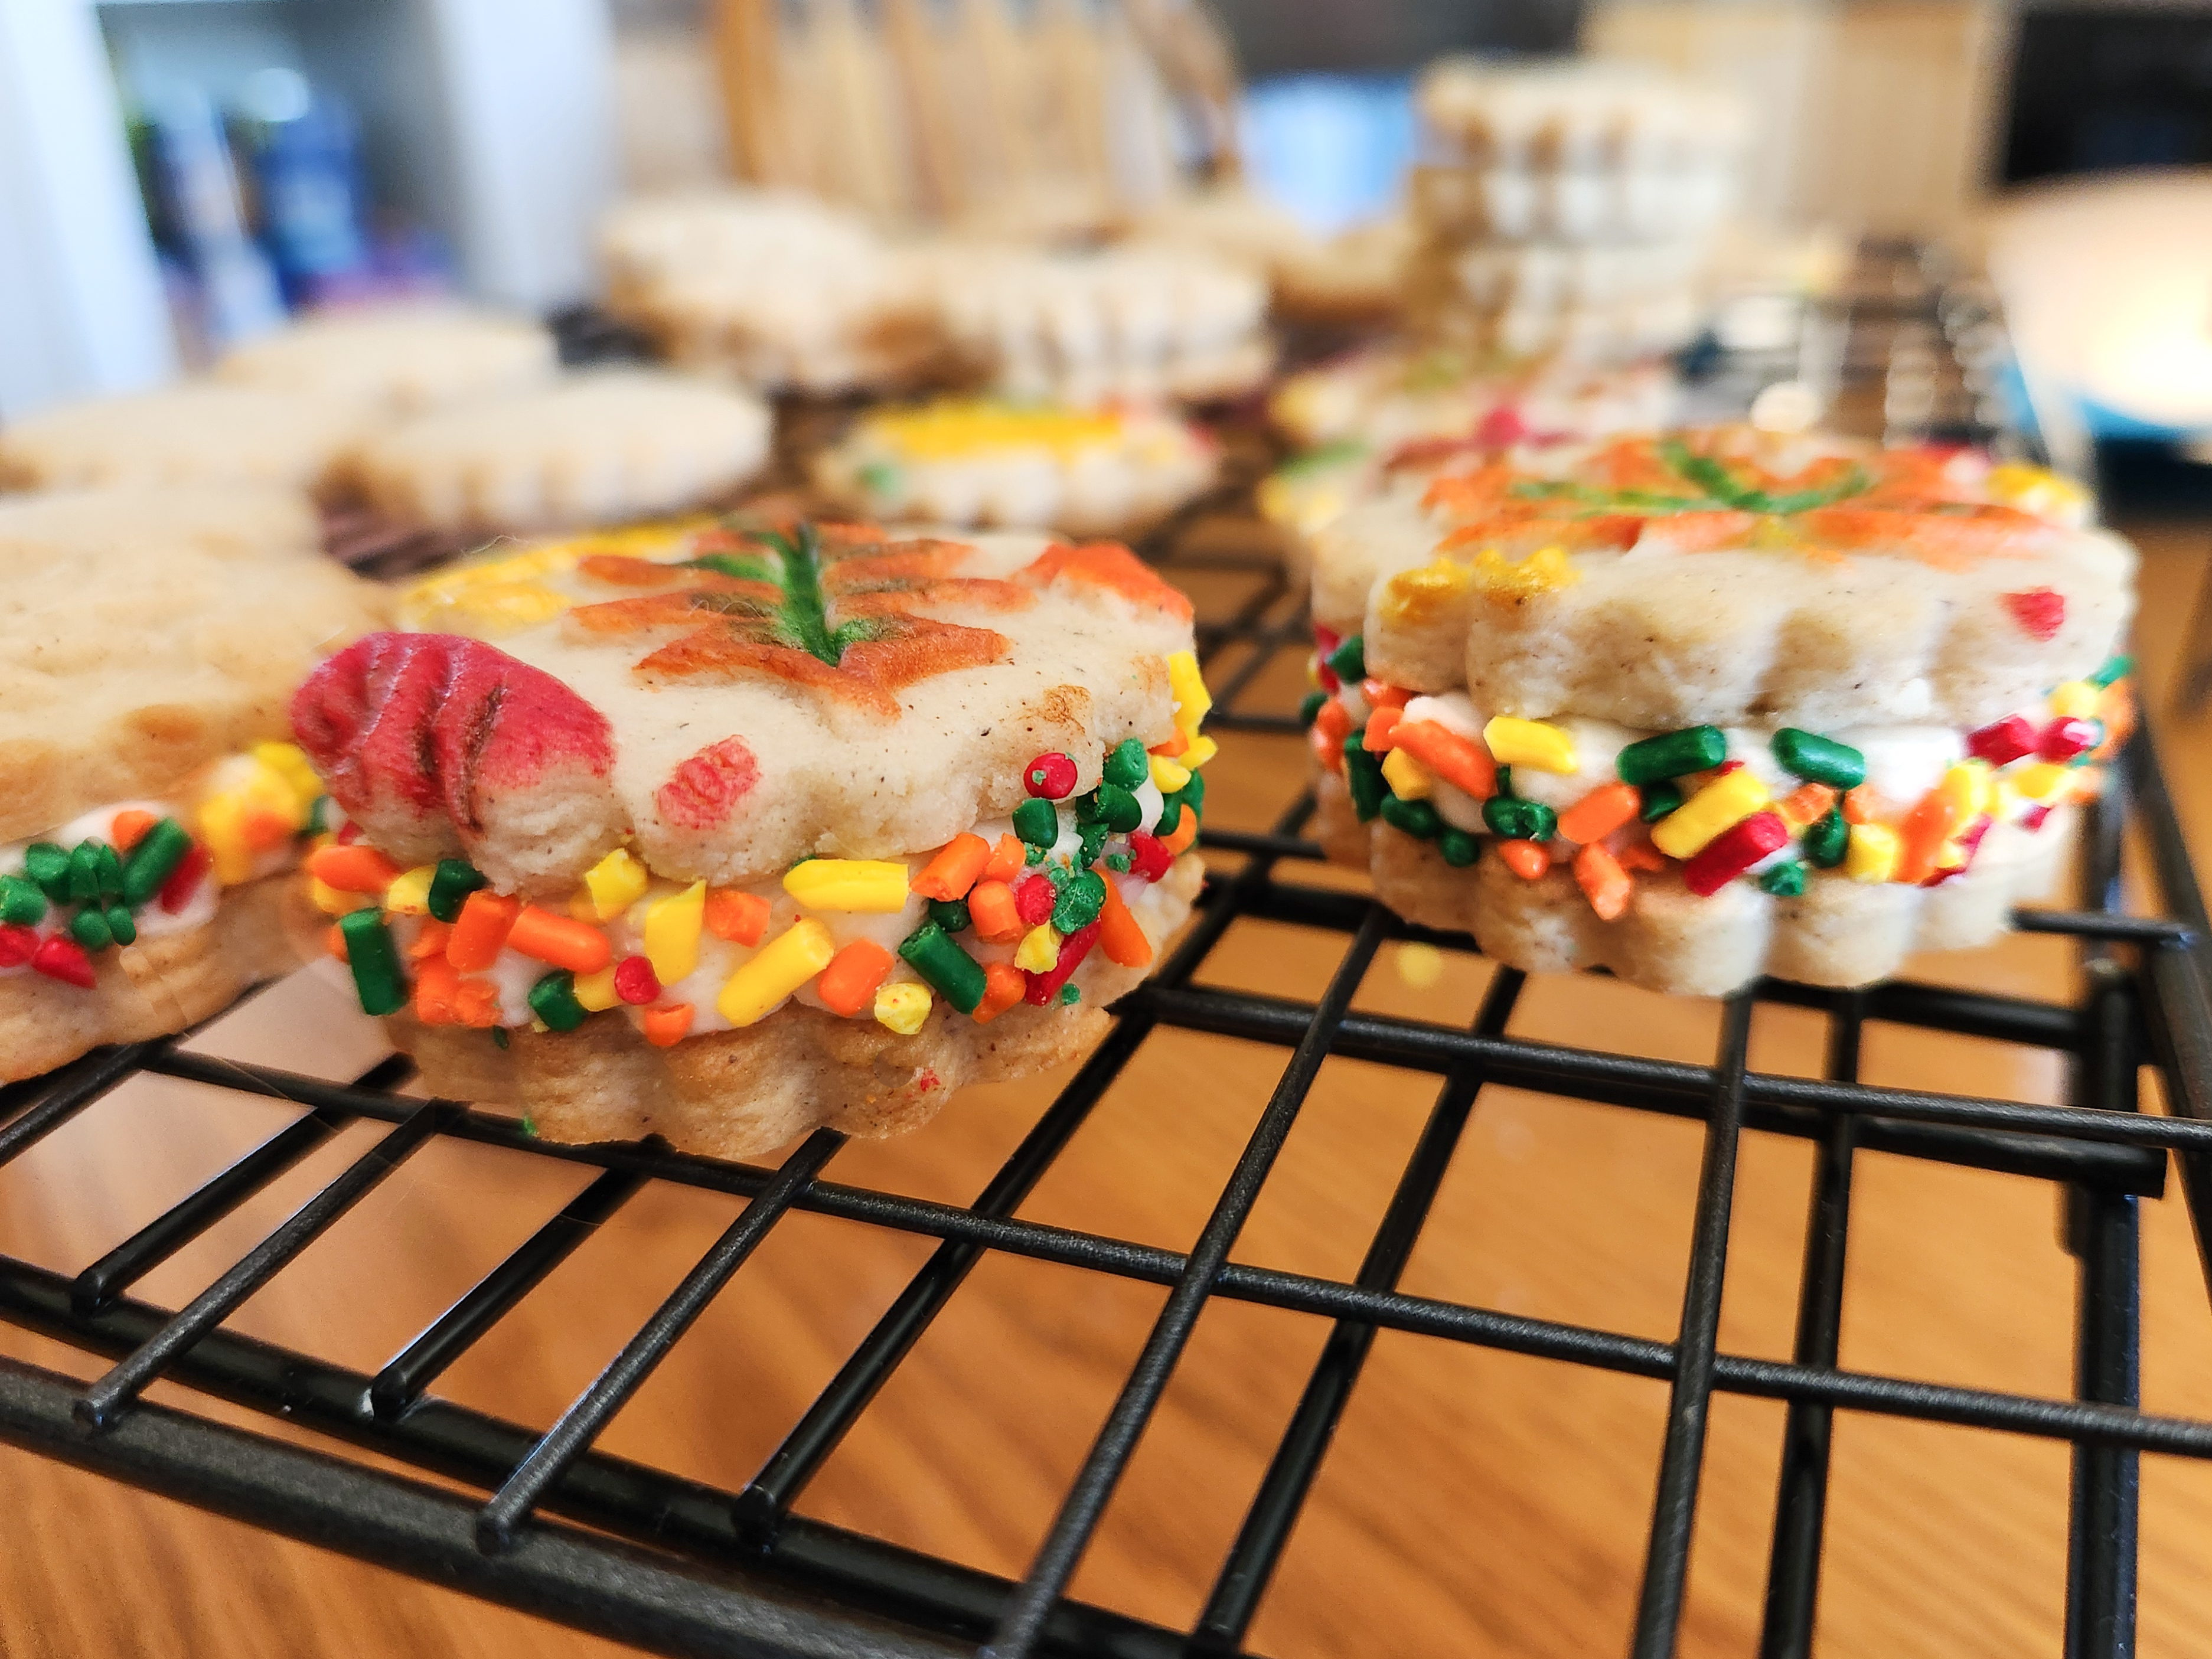
To go all out on these treats, roll them in sprinkles to make a sweet, colorful edge!

With this rolling pin you can also make big cookies! I designed them so they were cute with all of our sizes of cookie cutters.


We also have a leaves pin with smaller leaves! Our original Leaves Pin would make cute cookies for this recipe, too. They’re darling plain or painted.


Our website has all of our 200+ disk shapes, cookie press, embossed rolling pins, baking accessories plus more about our Women/Family Owned company! impressbakeware.com
All products are on our Etsy shop.
Our Amazon shop has our cookie press and disks and embossed rolling pins.
Let’s Bake!
Pumpkin Spice Rolled Cookies
1 cup (2 sticks) butter, softened (not melted) (I recommend Land O Lakes brand as I know it creams well. I have had trouble with some generic butters not creaming properly and making the dough difficult to work with.)
1/2 cup granulated sugar
1/3 cup honey
1 teaspoon vanilla extract
1 egg
3 3/4 cups all-purpose flour
1/4 teaspoon salt
1 teaspoon ground cinnamon
1/2 teaspoon ground cloves
1/4 teaspoon ground nutmeg
1/4 teaspoon ground ginger
In a large bowl, combine flour, salt, and spices. Set aside.
Using an electric mixer, cream the butter. Add the sugar and cream together very well, until it is light and fluffy. Add the honey, then the vanilla, then the egg, mixing thoroughly after each addition.
Add the flour mixture slowly, mixing on a slow speed until a workable dough forms. Make sure all of the flour is incorporated evenly. Knead it a bit by hand if needed to make sure it is uniformly smooth and mixed. Sometimes this dough can seem crumbly at first but it kneads together well. Perfect rolling dough has a clay-like, workable texture that is not too sticky or too stiff. If it feels difficult to knead, it is probably too stiff. Add a little water or vanilla extract a teaspoon at a time until you achieve a workable texture. If it is too easy to knead or is sticking to your fingers, it is probably too soft. Add flour a tablespoon at a time until it is workable like soft clay.
Divide your dough into balls a little bigger than your fist. Work with one portion at a time to keep it manageable. Cover the unused portion to keep it from drying out.
NOTE: Remember that for sandwich cookies you want to roll out half of your dough embossed for top cookies, and half plain and flat for bottom cookies. You will need about 22 plain bottom cookies and 22 patterned top cookies for 44 sandwiches.
Roll it out!

I usually recommend that you oil your regular pin with canola (or similar) oil before rolling, but this time I have a trick: waxed paper.
Start by creating a log of dough that’s about the width that you want, then flatten it out with your hands a bit. Put the waxed paper on top.
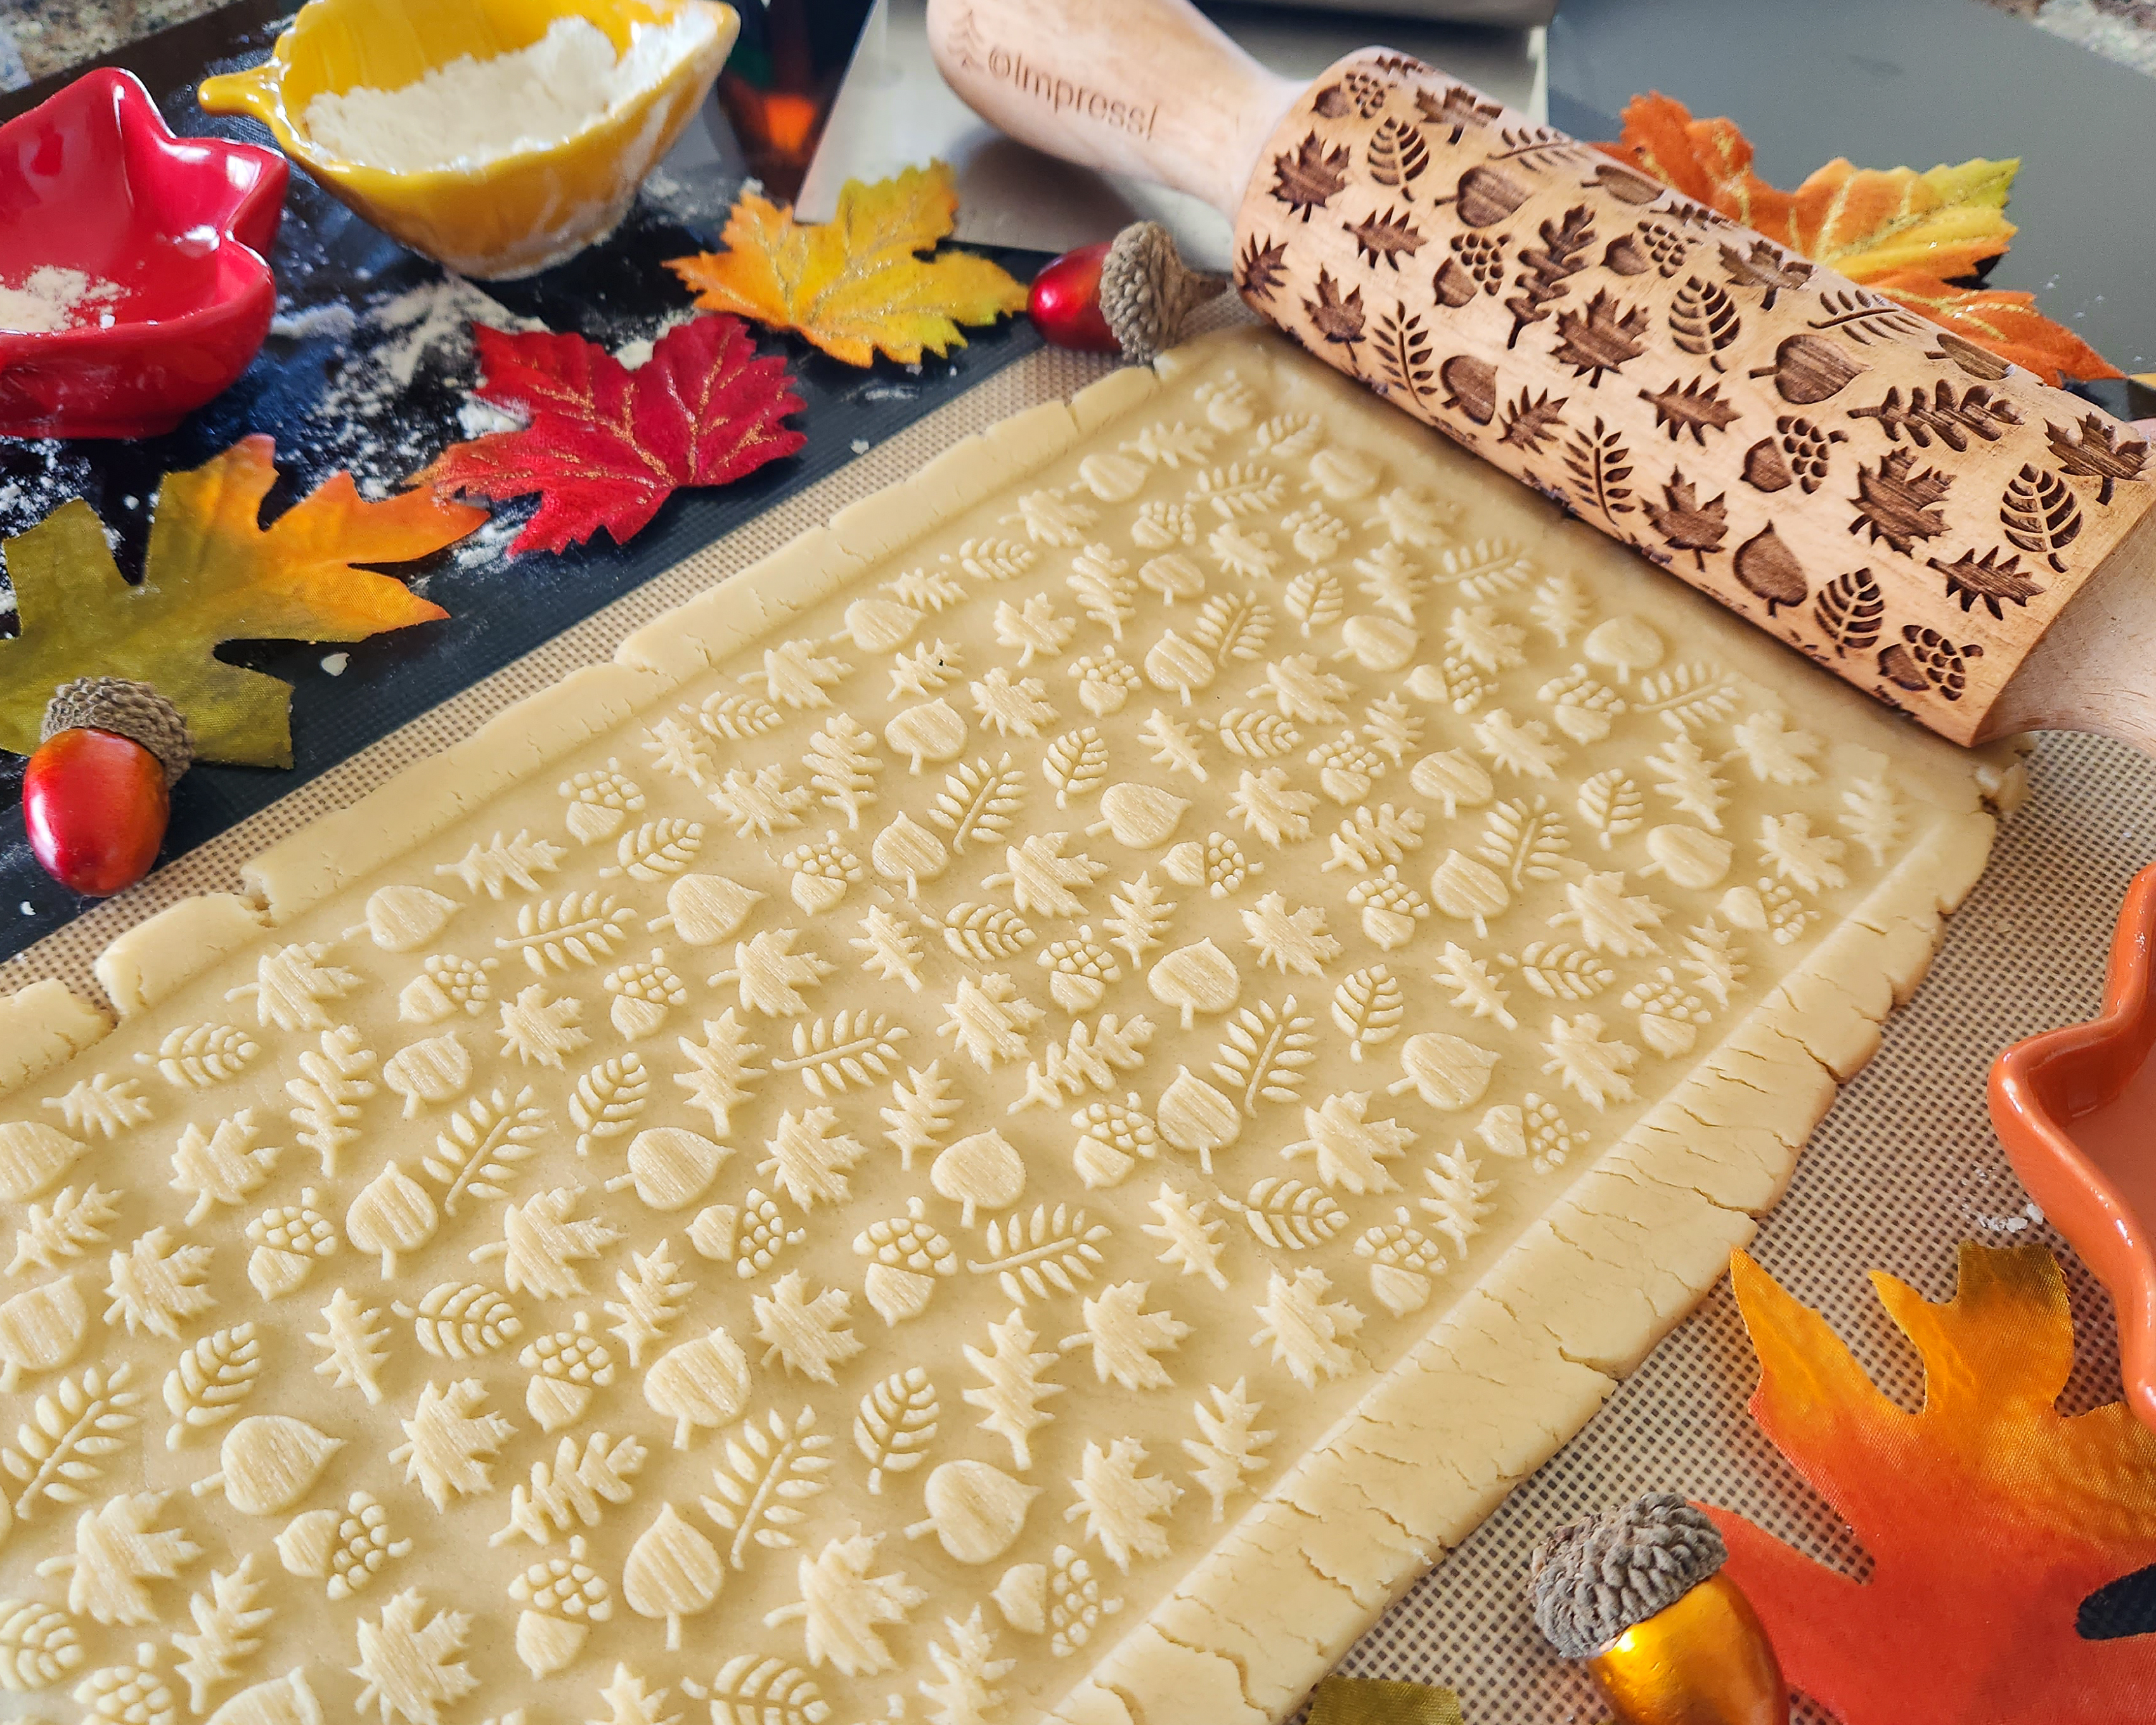
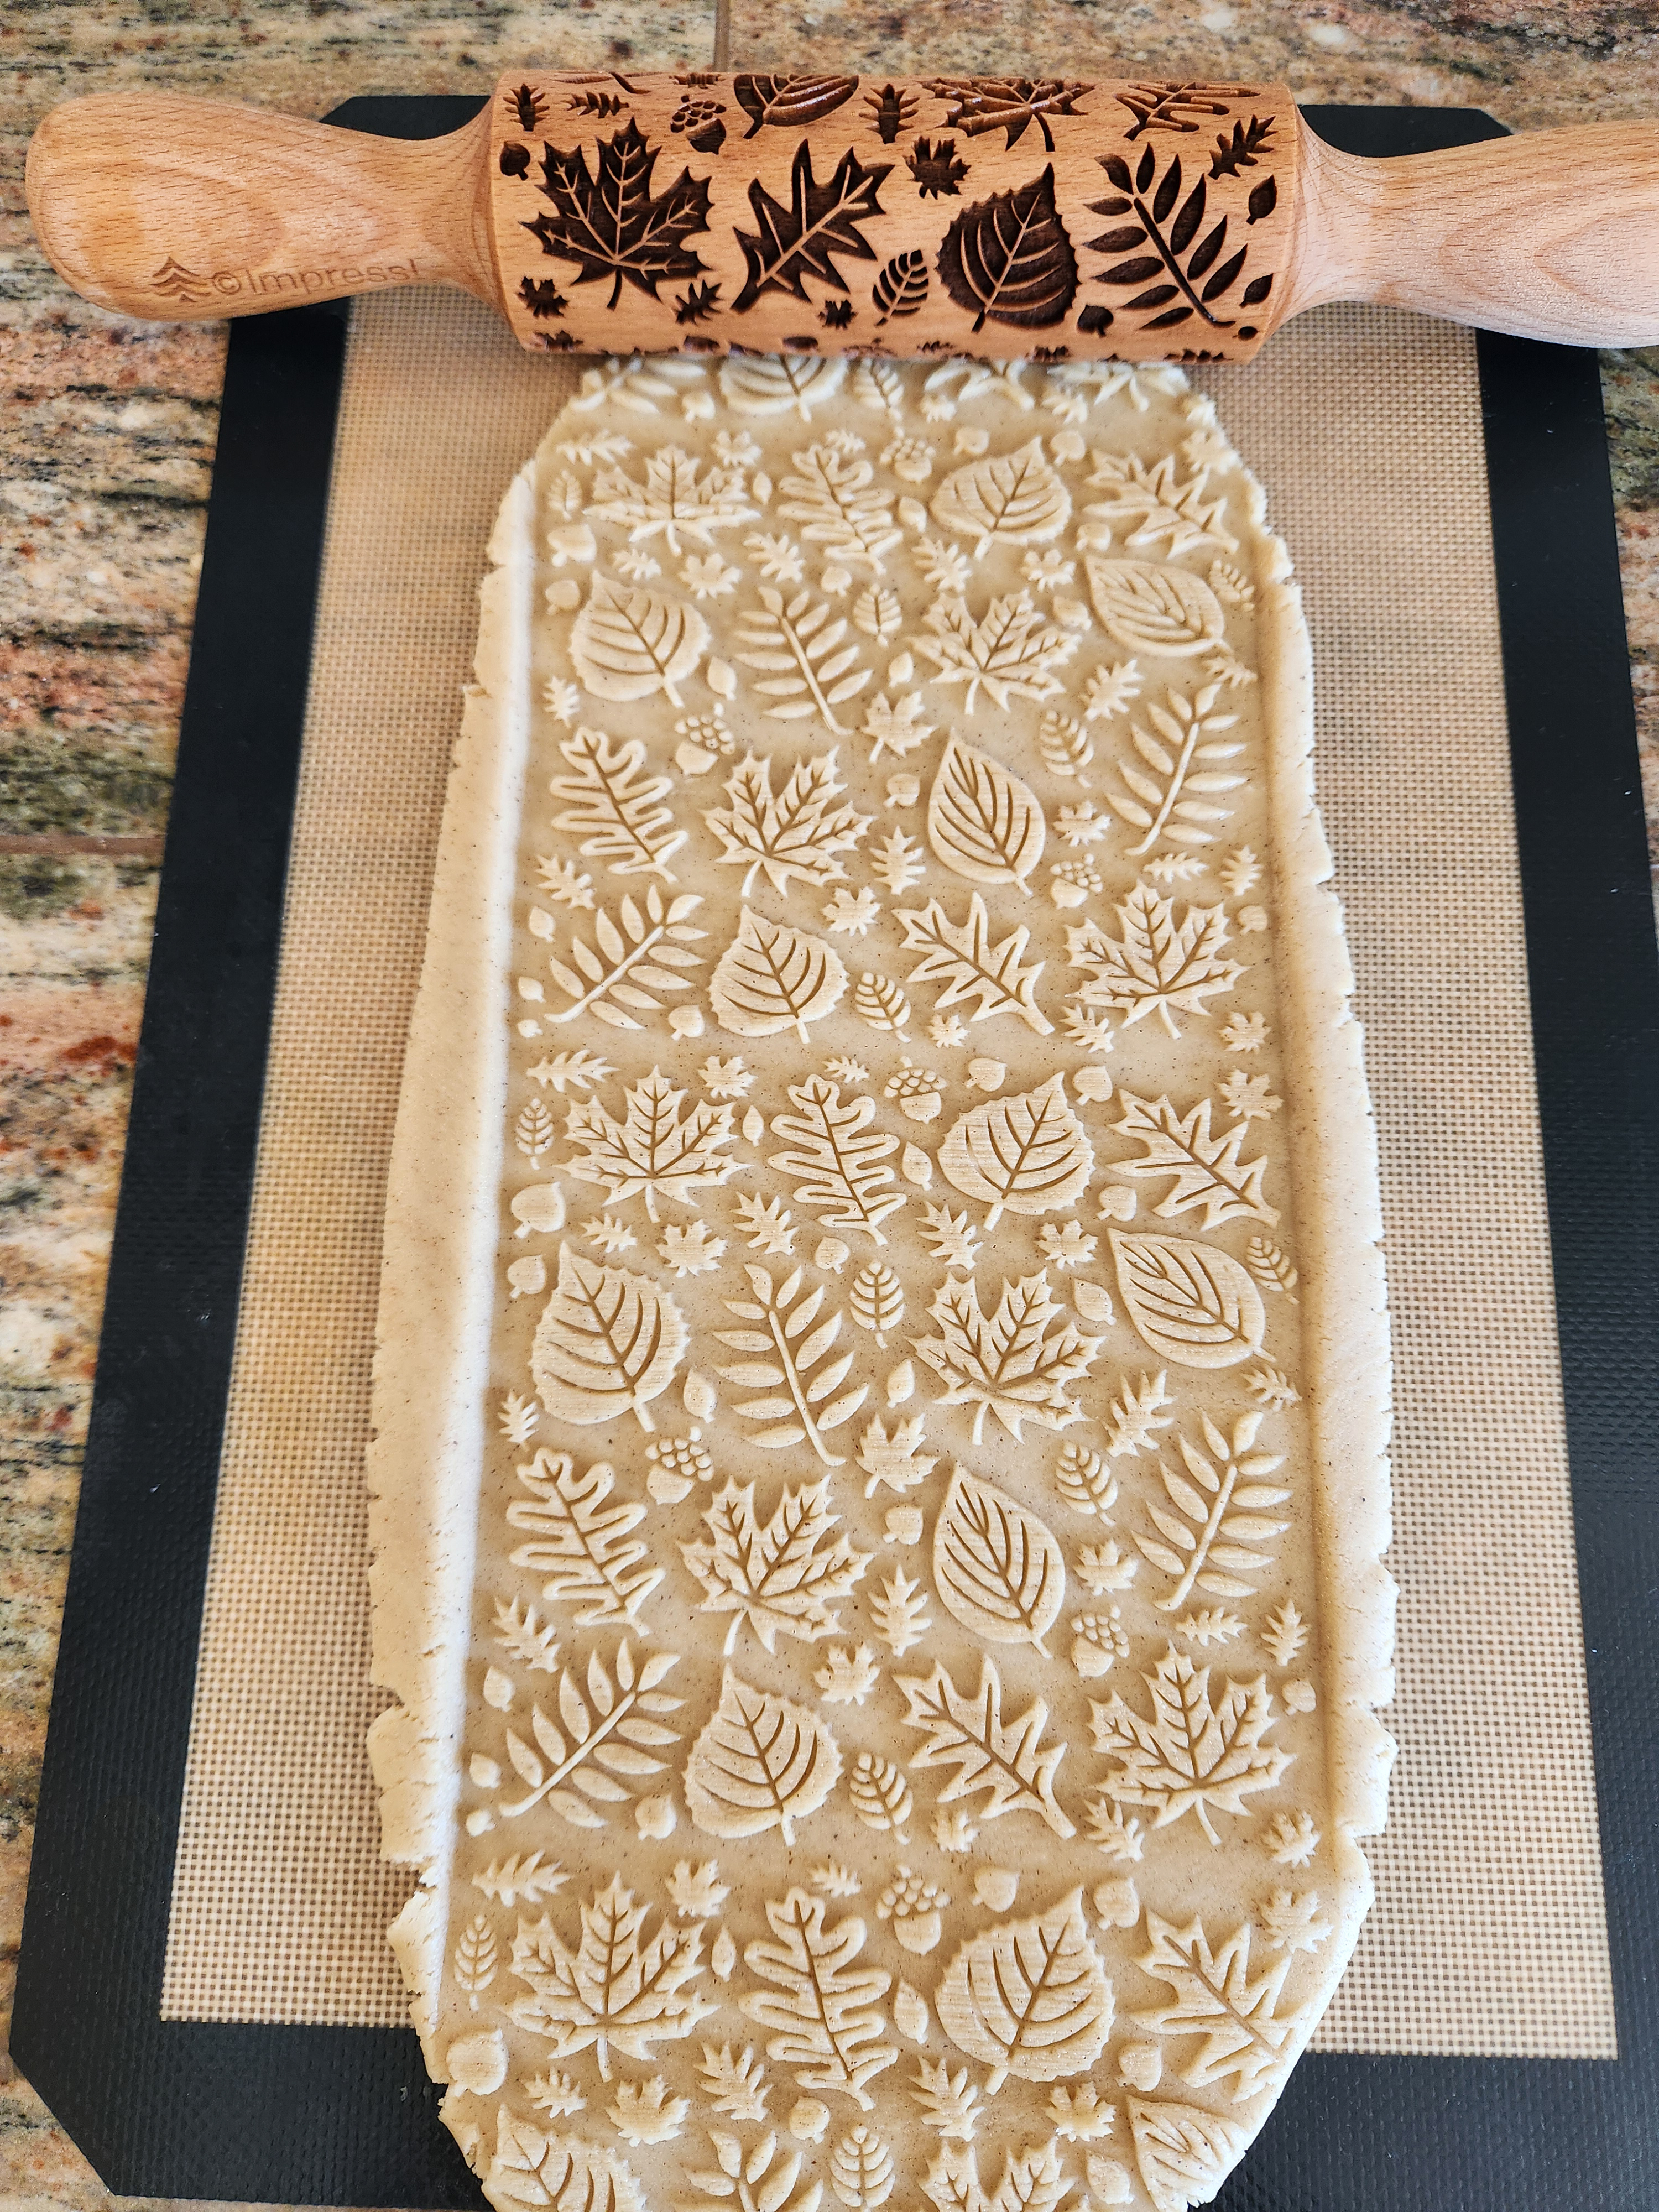
Use a regular rolling pin (preferably one with thickness spacer rings to make a perfect thickness, picture of ours above and at bottom of post) to roll your dough on to a silicone baking mat, glass cooktop, or lightly floured surface. Roll to a 1/4” thickness, and wide enough to accommodate the embossed pin. Create a long rectangular slab of dough. The patterns on the embossed pins are designed to repeat, so you will be rolling a long rectangle of patterned dough.
Watch the short video clip of me rolling the dough flat with the waxed paper.
Oil your embossed pin with canola (or similar) oil before rolling. Make sure to get it down into ALL of the engraved areas. You can use a pastry brush but it’s best to do it with your fingers, gently squeezing the pin with your hands to get oil into the shapes, and rubbing the surface to coat. Wipe off any excess with a paper towel, making sure nothing is left pooled in the larger cuts. We want a non-stick pin not a swimming pool! If you’re new or this is confusing PLEASE watch the quick video clip to see exactly what I mean!
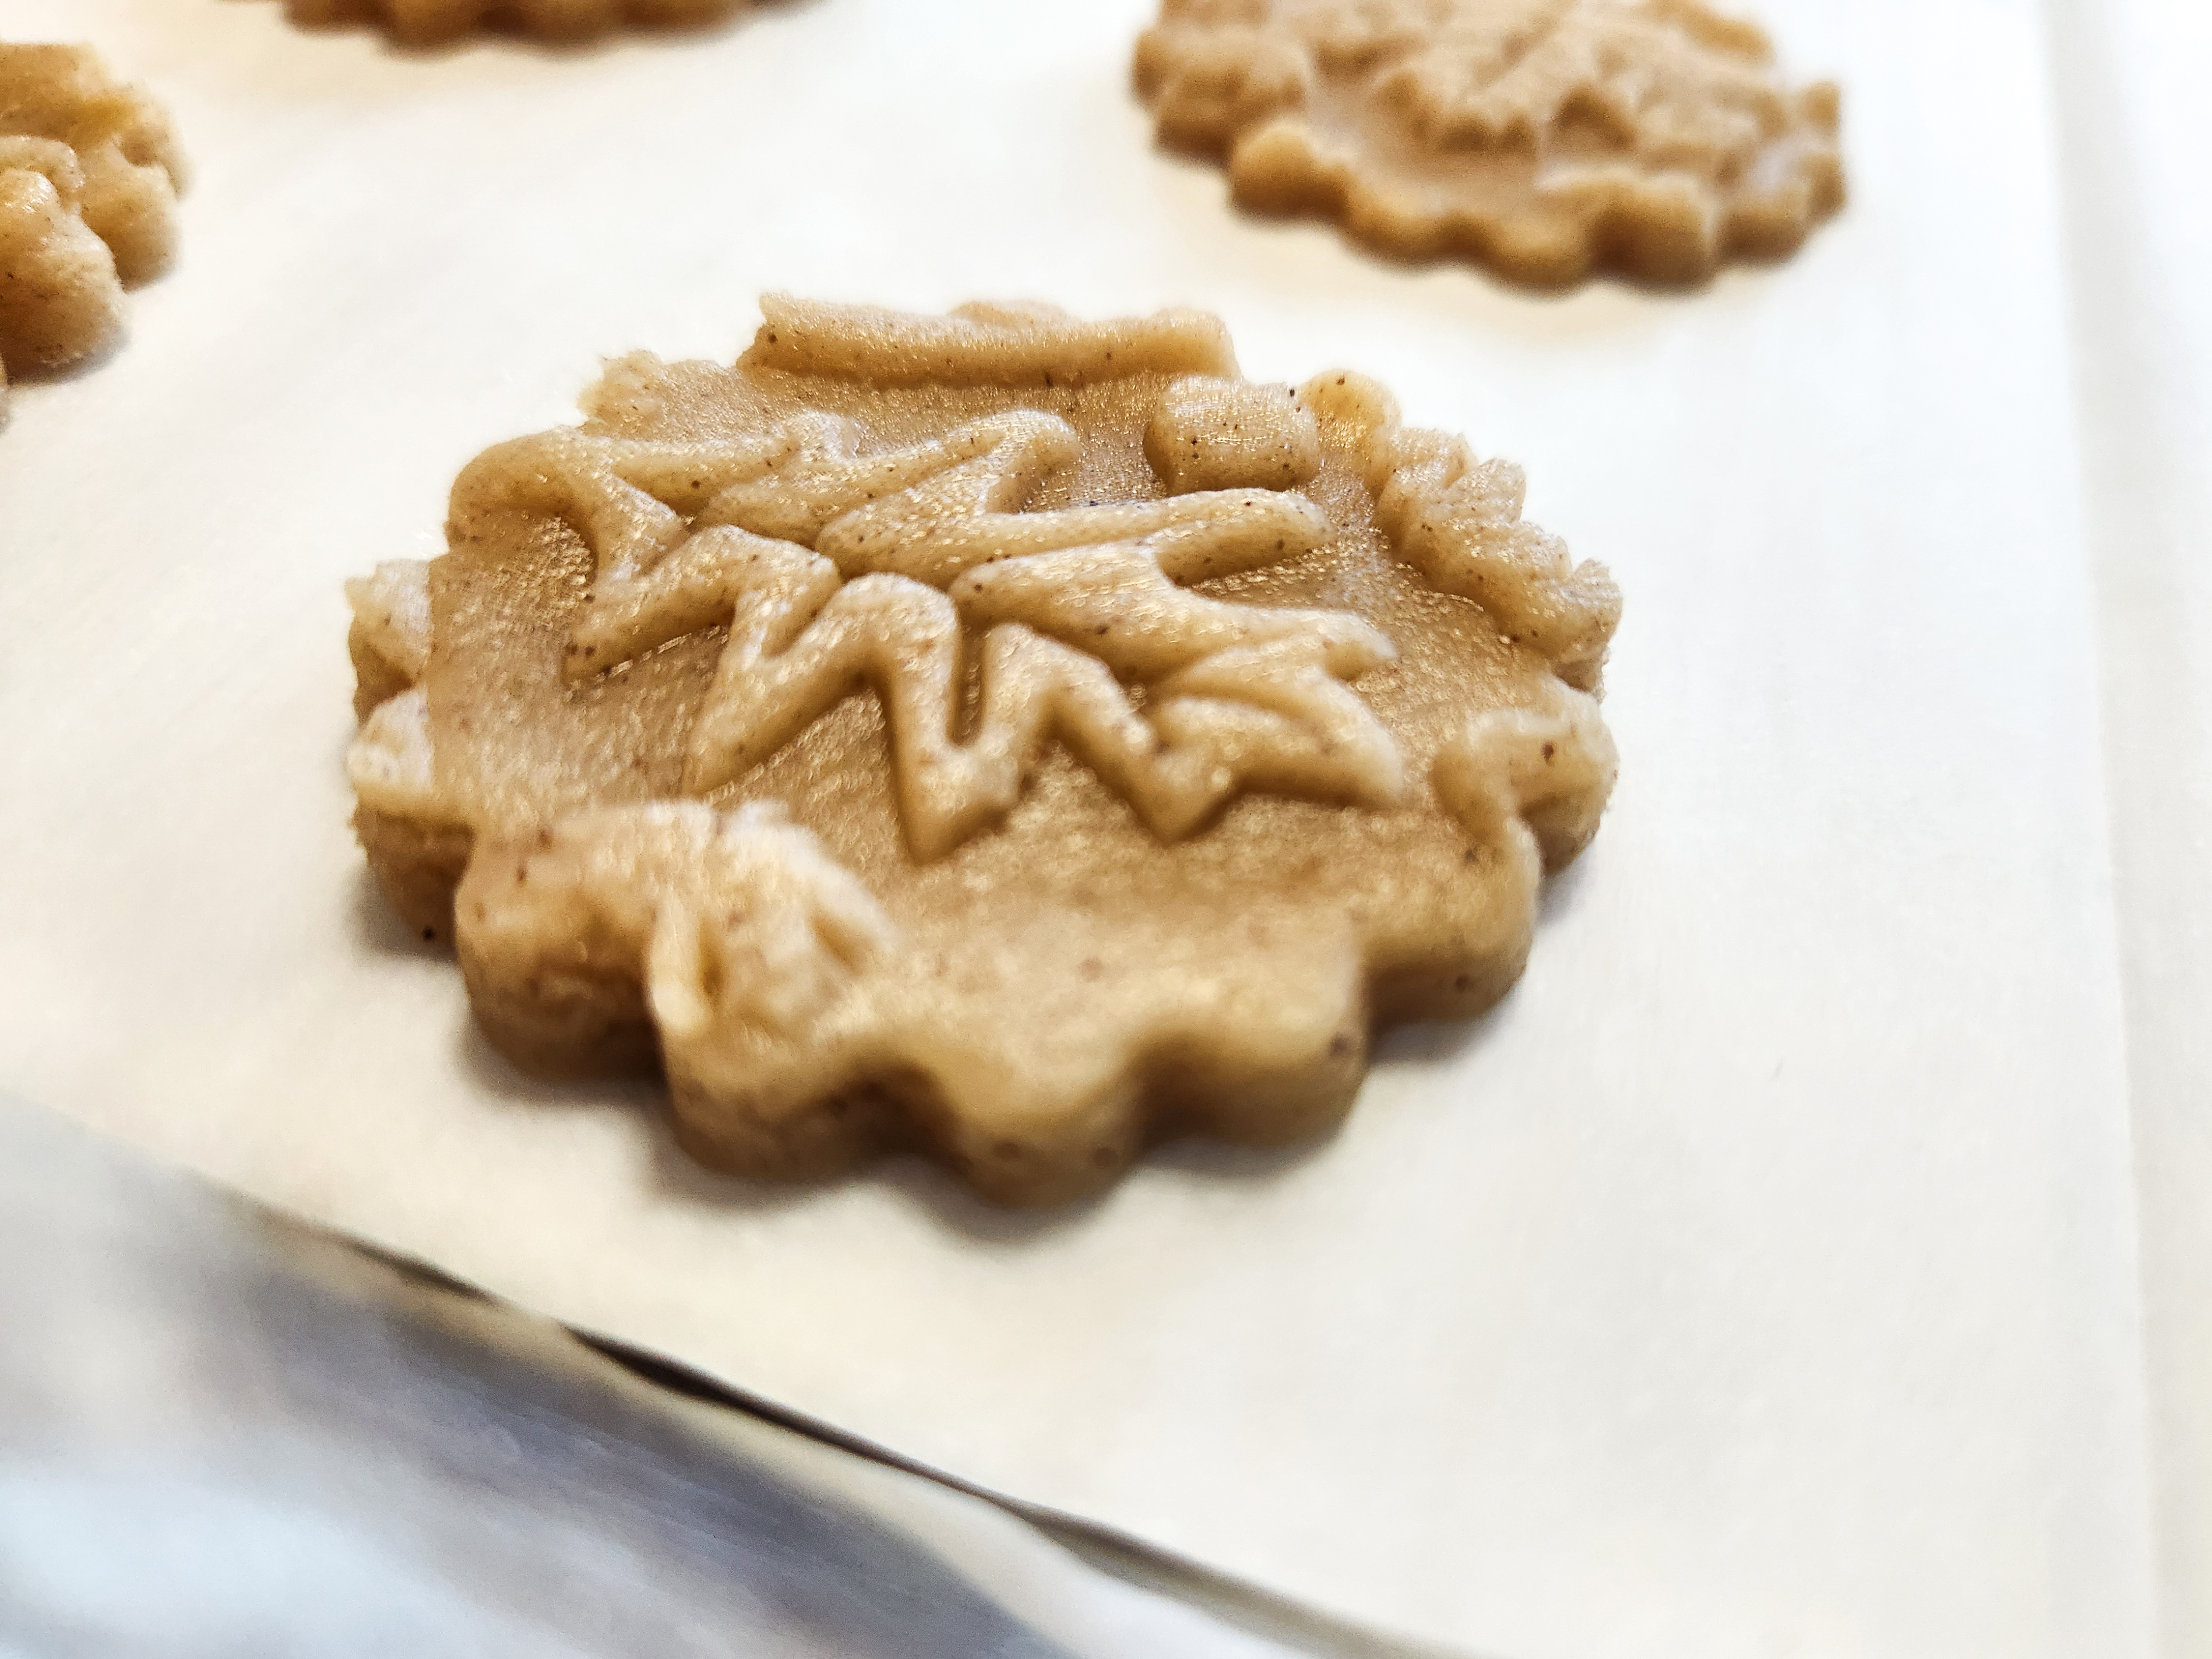
Place a bench scraper or similar item at the far end of the dough to prevent it from pulling up as you roll. Now roll with your embossed pin, pressing down with a steady pressure that leaves a deep impression in the dough. The designs should be as raised up on the dough as deep as they are in the pin. If the pattern is not deep enough it will disappear as the cookies bake and puff. As this dough is not cold or stiff, you do not have to press terribly hard! Just an even pressure.
Watch this quick video clip of me oiling it properly and rolling it out!
This is absolutely one of my favorite pins to work with! I love how deep and detailed the patterns are.
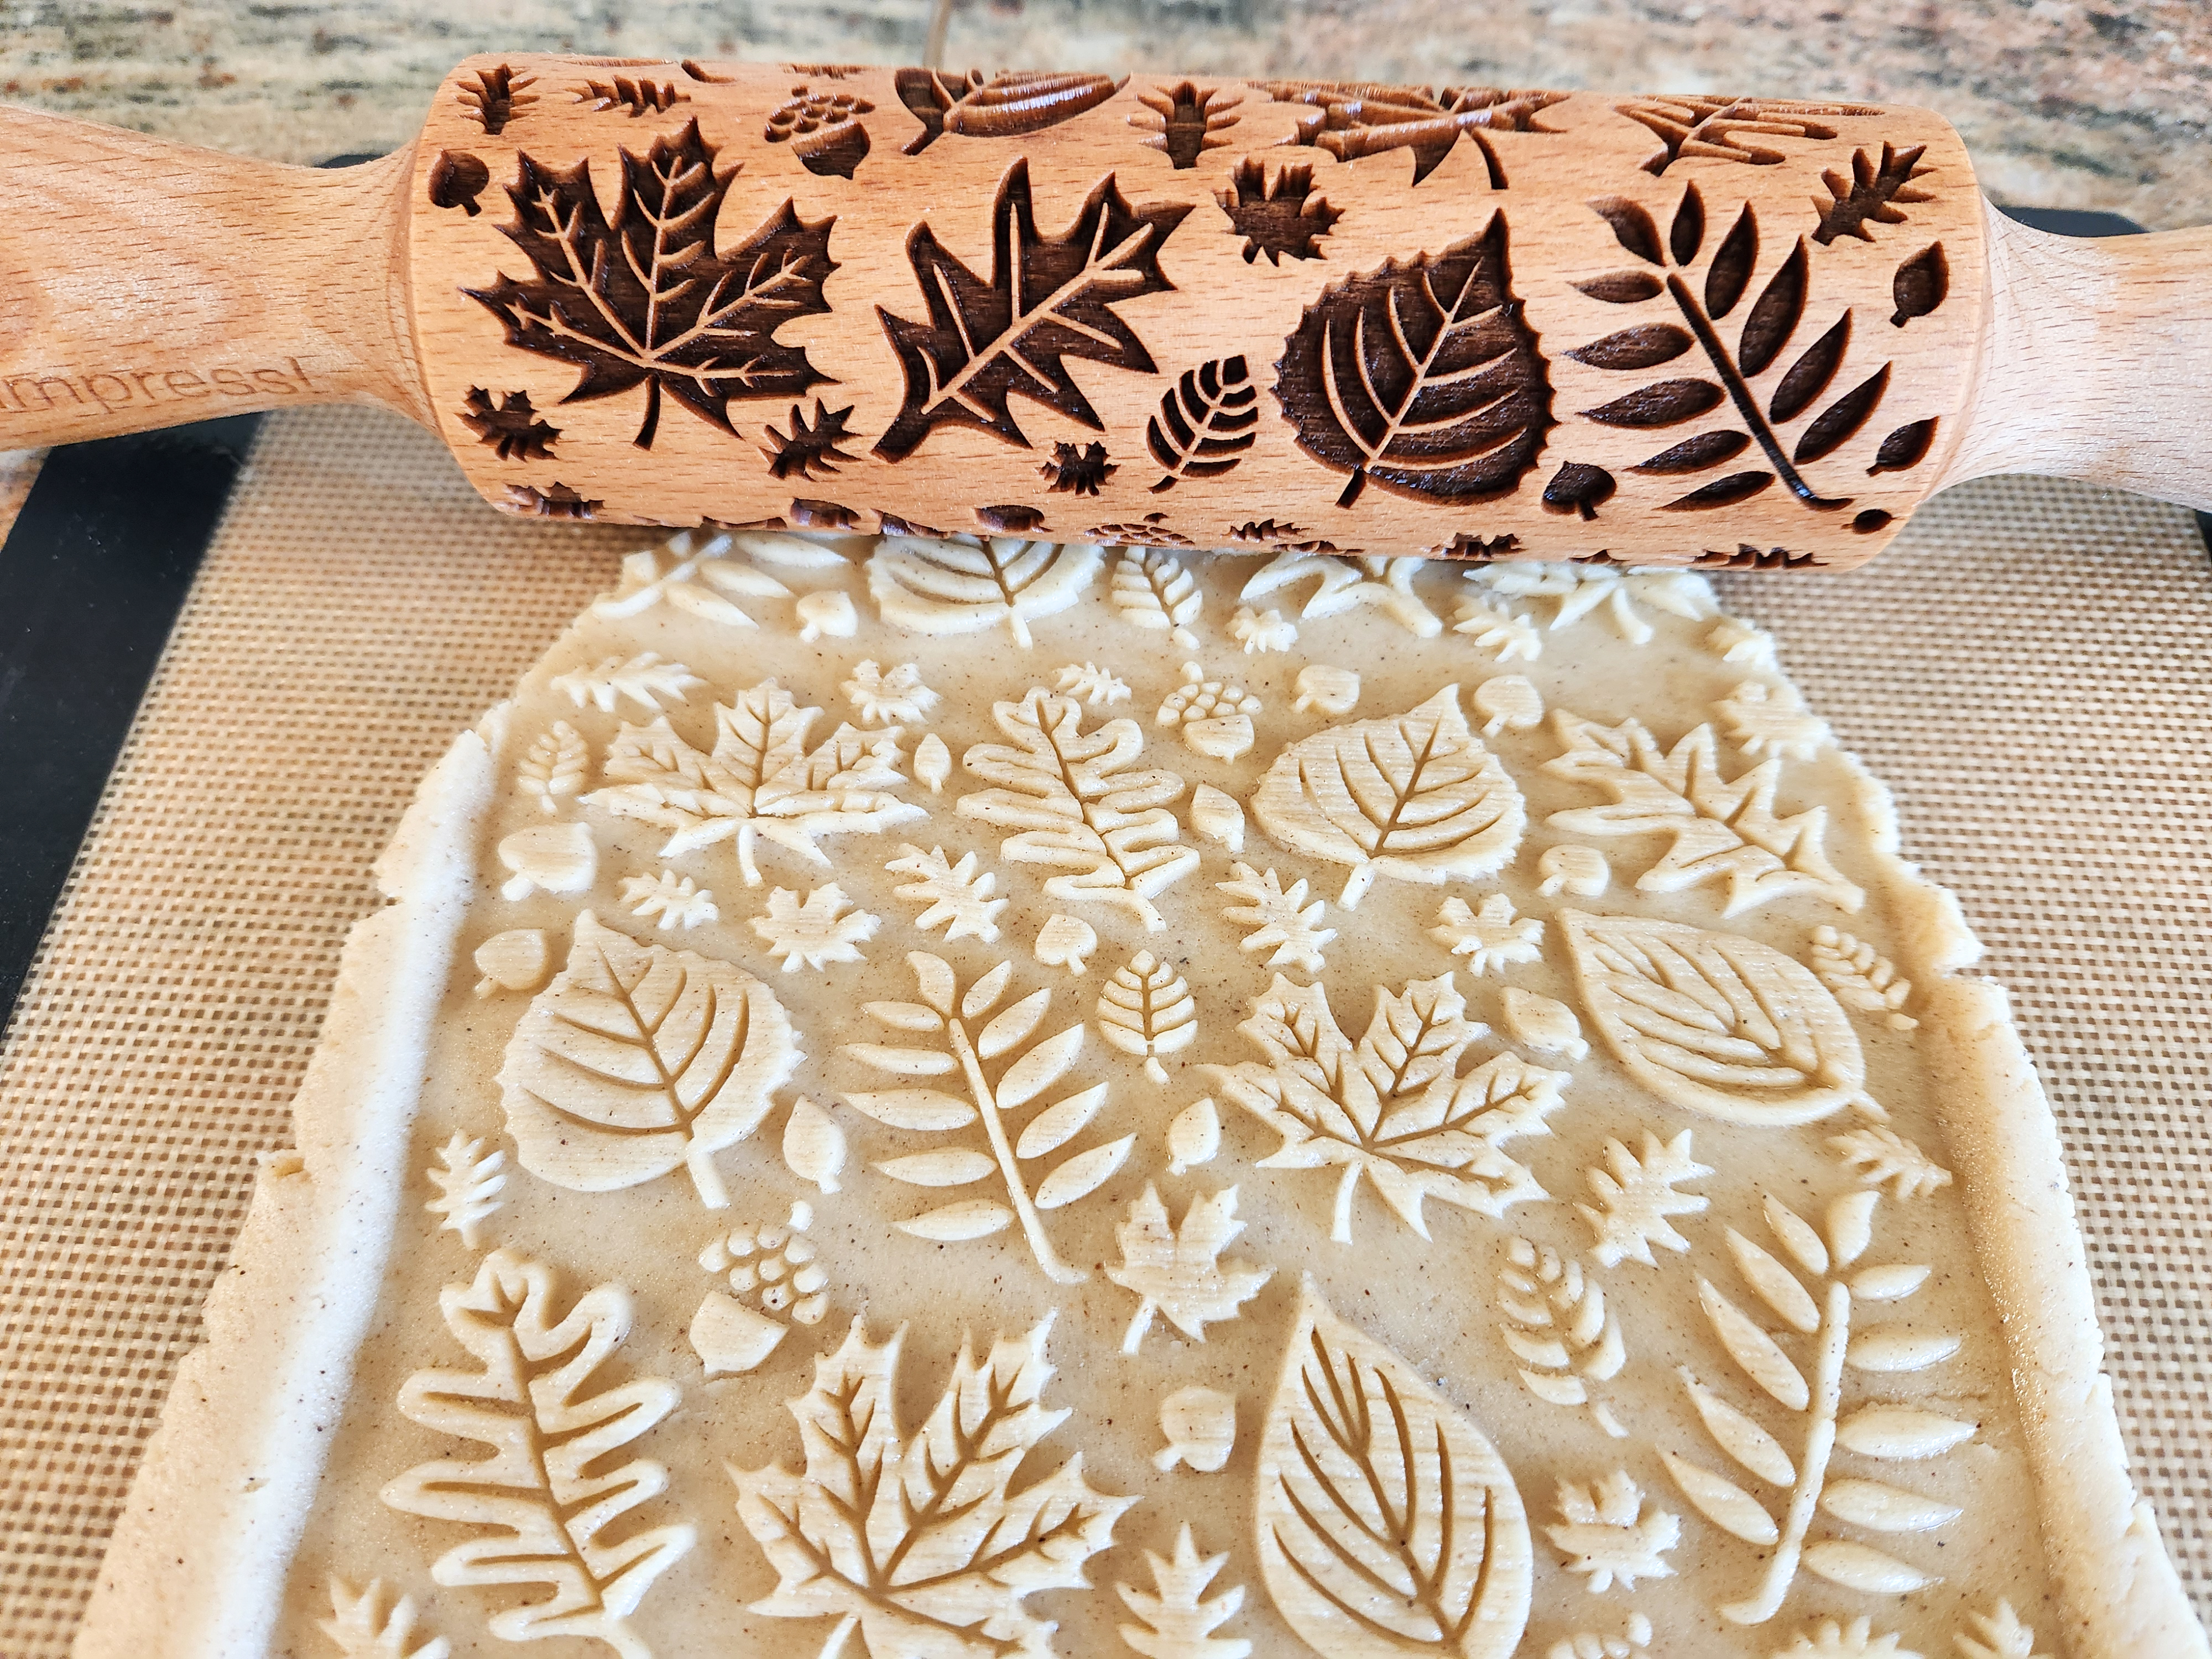

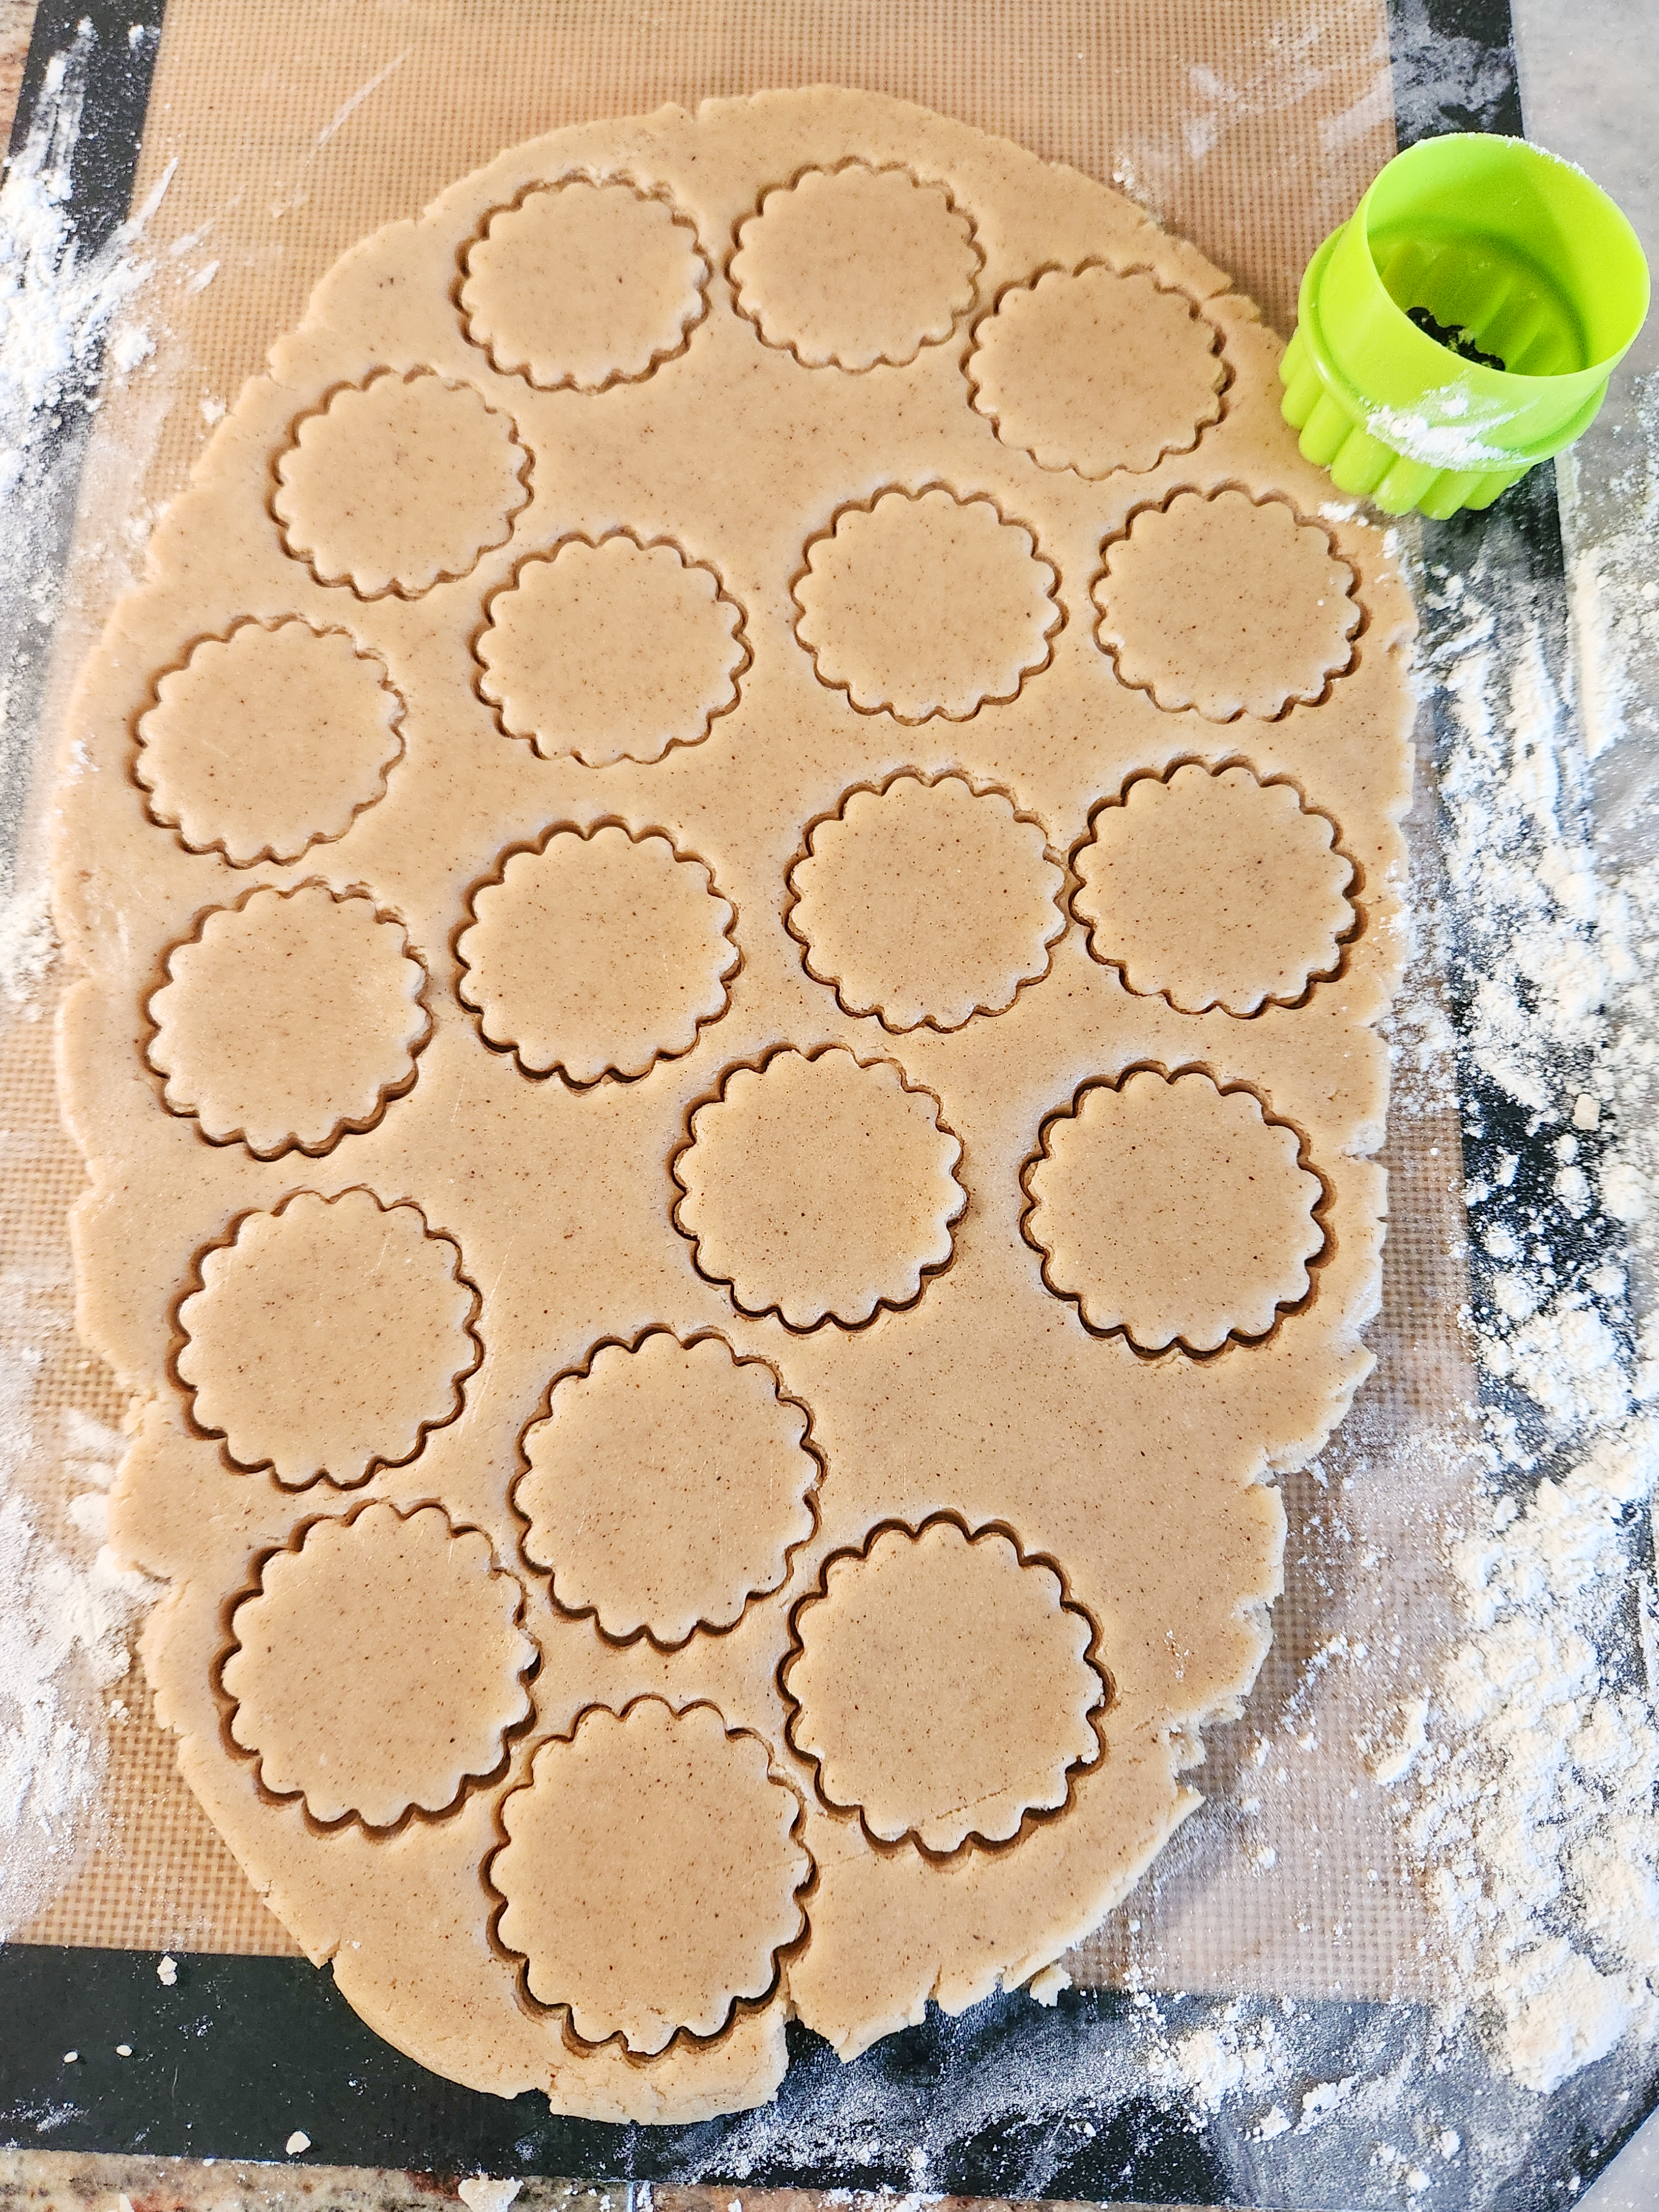
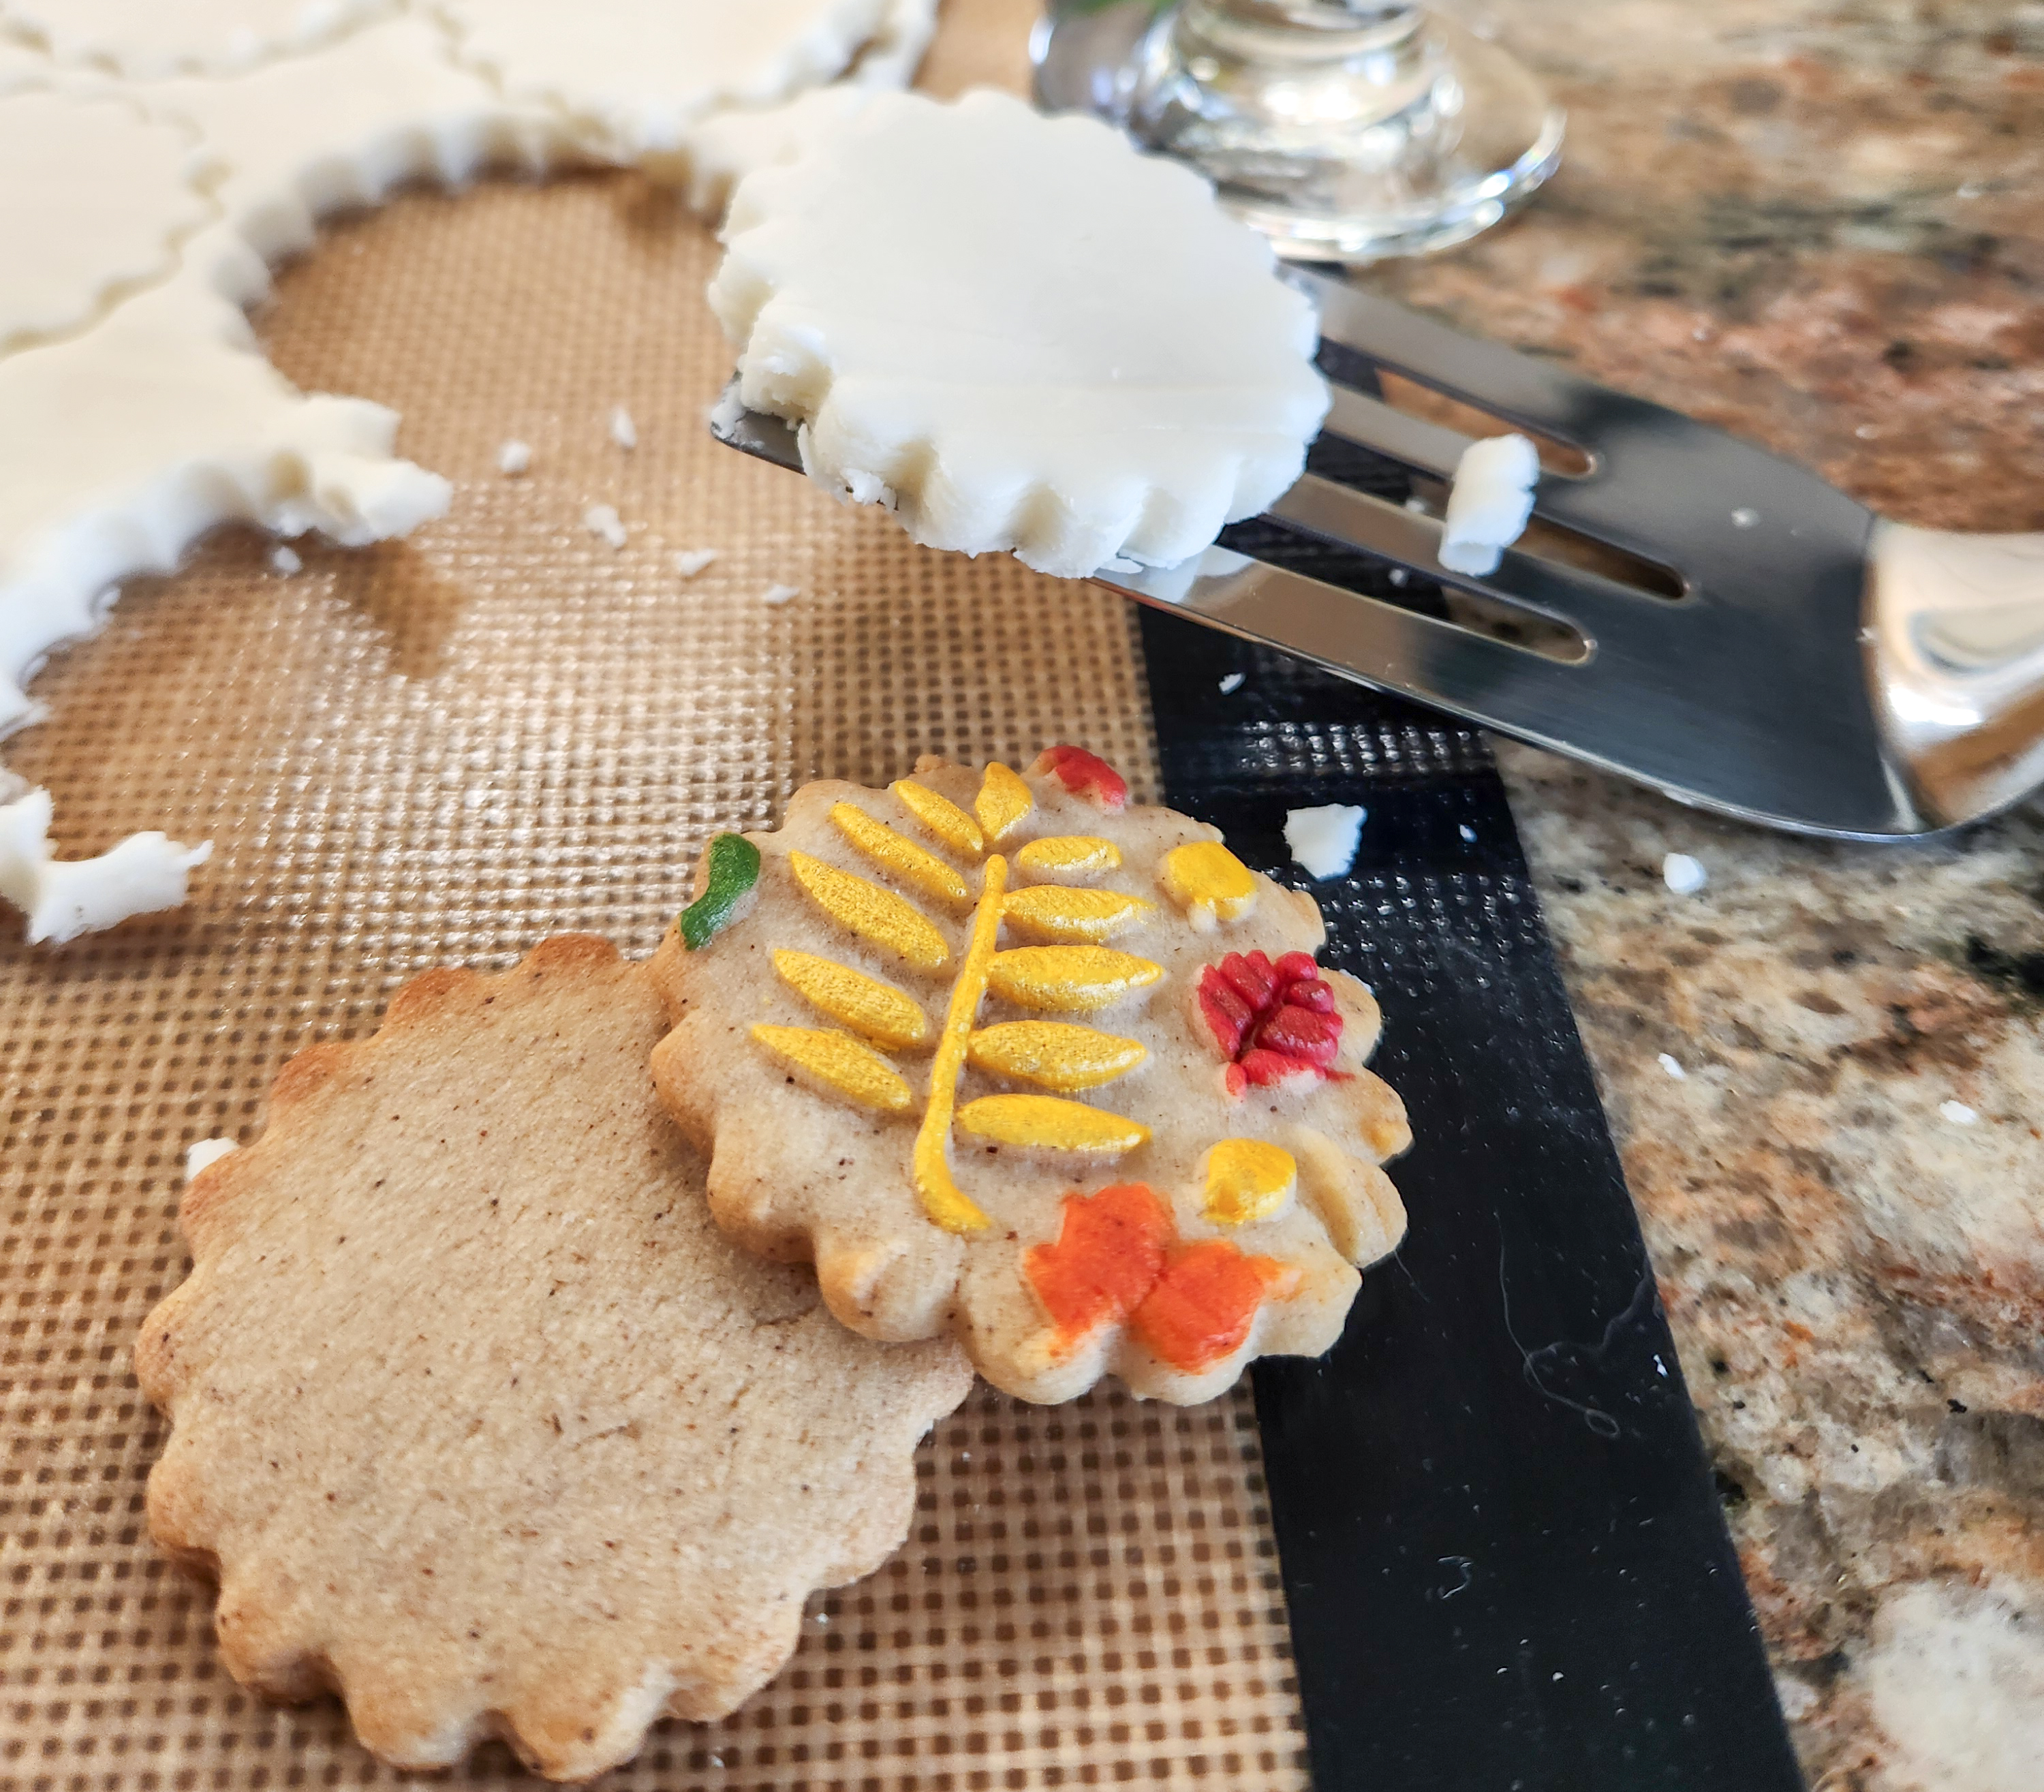
Once rolled, use a small cookie cutter to cut out shapes. Remove any excess dough around the edges. Keep your spatula/lifter flat, dust the end with a little flour, and lift the shapes, beginning by lifting one edge slightly first, then sliding the spatula/scraper under the whole shape. Transfer them to a cookie sheet lined with parchment paper, spacing them at least an inch apart. The rolling pin with thickness rings, bench/dough scraper and cookie cutters I’m using here are available at our website and Etsy shops.
I used our 1 3/4″ round cookie cutter. The fluted edges make a beautiful presentation!


Bake at 400°F for 7-10 minutes, checking at 7 minutes and every minute after as cookies brown quickly. They are done when the edges are slightly brown. Cookies harden significantly the longer they bake, so bake just a few cookies first to test timing for desired doneness and hardness.
Move to a cooling rack after 5 minutes.
Again, don’t forget to roll out plain flat dough and cut shapes as needed, to make enough bottom cookies. Off to parchment paper on a cookie sheet and bake as described above.
***If you are painting the cookies, scroll down to that section and PAINT FIRST BEFORE SANDWICHING! It is much easier to handle a single-layer cookie than a full sandwich. If you are rolling them in sprinkles that will be the last step, right after sandwiching.
If you’re not painting, read on!
Sandwiches!
The sandwich filling is a buttercream so thick you can roll it out and play with it like play dough! Try not to eat it all before the sandwiches are done. 😉
Super Thick Vanilla Buttercream
1/2 cup (1 stick) butter, softened
4 cups powdered sugar
2 1/2 teaspoons heavy cream
1 1/2 teaspoons vanilla extract
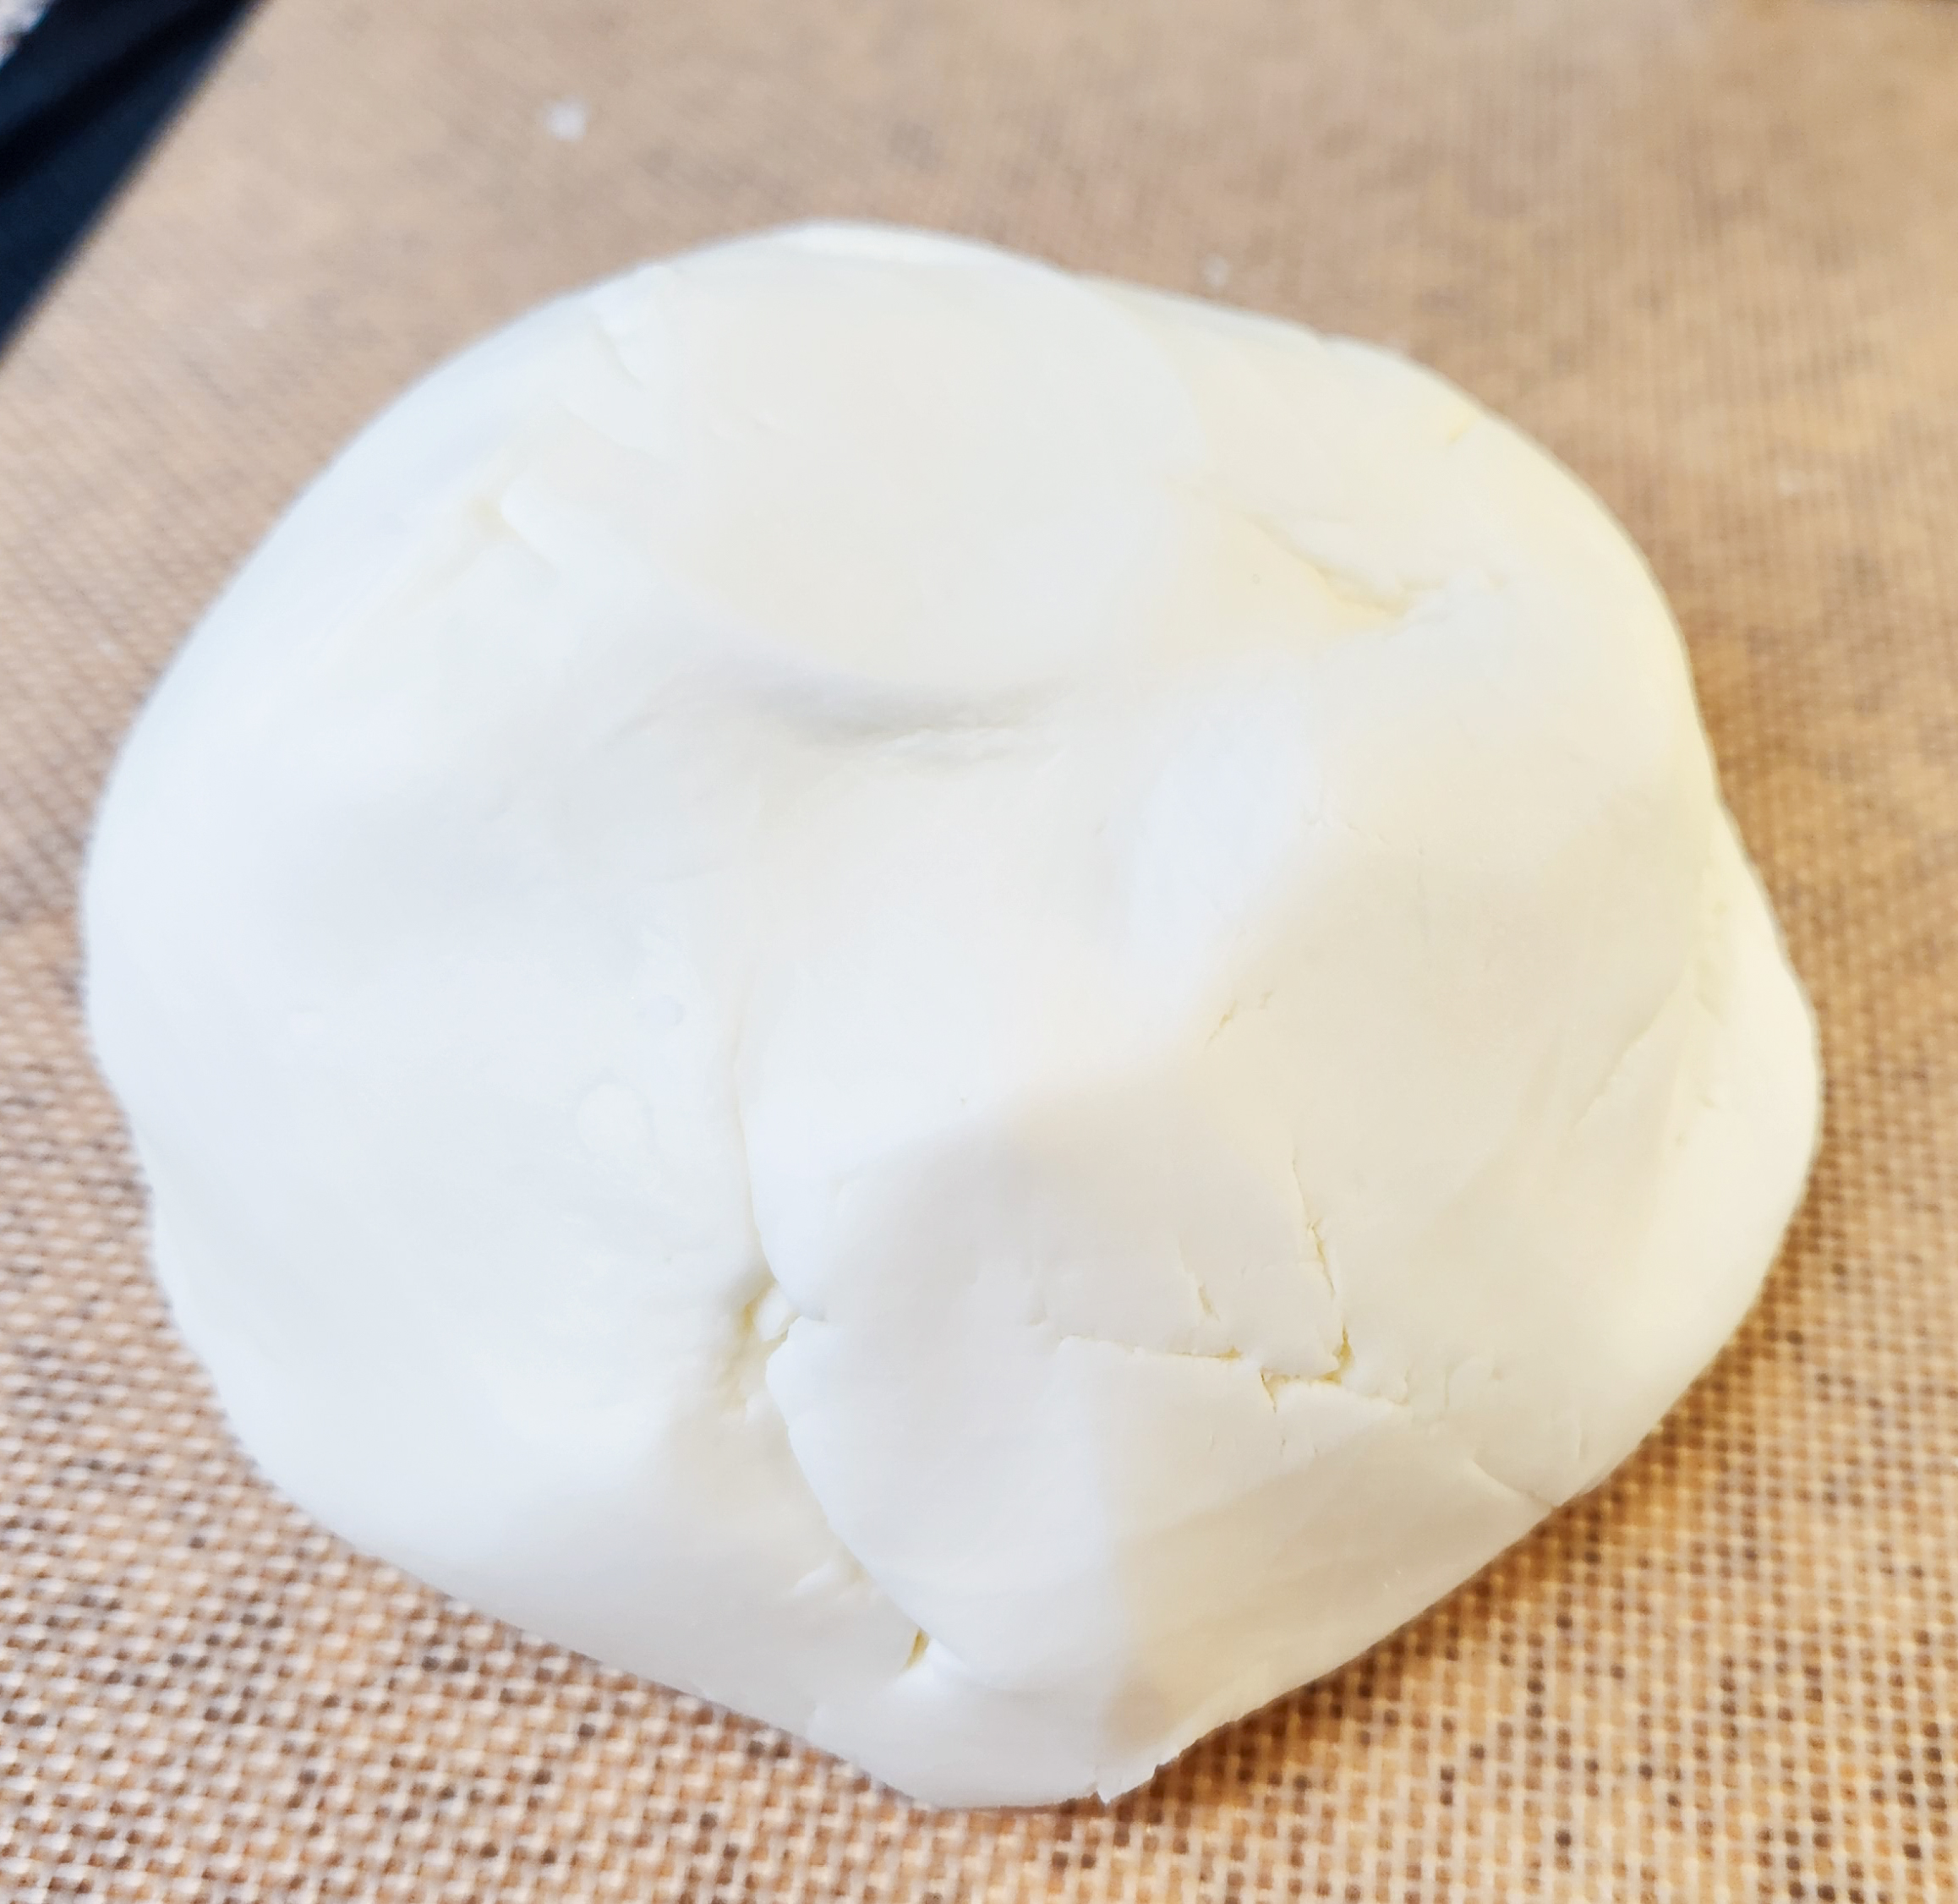
Cream the butter with an electric mixer, then add the heavy cream and vanilla extract and mix thoroughly. Add powdered sugar a little at a time. Do not be alarmed or surprised! This mixture can be very dry and crumbly, or very stiff in the mixer, so finish kneading by hand until a smooth clay-like dough forms. It will be much stiffer than the cookie dough. Keep kneading even if it seems very stiff, until it forms a workable ball as pictured. It will warm and soften as you work it. Add cream to an overly stiff mixture, or powdered sugar to a soft sticky mixture, as needed to get a workable clay-like consistency. It will be fun to knead, though still quite stiff, when it’s the right texture.

Roll it out on a clean silicone mat or surface, preferably with a spacing pin. Then cut out the shapes you need to sandwich your cookies. You can use the waxed paper technique I showed with the cookie dough on this buttercream filling.
I always use the same 1/4″ thickness spacing on my sandwich cookie fillings as I do for cookies. They’re crazy thick but oh so delicious. Use the same cookie cutter as you did for your cookies so it all matches up size-wise.


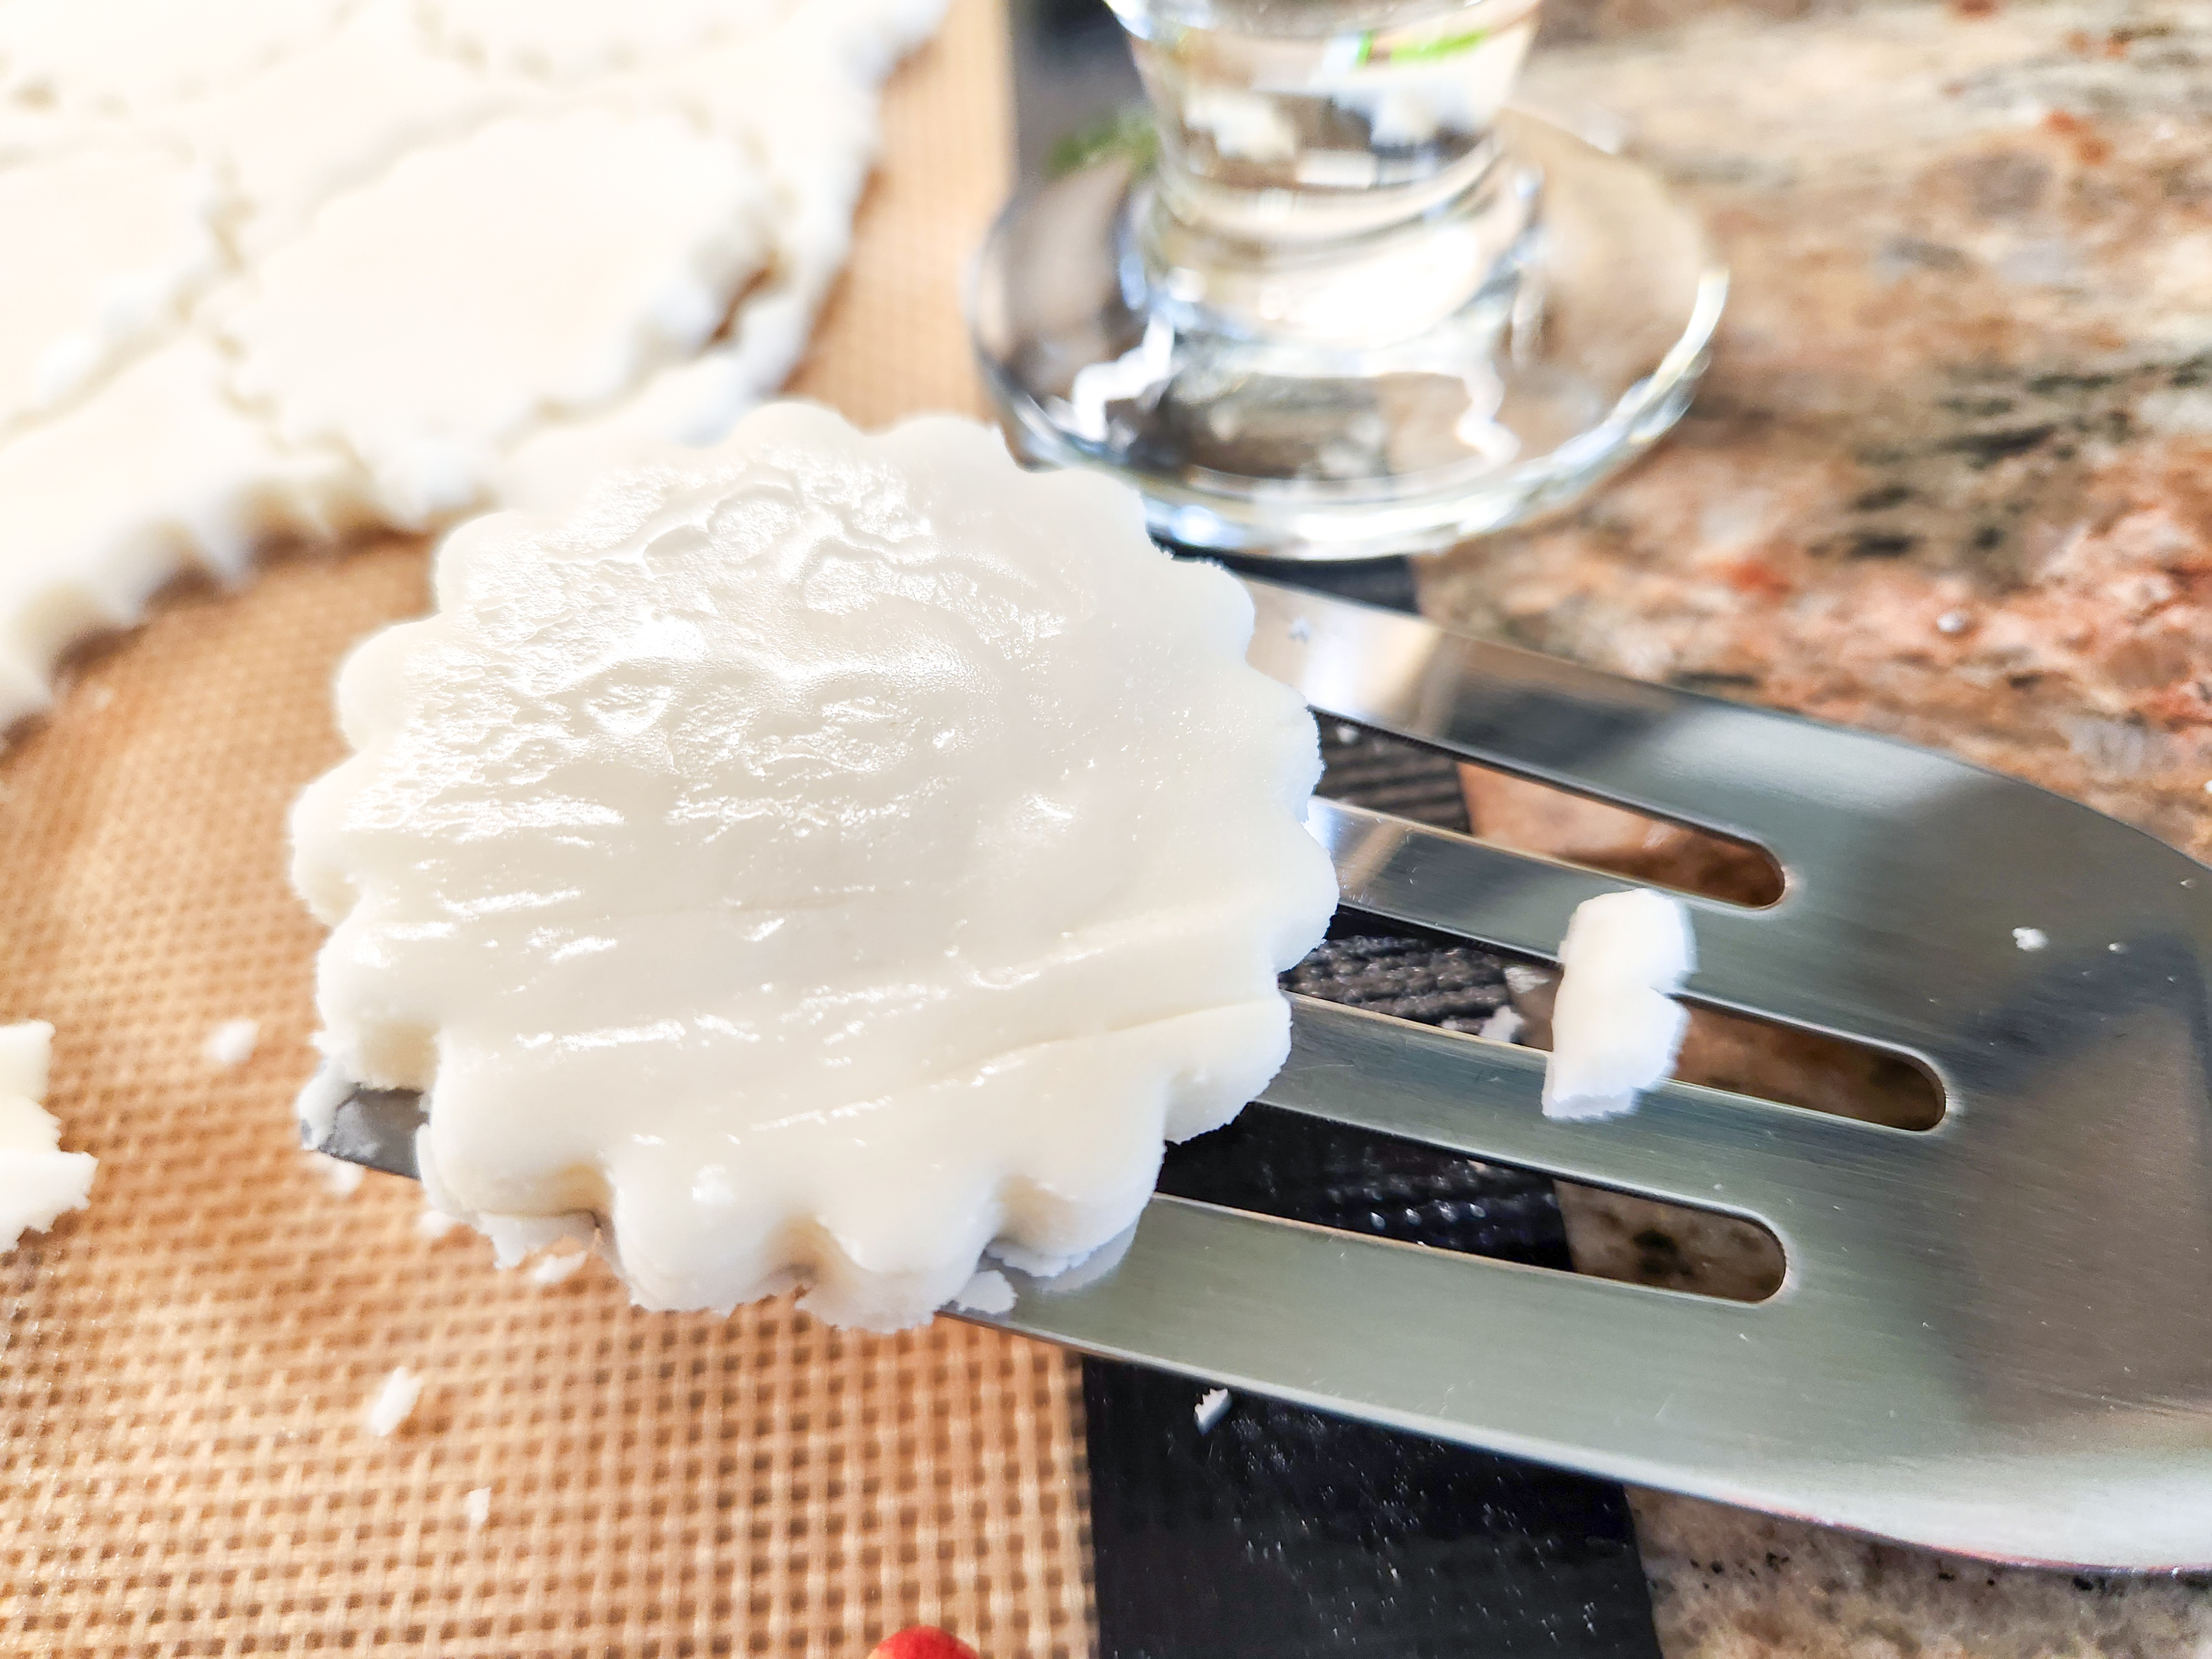
Lift them the same way you would lift cookie dough, getting under one edge first with your spatula/lifter. If needed you can use powdered sugar to keep your lifter non-stick the same way you use flour with cookie dough. As you go to put the filling on the cookie, wet the surface of the buttercream slightly with a fingertip and it will stick to the cookies. I keep a small cup of warm water there as I work.
If you’re rolling in sprinkles this is when you do it! Whether it’s plain or painted cookies, roll them as you sandwich them. I bought inexpensive little packets of the colors I wanted and mixed a tablespoon of each on a plate to make my own color mix. I found that my sprinkles were a bit large to stick to the filling, so I took a quick minute to chop them up on a plate.


Now just like wetting the filling to stick to the cookies, gently wet the edges of the filling with your fingertip and warm water to make the filling soft and sticky. Roll the cookies in the sprinkles. OR try holding the cookie up on its side and sprinkling sprinkles on the filling edges, pushing sprinkles into the filling as you turn the cookie. Add water if needed to get enough stickiness.


Painting!
I know this looks complicated but it’s really quite simple.

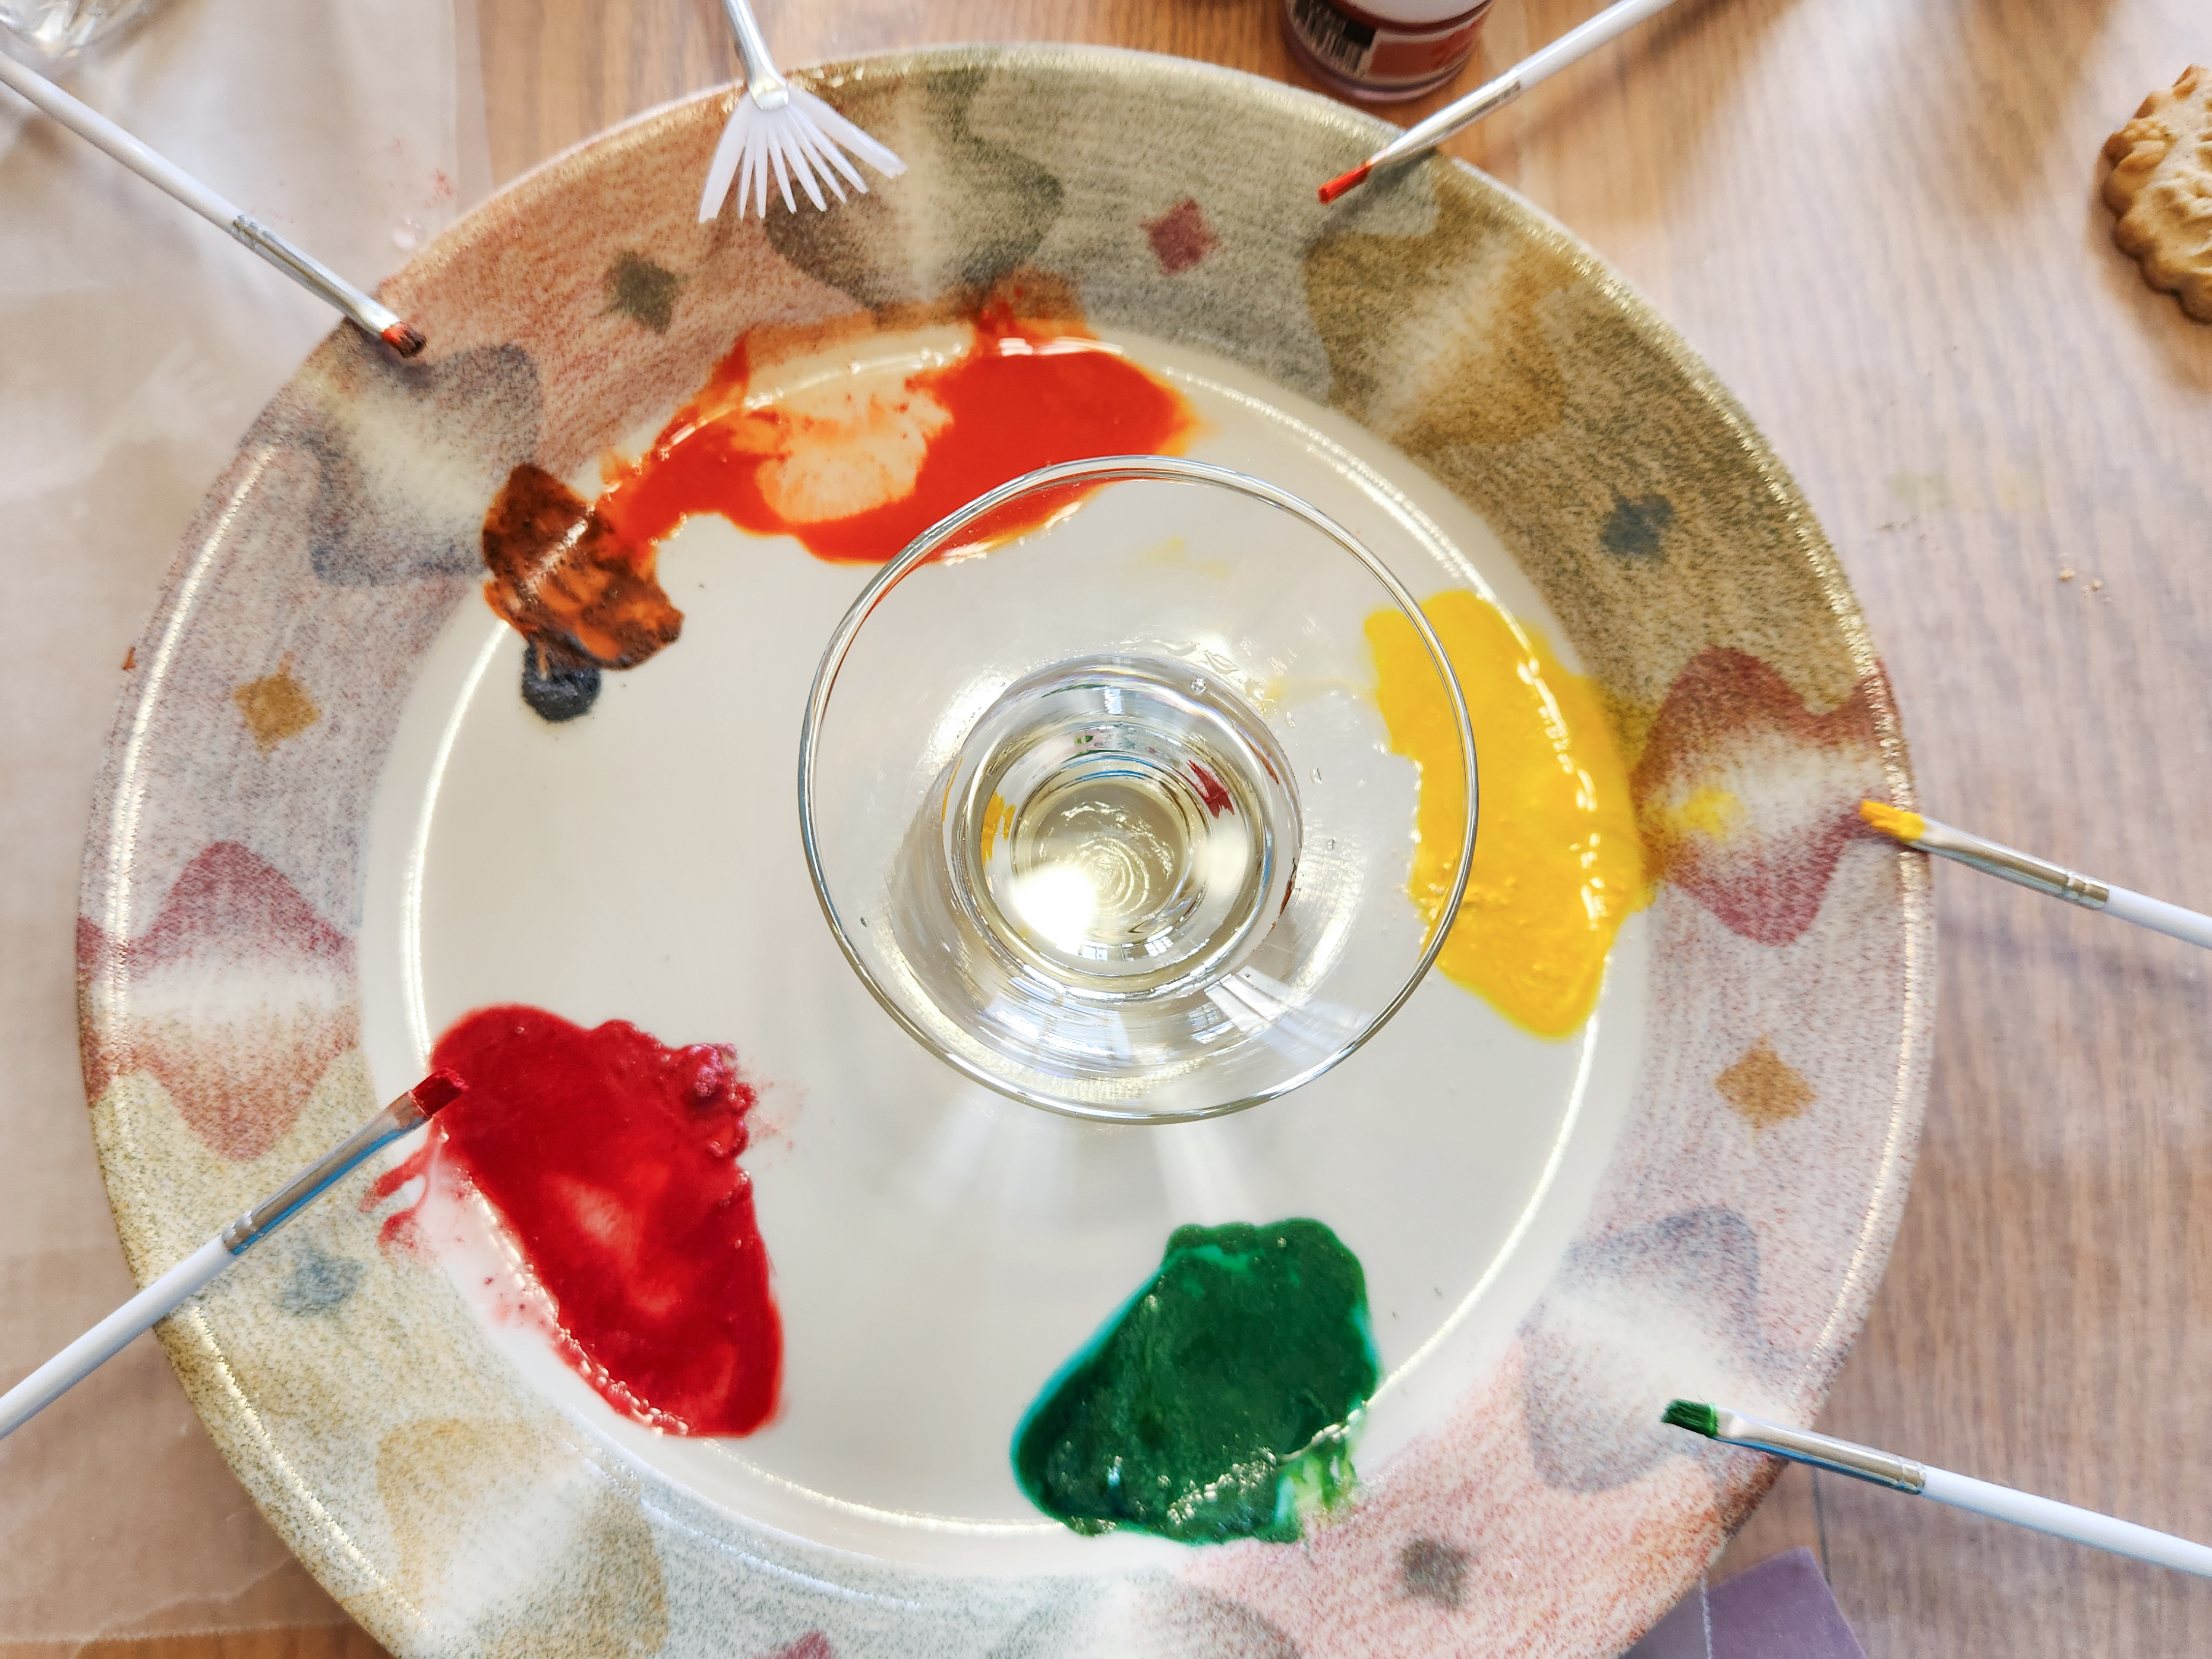
Luster dust is what makes this beautiful presentation possible. I use it so often in my cookie press posts that in 2022 we started selling it on our website and Etsy shop! We chose to partner with an American company, Bakell, that makes dusts here in the USA. They make gorgeous dusts that are silky, vibrant, and a joy to work with. Their 4 gram jars last and last. A little goes a long way!

To get this look you’re going to paint with edible luster dust mixed with clear alcohol. You could alternatively use any clear extract. Vodka is definitely the best choice and makes the smoothest, fastest-drying paint! The taste disappears. As you experiment, you’ll get the hang of mixing dust and liquid. Piece of cake… or cookie. We also sell a wonderful decorating brush set.
My technique (you may come up with a better one) is to put a small amount of vodka in a little dish or cup, then use a larger brush (always use food safe brushes) to drip the liquid a little at a time next to your piles of dust. I use a big plate and place small dust piles around it, then add extract a little at a time- it doesn’t take much! It also dries out quickly so you’ll find yourself adding more. I save that big brush and keep it clean so I’m always re-dipping it in a clean liquid.

NOTE: Always make sure you are using EDIBLE dusts! Some luster/pearl/glitter dusts on the market are “non-toxic” but that does not mean they are edible. Plenty of brands have actual food ingredients and are marked “edible”. ONLY use those for safety’s sake!
Start adding vodka to the dust and swirl it around until it forms a paint. Not too thick, not too runny or transparent. You want the color to show up but not be gloppy. So start painting and experiment! It takes a little practice to not get it too heavy or too light. Be patient and take a few minutes to see how runny or thick your “paint” needs to be.
I didn’t do anything particularly fancy or surprising with these cookies. I followed the raised patterns on the cookies themselves and treated them like a coloring book. I followed the veins of the leaves. I did some in one color, others multi. I mixed black and orange to make brown. Experiment and get creative!
For the multicolored maple and oak leaves, I started by following the veins, painting them green. Then I worked my way outward painting yellow, then orange, making sure to let the colors dry before I added the next one so they didn’t run or blend.

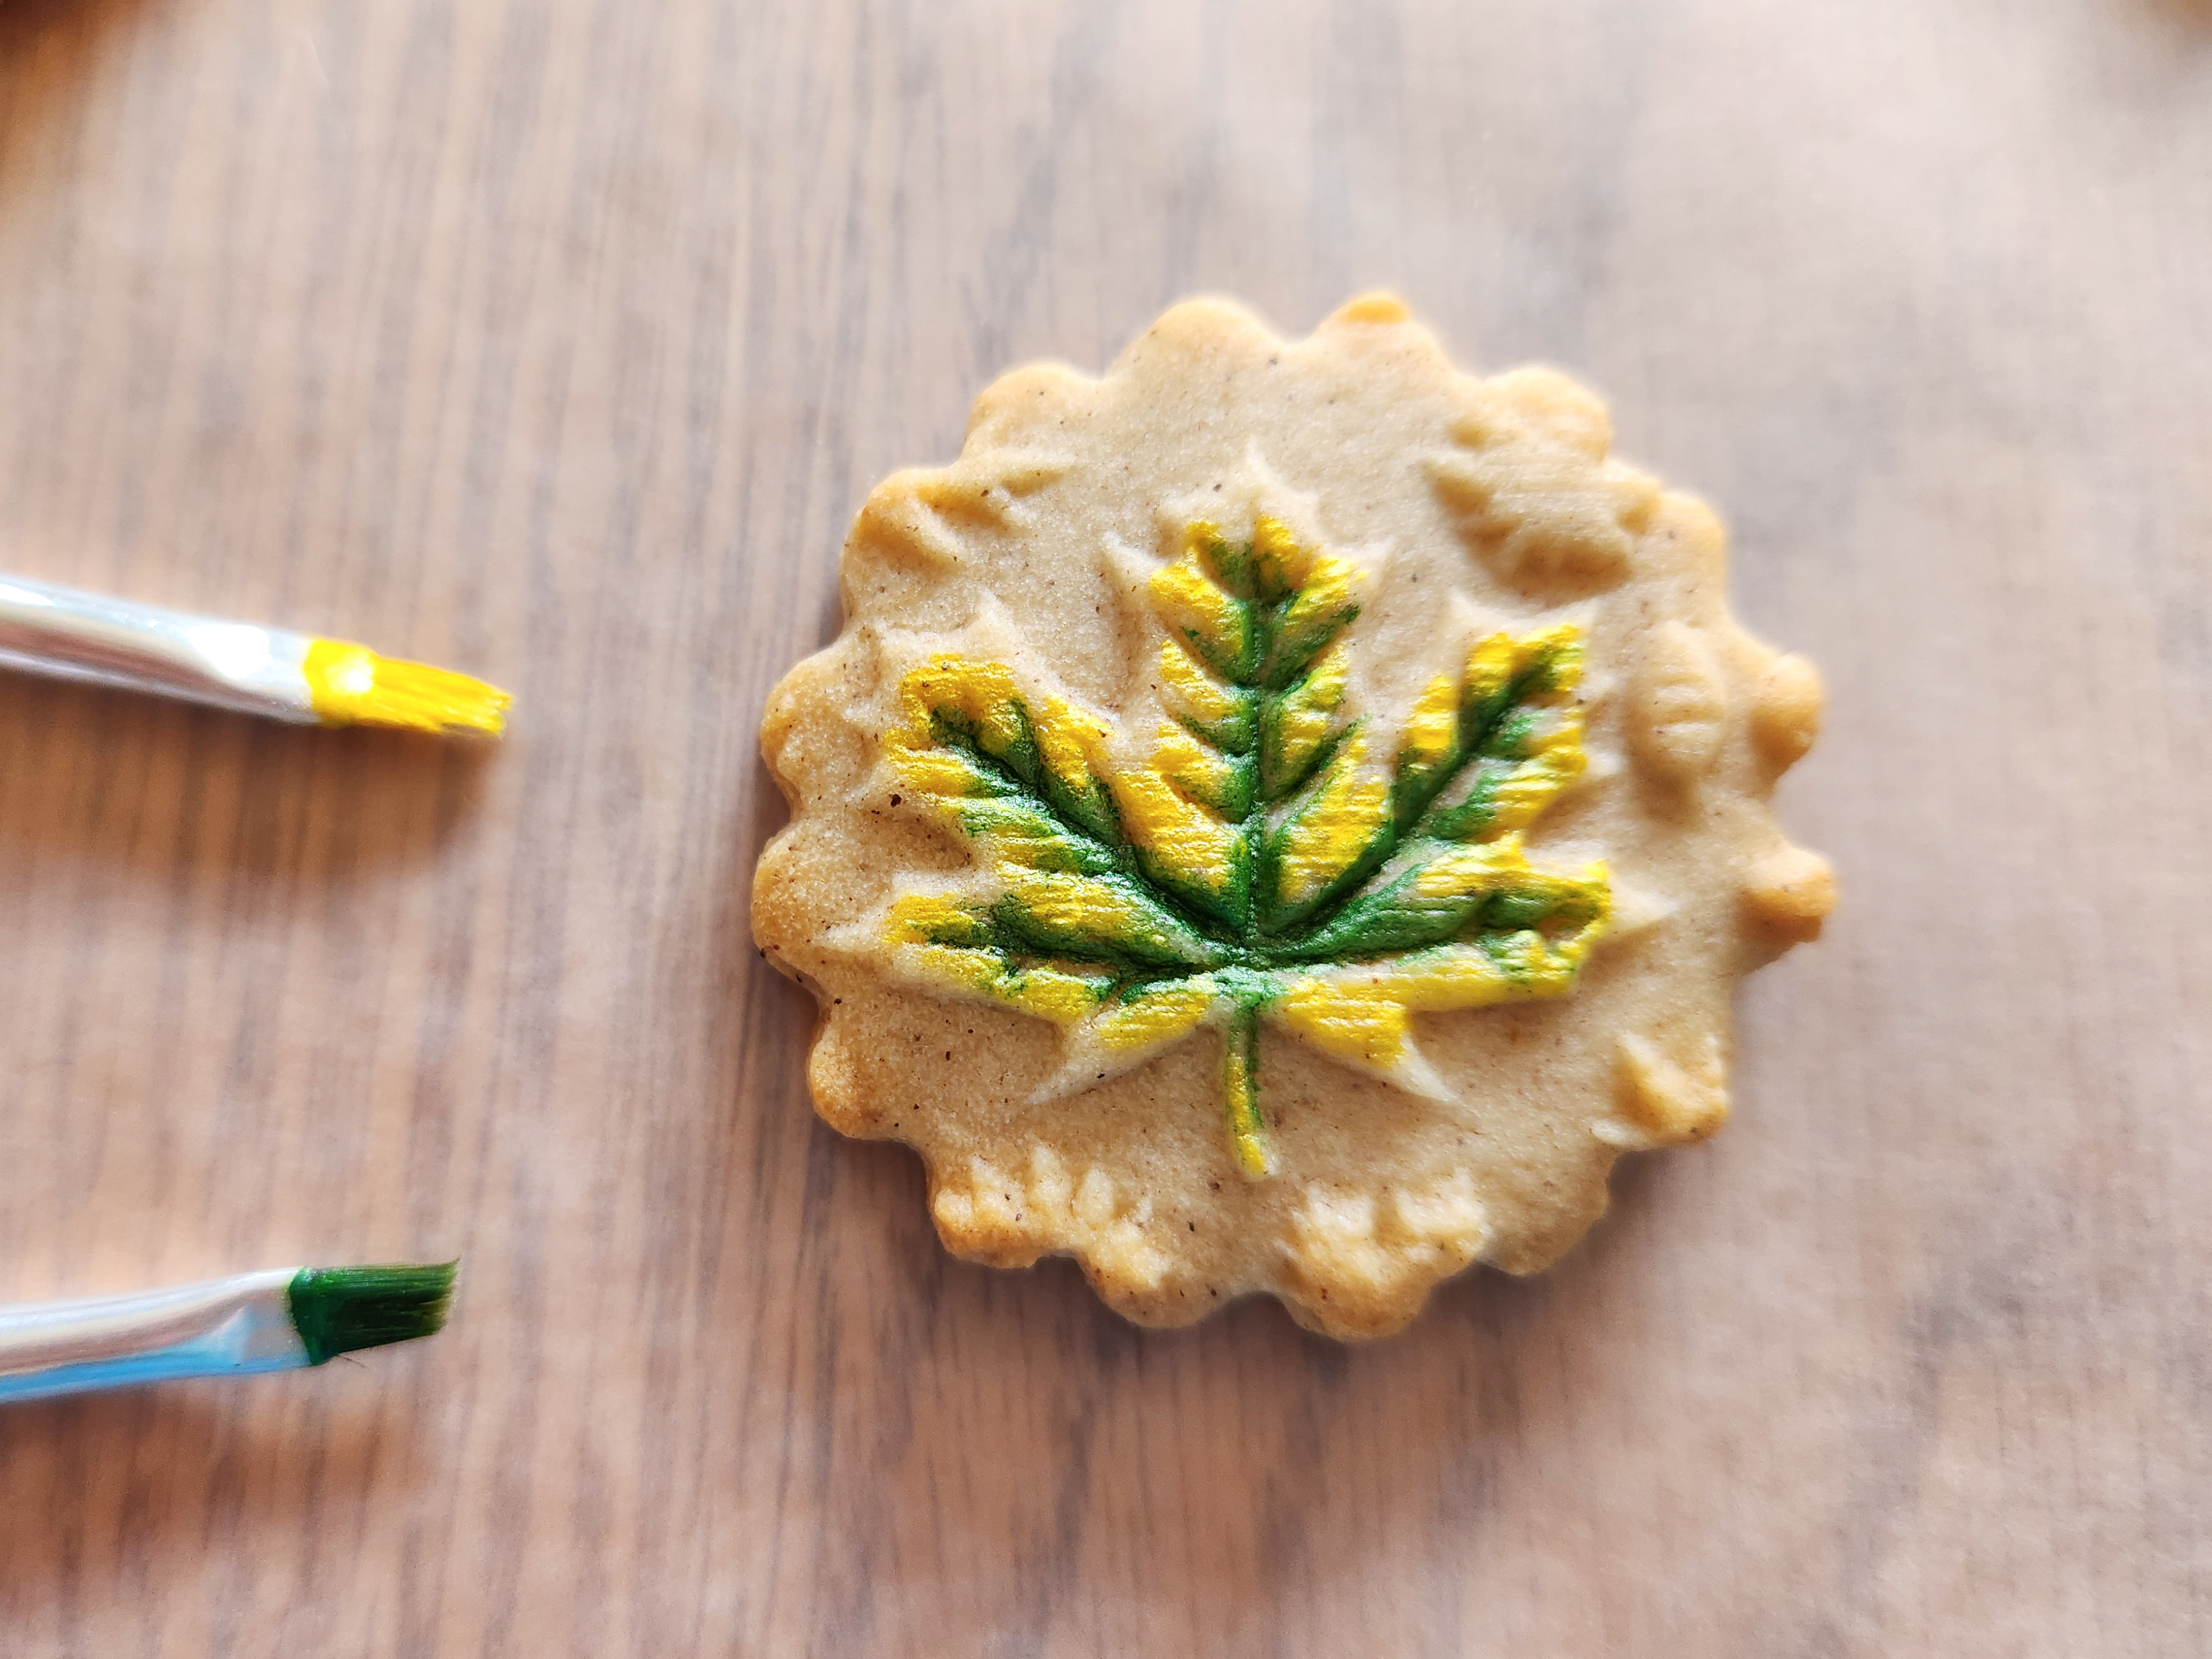

Painting cookies is relaxing and fun, like doing a coloring book. I put on a happy Spotify playlist and just painted while I sang. And unlike a coloring book, you can eat this art when you’re done with it! LOL
Now go back to the sandwiching section and get them all assembled!


Here’s the finished full recipe I did. Half painted, half not. This recipe made 44 sandwich cookies. I show 43 here because I dropped one on the tile floor and had to chase the pieces before my dog got them. 😂

Happy Fall everyone! I hope you get out to see some beautiful leaves.
As always, Happy Baking!
~Susie
Disk & Pin Designer/Co-Owner at Impress! Bakeware, LLC
Our website has all of our 200+ disk shapes, cookie press, embossed rolling pins, luster dusts, baking accessories plus more about our Women/Family Owned company! impressbakeware.com
All products are on our Etsy shop.
Our Amazon shop has our cookie press and disks and embossed rolling pins.
Follow us on facebook!
If you’re not familiar with rolling pins with thickness rings, here’s ours:
