

This recipe post is not about cookies! It’s all about pie, specifically, how to make gorgeous hit-of-the-party pie crusts. My baking focus is almost exclusively on cookies made with our cookie press disks or our embossed rolling pins. But not this year!
I was at a craft store recently and came upon the cutest 6 inch ceramic pie dishes. I normally make a few apple pies each fall, so I decided to give these a try. Our rolling pins are the perfect size to make beautiful patterns in the crust!
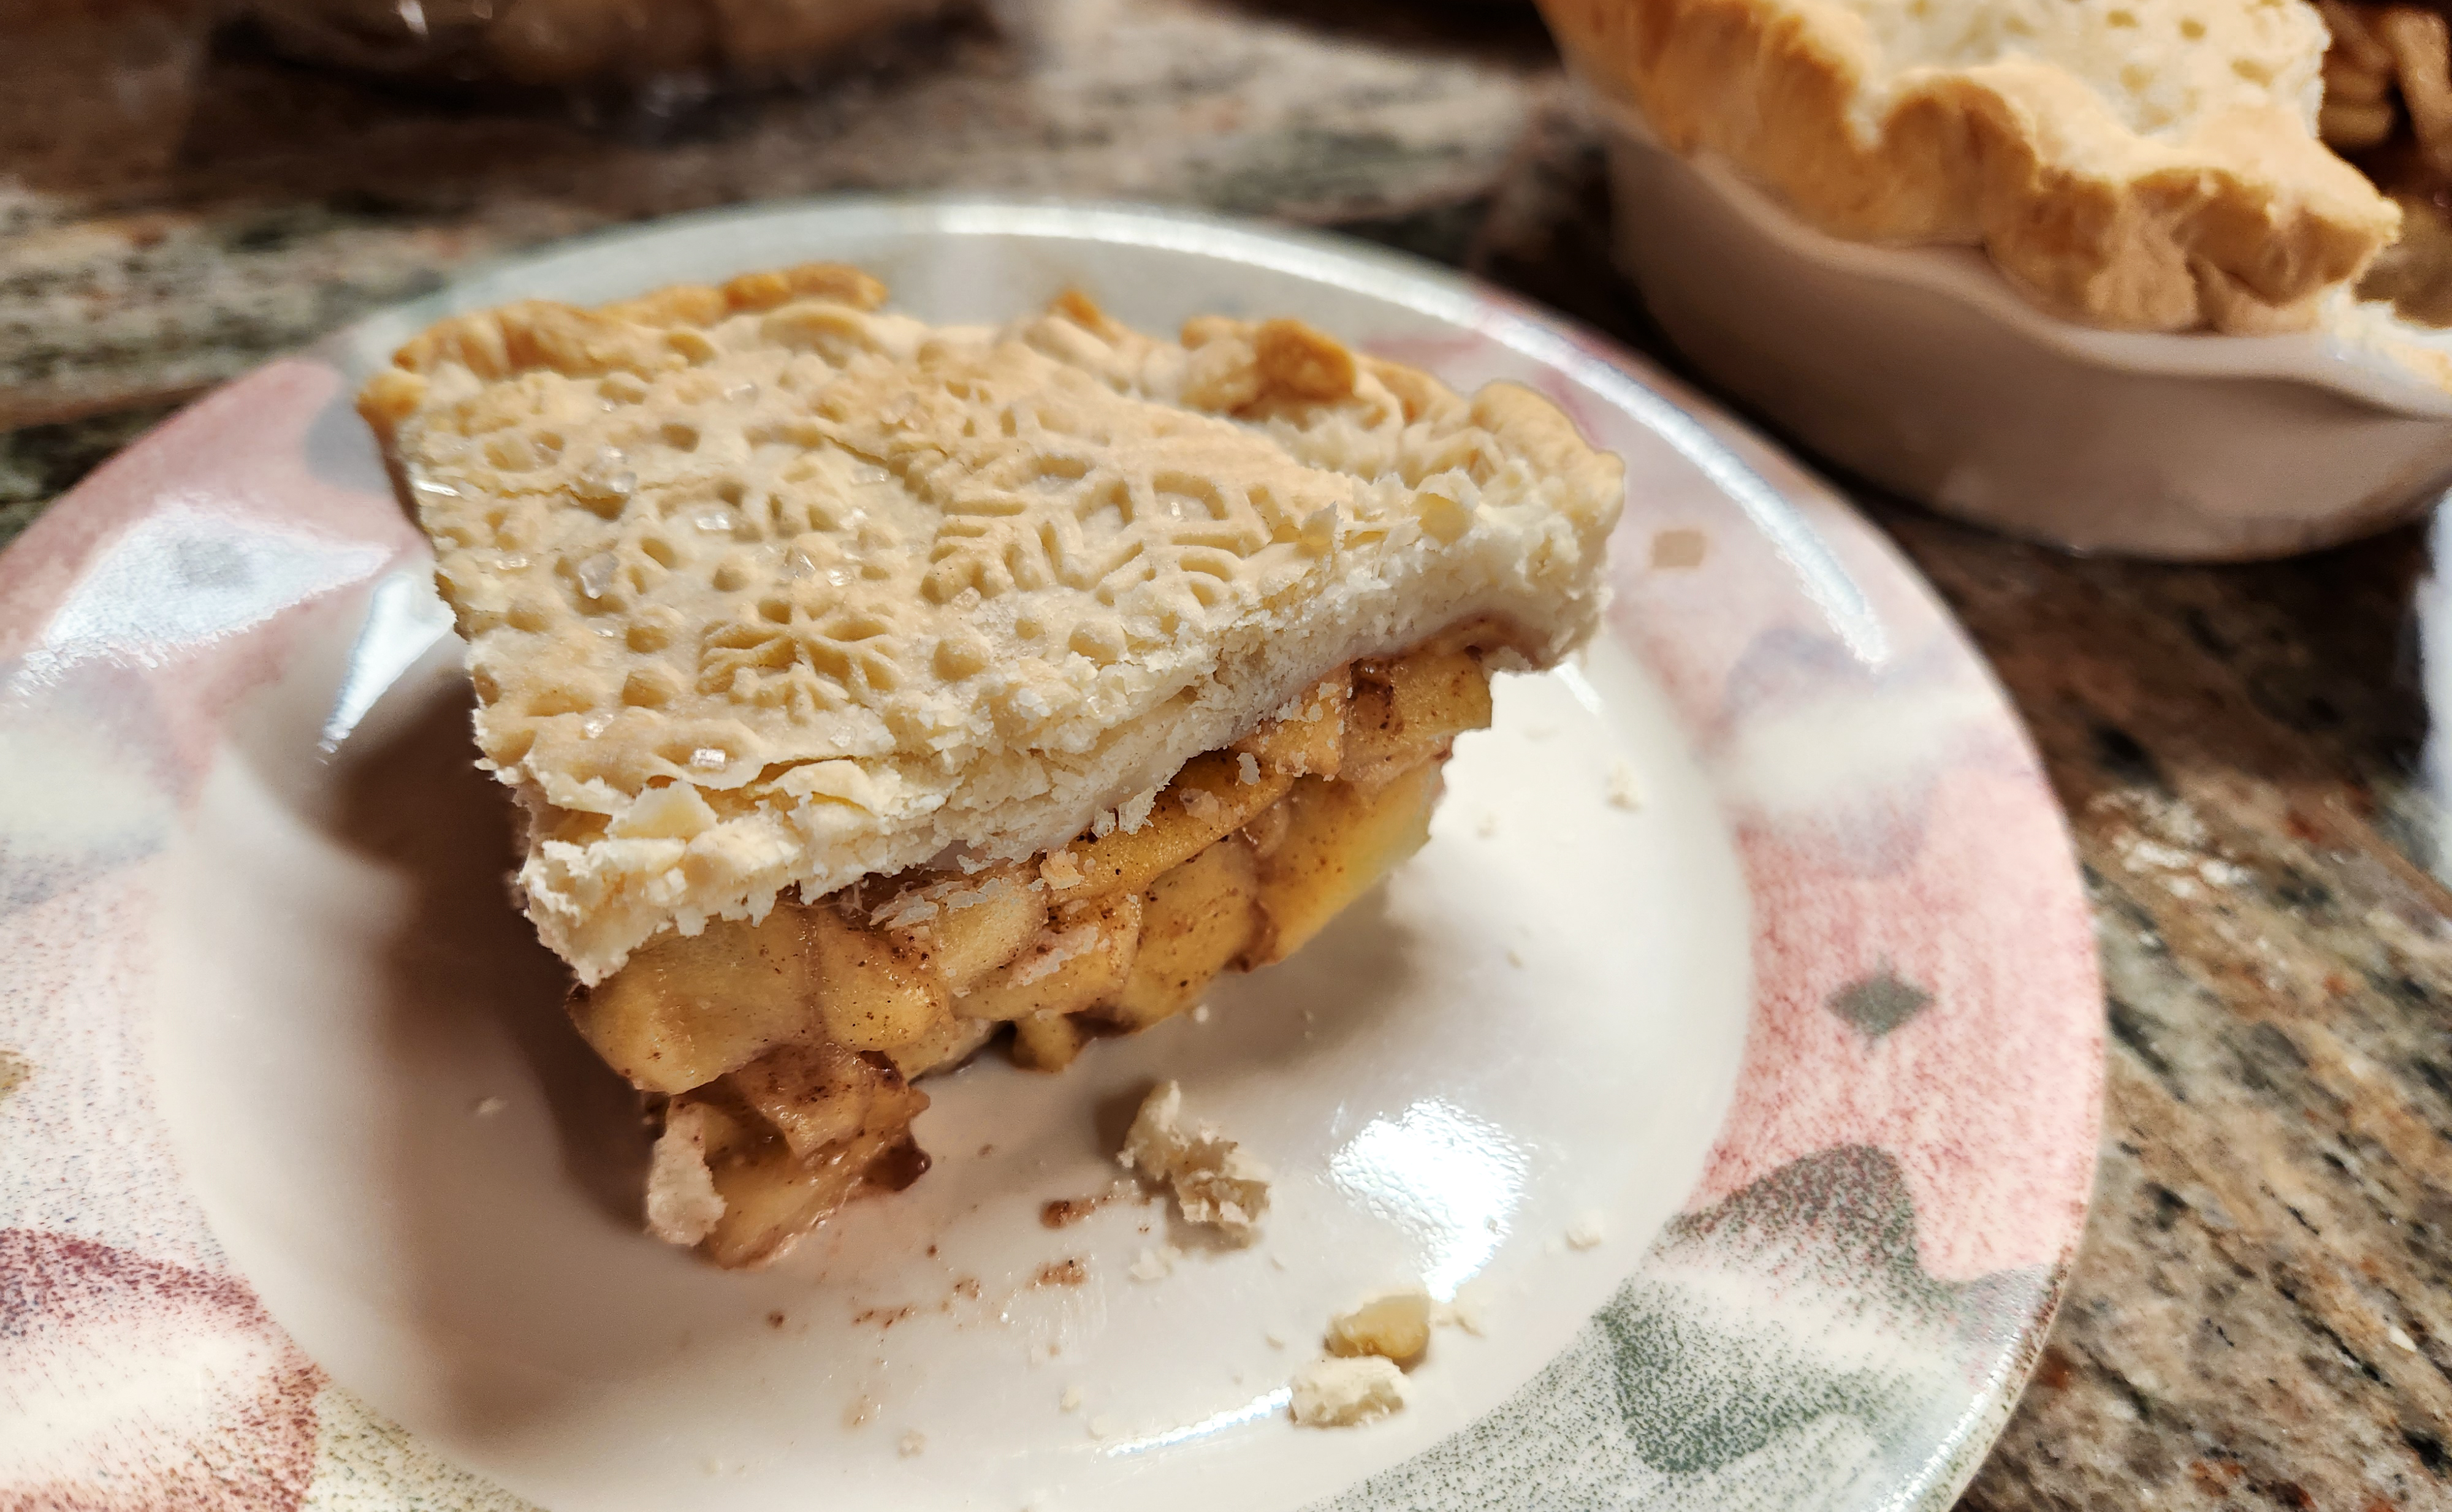
Mini pies are becoming super popular, especially for individual servings and small gatherings. But here’s some reasons why they are also wonderful for larger groups. Small pies are simply adorable! Many people love the crust-to-filling ratio. Variety! You can make multiple small pies with different flavors to share. Some people make them as personal pies or for just two people. We found that we could get 3 slices out of the 6” pies when we piled the apples high! I love that I can emboss the tops in several patterns just for the festive beauty of it.

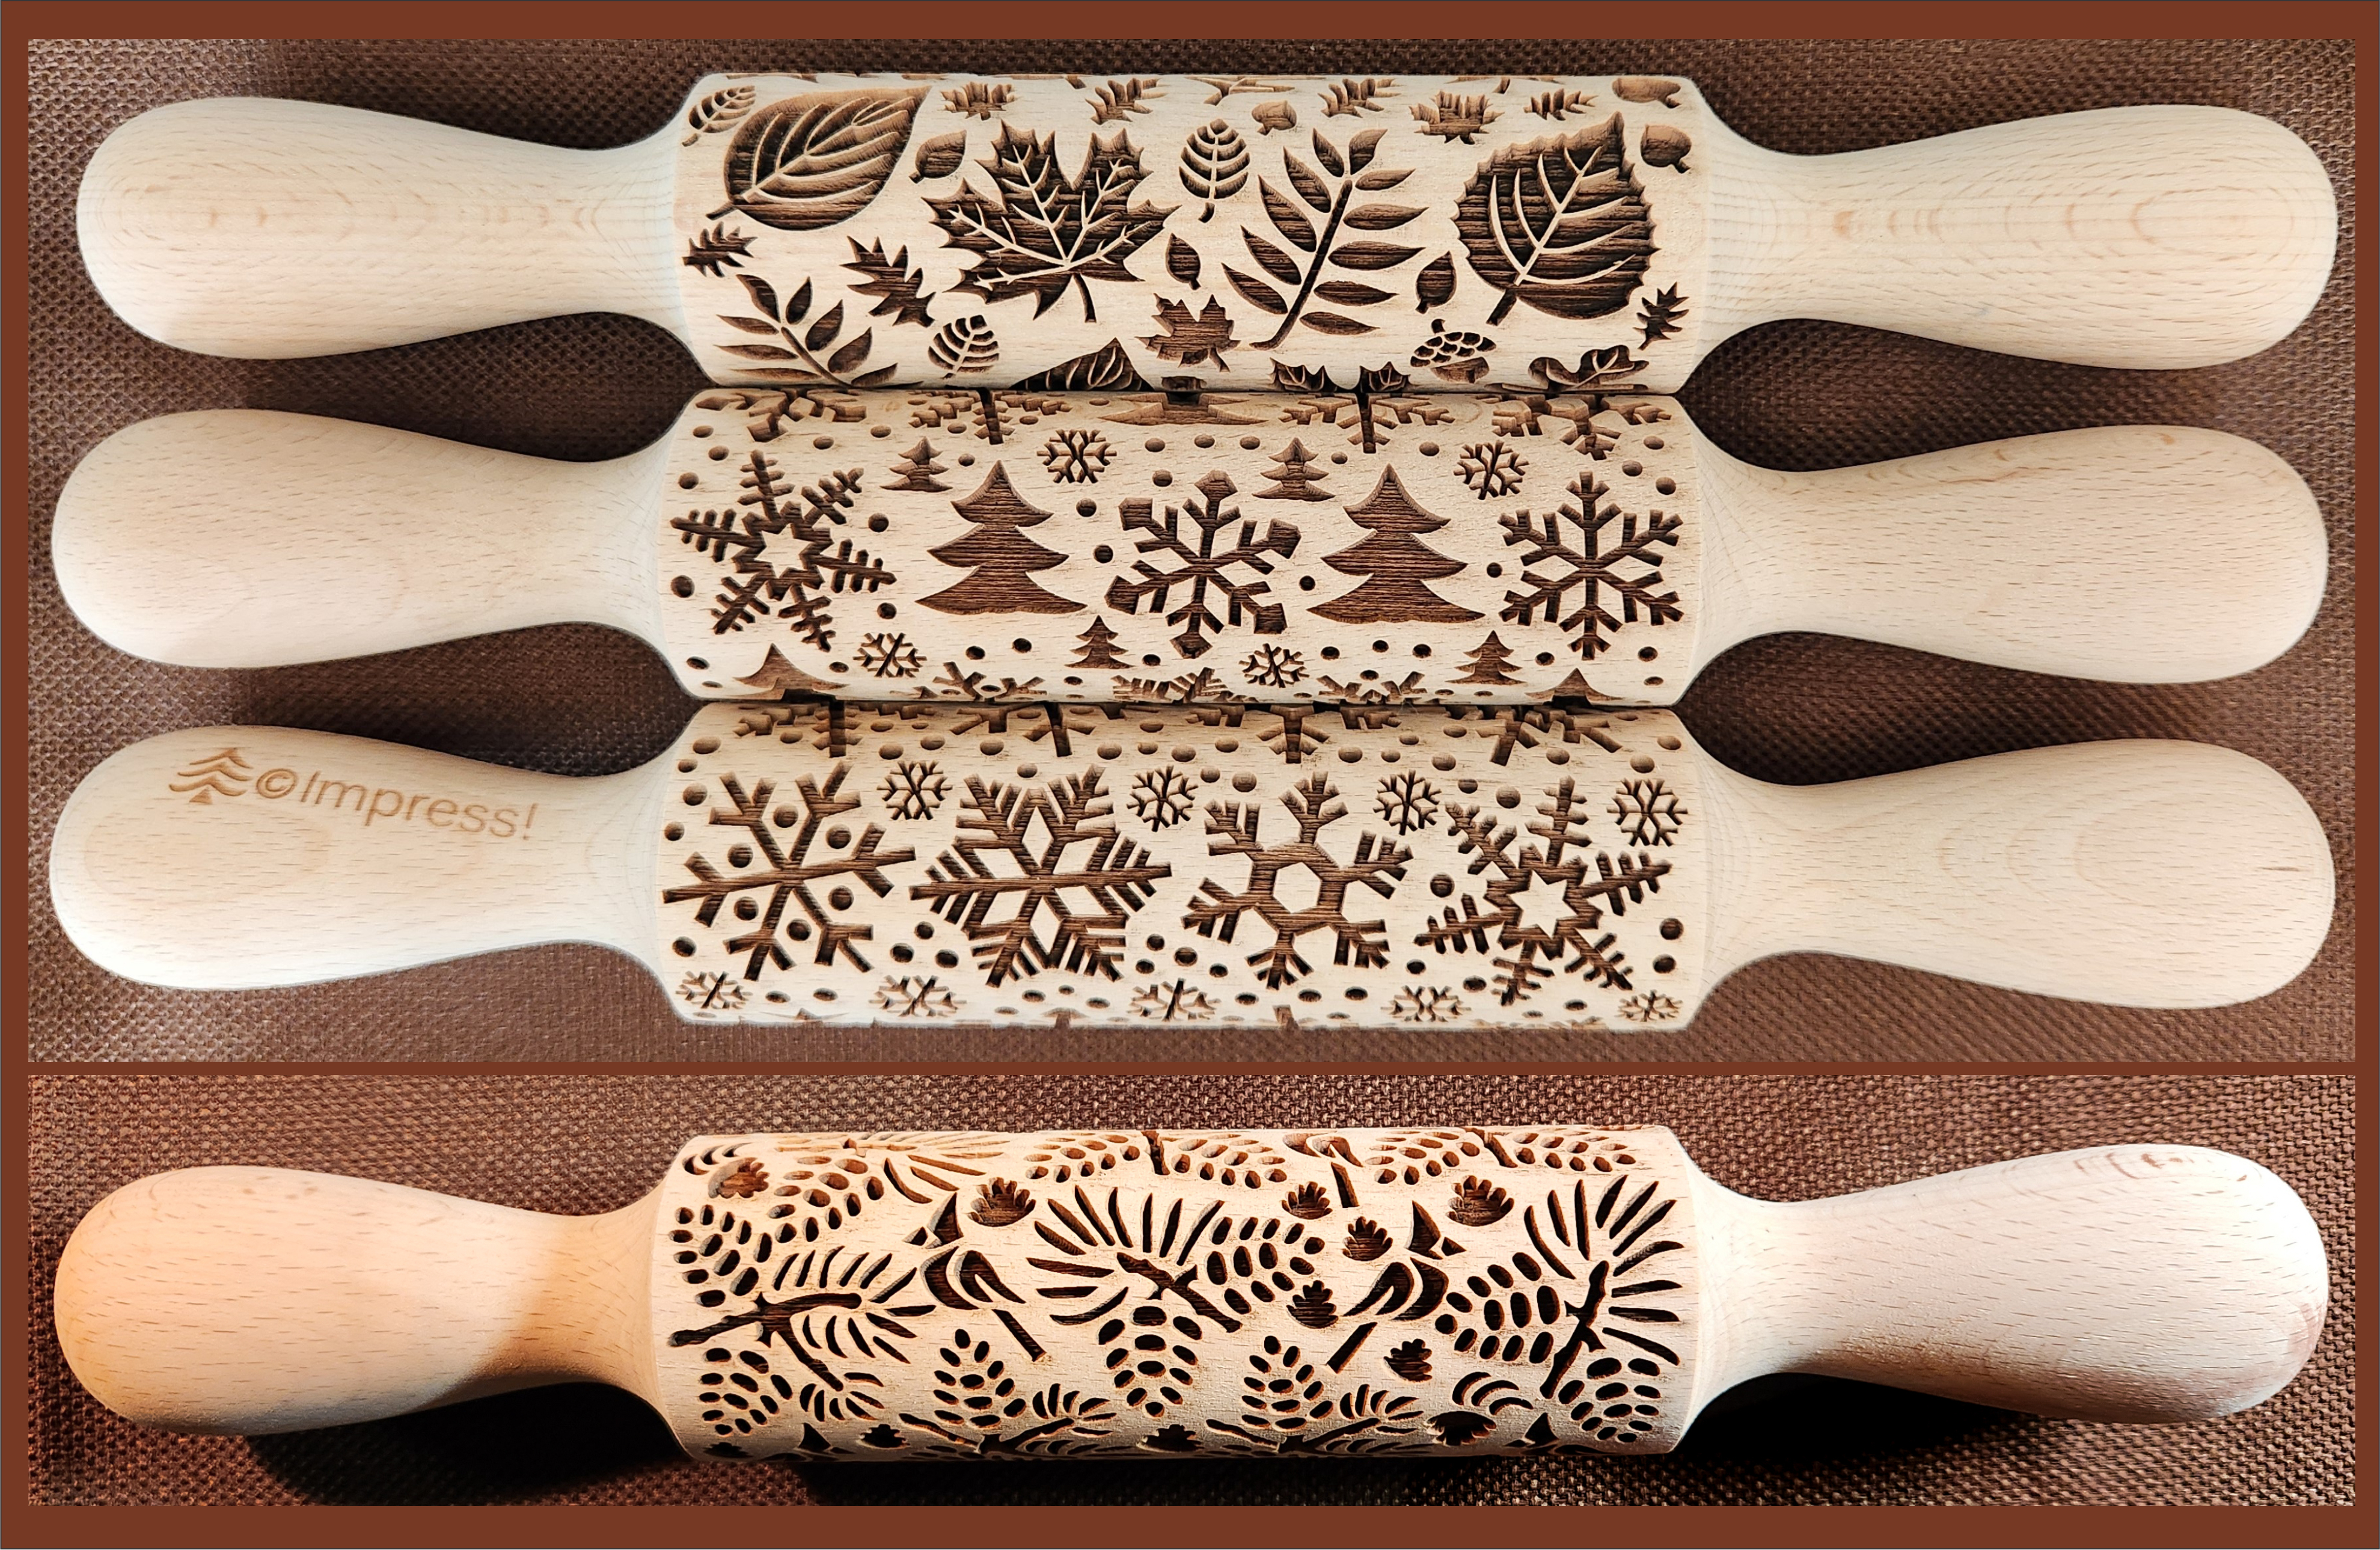
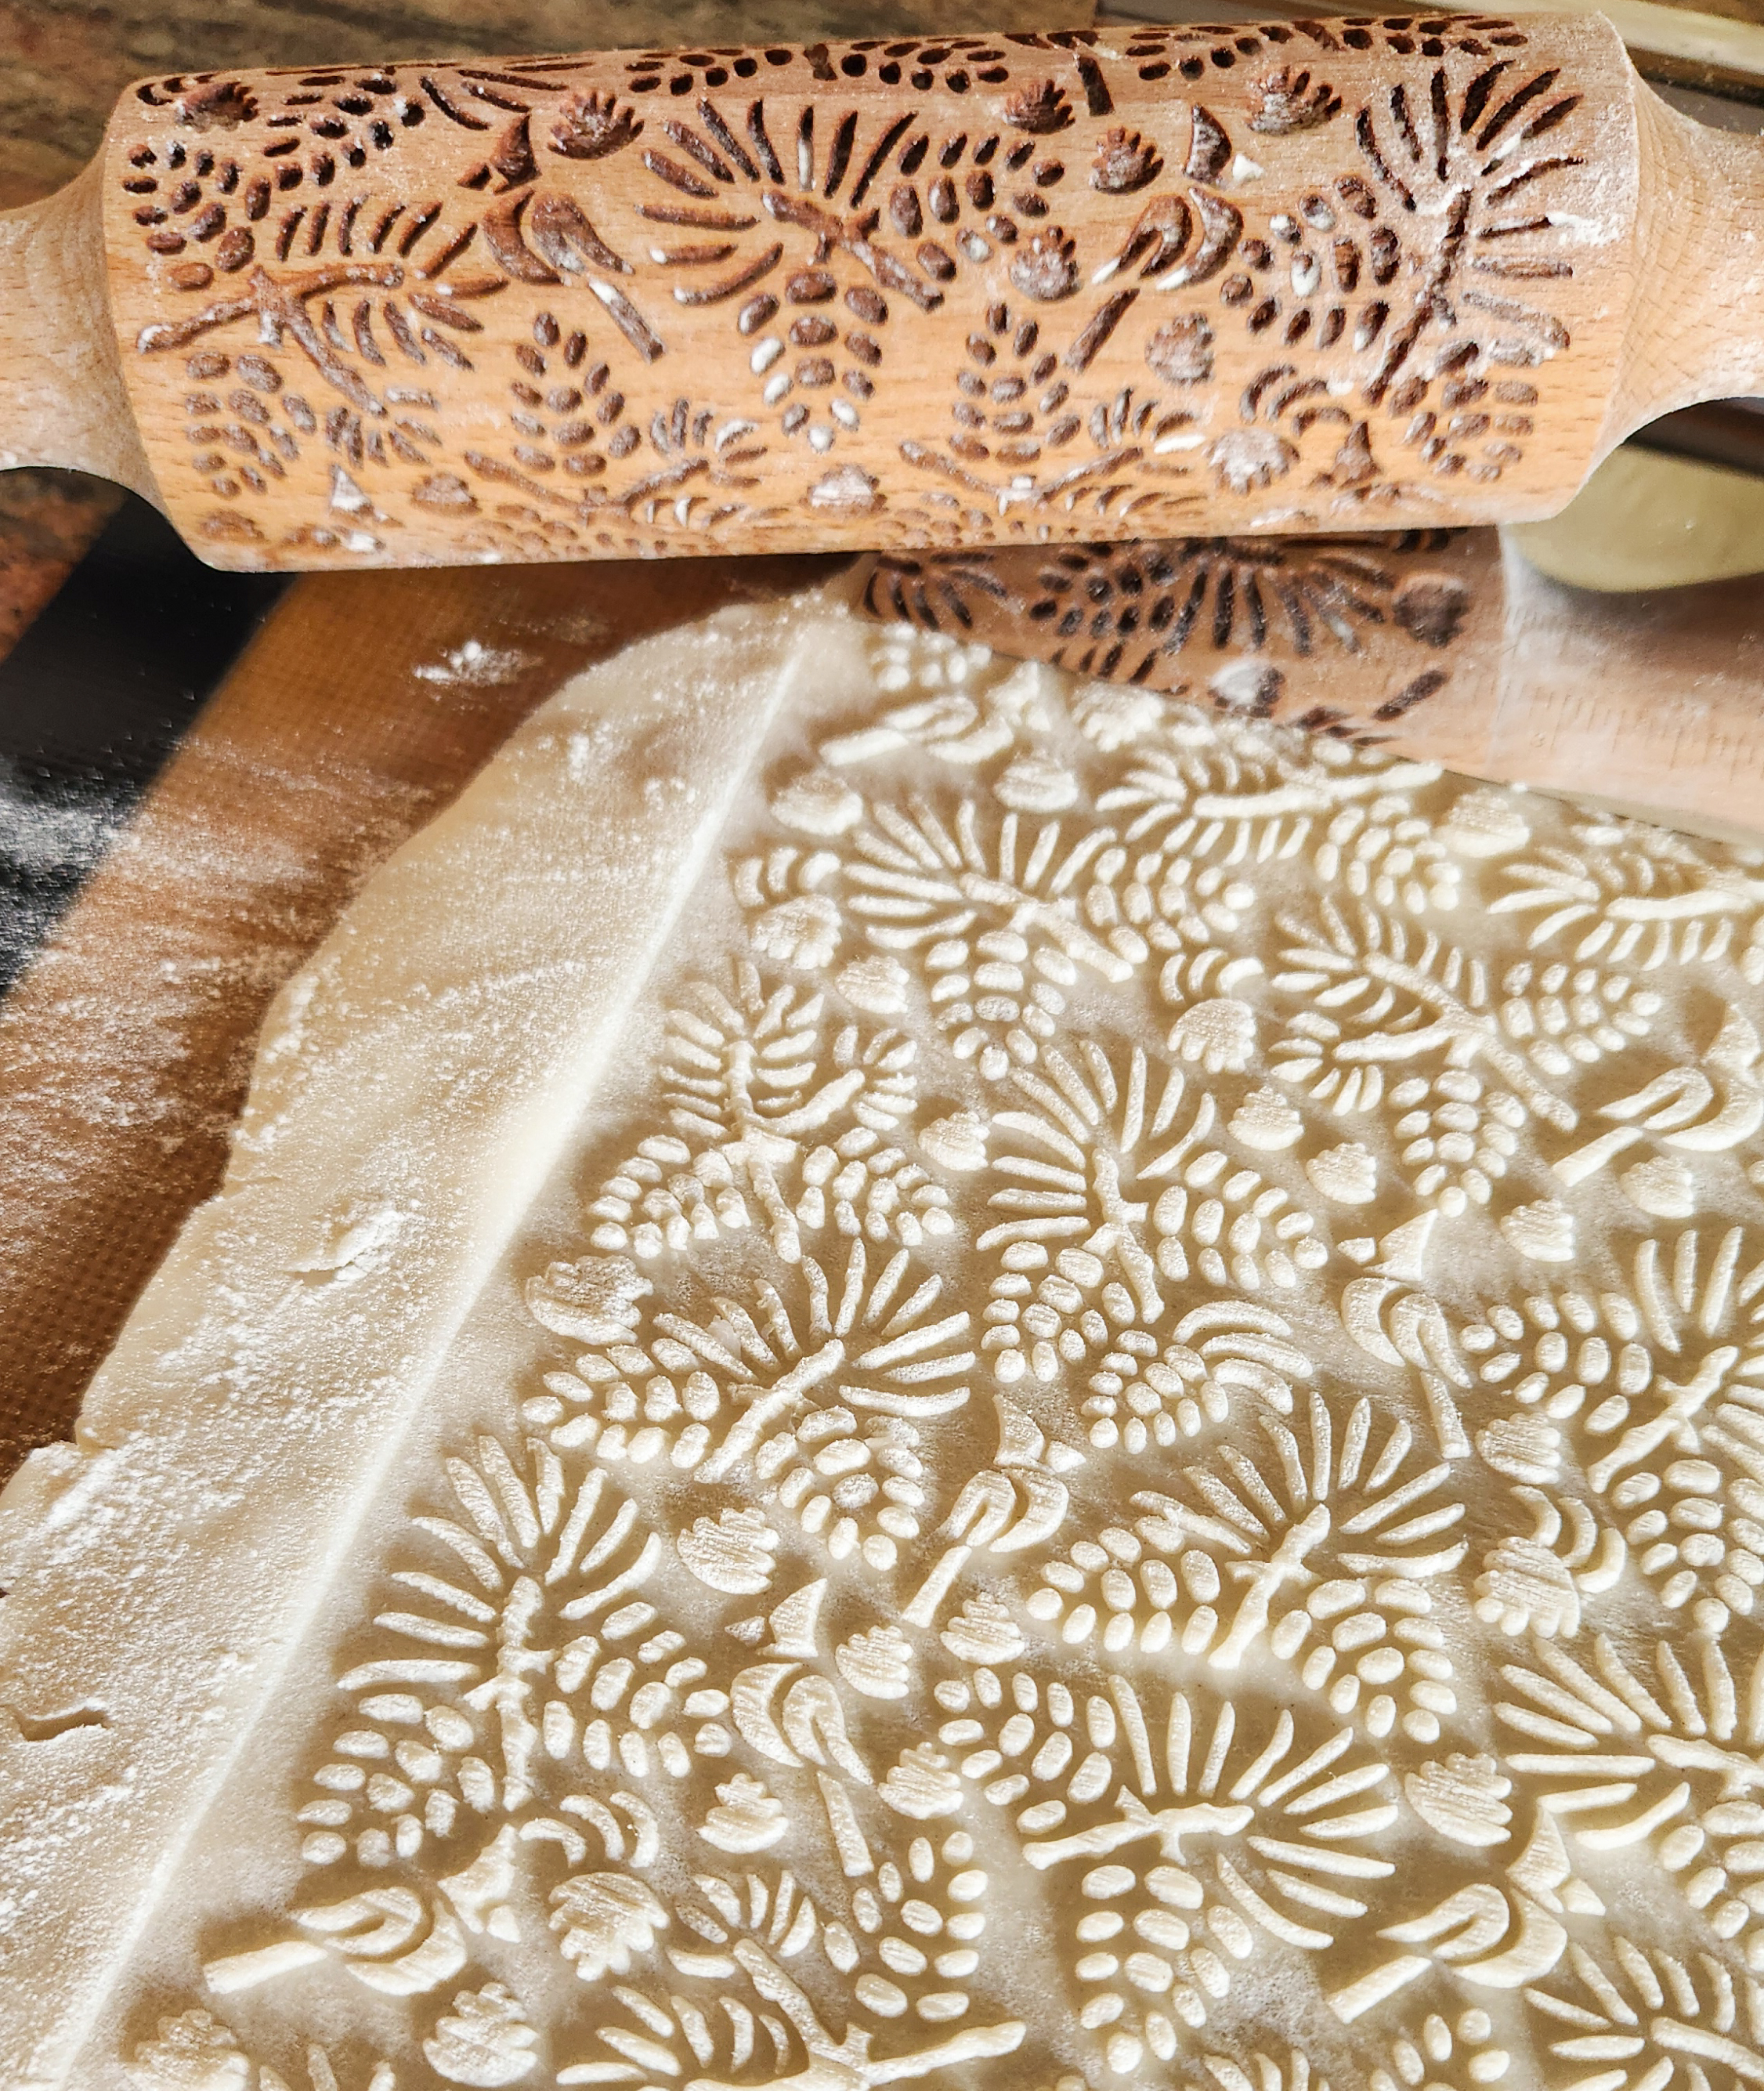
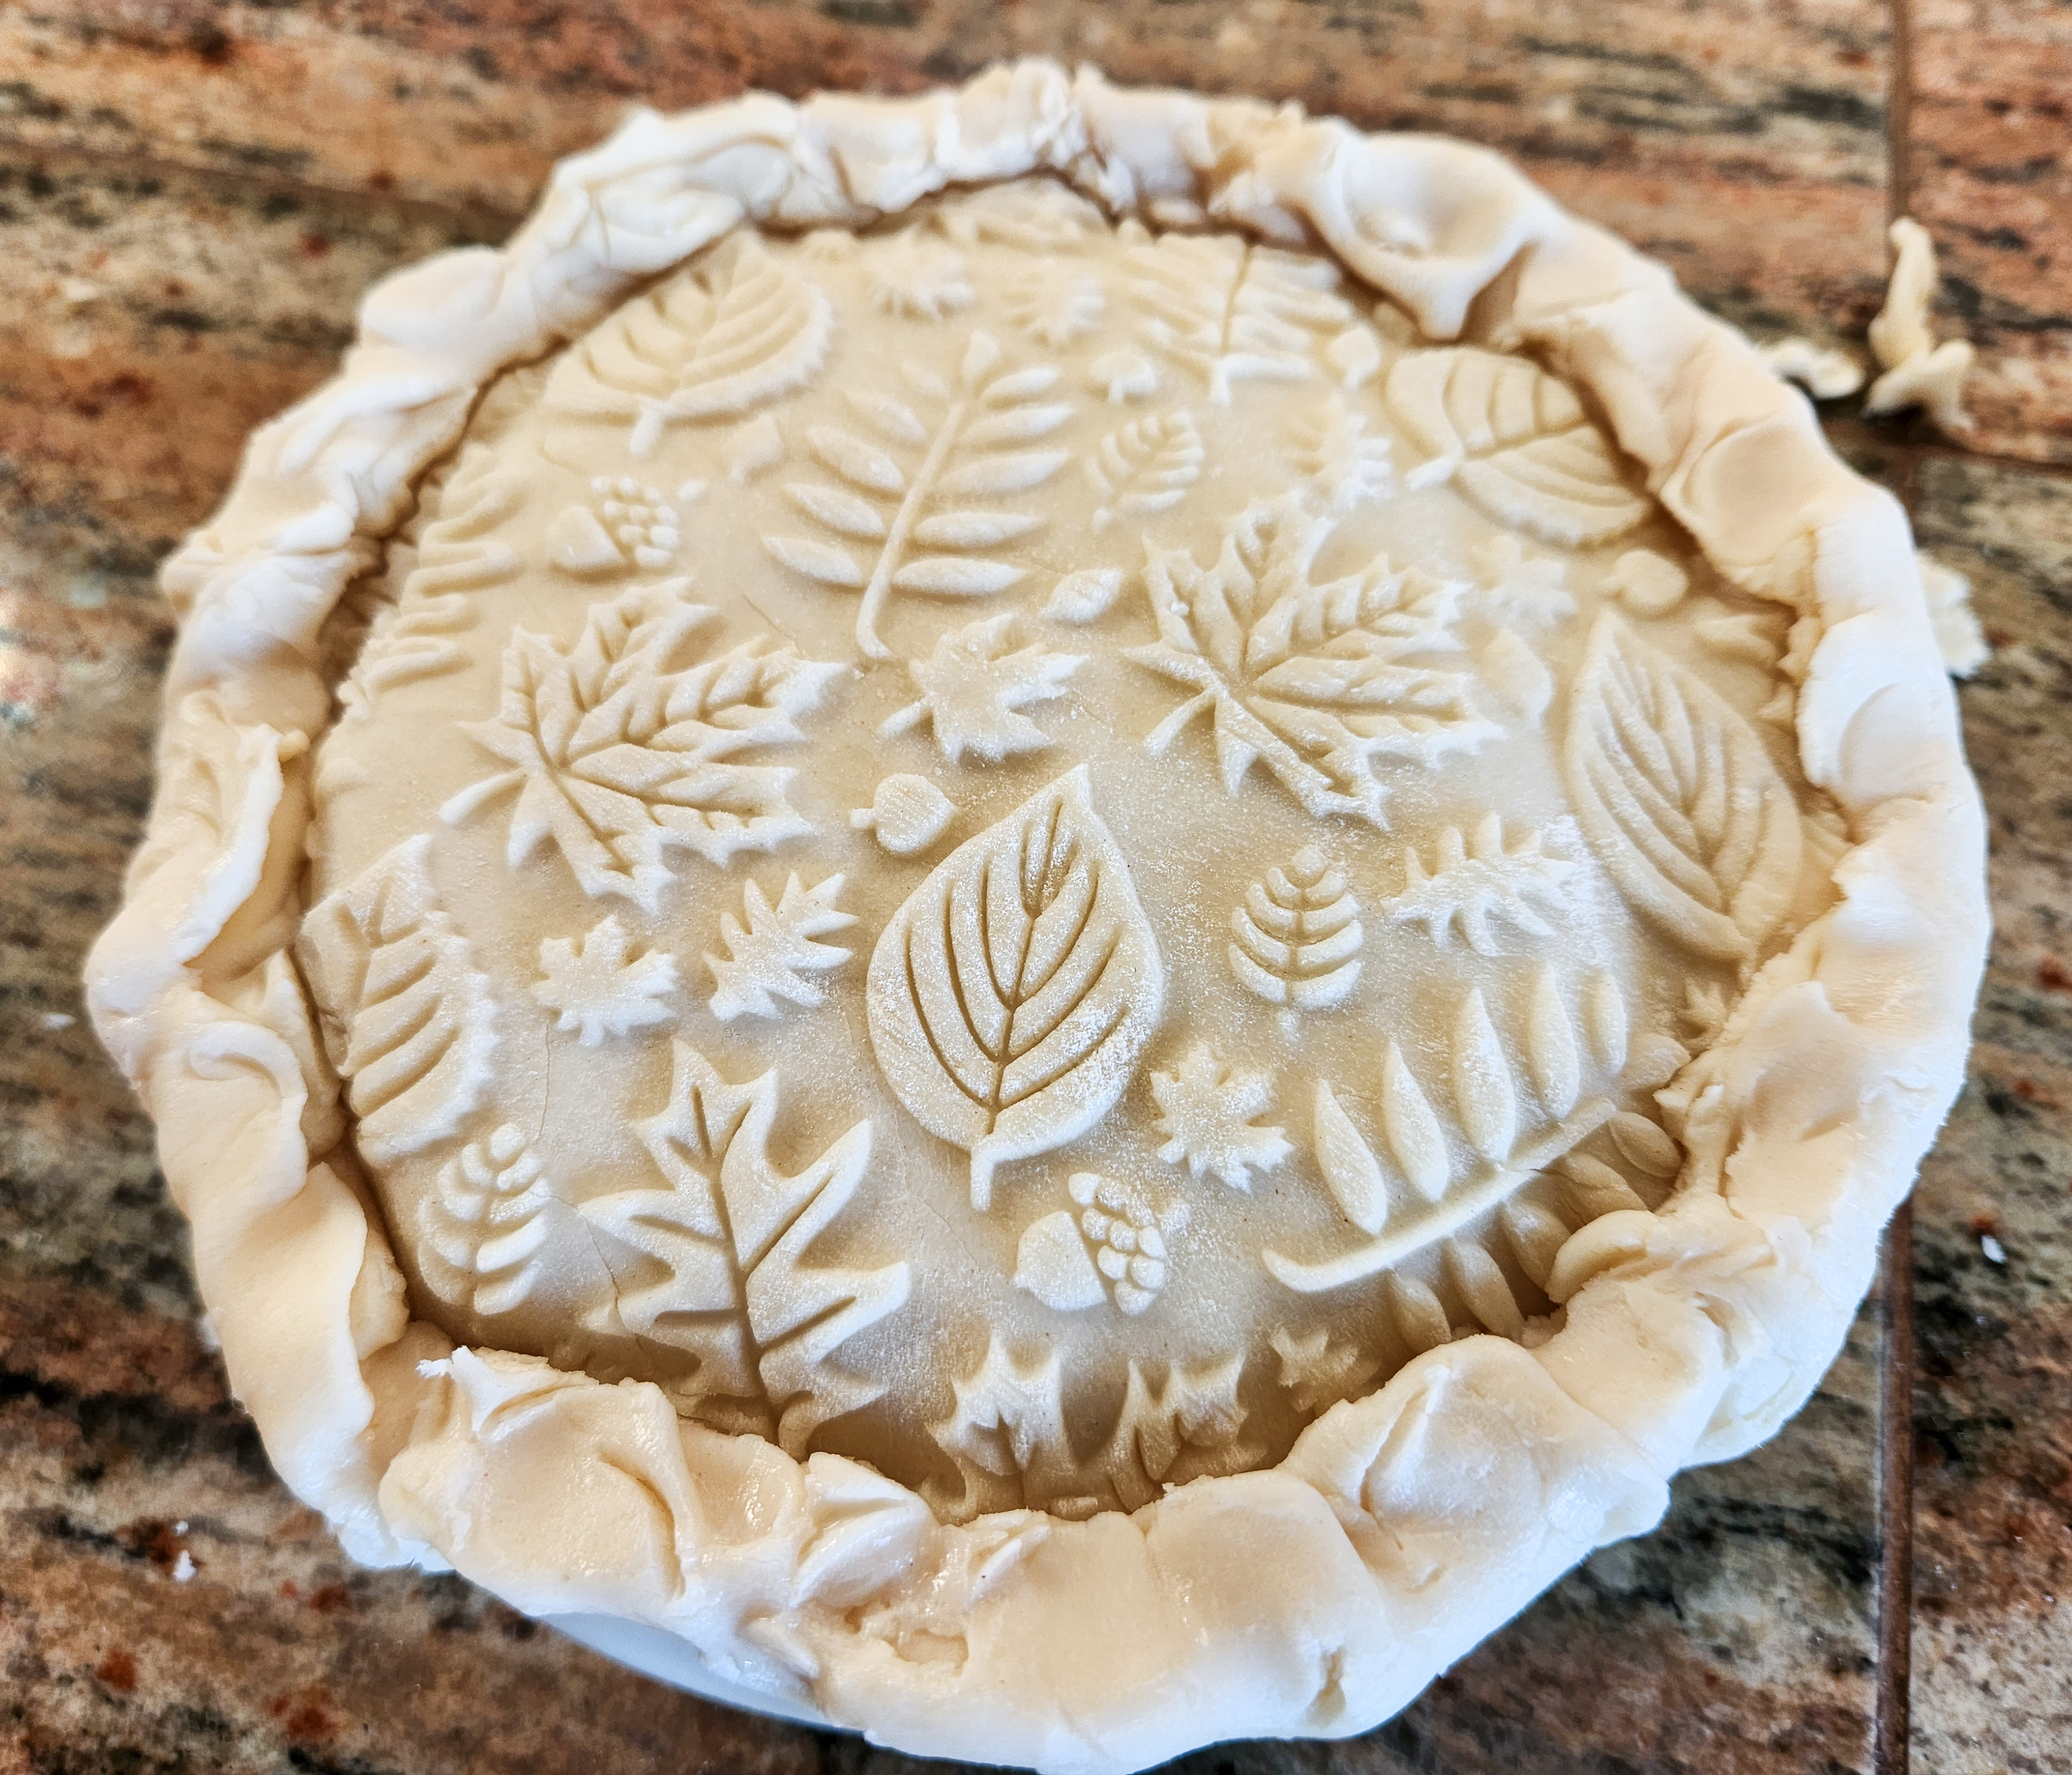
For this post I used four pins: Fall Leaves Large Designs, Snowflakes & Woodland Pine Trees, Snowflakes Large Designs, and Pinecones & Cardinals. It wasn’t until I had finished baking that I realized how cute the Pinecones & Cardinals would be, so I quickly made a fourth pie to test it out. So cute. I love them all! I show 2 other Thanksgiving & Christmas pins at the bottom of this post that would be adorable, too.
Our website has all of our 300+ disk shapes, cookie press, embossed rolling pins, baking accessories plus more about our Women/Family Owned company! impressbakeware.com
All products are on our Etsy shop.
Our Amazon shop has our cookie press and disks and embossed rolling pins.
🎉 15% OFF Last SALE of 2025 ❗
🎄Make edible art for the Holidays, because baking should be fun!
Discount on our cookie press disks, cookie press, embossed rolling pins, luster dusts, cookie cutters & baking accessories. Sale December 26 – January 4, 2026, on our website and Etsy shops ONLY! (Links above) Sale excludes holiday gift sets and our recipe book.
It’s not difficult at all to roll out even store-bought pie crust, so don’t be intimidated by this! You can keep it extra simple and use both store-bought pie filling and crust. It works like a charm and is quick and easy.
For decades I’ve made my apple pie from scratch, and it’s always been a huge hit with family and friends. So I’m sharing my apple filling recipe for this post. That said, ironically for as much as I love to bake cookies, I’m not a homemade pie crust person. Funny, right? So, if you have a favorite pie crust recipe that you love, by all means use that here. (Note that homemade canola oil crusts do not work well, they are too crumbly to hold the patterns.) Or do what I did and go store-bought. I usually do a press-in-pan canola oil crust with a Dutch crumble top crust for my apple pie, so this rolled-out top crust is a new adventure for me! I gotta admit, I found it totally fun.
This recipe post is really about embossing the crust so whatever crust dough and filling you choose, follow along and I’ll show you how easy this can be.
At Thanksgiving I often make pot pie from leftovers! Don’t forget savory pies when you think about beautiful crusts. 😉
Let’s bake!
A note about apple choices. Most people use a mix of tart and sweet apples for pie. I’m a sweet apple fanatic so I used all gala apples.
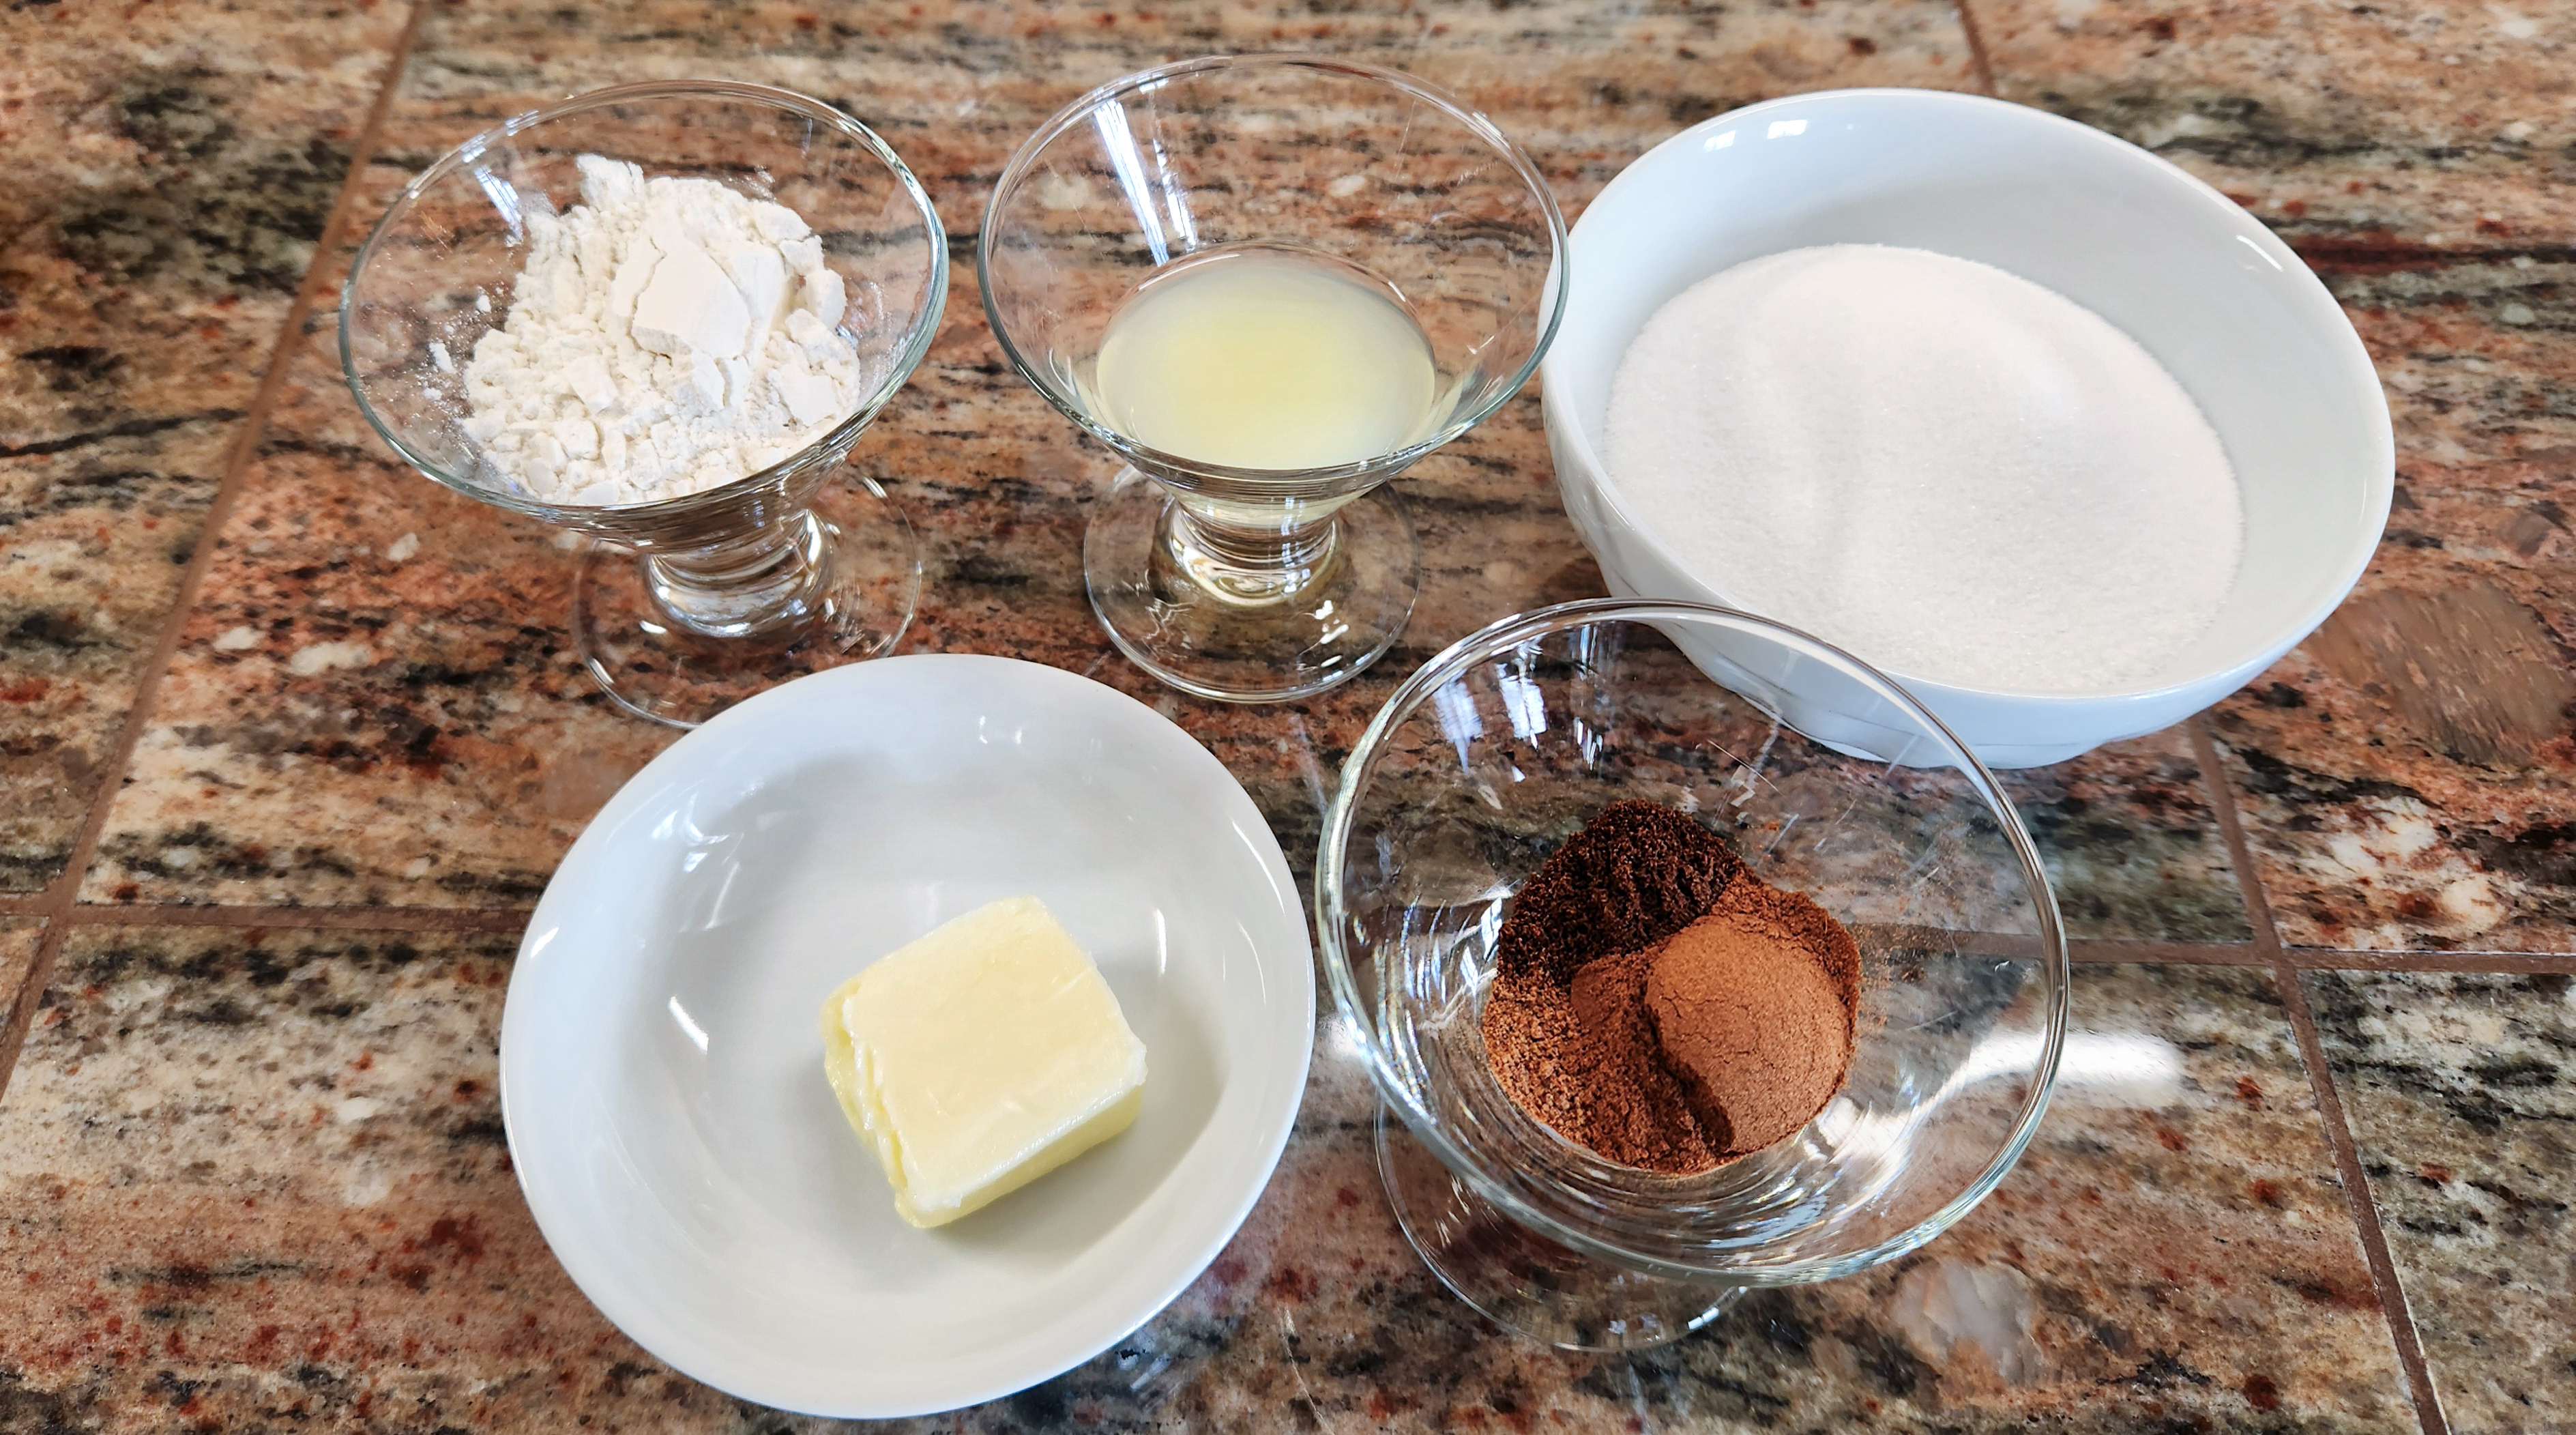
Susie’s Apple Pie filling (makes three six-inch pies)
6 medium apples (or approximately 4 large/8 small)
1/2 cup white granulated sugar
1 tablespoon flour
1 tablespoon lemon juice
1 1/2 teaspoons ground cinnamon
1/4 teaspoon ground cloves
1/8 teaspoon ground nutmeg
2 tablespoons of butter to “dot” in between apple layers

“Crust Dust” to keep the bottom from getting soggy
1 tablespoon flour
1 tablespoon white granulated sugar
Butter to grease the bottom of your pie dishes
3 boxes of store-bough pie crust. I used generic from Kroger and they worked great! (Each box has 2 pre-made rounds of crust dough for big pies. You will use one full round for each top crust, and only half a round for the bottom. So you’ll have one round left over. (I cut that last one up and pressed the crust into a muffin pan, added canned apricot and raspberry filling and made little tarts!) OR use your own homemade pie crust, enough for 3 big pies.
***If using store-bought pie crusts, set them out to warm up to room temperature.
In a small bowl combine the sugar, flour, and spices. Set aside.
Peel your apples and cut them into thin slices. Thinner slices bake evenly and layer well.


Toss them in the lemon juice in a large bowl. Add the sugar, flour, and spices mix and toss to coat the apple slices evenly. Cover and set aside.
Now comes the fun part!
Lay one round of pie crust dough out on a silicone mat or other surface you can roll on. Have a regular rolling pin (preferably with thickness spacing rings!) and your embossed pin ready. Grab a bench /dough scraper and a sheet of waxed paper, a small cup of flour, and a big plate

Fold the dough in half and smoosh it with your knuckles to combine the two layers into one. Smoosh it some more with your hands until it is in a more square or rectangular format. Make it about a half-inch to one inch wider than your embossed pin. Unlike cookie dough, you won’t need the entire length of what you roll, so don’t worry if this seems “short”. Place waxed paper over it or dust your pin with flour, then roll it out until it is evenly flat and there are no seams showing from combining the two layers. Use your knuckes again if you need to pinch those layers together.
So WHY are we doing this? These store-bought crusts are just the right thickness for baking, BUT when you emboss dough, it thins out as the patterns dig in. SO we are doubling this dough up to make it closer to the 1/4″ thickness I use for cookies. Just make sure your folded, smooshed dough is significantly thicker than the original round, and and evenly flat!


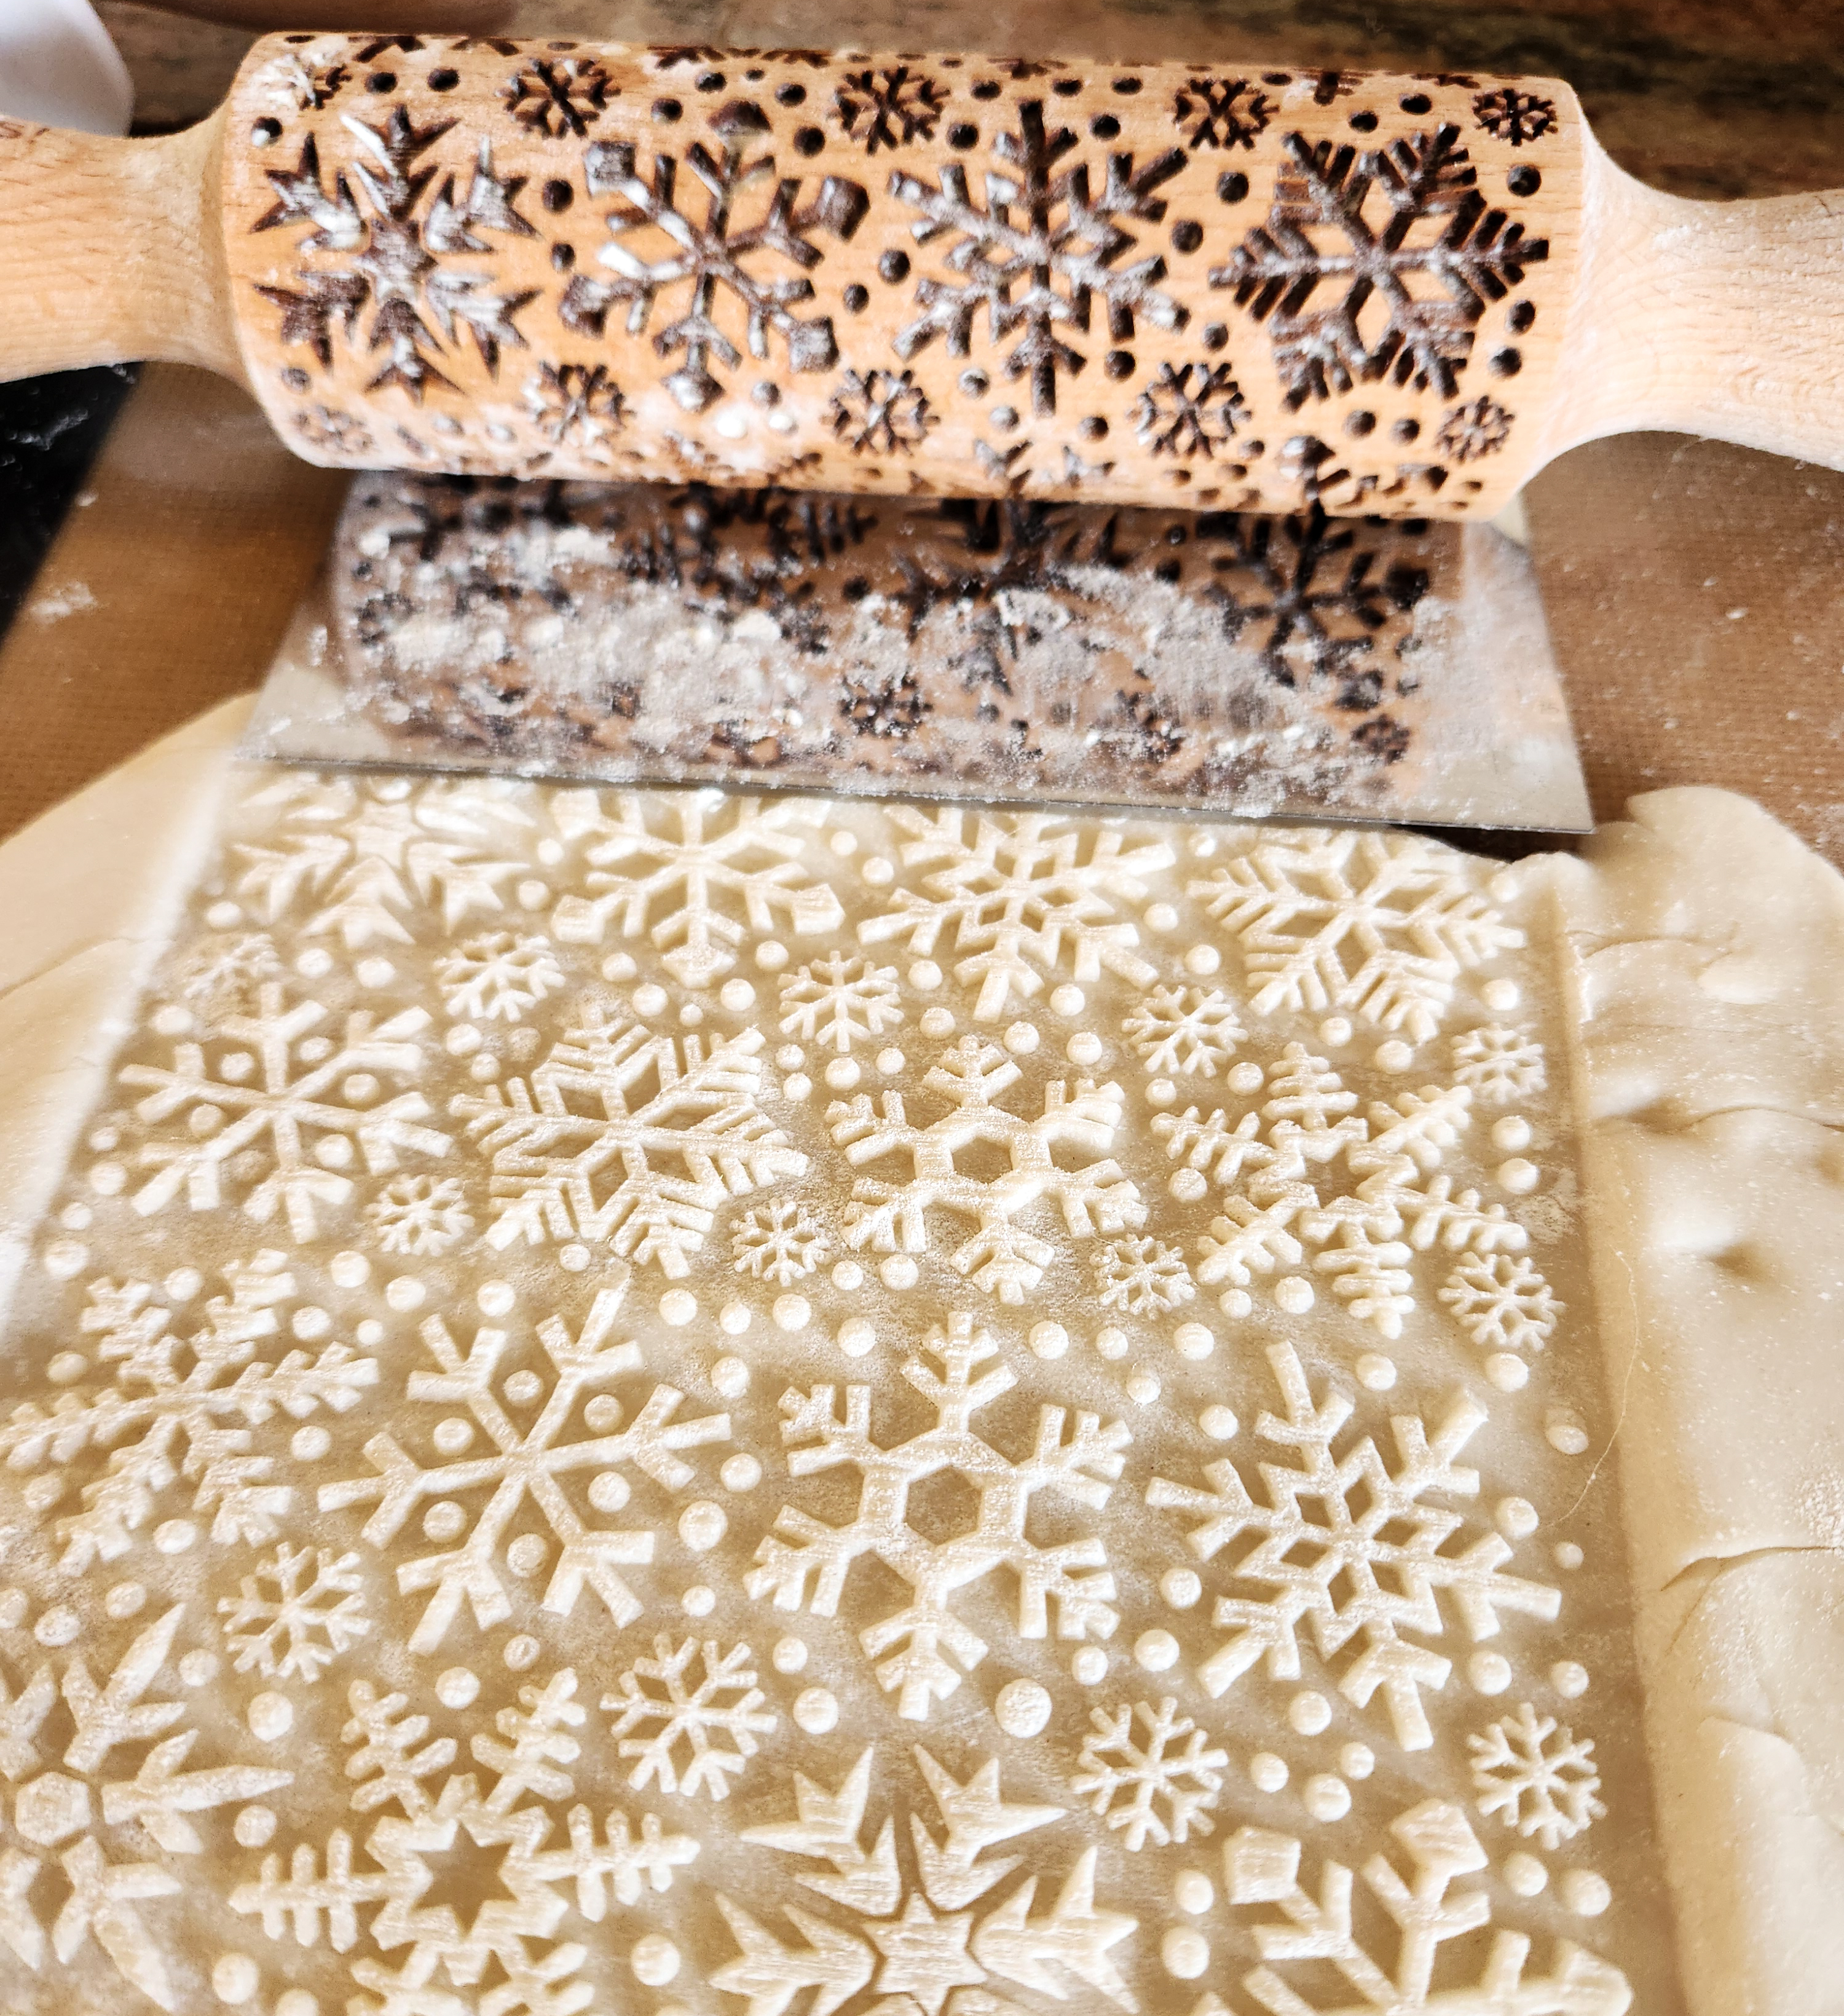
Now roll with the embossed pin.
Generously flour your embossed pin and lightly dust the surface of the crust dough. Place a bench scraper at the end of your dough, and slowly roll towards you using a firm, even pressure. This is significantly stiffer than cookie dough so press harder than you would for cookies.
Here’s a quick video of me rolling the crust dough out with the Fall Leaves Large Designs Pin:
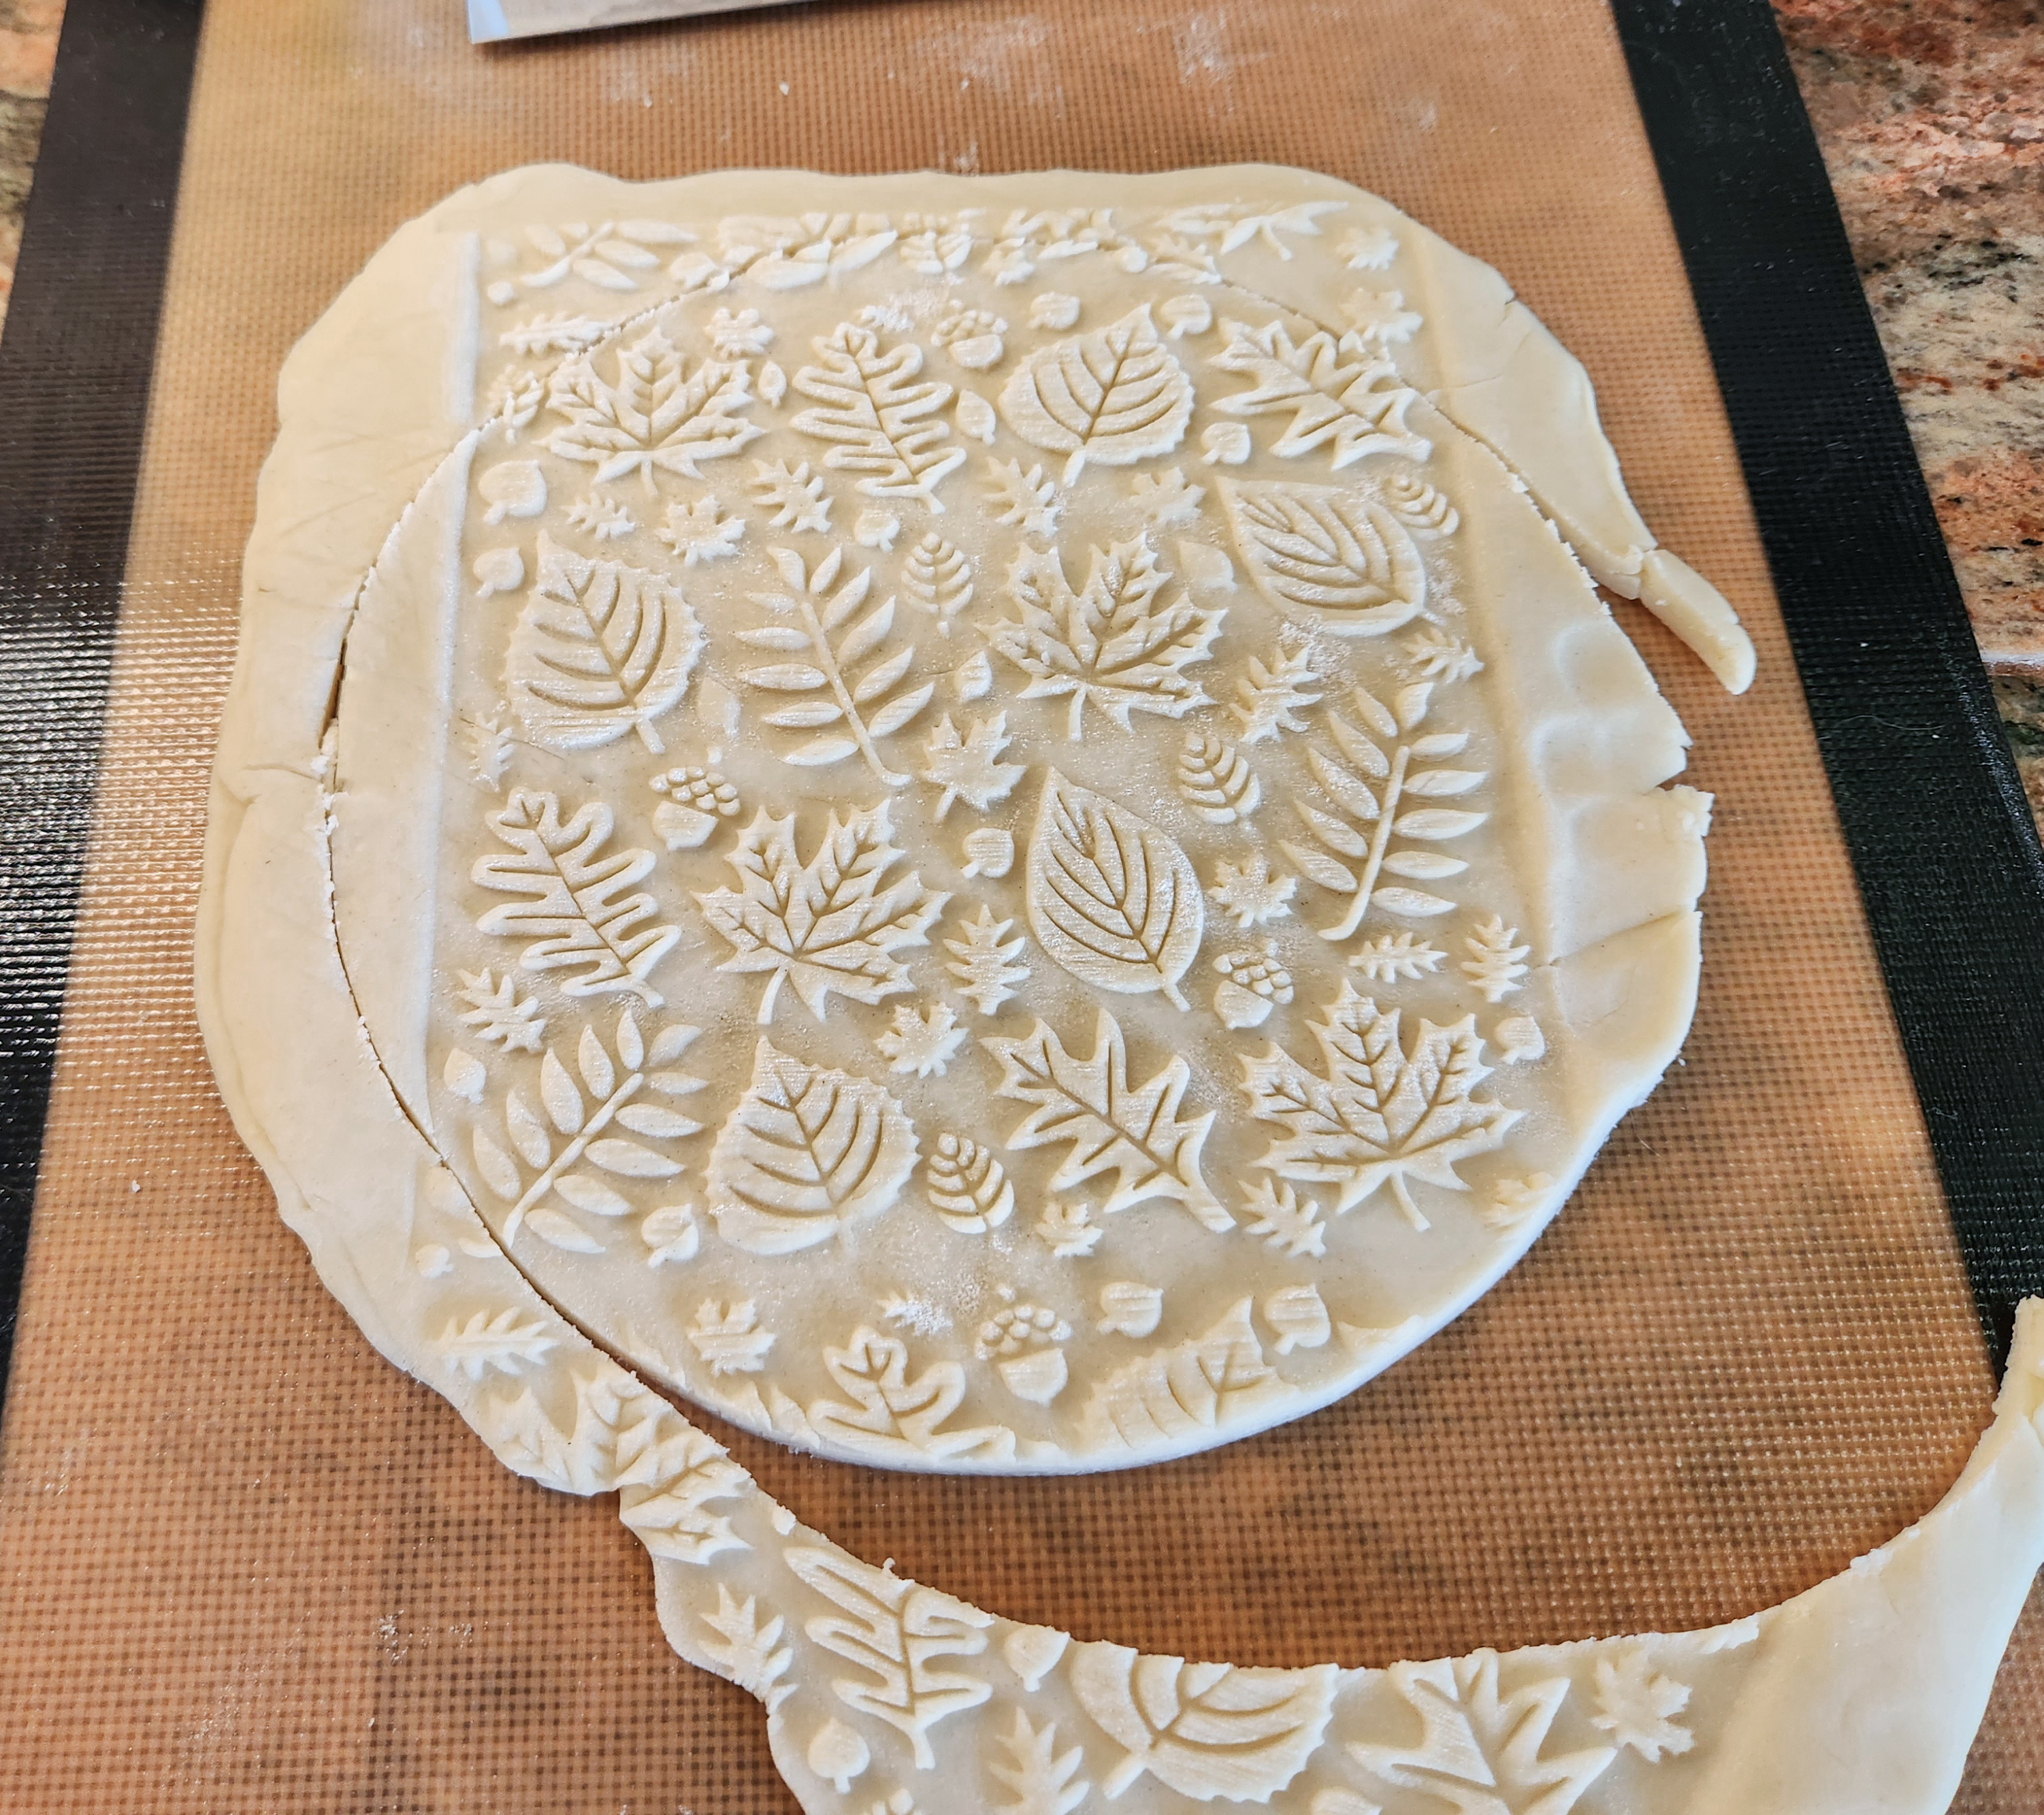
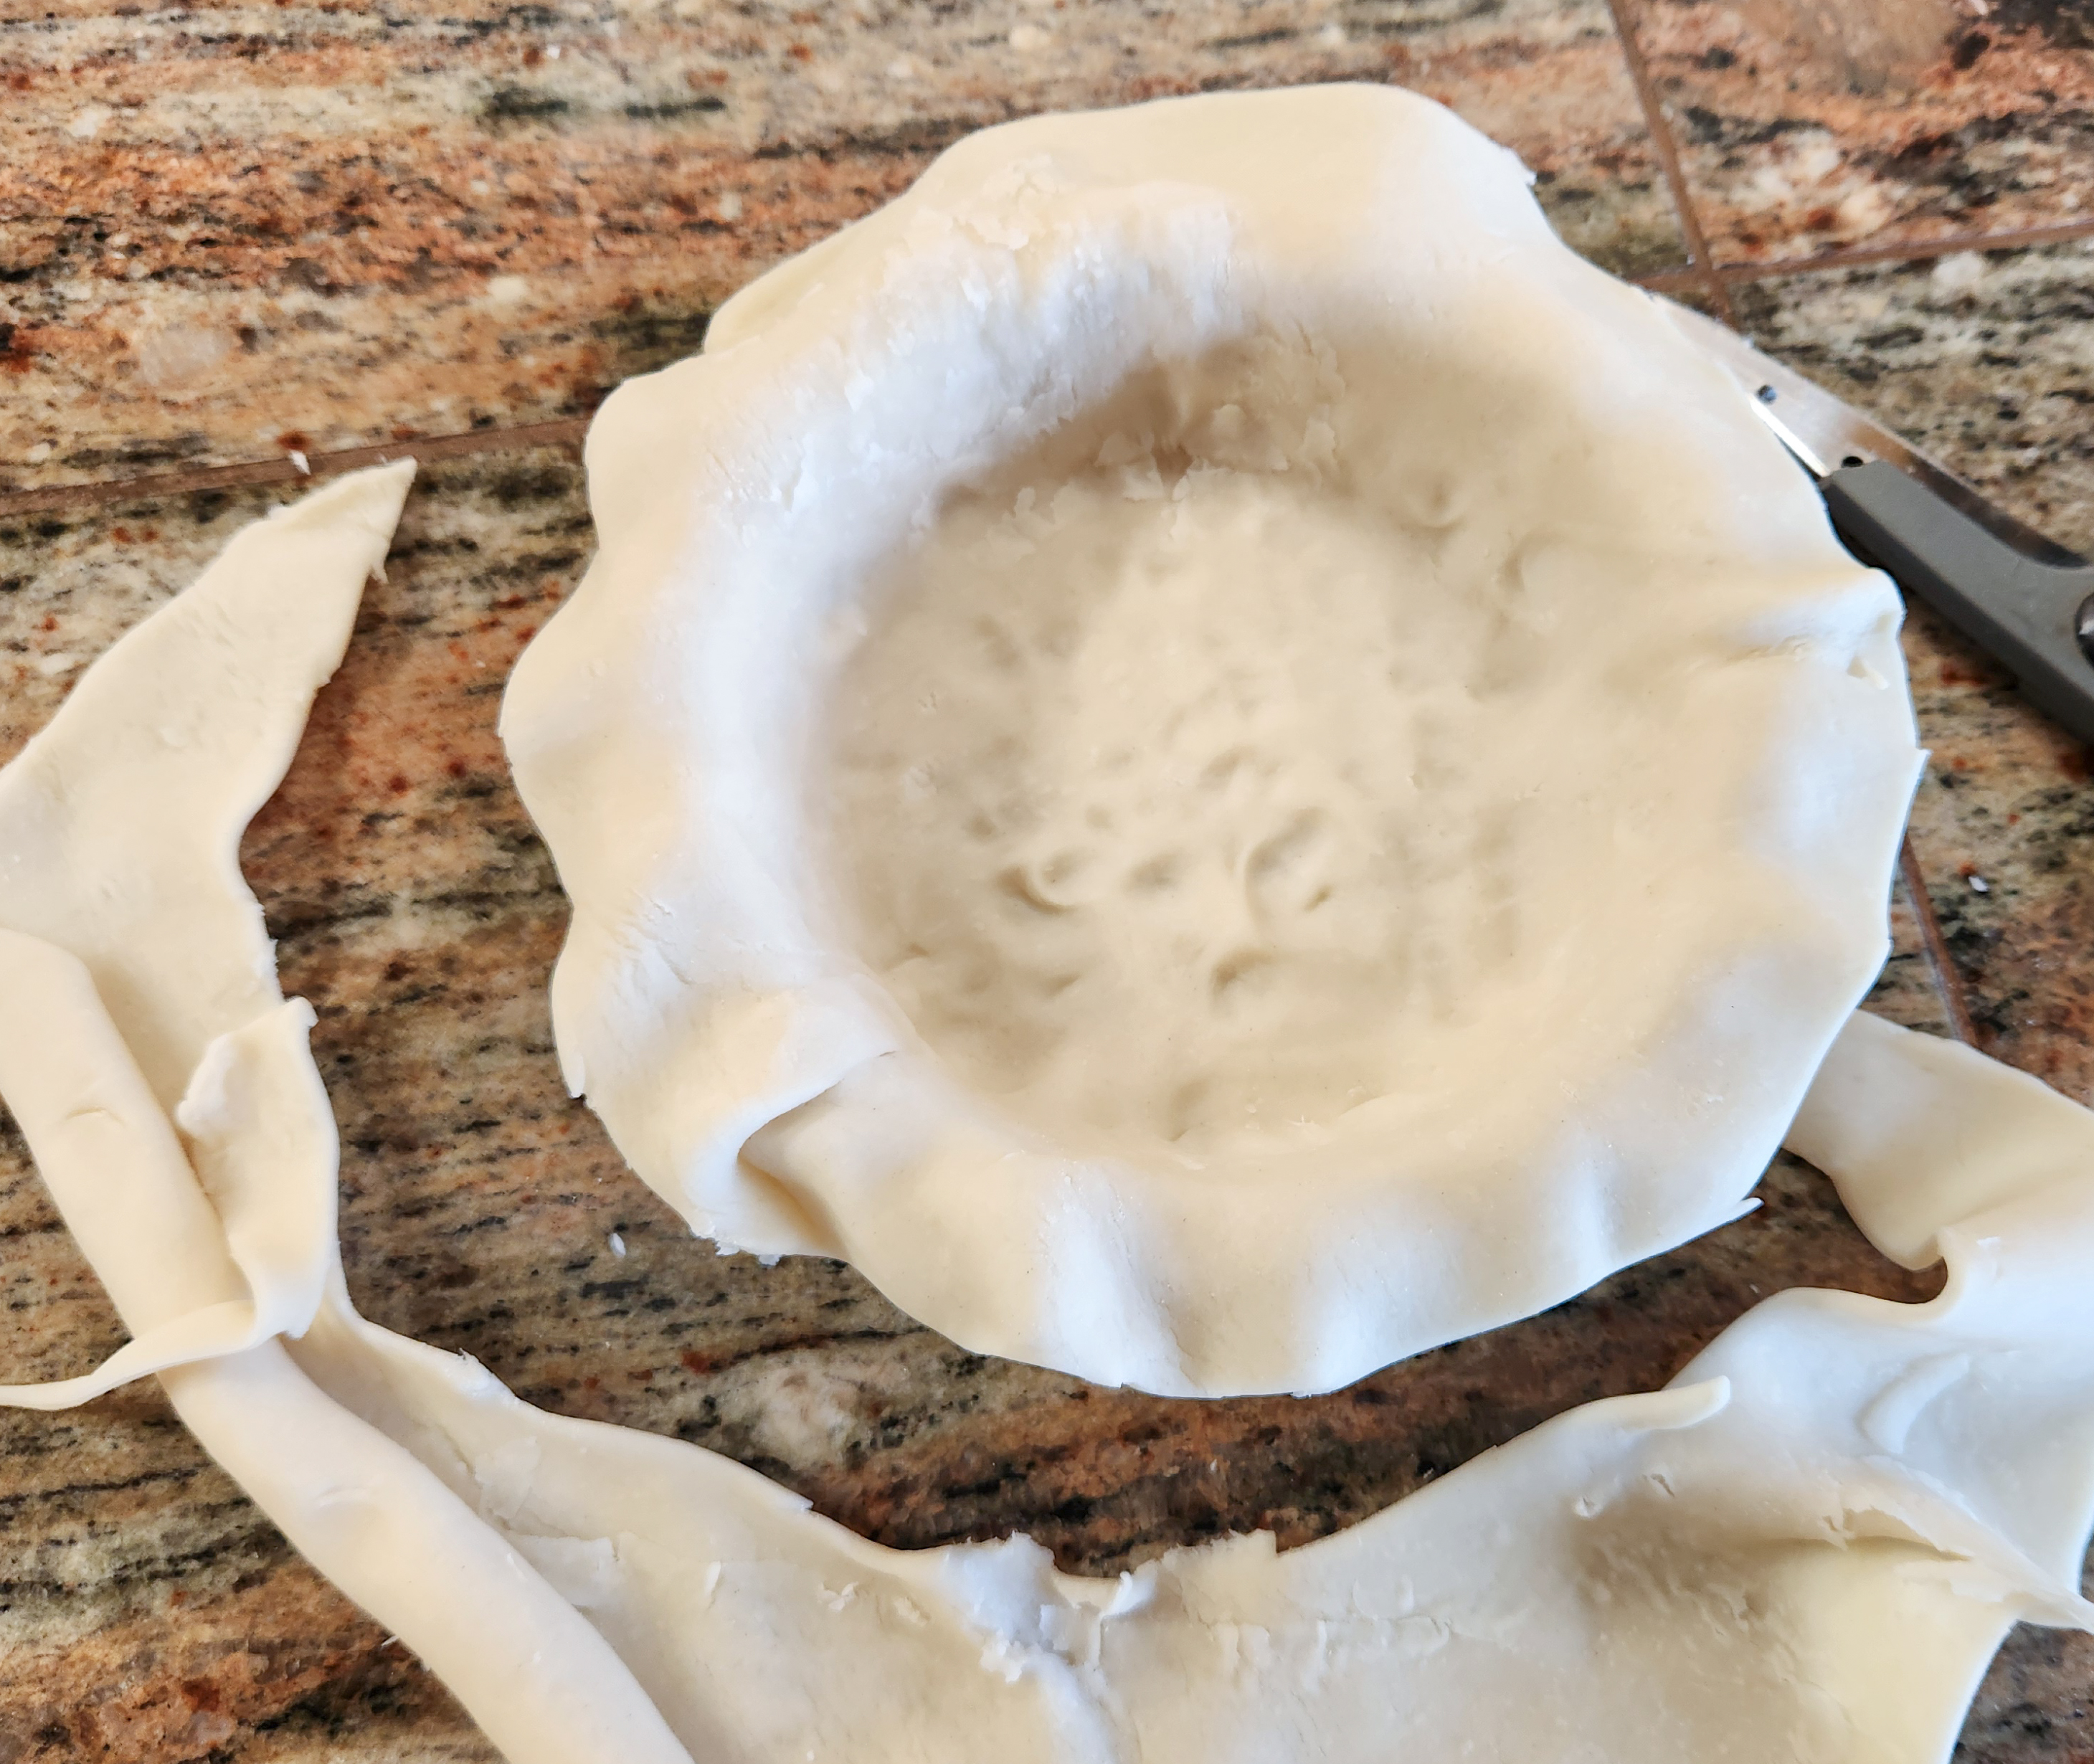
Cut out a circle of this dough that’s about an inch to and inch and a half WIDER than your pie dish. It helps to cut out a paper or waxed paper circle and lay that on top of the embossed dough. Use a knife to gently cut your circle out. Scoop away the excess dough. You can smoosh the excess up and press it into your pie dishes as bottom crusts. Works like a charm! Keep it covered until needed.
Note: It doesn’t matter that the edges of your circle of dough are not patterned! That part will be rolled up together with the edges of the bottom crust to form the outer ring of the pie.

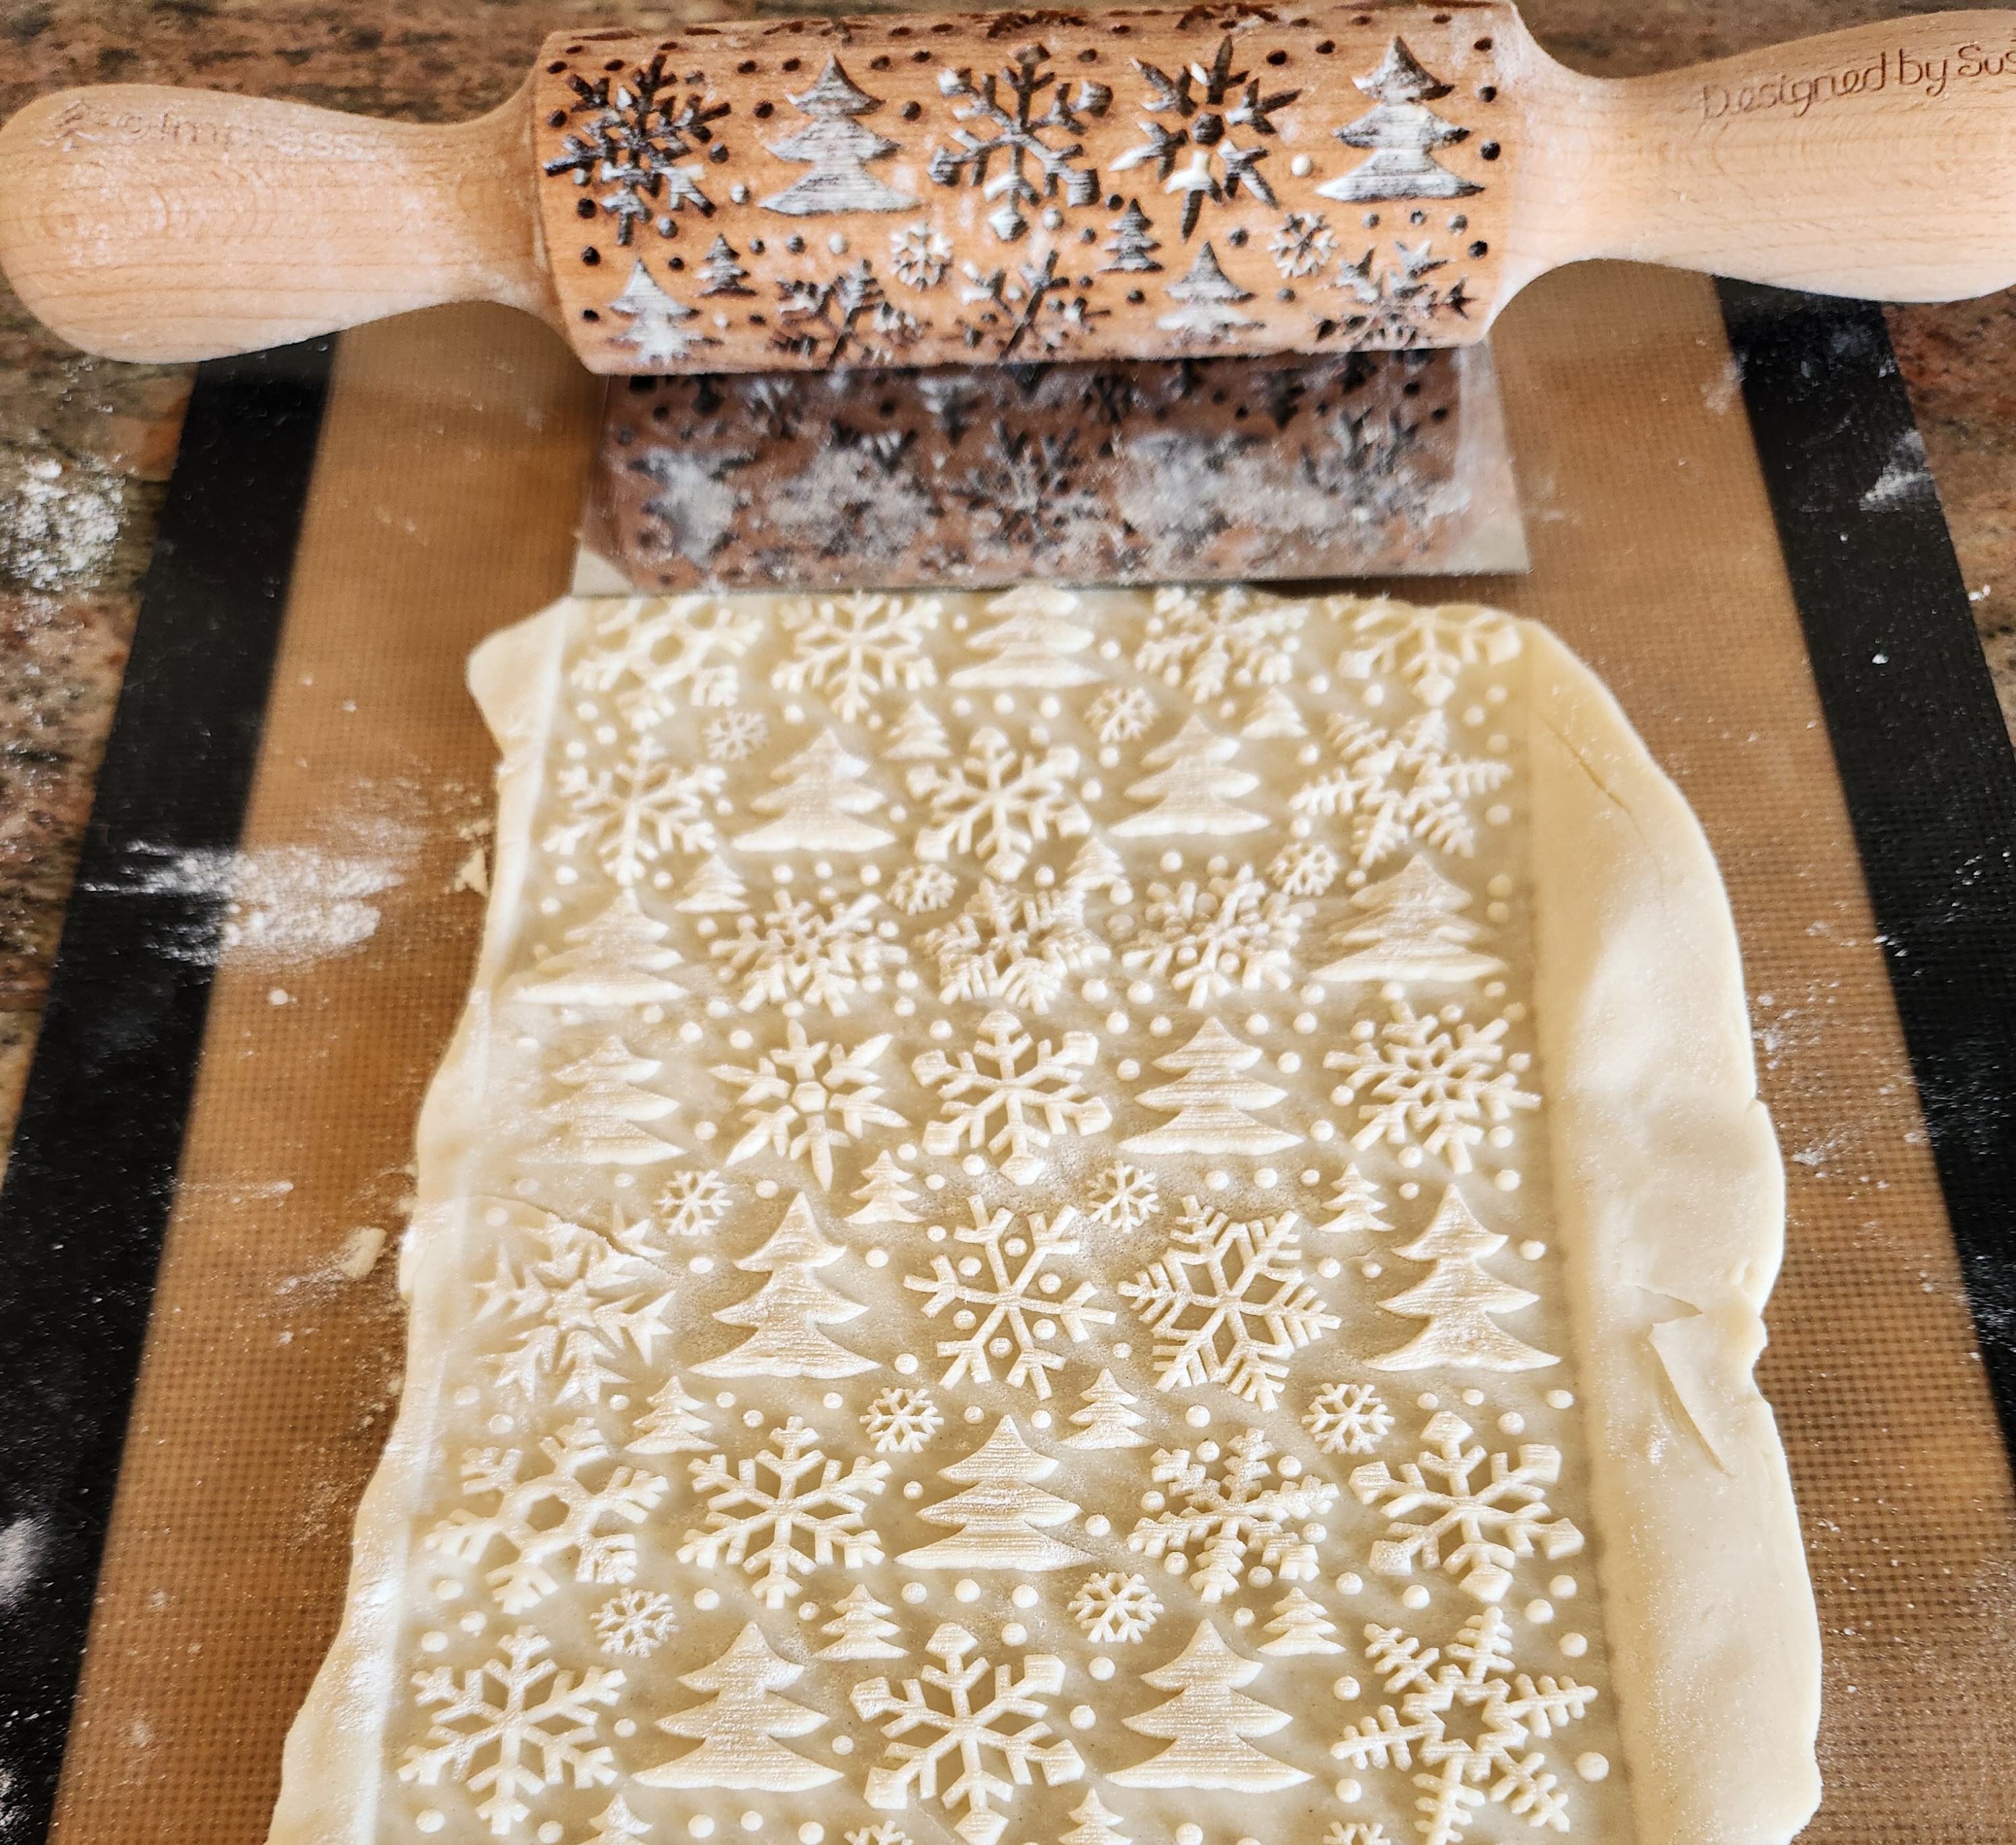
Here’s how the crust dough rolled out with the other pins:
Now place a crust round into the bottom of your first pie dish. Use shortening or butter to grease the bottom of the dish to prevent sticking. You won’t need the full big round of dough, so use your fingers to press it into the pan and cut away the excess with a knife or kitchen shears. Then sprinkle enough of your “crust dust” mixture (mix the sugar and flour together) on the top of this bottom crust. It helps keep the crust from getting soggy.
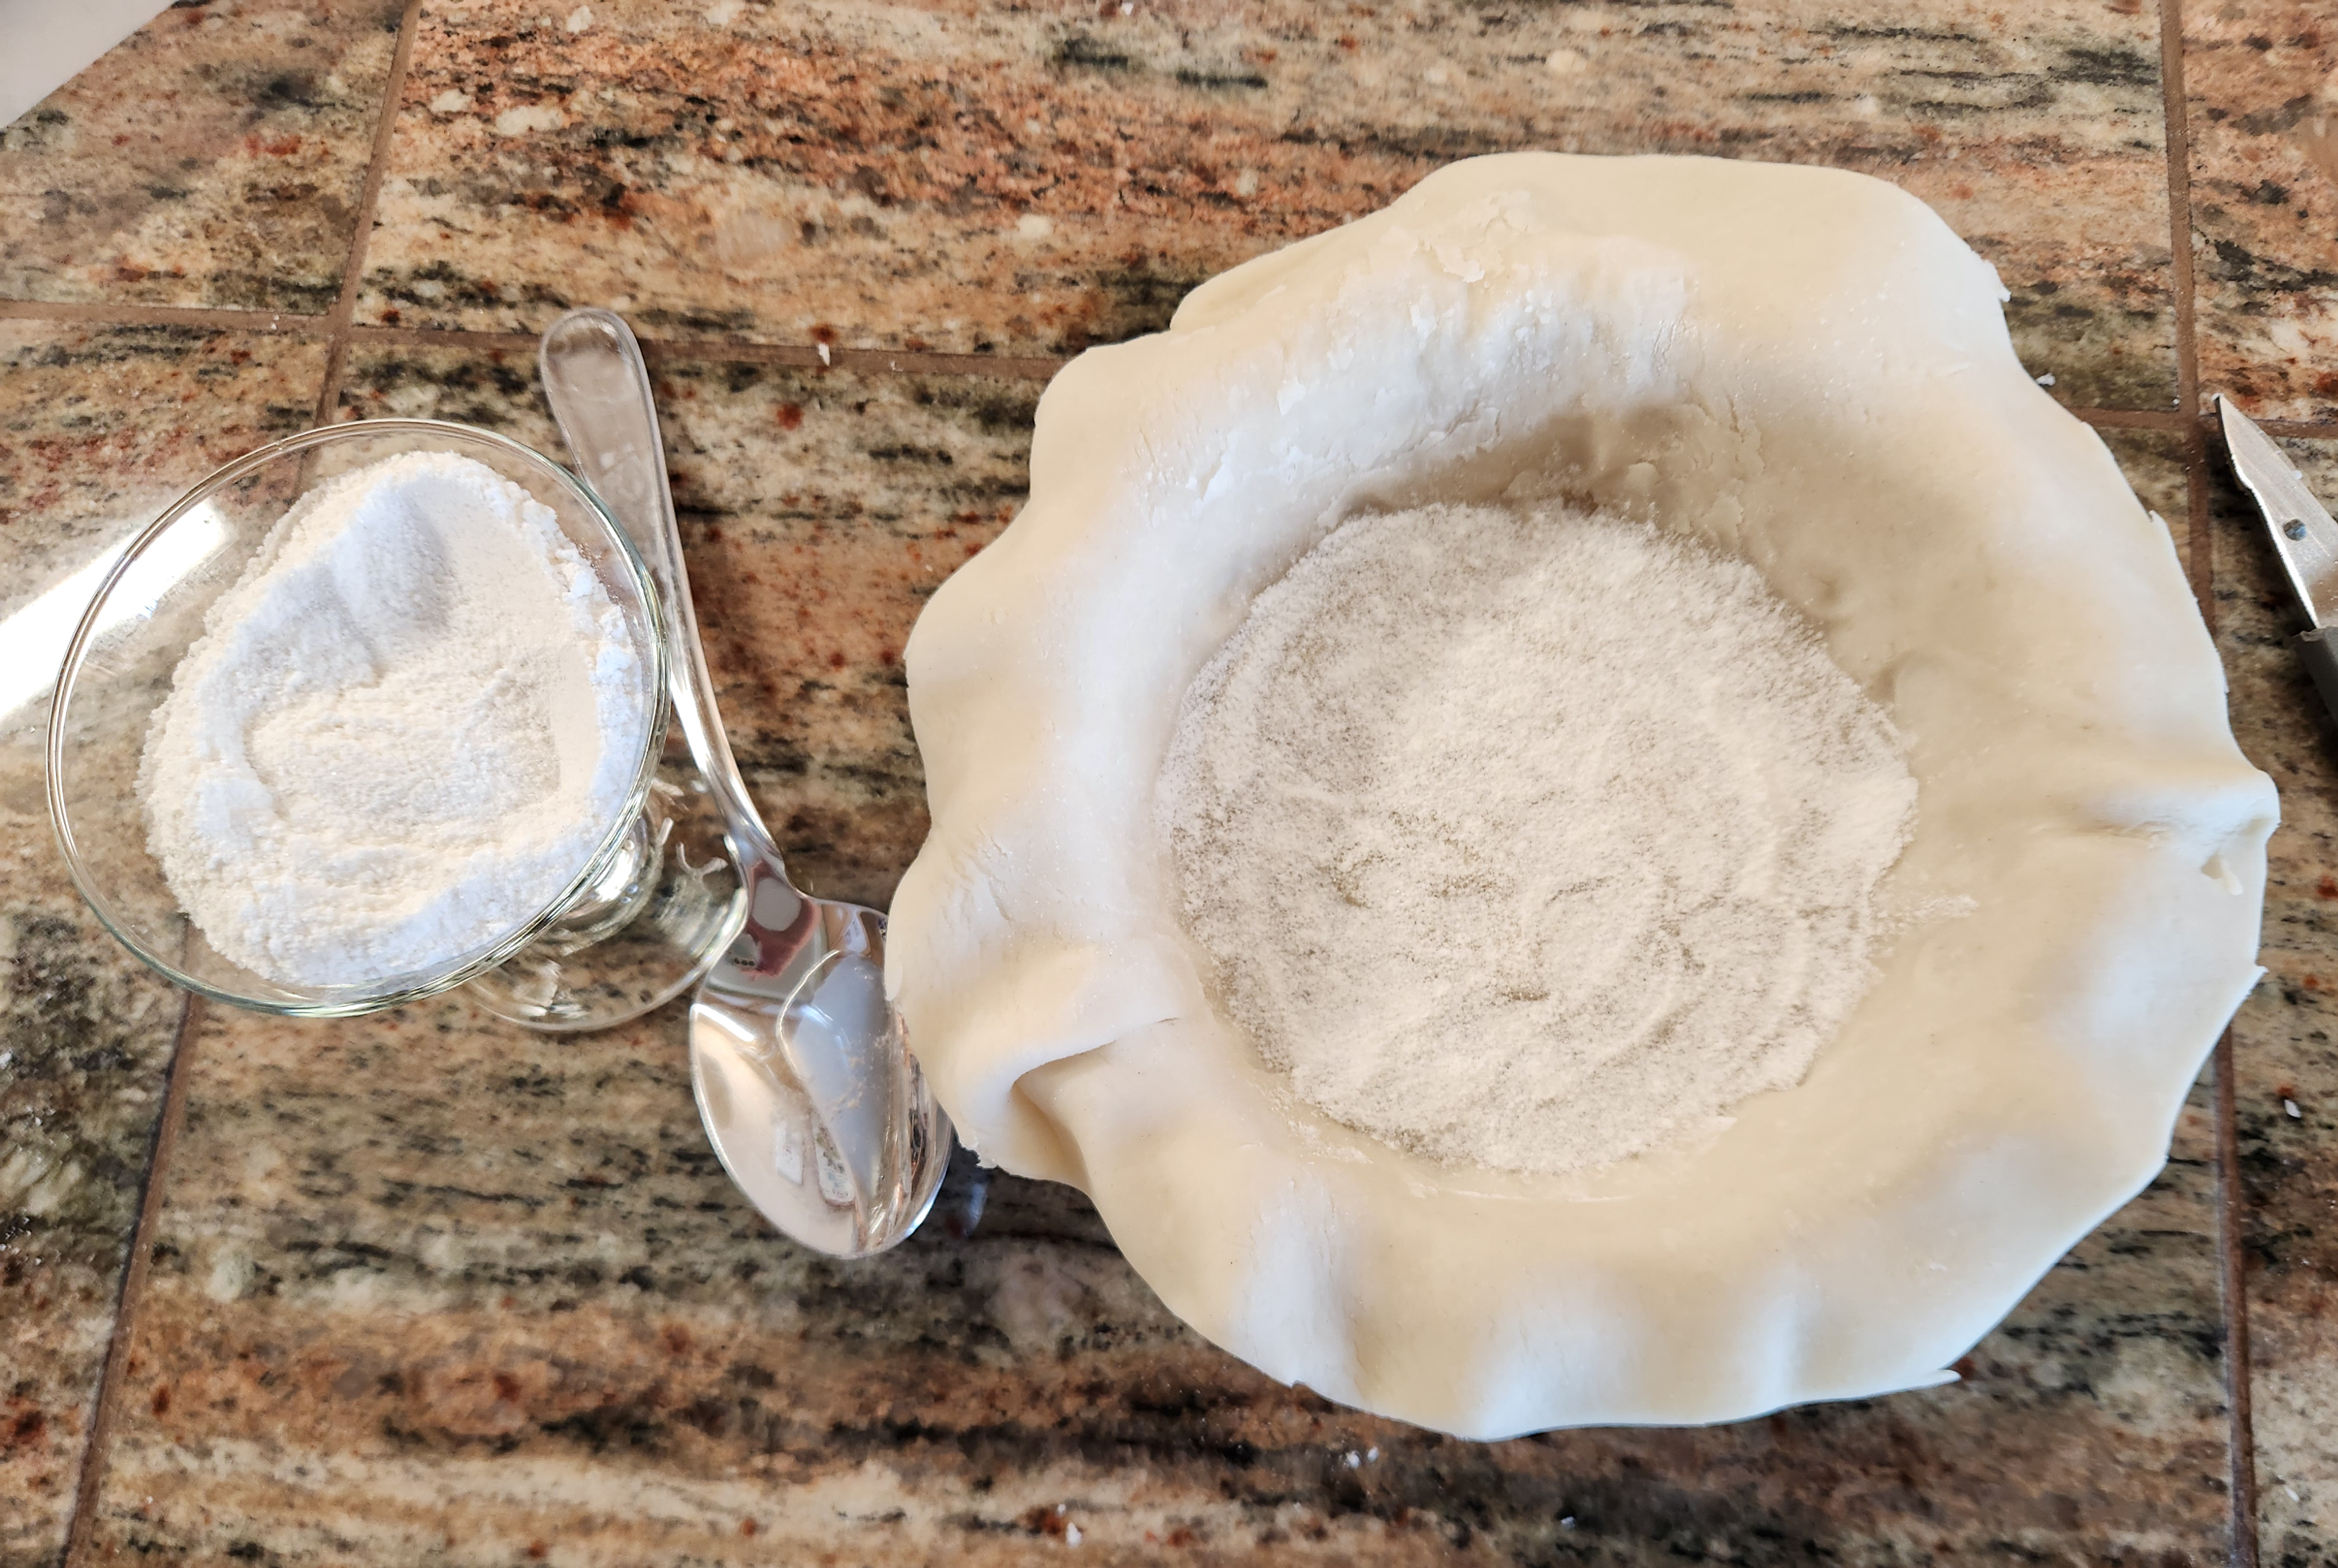
Again scoop away that excess dough to be re-used.
Time to layer in the apple filling.
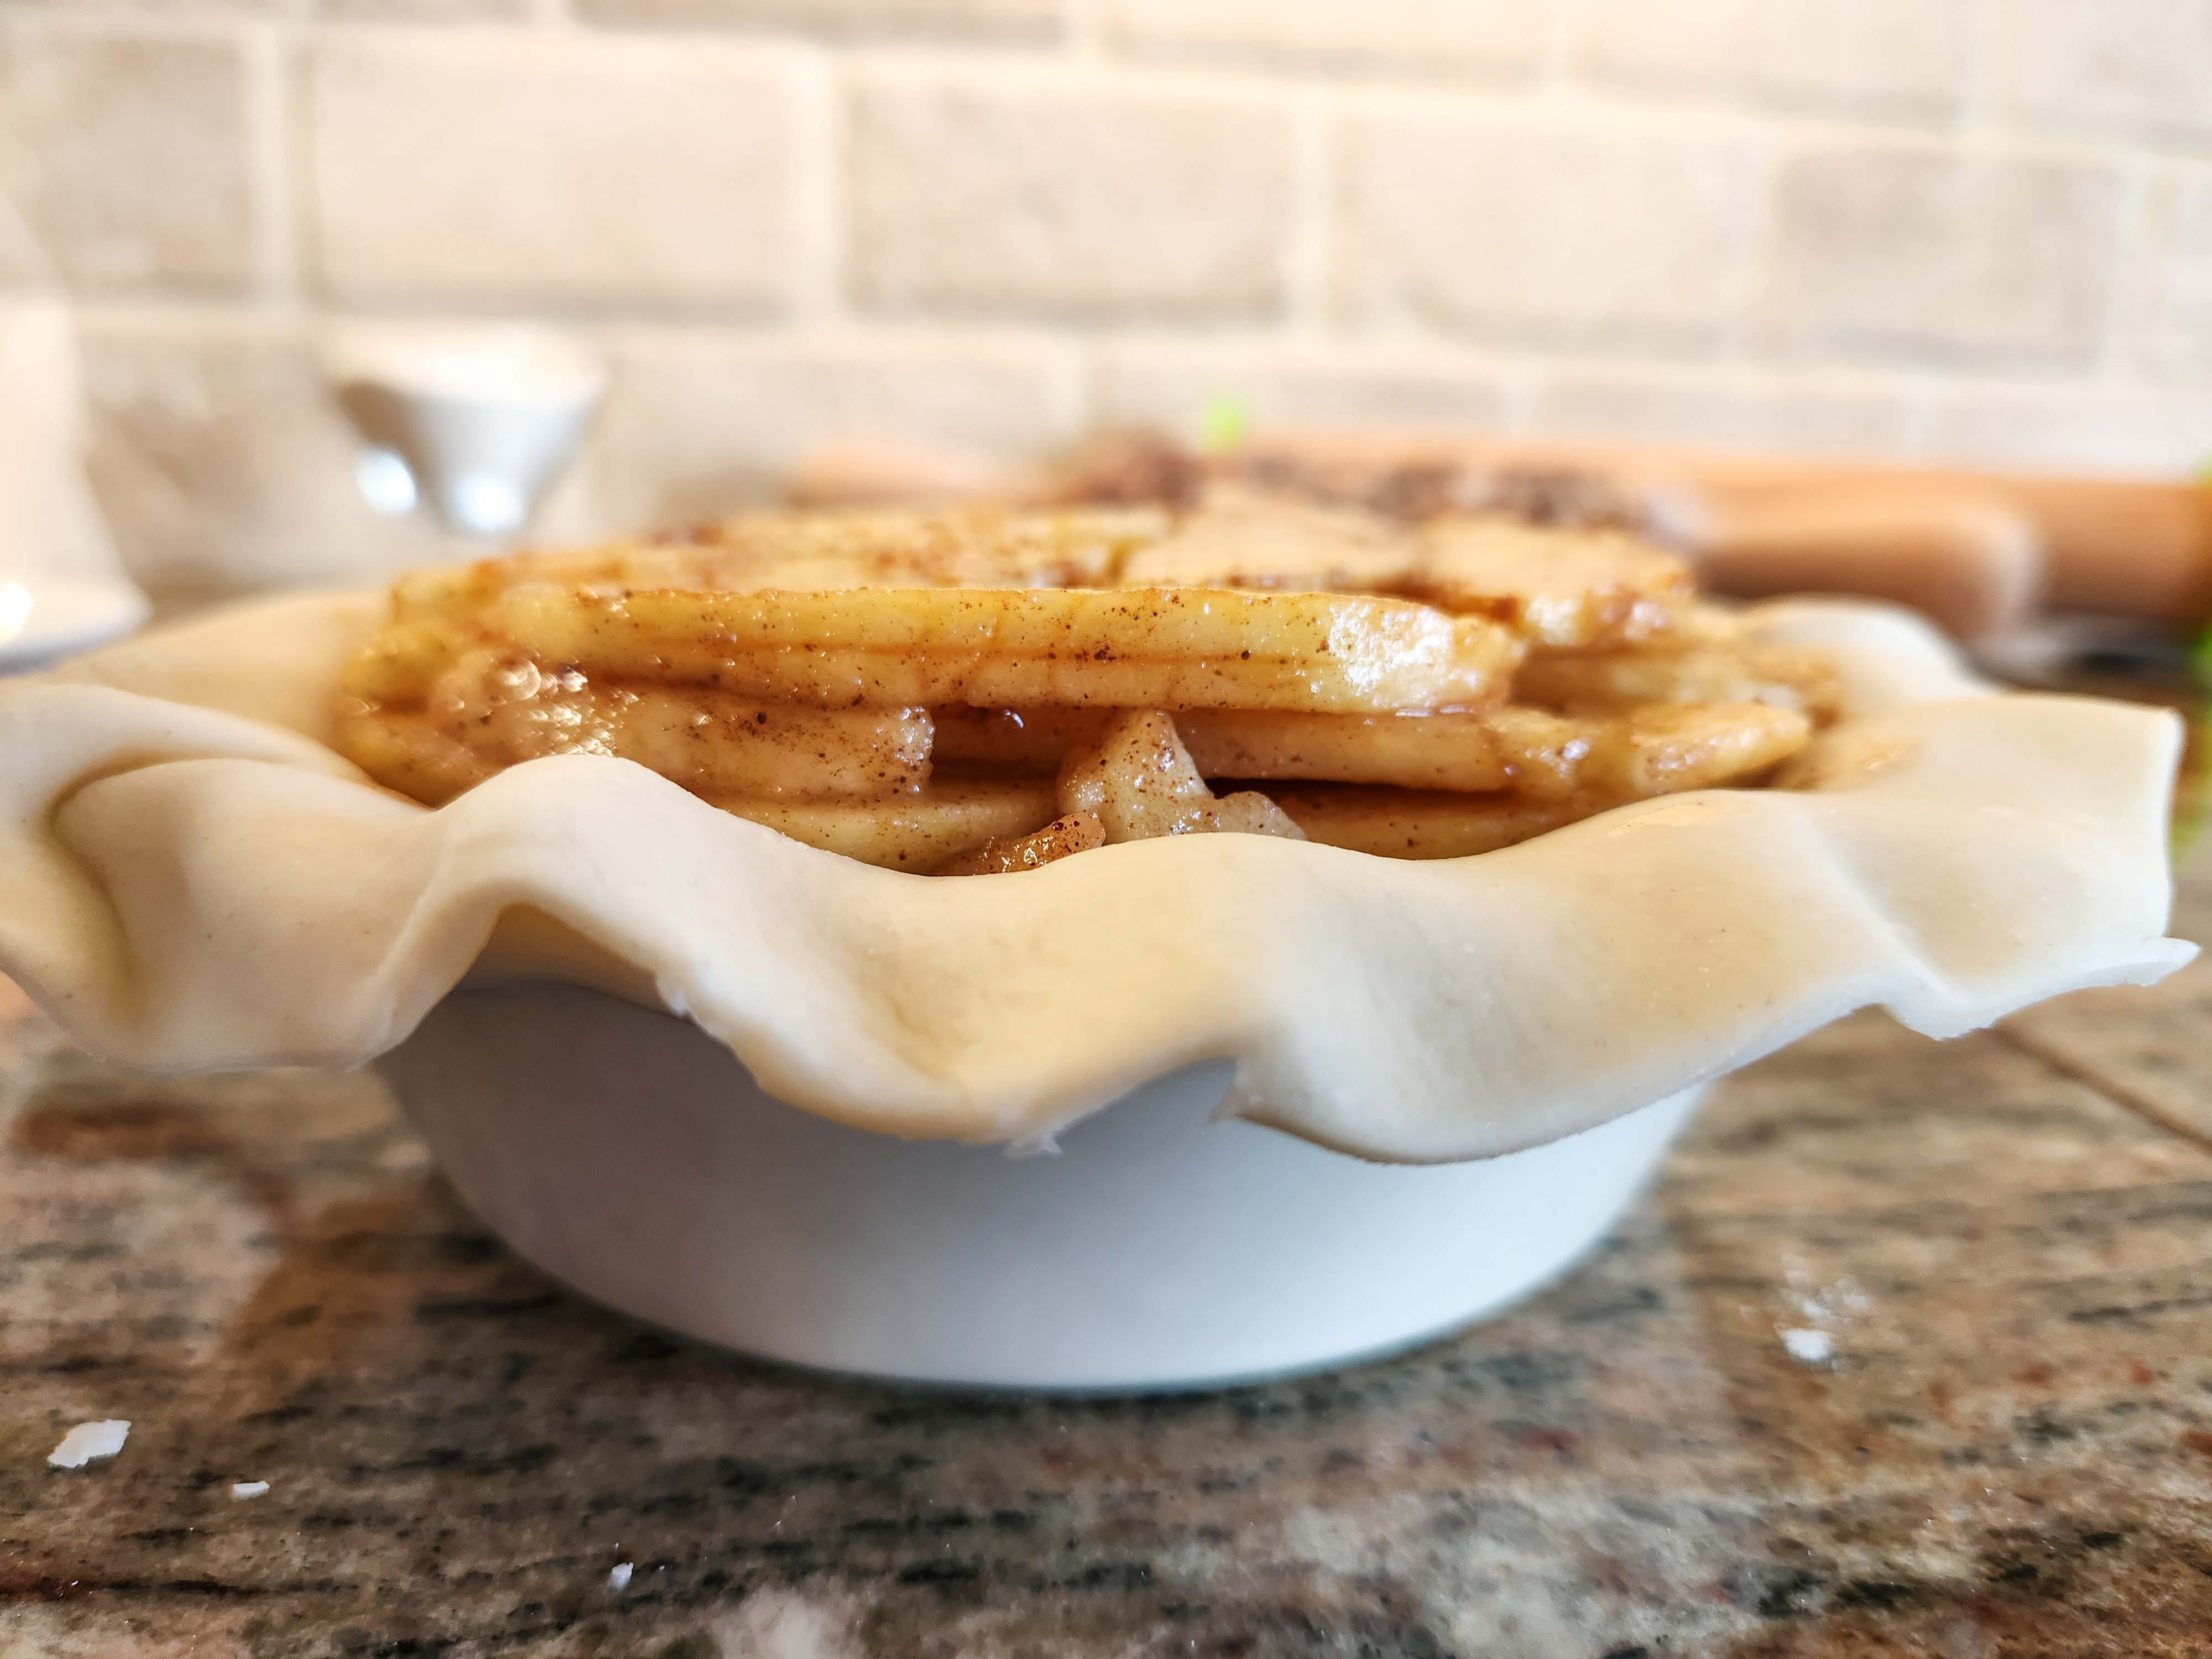
Hand-place your apple slices into the prepared bottom crust. Layer them flat, adding little dots of butter in between layers. Keeping the layers even and flat keeps the top crust even and flat by preventing collapses in the filling as the apples soften.


Stack and layer your apple filling nicely above the height of the dish. It will lower as it bakes and softens.
Now add that beautiful top crust!
Gently lift the top crust taking care not to tear it. Work slowly until you’re familiar with how it feels to peel it up. You can use a floured spatula to help loosen and lift it if needed. I was able to do it all by hand. If you made it thick enough it should honestly be pretty sturdy.
Center it on top of the pie filling. Place your pie dish on something grippy like a silicone mat. It will be easier to work with if it isn’t slipping around. (A slightly damp towel would do in a pinch.) Now start pinching the edges of the bottom and top crusts together, and rolling them up and inward as you seal them together. Wet the dough edges ever so slightly if they are too dry to pinch and seal together. Then you can flour your fingers to keep them from sticking to the dough.

Now flute the edges by placing a knuckle or fingertip on the inside edge of this crust ring, while pinching your finger from the outside of the ring. This creates a lovely wavy pattern along the edge. Here I did that with the Snowflakes & Woodland Pine Trees embossed pie.

Here’s how the Fall Leaves pie looked.


And here’s how the pies looked with the Snowflakes Large Designs and Pinecones & Cardinals pins.


(EDIT after I published this recipe! Someone asked on social media how I vented the pies. Great catch! I did not show it and I meant to. Full transparency, I kept forgetting to add the slits in the top to vent. But, my fingers had pierced the crust as I rolled and crimped the edge. They all vented that way, along the edges. I meant to add that info in this recipe, so I’m editing it in now. Thanks to the commenter for the keen observation, it’s appreciated!)
Time to bake!
Preheat your oven to 400°F.
Sprinkle some coarse sanding sugar on top of the pies for a sweet sparkle.
*Important note!* Please do not add any kind of “wash” (like egg wash or milk or cream) to the crusts. They will cause the patterns to lose their definition as the pies bake!
Cut out foil pie shields to protect the edges from browning. Make them a couple inches wider than your pie dish, so they can wrap over the edges. You can use your paper guide from the dough as a guide for this. Maybe make the foil a touch wider to make sure it covers down the edges. Then cut out a smaller circle on the inside.

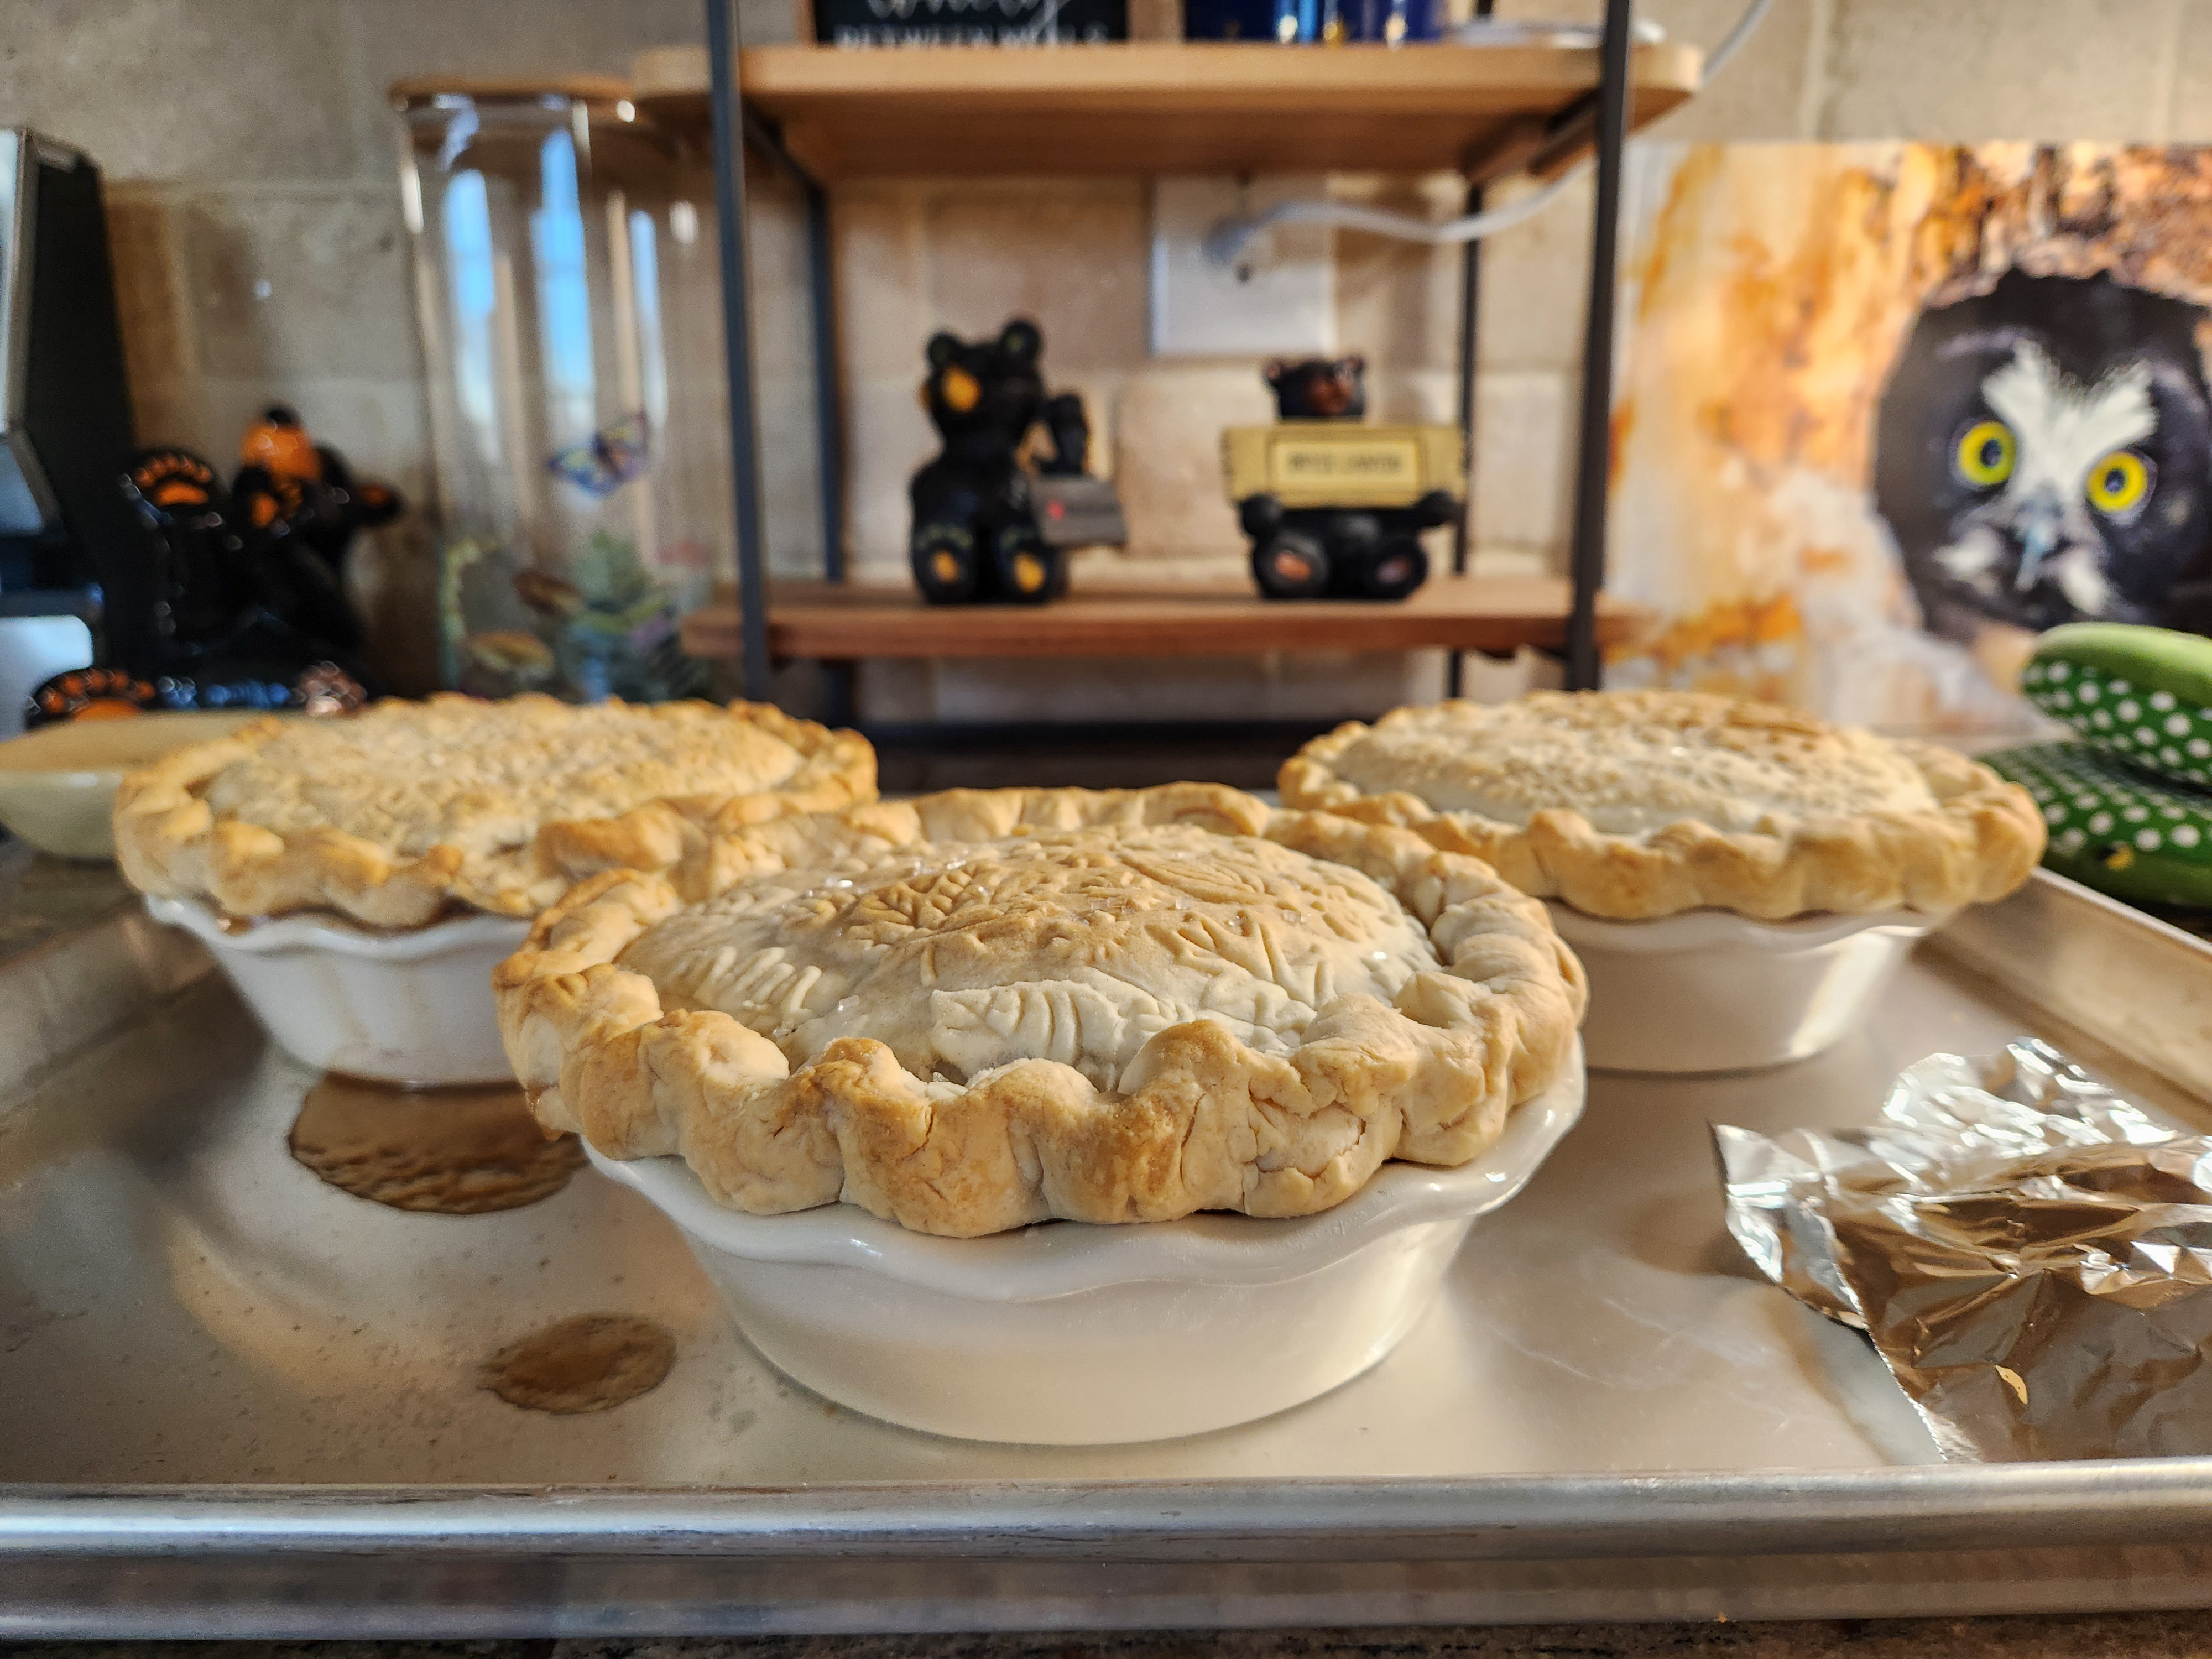
Finish all of your pies, however many you decided to make. I made three at once and made my fourth the next day in a separate recipe.
Place them on a baking sheet to catch any drips.
Bake at 400°F for about 25 minutes, or until you see some slight browning on the tops.
Lower the temperature to 375°F and remove the foil shields. Bake for another 20-25 minutes or until you see some filling liquid bubbling out! If any parts of the crust are browning too much, simply place a small piece of foil over that area to slow that spot down and let the other areas brown and catch up. I honestly forgot to lower my temperature and they turned out fine. FYI. 😉
When they’re nicely browned to your preference and the filling is boiling over a bit, they’re done. Remove from the oven and set aside to cool.

That’s it! Enjoy your mini apple pies! May you all have happy and beautiful Holiday gatherings. ❤

🙏We have a request💕 If you’re enjoying our recipes, *EVERY DISK & PIN PURCHASED helps us stay in business* & supports our families! Impress is a women/family-owned USA small business in Colorado. We design, make, & sell over 300 shapes of cookie press disks & dozens of embossed rolling pins. The recipes we share are free – we have no ads on this recipe blog – we make our money selling disks & pins. The recipes give our customers creative ideas and attract new customers!💕 THANK YOU! 💕~Susie the Disk & Pin Designer
Happy baking!
~Susie
Disk Designer/Co-Owner at Impress! Bakeware, LLC
Our website has all of our 300+ disk shapes, cookie press, embossed rolling pins, baking accessories plus more about our Women/Family Owned company! impressbakeware.com
All products are on our Etsy shop.
Our Amazon shop has our cookie press and disks and embossed rolling pins.
Follow us on facebook!
**Two more pin ideas! For a more whimsical, festive look for the holidays, you could try our Thanksgiving or Christmas pins, too! I think the large design version of both would work especially well. Here’s the photos from our product listings of these pins, shown with rolled cookie dough and baked cookies (some painted with luster dust). They would make adorable pies. ☺️


