
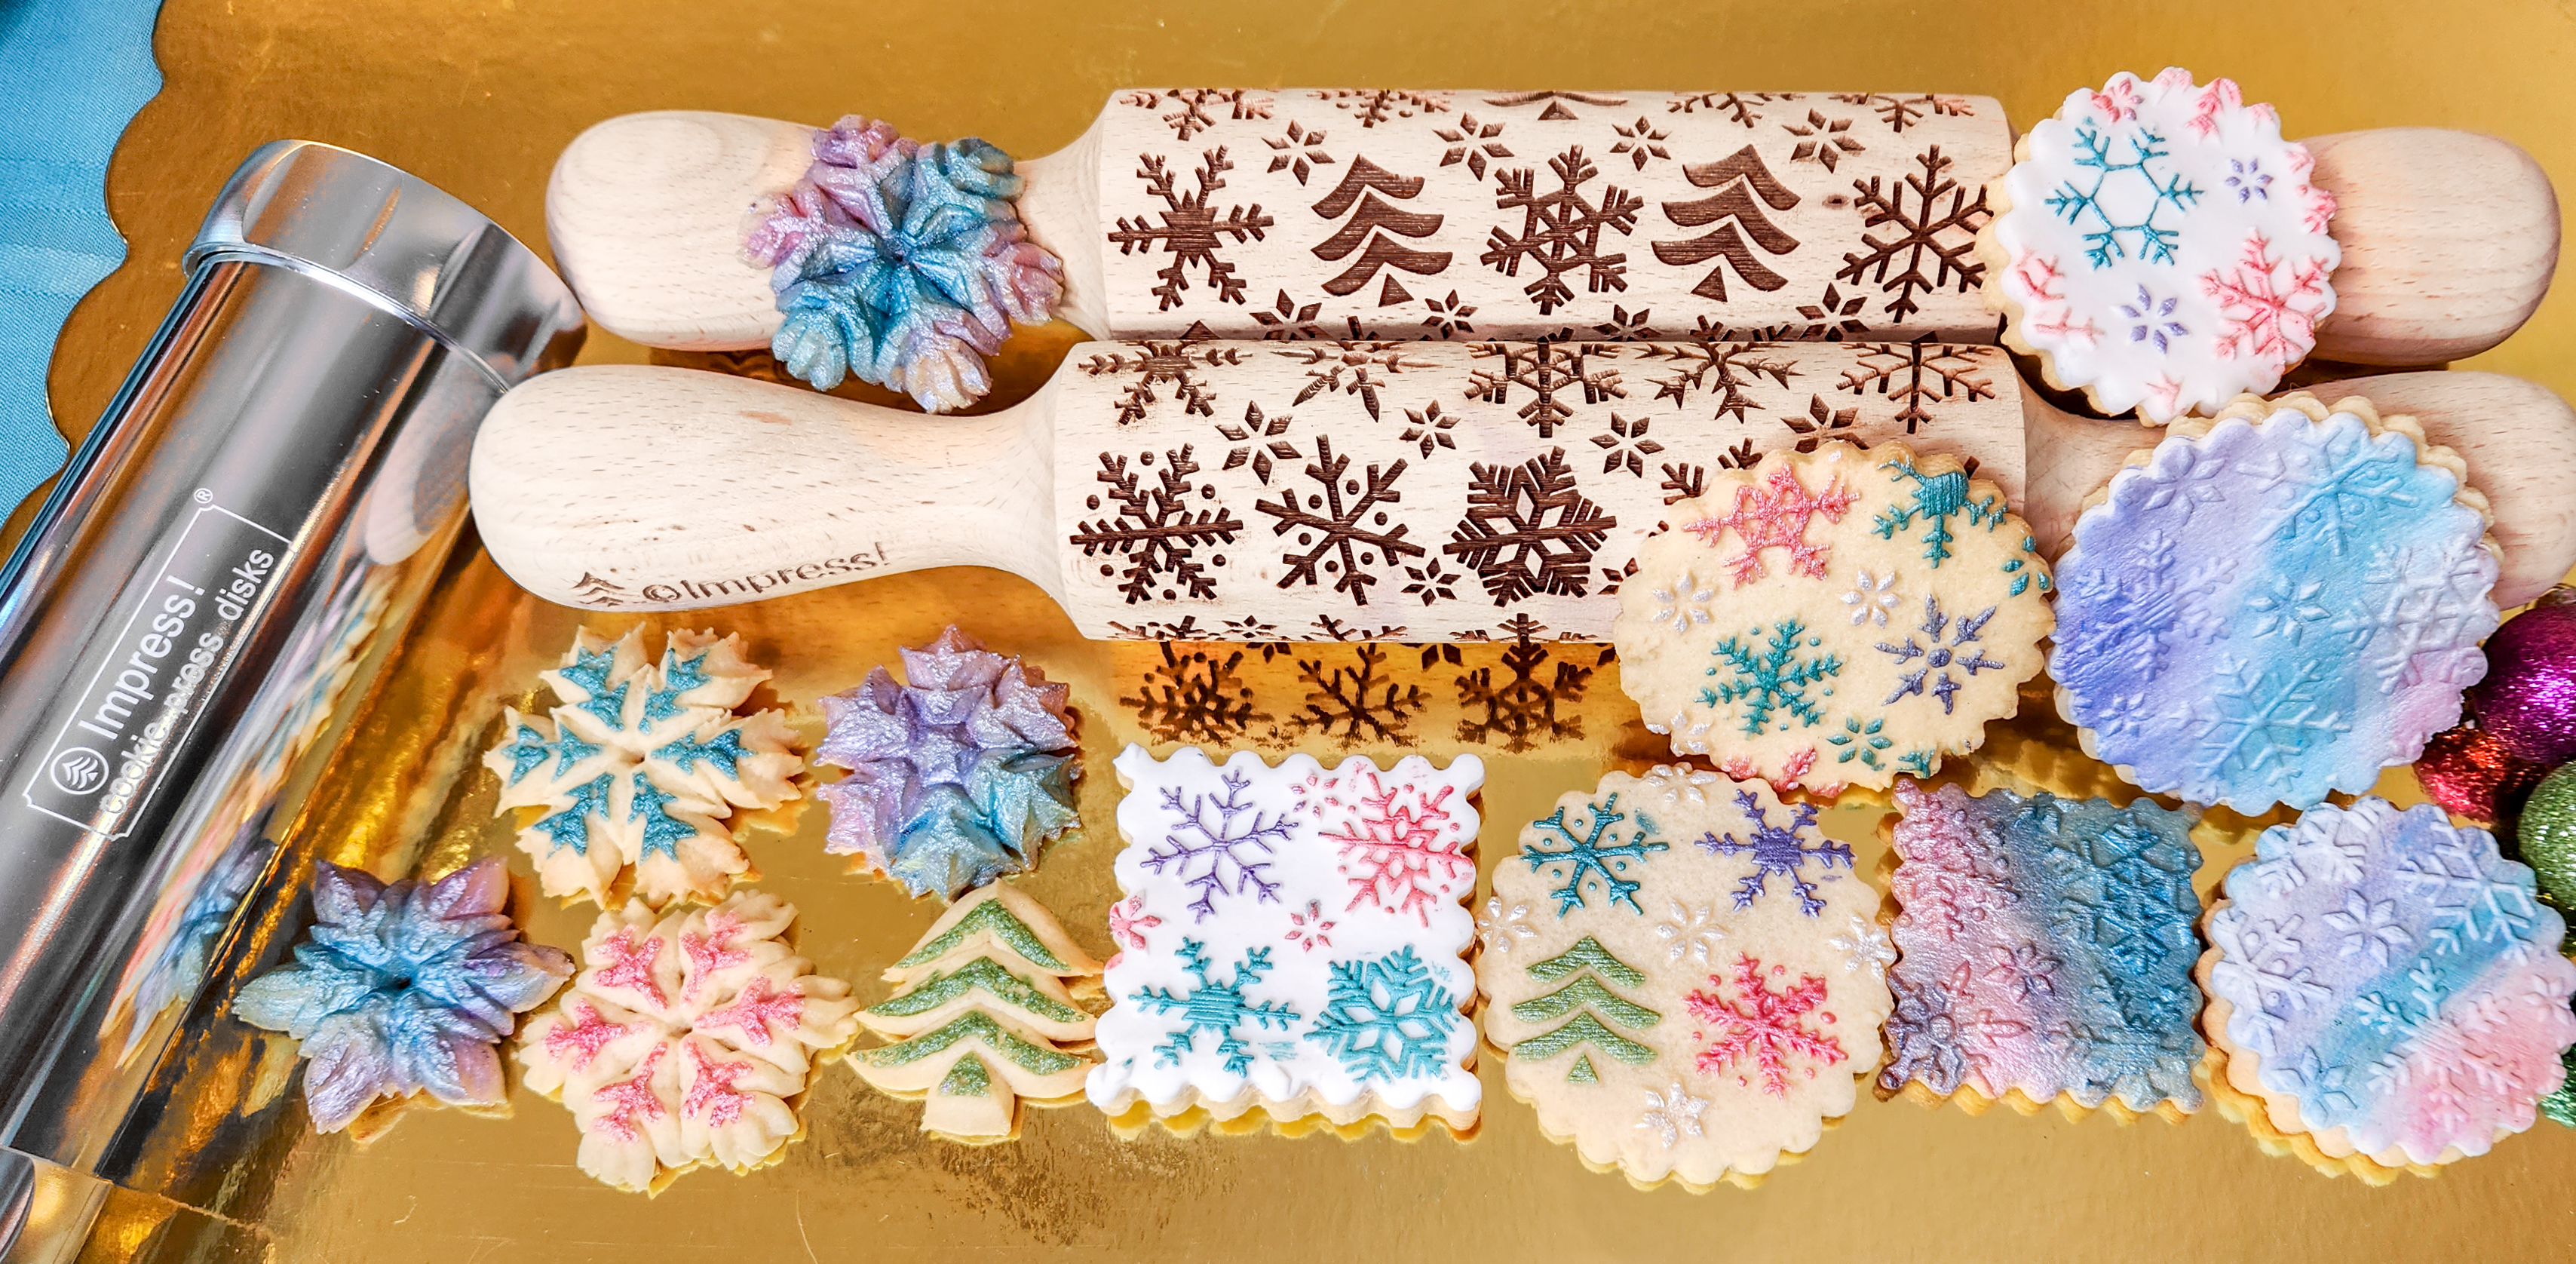
This post was completely photographed and half written when I had an epiphany. I realized that the luster dust painting techniques I was showcasing would work well on spritz cookies, too. I thought, hmmm… can you press this dough as well as roll it? Turns out you can! The dough just requires a slight tweak to be pressed.
So I made and decorated some spritz (pressed) cookies and voila! Big recipe blog full of all kinds of ideas for you! Make just rolled or just spritz, or make both, your choice. I also topped some of the rolled embossed cookies with decorated fondant icing. Super yummy. 😋
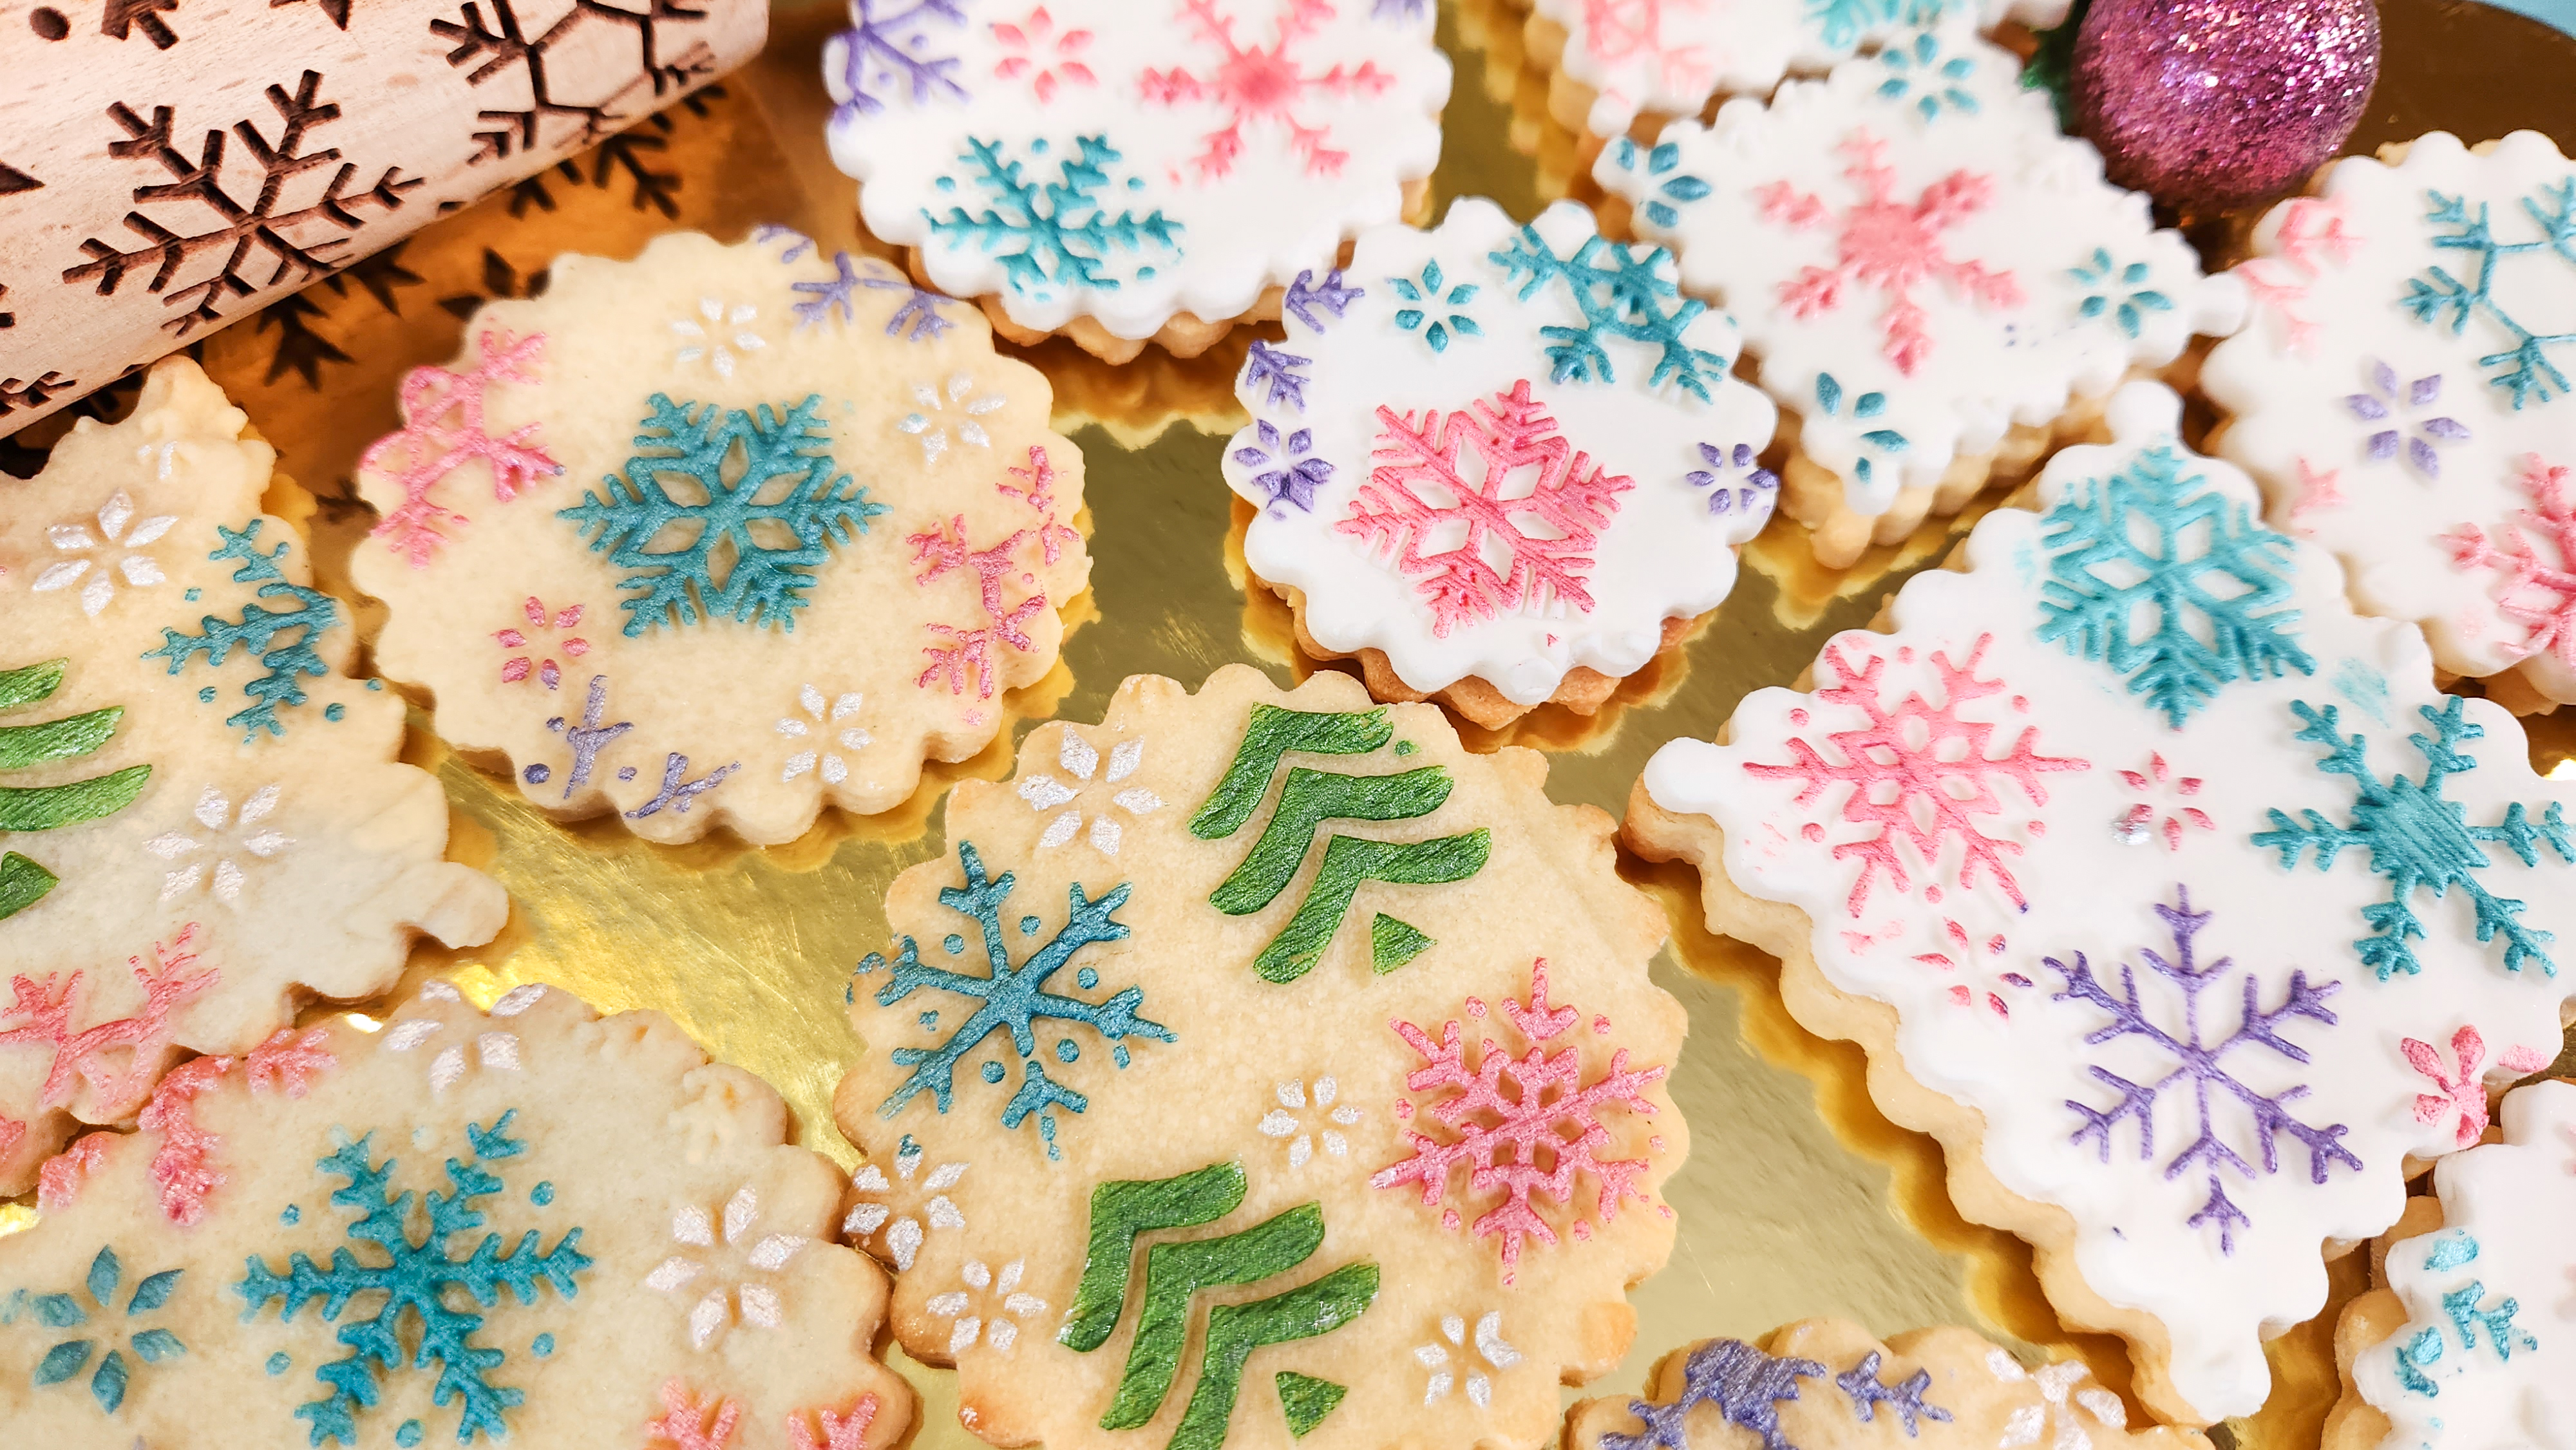
❄️Most of these pretty little snowflakes got their shimmer by finger painting using edible luster dust. The raised snowflake shapes on the embossed cookies and fondant, and the ridges of the spritz cookies, stand up just enough that a fingertip with paint will only leave color on the snowflakes. How cool is that? There are video clips below showing all techniques.


For the tie-dye look on the fondant icing I finger painted (smeared) luster dust over it and then rolled the fondant out. Cut out some shapes, set them on cookies and voila- beautiful iced snowflake cookies.

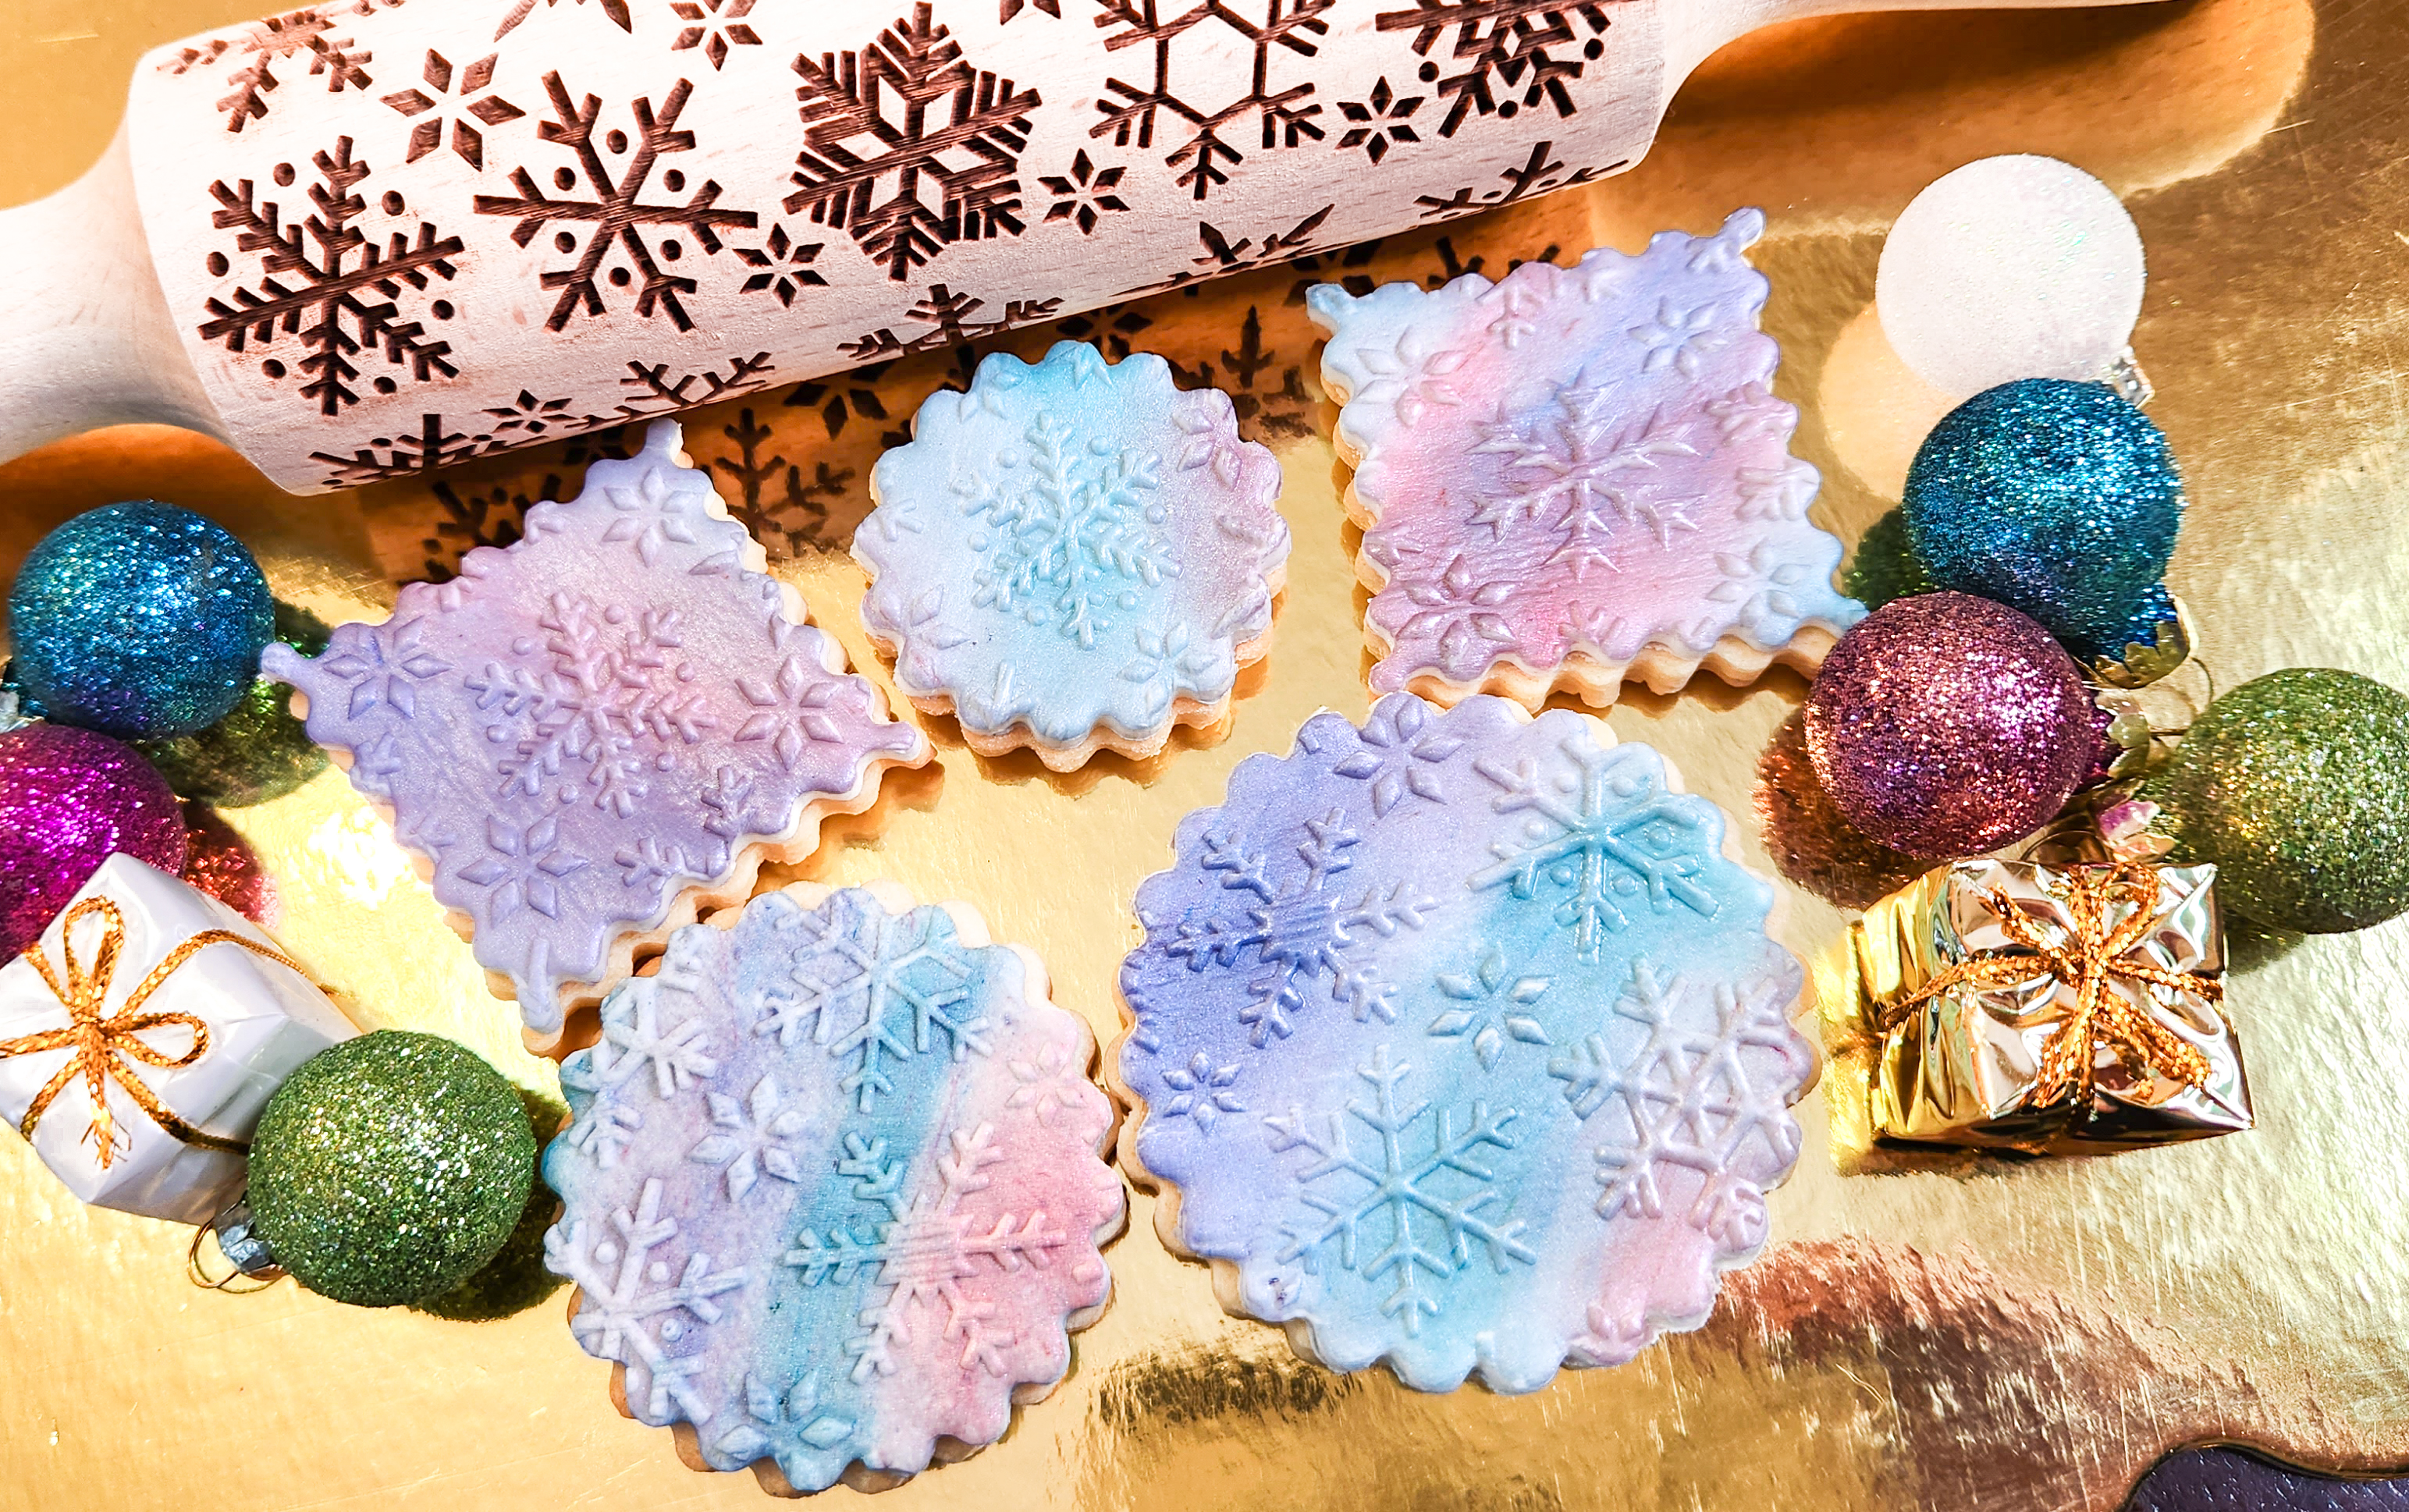
Of course then I realized that I could tie-die the tops of embossed cookies, too. The darker tie-dye embossed and spritz cookies were easily, quickly dry brushed with dust. Amazing what an intense look can come from such easy techniques!

These beauties are made with my Vanilla-Honey Rolled Cookie recipe. It makes a rich butter cookie with a wonderful texture and intense flavor. Whether you roll them or press them you’re going to love the flavor it packs!
Here is our snowflakes cookie press disk set if you’re not familiar yet. List of presses disks fit on our website.

Our website has all of our 200+ disk shapes, cookie press, embossed rolling pins, baking accessories plus more about our Women/Family Owned company! impressbakeware.com
All products are on our Etsy shop.
Our Amazon shop has our cookie press and disks and embossed rolling pins.
🎉 “Tis the Season!” 15% off SALE❗
🎄Make edible art for the Holidays, because baking should be fun!
Discount on our cookie press disks, cookie press, embossed rolling pins, luster dusts, cookie cutters & baking accessories. Sale November 26 – December 10, 2025, on our website and Etsy shops ONLY! (Links above) Sale excludes holiday gift sets and our recipe book.
I included video clips of everything you need, as well a written instructions.
Ok let’s bake and have some sparkling snowflake fun! 🙂 ❄️
Impress! Vanilla-Honey Rolled Cookies
1 cup (2 sticks) butter, softened (not melted)
1/2 cup granulated sugar
1/3 cup honey
1 teaspoon vanilla extract
1 egg
3 3/4 cups all-purpose flour
1/4 teaspoon salt
Note: For a gluten-free option simply replace the flour with a 1:1 substitute like King Arthur’s Gluten Free Measure for Measure.
In a large bowl, combine flour and salt. Set aside. Using an electric mixer, cream the butter. Add the sugar and cream together very well, until it is light and fluffy. Add the honey, then the vanilla, and the egg, re-creaming the mixture after each addition. Add the flour mixture slowly, mixing on a slow speed until a workable dough forms. Make sure all of the flour is incorporated evenly. Knead it a bit by hand to make sure it is uniformly smooth and mixed. This dough can seem crumbly at first but it kneads together well. Perfect rolling dough has a clay-like, workable texture that is not too sticky or too stiff. If it feels difficult to knead, it is probably too stiff. Add a little water or vanilla extract a teaspoon at a time until you achieve a workable texture. If it is too easy to knead or is sticking to your fingers, it is probably too soft. Add flour a tablespoon at a time until it is workable like clay.
IF you are dividing this recipe to roll half and press half, divide your dough in two. The first half is ready to roll.
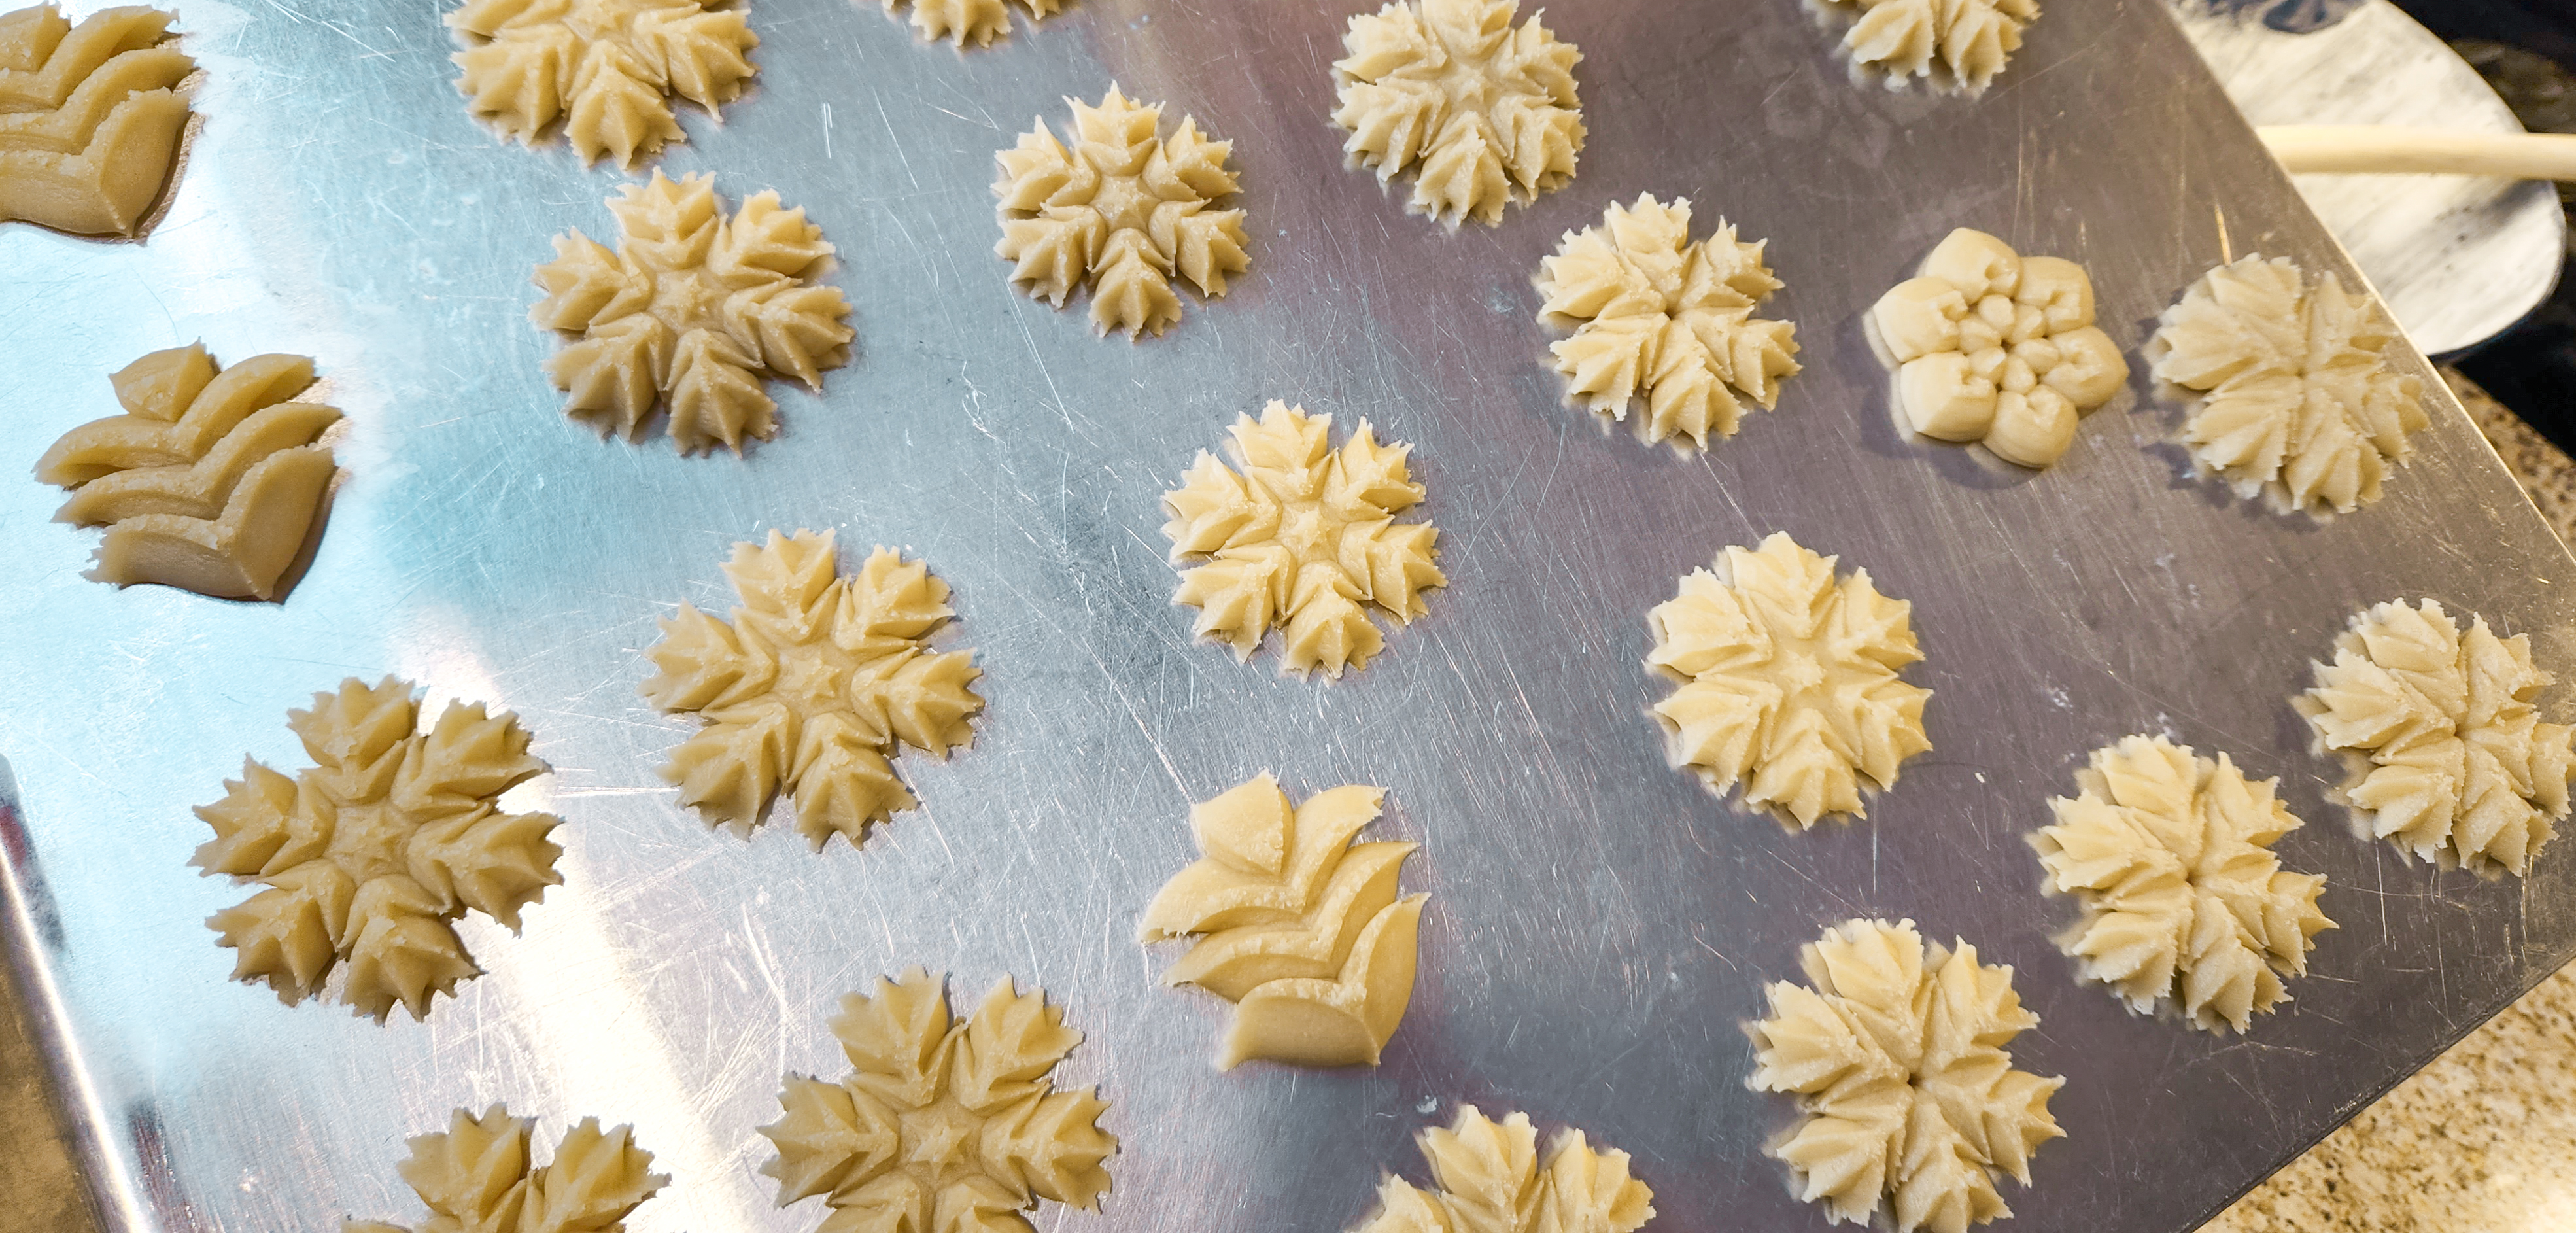
Directions to press with snowflakes disks and cookie press:
The second half of your dough needs a small tweak to press. You will want to add enough vanilla and/or water to make it press-able. I had super low humidity the day I baked this. I added 1 teaspoon of vanilla and a half teaspoon of water to get my dough just right. Add as much as you need, half a teaspoon at a time, until it is workable like a soft easy-to-work clay. If it doesn’t press well, add some more till its right!
Important note: While this recipe can be tweaked to press, it takes quite a bit of tweaking to make spritz dough rollable. I spent most of this summer testing and re-testing my most popular recipes to make them hold up under the pin and still taste great. There was more to it than just adding more flour. So don’t be too tempted to try all of the spritz recipes on this site with a pin! That said, 5 recipes come with the pins: this Vanilla-Honey, Chocolate, Gingerbread, Pumpkin Spice, and Apple Pie. Pumpkin Spice/Apple Pie together was my last post here. 🙂
Here is a video clip of me both pressing and rolling the Vanilla-Honey dough.**In this video I show pressing the rolling pin dough. It is VERY stiff to press. It can be done, but go very, very, I mean VERY slowly. It was much easier after the video when I added the vanilla and water, so that’s my suggestion!
I have a more detailed video of just rolling and embossing below.
**If you are new to cookie pressing, I suggest checking out one of my posts with video. You can skip around to dough making or pressing or whatever you need a tutorial on. This Christmas Trees post has a great explanation of perfect spritz dough and pressing technique. 🙂 https://creativecookiepress.com/2017/12/09/how-to-make-christmas-tree-spritz-cookies-with-video/
Spritz dough has a beautiful breakable texture. It is malleable in your hands but it breaks nicely as you press it. It should not be super sticky and stuck to all your fingers. You should be able to handle it like a soft clay. When your spritz half of the dough is ready, pack the dough into your cookie press, using the back of a spoon to remove all air pockets as you go. Spritz cookies have to stick to the pan as you press their shapes, so never grease cookie sheets and don’t use non-stick pans.
Always remember that the first few cookies often come out wrong, as pressure needs to build up in the barrel. If you press out a few or even a row of goofy-shaped cookies, just toss them back in the bowl to be re-pressed. No biggie! Once you are achieving a good shape, try to press in a consistent rhythm. Remember that with one-click-per-cookie presses, some shapes might take a bit less than a full click yet others might require you to squeeze a little more after the click. A cookie press is simply a dough pump. Just think of it as a way to extrude the dough, regardless of “clicks”. If you seem to get out of synch and it just isn’t working, try pressing a cookie into the air, just letting dough come out. It will re-establish proper pressure. Just wipe the dough away and put it back in the bowl to be re-pressed.
Bake in a 400 degree oven for 6-10 minutes or until the edges just begin to brown slightly. Check them early and often as all ovens are different, and spritz can brown quickly once they start to go. Let them cool for four or five minutes before removing to a cooling rack. If they’re too soft after baking they may break when you lift them, and if you wait too long they could stick to the pan. With time you’ll get a feel for it. Check them to see if they’re ready to be moved. If not, wait a few more minutes.
Ok one set of cookies done! Let’s do the rolled.

Directions to roll and emboss:
I used two of our embossed pins: Snowflakes, and Snowflakes & Pine Trees.
Divide your dough into balls a little bigger than your fist. Work with one portion at a time to keep it manageable. Cover the unused portion to keep it from drying out. (pictured is the whole recipe dough ball)

Use a regular rolling pin (preferably one with thickness spacer rings to make a perfect thickness, picture of ours at bottom of post) to roll your dough on to a silicone baking mat, glass cooktop, or lightly floured surface. Roll to a 1/4” thickness, and wide enough to accommodate the designed pin. Create a long rectangular slab of dough. The patterns on the embossed pins are designed to repeat, so you will be rolling a long rectangle of patterned dough.
Oil your embossed pin with canola (or similar) oil before rolling. Make sure to get it down into the engraved areas. Wipe off any excess with a paper towel. Oil should be down in the patterns, but not pooling in them! You can use a pastry brush or apply by hand, gently squeezing the pin to get oil into the shapes, and rubbing the surface to coat.
Roll with your embossed pin, pressing down with a steady pressure that leaves a deep impression in the dough. The designs should be as raised up on the dough as deep as they are in the pin. If the pattern is not deep enough it will disappear as the cookies bake and puff. As this dough is not cold or stiff, you do not have to press terribly hard! Just an even pressure.
Here’s a video clip of me rolling this dough, cutting shapes and lifting them. I talk about proper pin oiling, too.


Once rolled, use cookie cutters to cut out shapes. Remove any excess dough around the edges. Keep your spatula/lifter flat, dust the end with a little flour, and lift the shapes, beginning by lifting one edge slightly first, then sliding the spatula/scraper under the whole shape. Transfer them to a cookie sheet lined with parchment paper, spacing them at least an inch apart. The rolling pin with thickness rings, bench/dough scraper and cookie cutters I’m using here are available at our website and Etsy shops. Links at bottom!
Bake at 400°F for 6-10 minutes, checking at 6 minutes and every minute after as cookies brown quickly. They are done when the edges are barely, slightly brown. Cookies harden significantly the longer they bake, so bake just a few cookies first to test timing for desired doneness and hardness.
Move to a cooling rack after 5 minutes.
If you are painting the snowflakes on the white fondant, here’s a video clip of me rolling it, with tips about fondant. It’s stiffer than cookie dough, for sure! But very pretty. I show the tie-dye version further down. Roll it thinner than cookies! Go for 1/16 to 1/8 ” at most.
NOTE: This year (2023) we’re NOT selling fondant, but its readily available at craft stores, WalMart, etc. You could also take inspiration from my Embossed Maple Cookies post where I use a homemade buttercream so thick you can roll and paint it like fondant! Simply replace any maple flavor in the buttercream recipe with vanilla extract. Check it out! https://creativecookiepress.com/2022/10/25/embossed-maple-cookies-with-maple-buttercream-sandwich-cookie-option/
Decorating!
Luster dust is what makes this beautiful presentation possible. I use it so often in my cookie press posts that this year (2022) we’ve started selling it on our website and Etsy shop! We chose to partner with an American company, Bakell, that makes dusts here in the USA. They make gorgeous dusts that are silky, vibrant, and a joy to work with. Their 4 gram jars last and last. A little goes a long way!

Here are video clips of these easy techniques, start to finish. It’s much easier to show than explain in writing. 😉
The first technique is finger painting luster dust onto the embossed cookies or embossed and cutout fondant. This is a “wet” technique, using vodka as the paint base. The alcohol evaporates quickly and dries with no taste! You can also use canola oil as your paint base. Using canola oil won’t stain your fingertips as much as the vodka does, if that’s an issue for you. I know it comes off in the next shower so it doesn’t bother me. LOL
First is painting on the rolled embossed cookies or fondant, second is painting on the spritz cookies.
The next decorating technique is finger painting fondant icing before rolling. Roll white fondant out flat, do not emboss it yet. Gather the colors you want and put small piles of dust on a plate. Now finger paint the surface of the fondant by smearing the dust around! Make a pretty pattern of whatever colors you want by smearing the dust and very gently rubbing it in. The surface becomes dry and smooth. It creates a gorgeous pastel, shimmery color on the fondant icing!
Oil your pin but make sure to dab up any oil pooled in the engraved areas. You don’t want it to stick to and remove any dust. Put the bench scraper at the end and roll. Use cookie cutters to cut out shapes. Lift and place on cookies. Lightly wet the back of the fondant with a little water to help it stick to the cookies. You can scoop up the leftover fondant, re-knead, re-roll and paint and cut again until you use it all up.
Here’s a video clip, start to finish.
The last decorating technique is simply dry-brushing luster dust onto either type of cookie. The colors came out deep and vibrant on these, and very sparkly!
That’s it! Store these cookies loosely covered for freshness.
Wishing you all a sparkling winter full of good times. Happy Baking! ❄️ 💕
~Susie
Disk Designer/Co-Owner at Impress! Bakeware, LLC
Our website has all of our 200+ disk shapes, cookie press, embossed rolling pins, luster dusts, baking accessories plus more about our Women/Family Owned company! impressbakeware.com
All products are on our Etsy shop.
Our Amazon shop has our cookie press and disks and embossed rolling pins.
Follow us on facebook!
If you’re not familiar with rolling pins with thickness rings, here’s ours:
