
**NOTE 11-8-19**
Our new streamlined website is finally up! Get creative this Holiday Season with our 28 unique sets of Cookie Press Disks & the new Impress! Cookie Press. Learn with our recipe tutorials & decorating blog, with expert advice & troubleshooting tips. The press & all of our disk sets are ready for purchase now! Happy Baking! ~Susie the Disk Designer www.impressbakeware.com
Our products are also available on Amazon: https://www.amazon.com/s?k=Impress+Bakeware&ref=bl_dp_s_web_0
Read here about our new cookie press and 5 new disk sets: https://creativecookiepress.com/2019/11/05/were-back-meet-our-new-disks-and-press/
Original October 30, 2014 Post:

Ahh, Fall!
Time for beautifully colored leaves, walks through the apple orchards, and caramel apples!
If you love that gooey, delicious flavor combination as much as I do, then have I got the cookie for you.
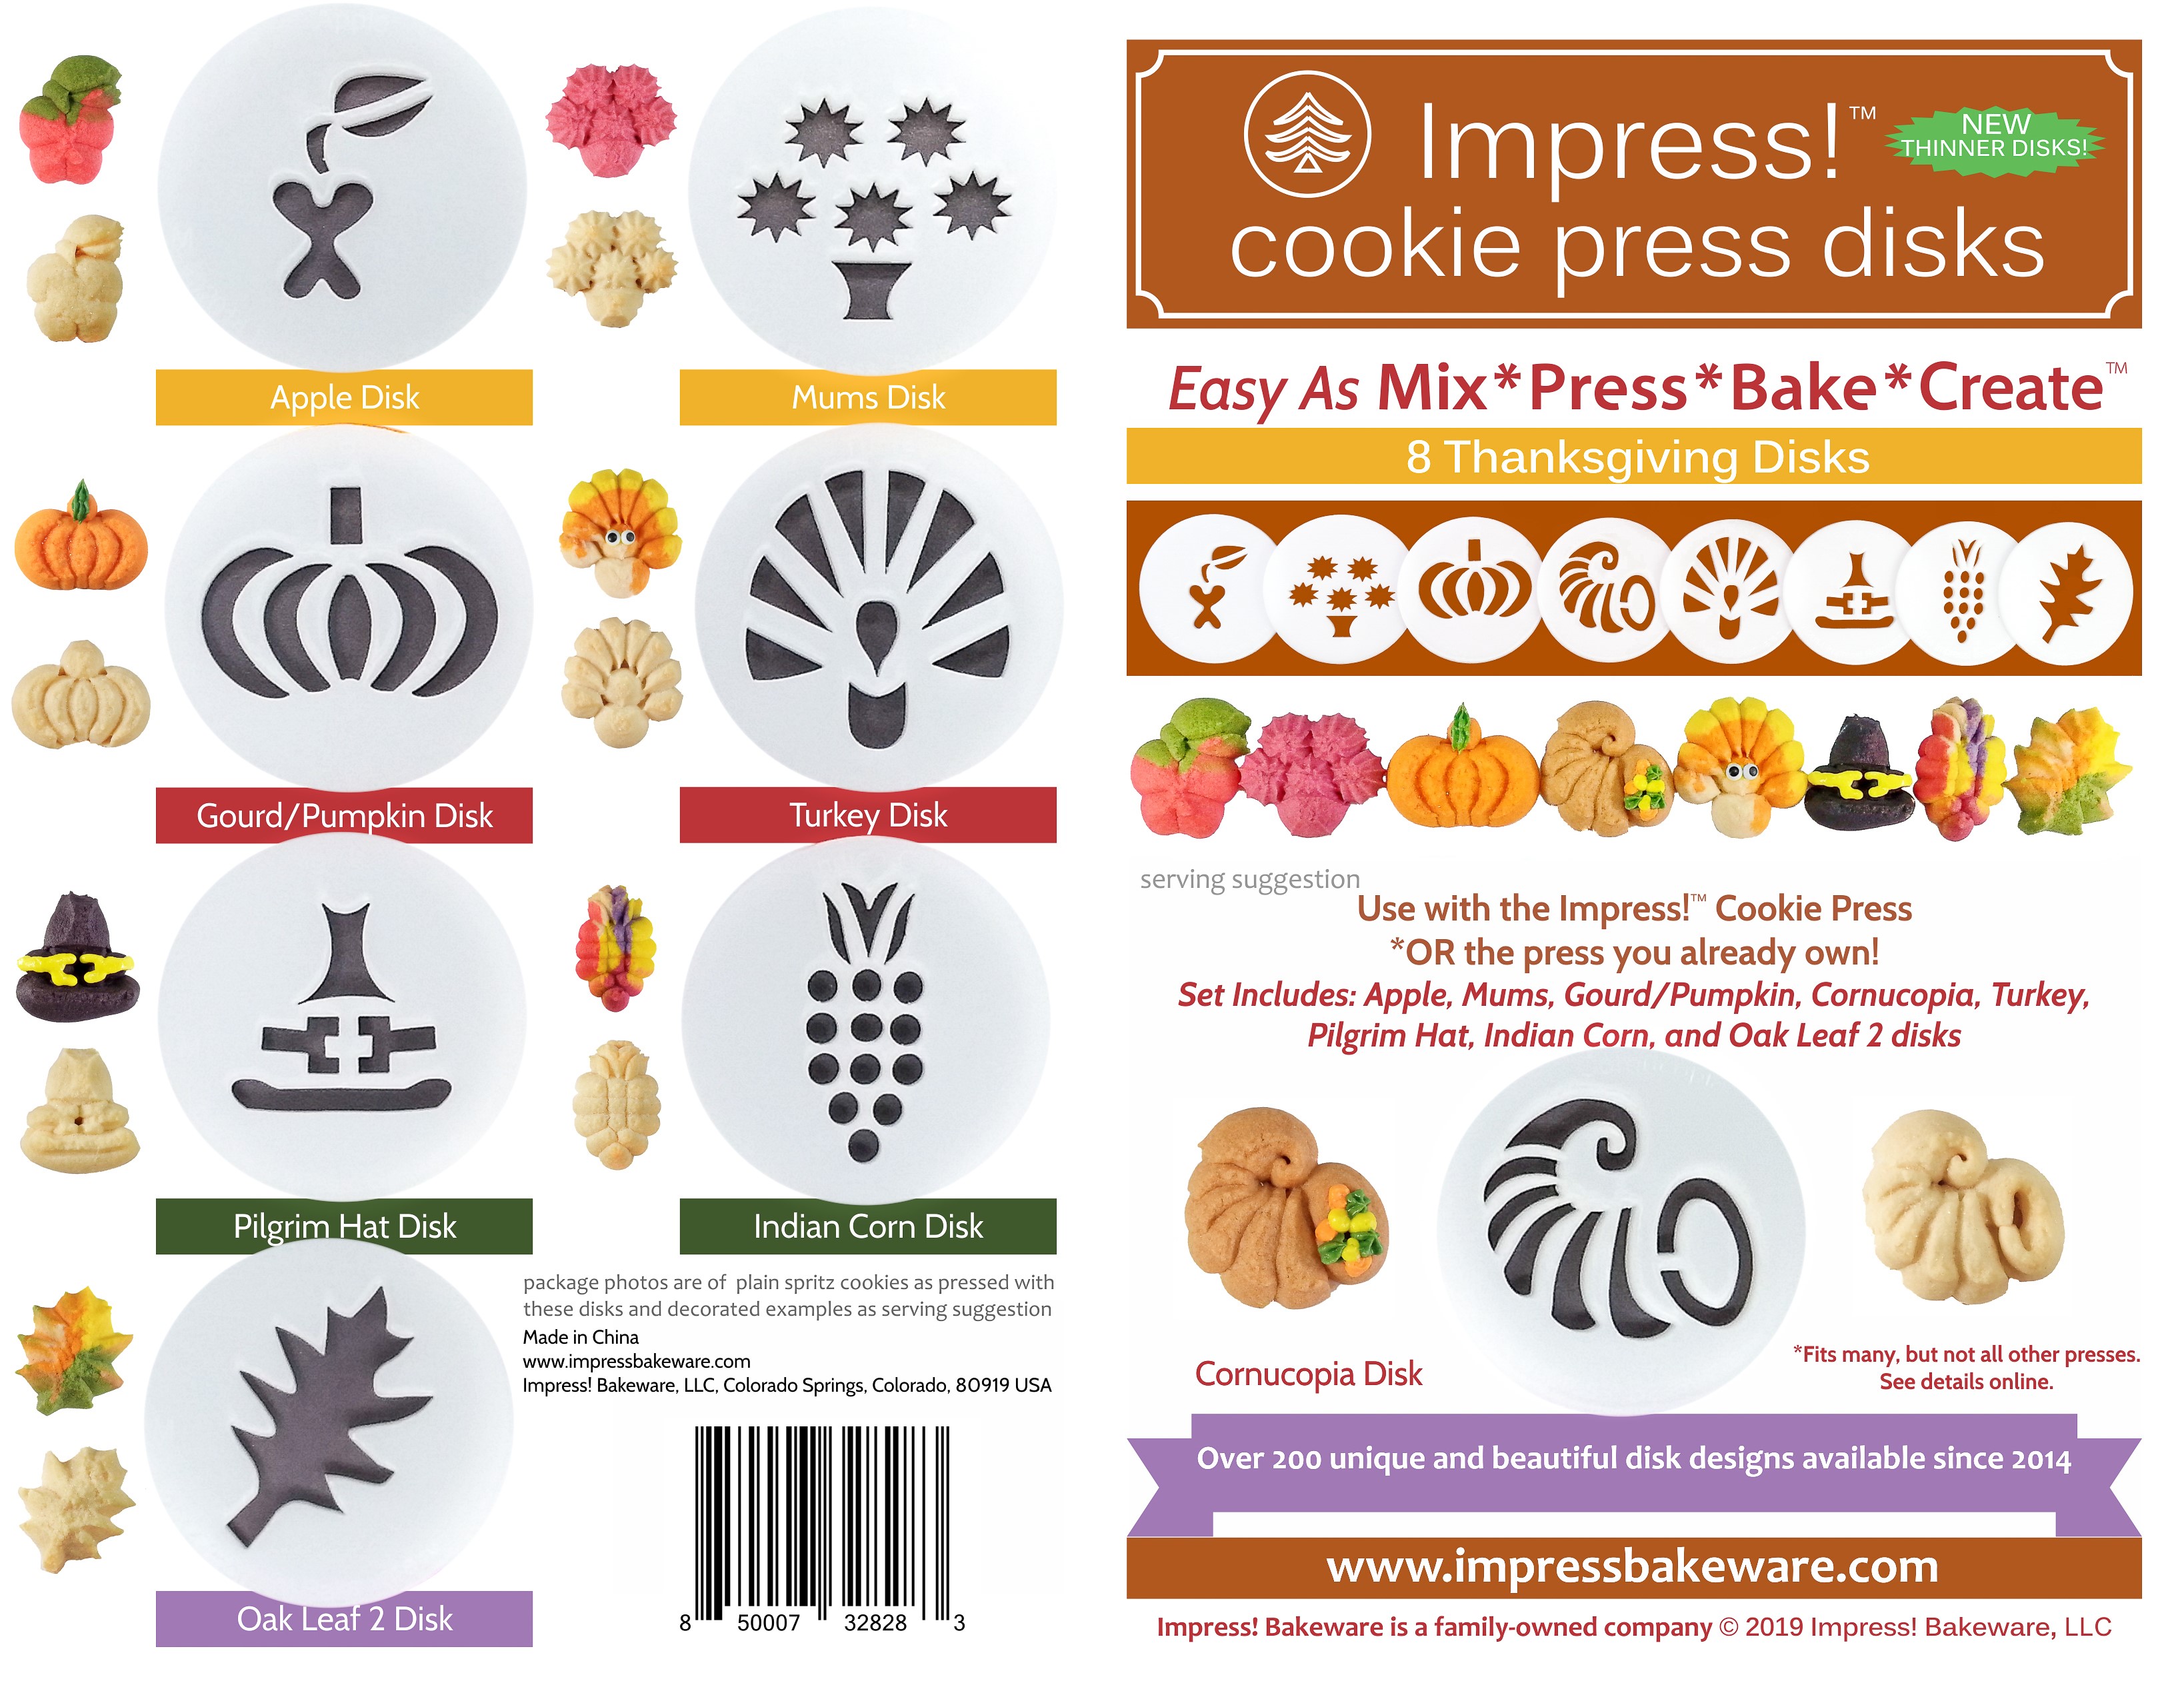
Impress! Bakeware™’s Apple Cookie Press Disk (from the Thanksgiving set) makes adorable little apple cookies just begging to be paired up with some caramel and sweet apple flavored filling. Yum! They are made from a basic vanilla butter spritz cookie (tinted), sliced caramels, and a very thick apple flavored icing filling.
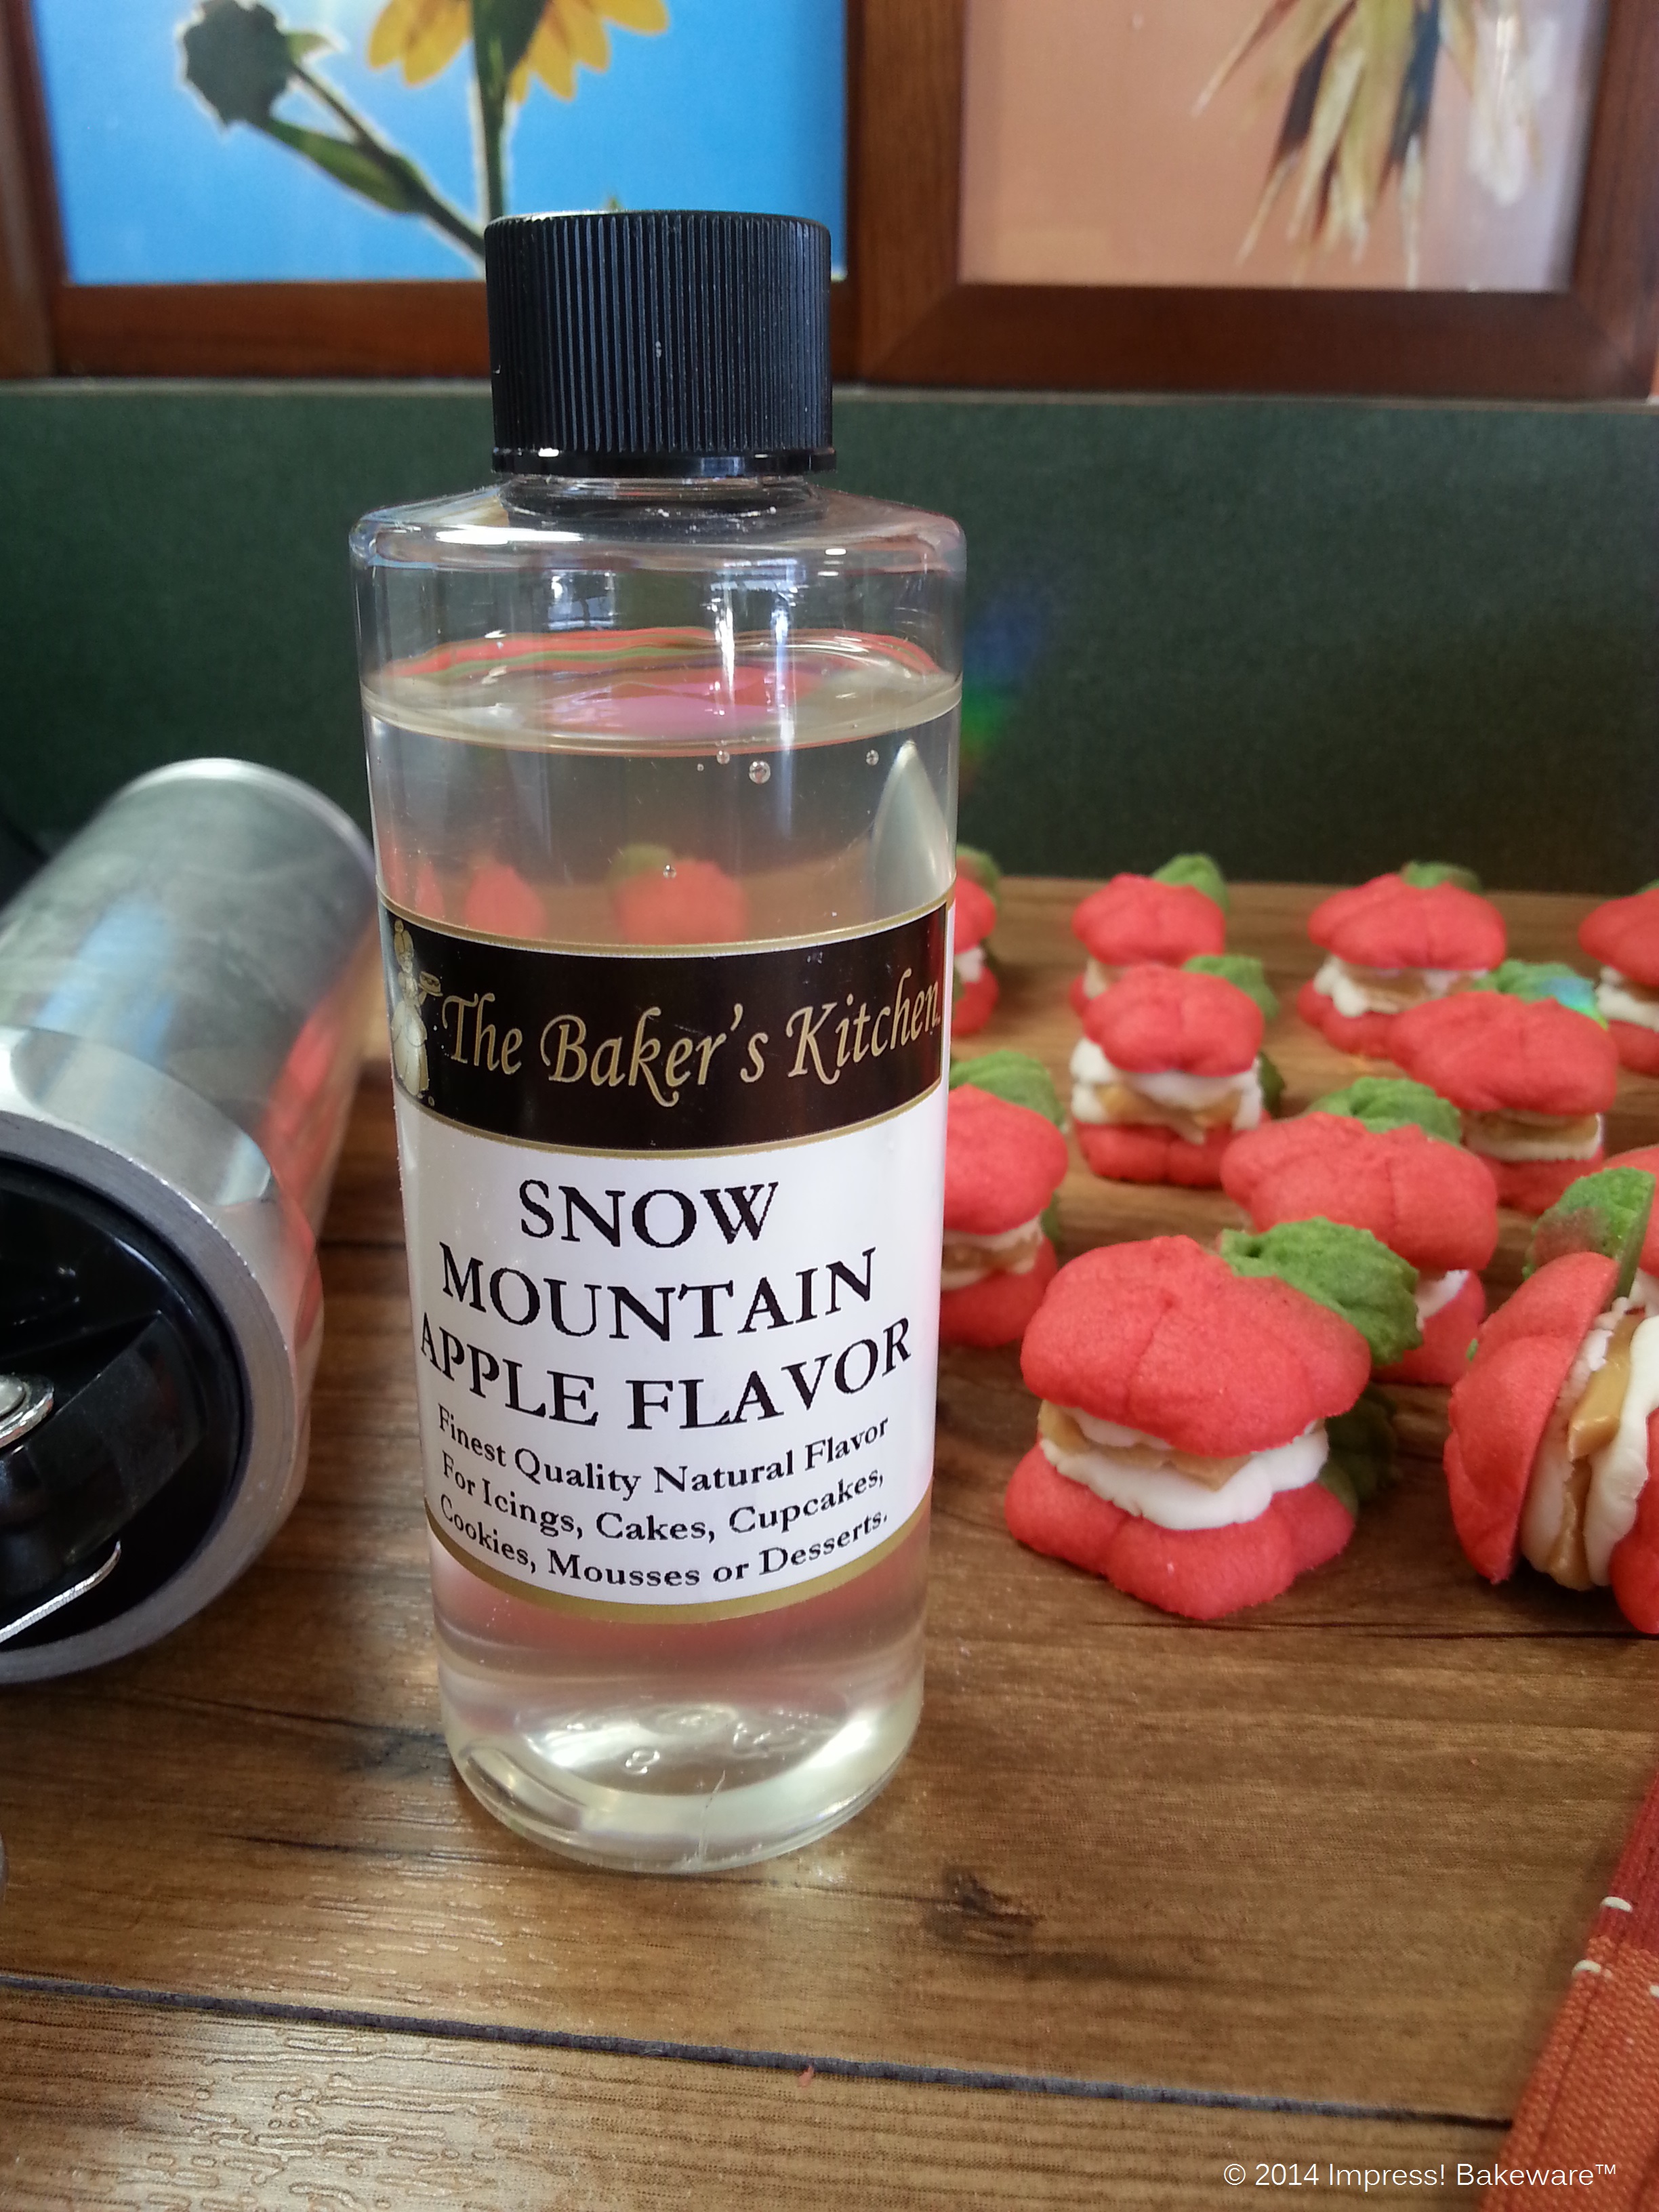
To make these pop-in-you-mouth little gems, you’ll need a cookie press, the apple disk, green and red gel food coloring, apple flavoring (The Baker’s Kitchen™ makes an excellent flavor called Snow Mountain Apple Flavor, available online), caramels, and the ingredients listed below for spritz cookies and apple sandwich cookie filling.
Begin with making the spritz cookies. Now these particular red and green cookies require a little finesse but don’t worry, I’ll explain the trick to getting the apples red and the leaves and stem green.
The key to great spritz cookies (cookie press cookies) is the dough. It has a particular consistency that when made right, presses smoothly, quickly and easily. Here’s our basic recipe that I used to make this batch.
Impress!™ Vanilla-Honey Spritz
1 1/2 cups (3 sticks) butter, softened (not melted)
1/2 cup granulated sugar
1/3 cup honey
1 and 1/2 Tablespoons vanilla extract
1 egg
4 cups all-purpose flour
3/4 teaspoon baking powder
1/4 teaspoon salt
Preheat oven to 400°F. Cream the butter well. Add the sugar and cream it very well again. Add the honey, then vanilla and egg; beat well. Meanwhile, in a separate bowl, combine the flour, baking powder and salt. Add it slowly to the butter mixture, just until the flour is mixed in. DO NOT over-mix!
Spritz dough should be soft but not sticky. It has an almost crumbly texture that doesn’t stick to your fingers.
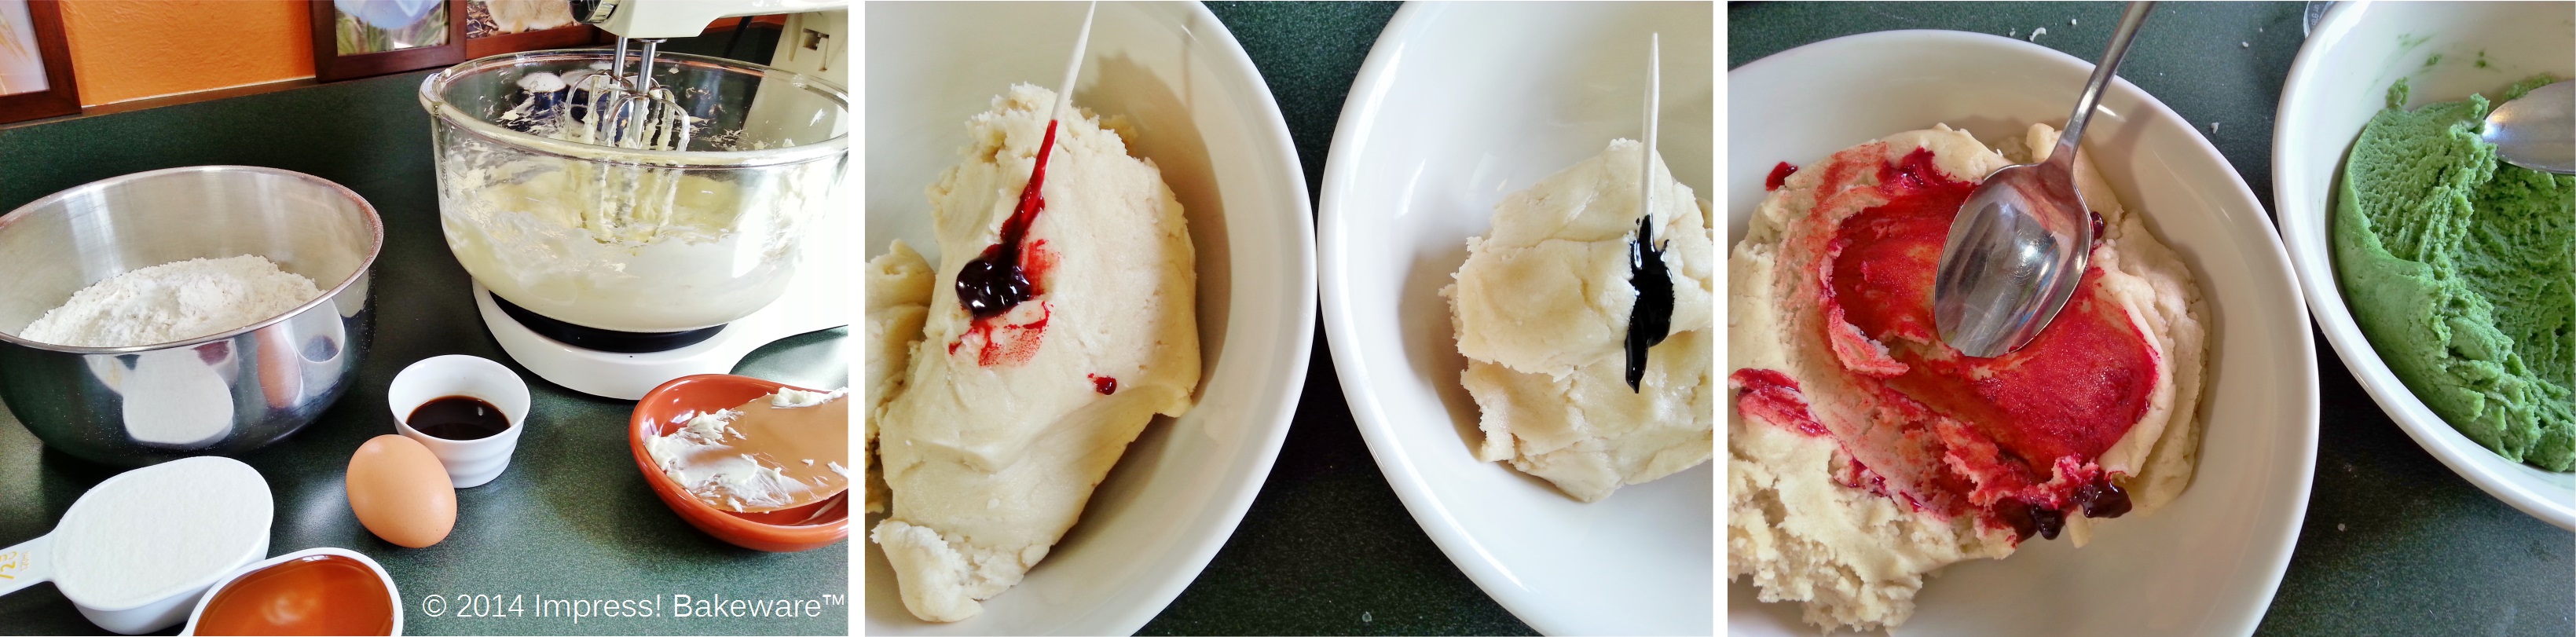
Separate dough into two bowls. You will need about 1/3 as much green as red dough, so adjust accordingly. Using GEL food coloring (liquid will change the consistency too much), color your dough to the desired tint.
Now roll small amounts of dough in your hands, as pictured. Here’s the tricky part! Hold the rolled dough against the disk,lining up the colors you want to show through the leaves and stem and the apple itself. Mold the two rolls of dough together into a log slightly smaller than the cookie press tube itself, so you can drop or slide the log in. Keep the disk in a constant position! Don’t let it twist or slide.
*IMPORTANT* Once you have the dough all the way in the barrel, hold the disk in position with a finger tip as you twist the end ring on- otherwise your shape will no longer be lined up properly!

(*NOTE: As of our 2019 Re-Opening our new disks are made of a solid white material, but the designs are exactly the same, and press identically.)
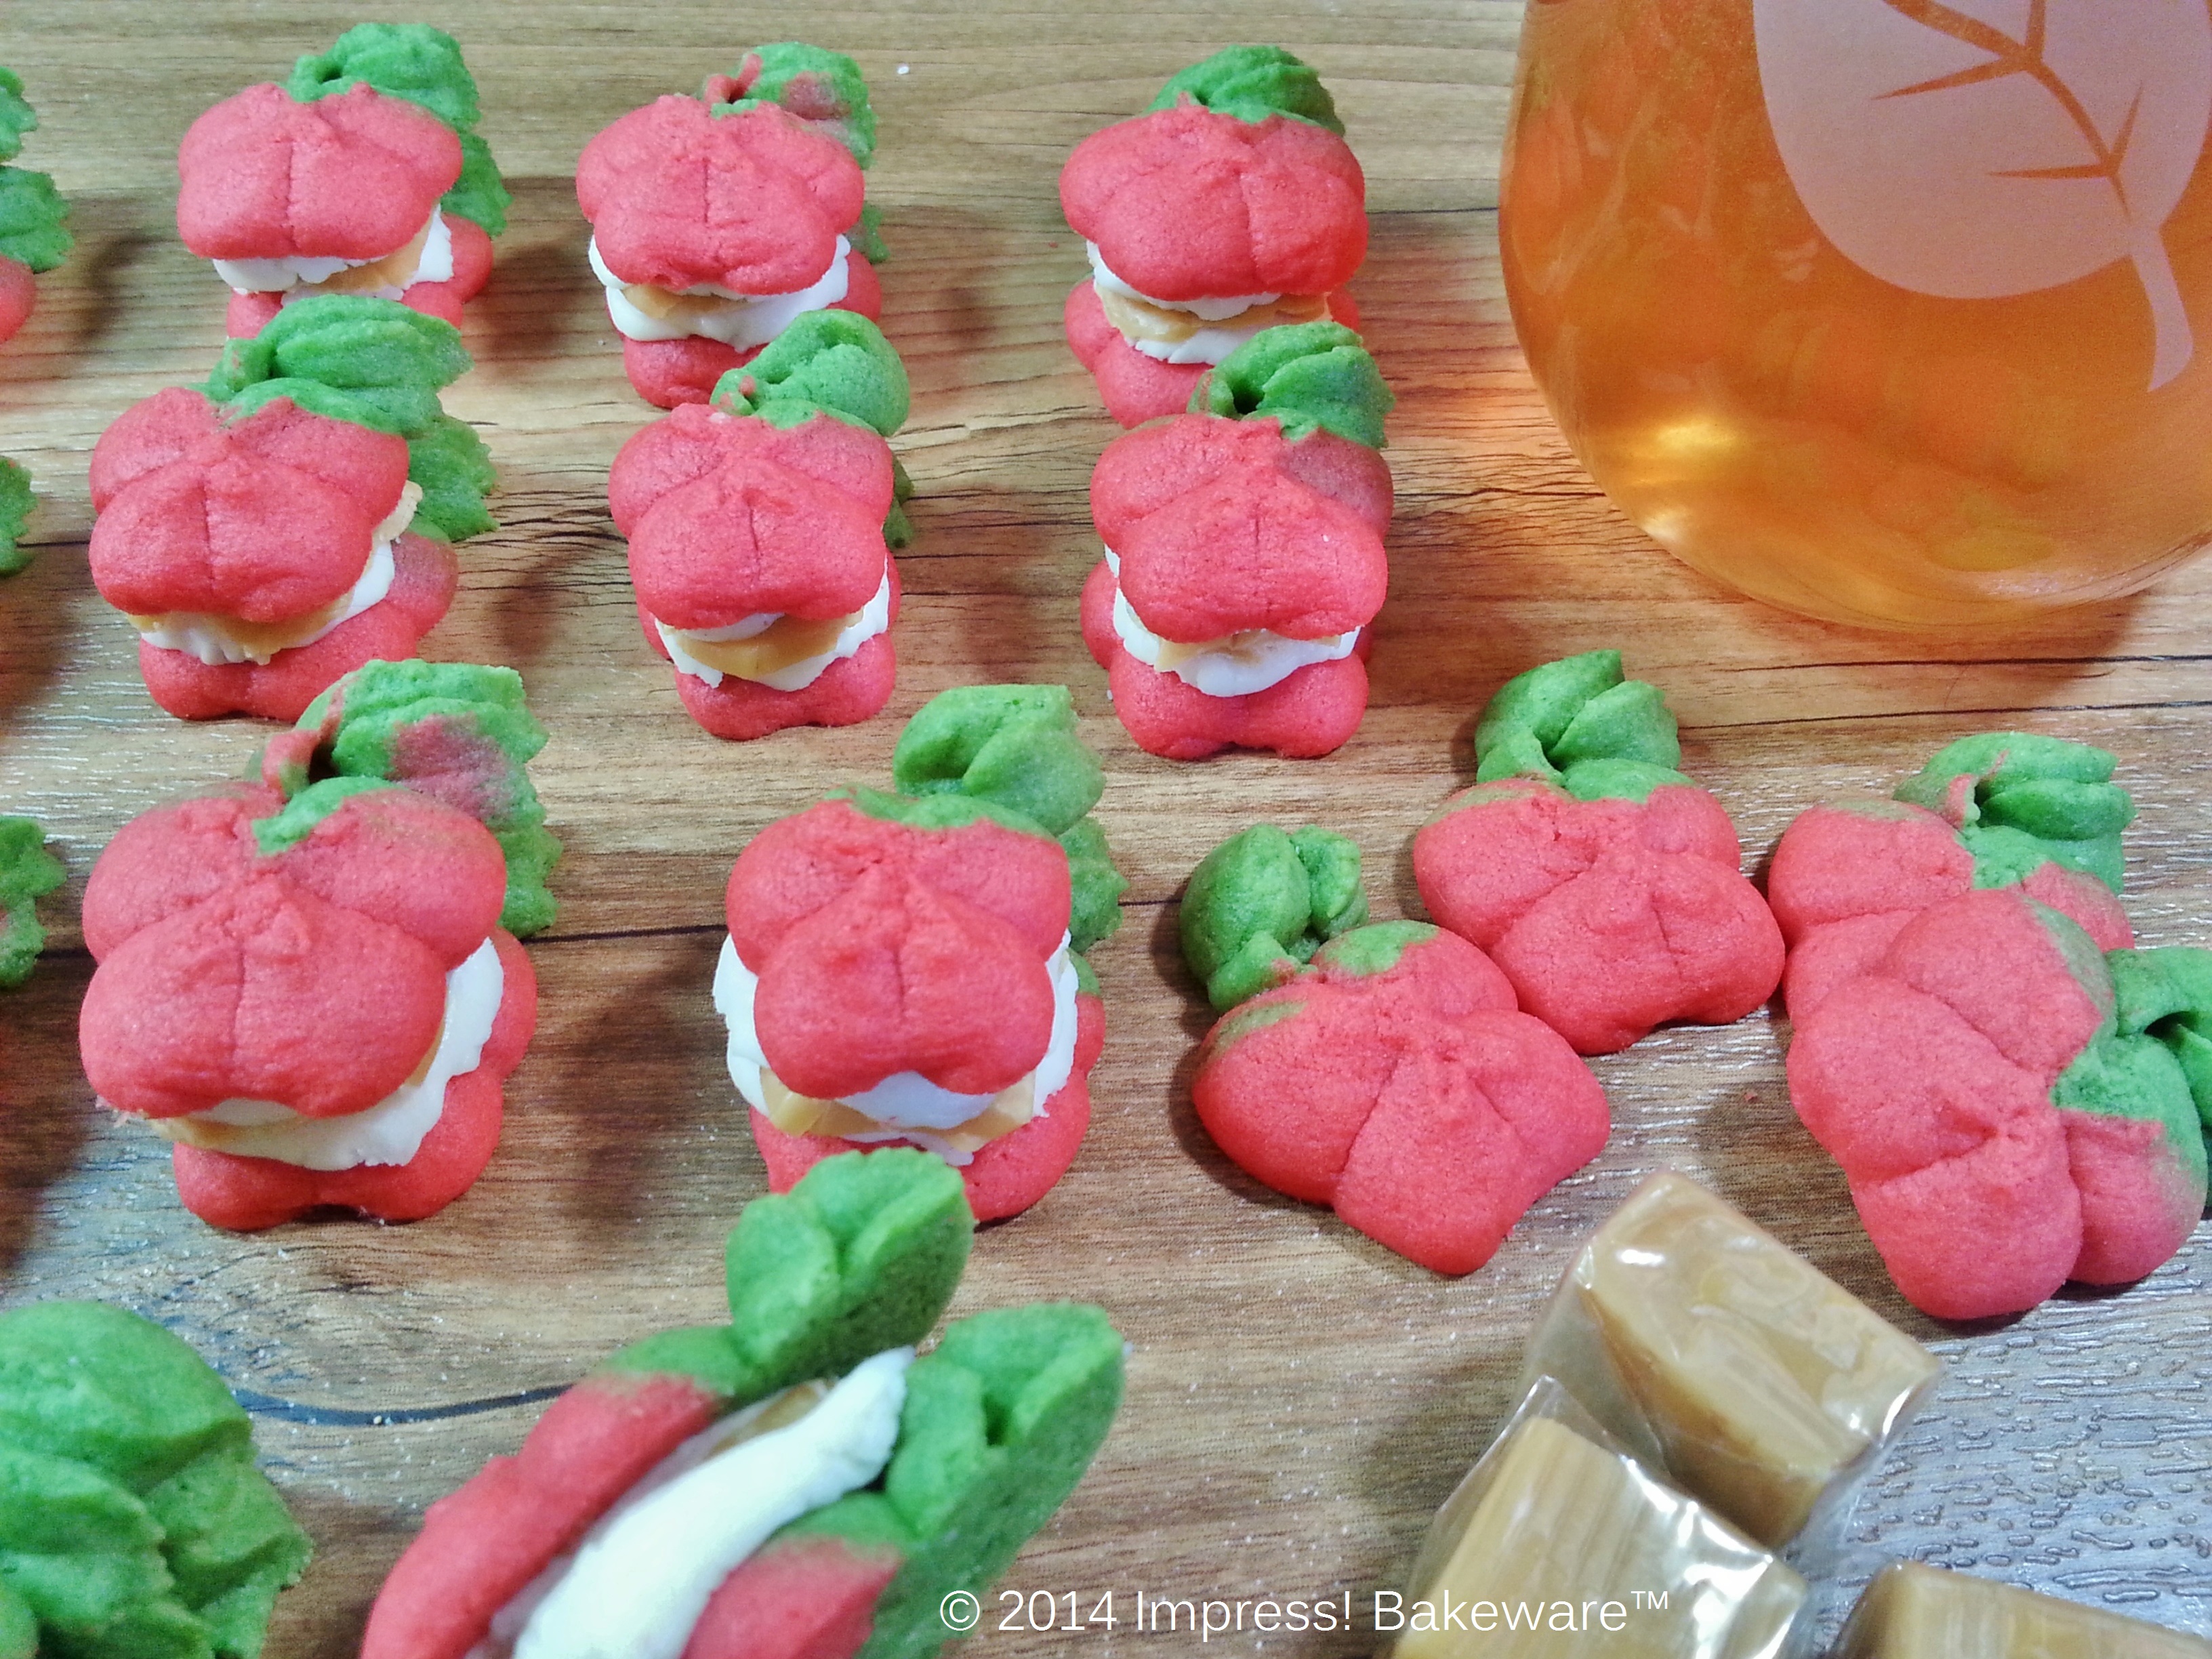
Press out the apple cookies onto an ungreased cookie sheet. If you lined up your colors pretty accurately on your disk, you should have a good approximation of red apples with green leaves and stems. Try to press them so that you have an even number of each size- let’s face it, when pressing cookies they often come out a little different in size, as we all sometimes have to press out more or less than one “click” to get them out right. So, try to pair them up so you can match them for sandwich cookies.

Bake for 8 to 10 minutes until the edges begin to brown. All ovens are different, so check that first batch early- at 6 or 7 minutes to gauge your baking time. Let sit for just a minute or two then remove from sheet & cool on rack.
Once cooled, pair up your sizes!

Now it’s time to prepare the filling. Apple sandwich cookie filling:
4 Tablespoons butter (1/2 stick)
2 cups powdered sugar
2 teaspoons apple flavoring (my favorite is available online from The Baker’s Kitchen™- Snow Mountain Apple Flavor)
Cream the butter well. Add 1/2 cup powdered sugar and cream again. Add the apple flavoring. Slowly add the rest of the sugar and mix until thoroughly combined. This icing will be very stiff. That’s exactly what you want.
Now slice some caramels into smaller pieces- into 4 or 5 little “slices” depending on how thick you want your caramel layer. Shape each piece with your fingers to be the right size to fit between two apple cookies.
Next use your fingers to create small pieces of apple filling. Place the apple filling piece on a cookie, then a caramel piece, then more apple filling. Place another cookie on top and lightly press, forming the sandwich.


Ta-da! Caramel apple sandwich cookies.

Spread any extra apple filing on other snacks, or keep in the refrigerator or freezer for another batch of cookies.
Store cookies at room temperature for a few days, after that in the refrigerator as the filling is buttercream.
Enjoy! Happy Fall and Happy Baking!
~Susie
Disk Designer at Impress! Bakeware, LLC
Follow us on Facebook! https://www.facebook.com/impressbakeware/
The Thanksgiving Disk Set:

The apple flavoring can be found at http://www.thebakerskitchen.net/TBK-Natural-Snow-Mountain-Apple-Flavor.aspx
**NOTE 11-8-19**
Our new streamlined website is finally up! Get creative this Holiday Season with our 28 unique sets of Cookie Press Disks & the new Impress! Cookie Press. Learn with our recipe tutorials & decorating blog, with expert advice & troubleshooting tips. The press & 12 other disk sets are ready for purchase now, & more will be available as they come in stock! Happy Baking! ~Susie the Disk Designer www.impressbakeware.com
Our products are also available on Amazon: https://www.amazon.com/s?k=Impress+Bakeware&ref=bl_dp_s_web_0
Read here about our new cookie press and 5 new disk sets: https://creativecookiepress.com/2019/11/05/were-back-meet-our-new-disks-and-press/

Great looking disks! Which press do you use? I have three dead ones….
LikeLike
Thanks for stopping by and commenting! I don’t recommend any particular press, as that is a very personal choice based on hand strength, preference of materials or mechanisms, etc. I actually own 12 presses and they each have their strengths and weaknesses. For this blog post I used the Norpro. A couple of others that I find comfortable to handle and that work quite well with our disks are the OXO and the smallest Wilton. There are plenty of decent presses, but if you’re as hard on them as I am even the best press will give out! You can always contact me through our website customer service if you’d like to discuss presses more at http://www.impressbakeware.com.
Happy Baking! -Susie, Owner/Disk designer at Impress! Bakeware, LLC
LikeLike