

For this post I wanted to create something eye-catchingly wonderful yet simple. I wanted to make something that both the super talented cookie decorators and those of us who are decorating challenged could get excited about and have success with. Something families could come together around to bake up some fun Christmas memories.
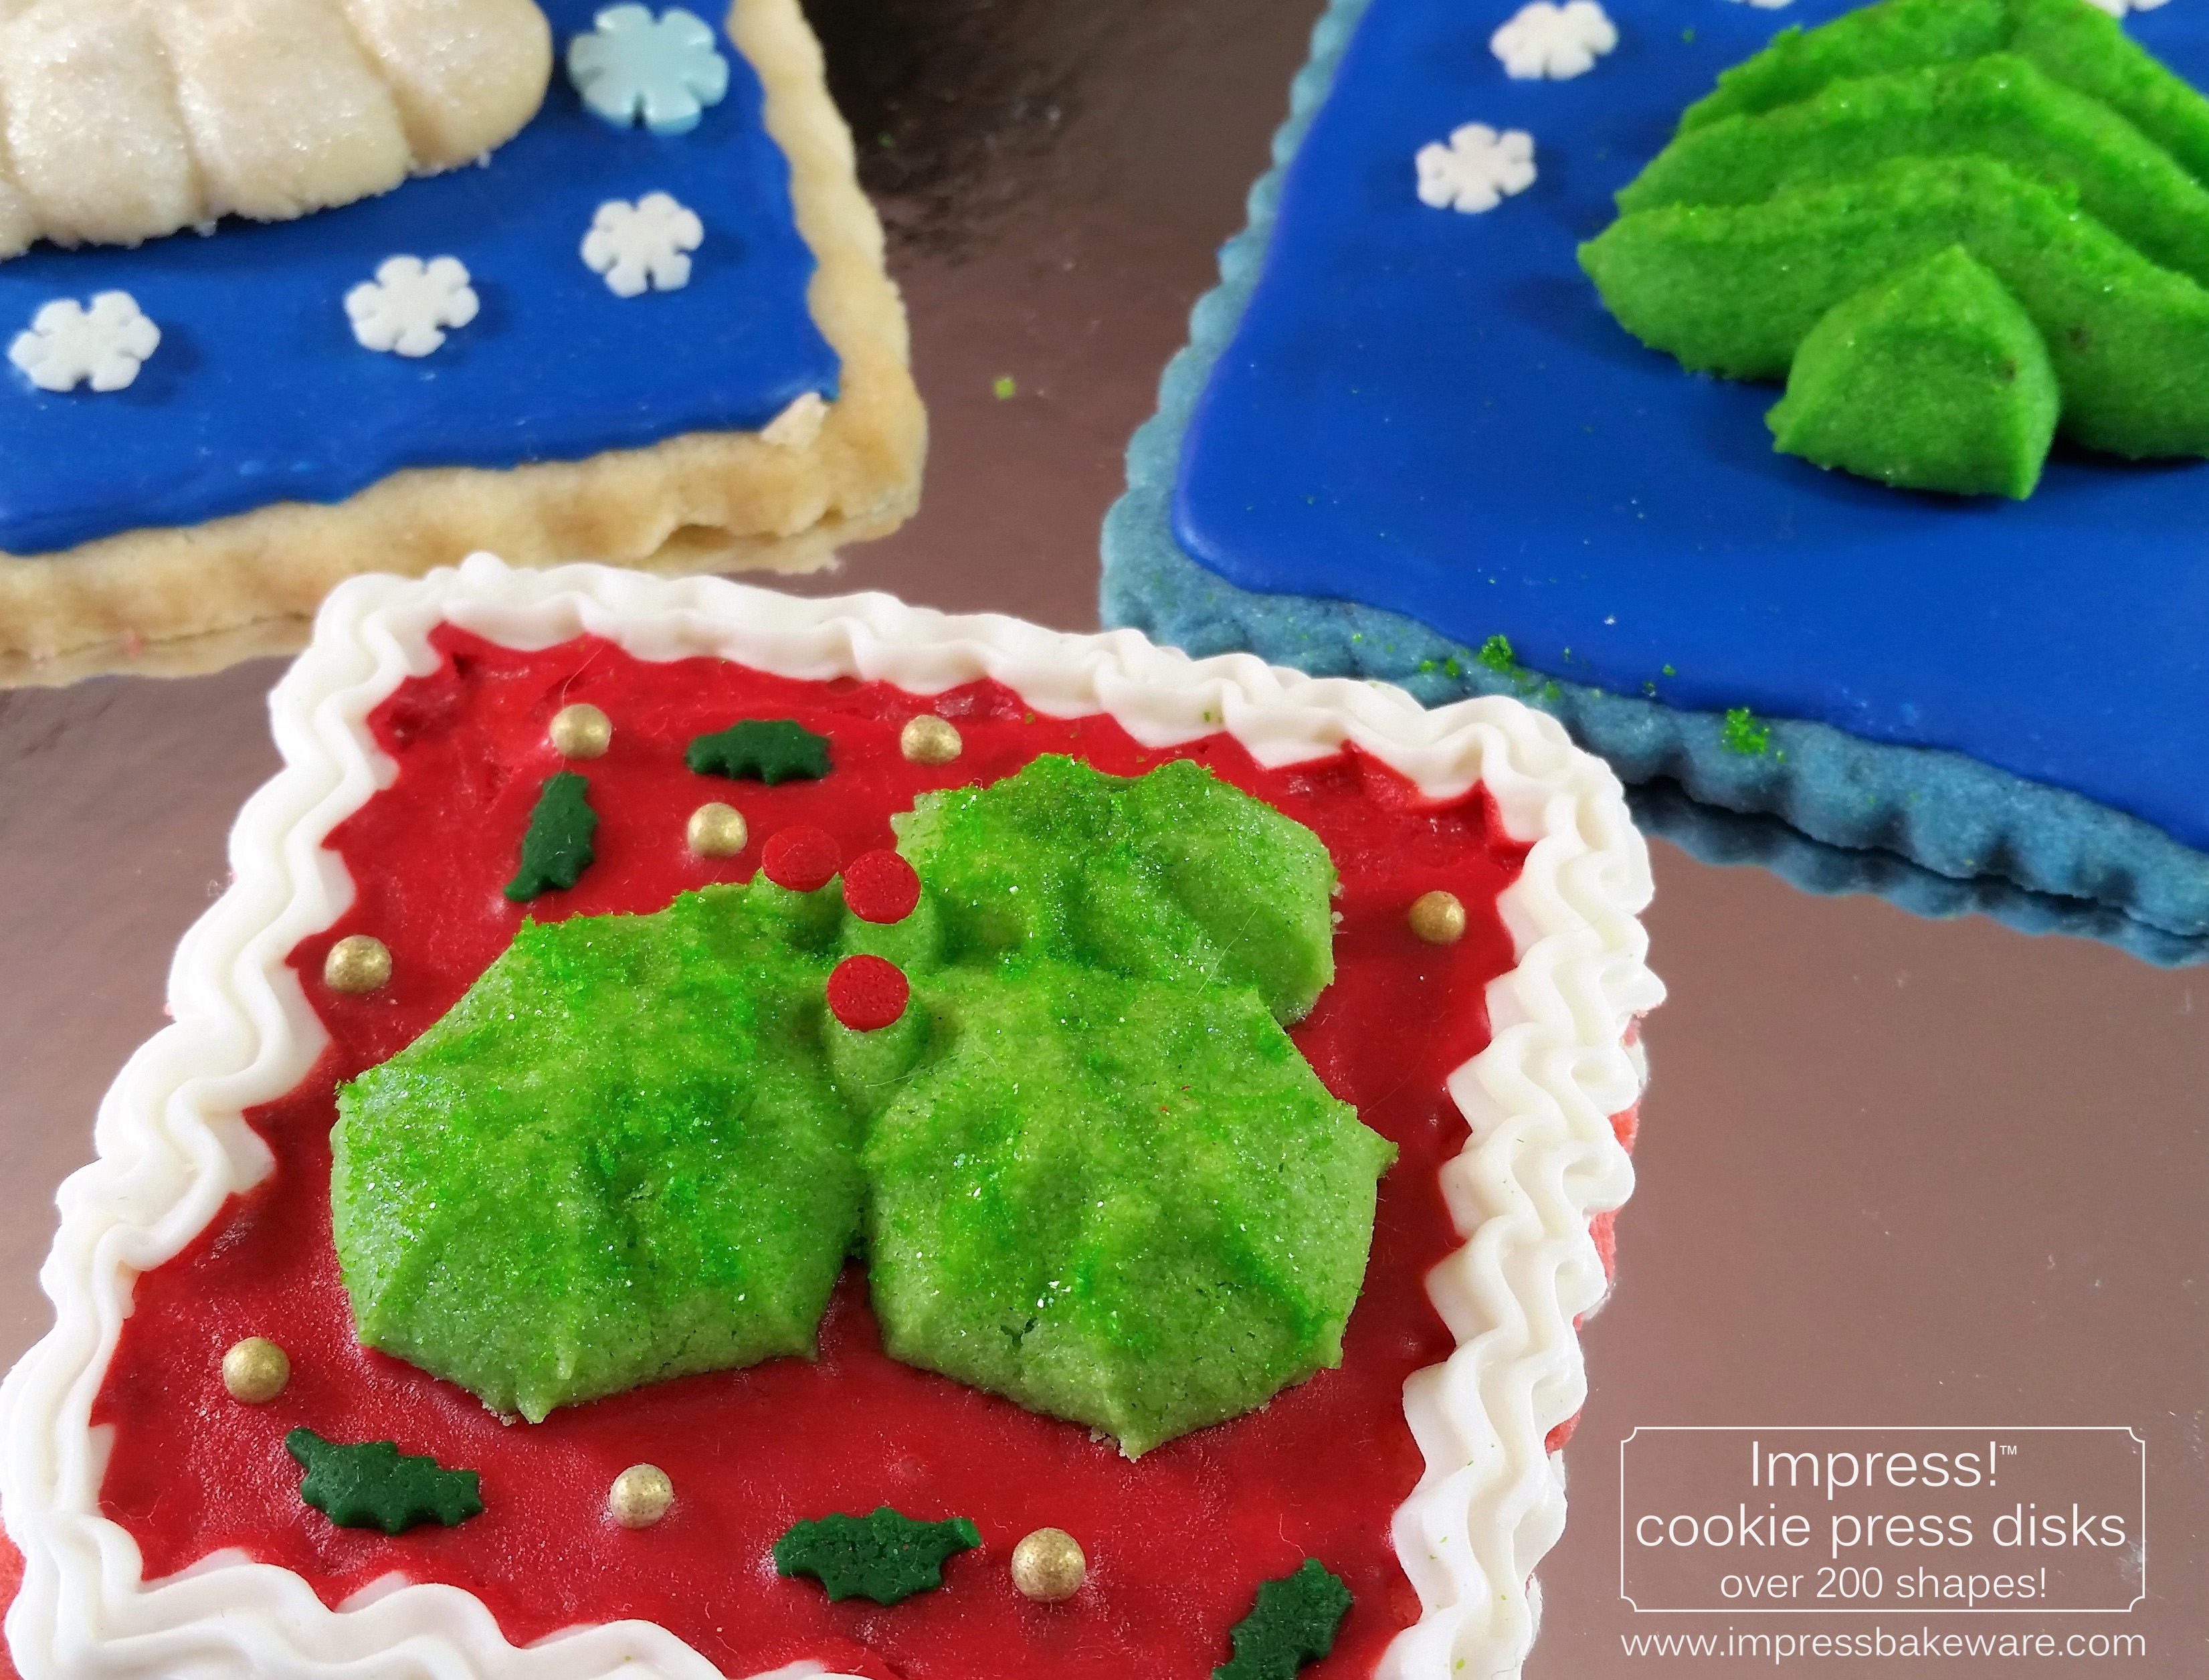
These are what I’m calling sculpture cookies. Taking a spritz cookie (which if you think about it really is a low-relief sculpture made of cookie dough) and placing it on top of a cutout cookie (also made with yummy spritz dough) to create a slightly 3D scene. So maybe these are scene cookies.
Whatever they are, I am loving the marriage of cutout cookies (with NO rolling out the dough- see how I did it below) with spritz cookies. I know many “cookiers” out there are huge fans of decorating cutout cookies. Here’s the fabulous thing about this sculpture cookie technique. If you want to have a blast decorating the big base cookie, by all means jazz it up. Make lovely borders and intricate details and wow people with all the artistic talent you’ve got. Use the flooding method to coat the base cookie with a glossy layer of icing and create onward from there. You’ll be doing your usual cookie thing just with the addition of a 3D decoration not made of icing or marzipan, etc, but of more cookie. Being obsessed with cookies, I love the idea of more cookie.

I’m going to be honest about cutout cookies, though. I love how they look but I stink at making them! I have zero talent for that kind of detail work.
That said, here’s the other fabulous thing about this technique. If, like me, you stink at decorating, don’t have the patience, don’t have the time, or just straight up don’t want to do all that work, there’s an easier way. My new favorite substance, edible pearlescent dust, is incredible on spritz cookies. You just brush it on a cooled cookie and that’s it. It gives them a velvety sheen and slight texture that looks rich or sparkly. I brushed it on a light layer on the base cookies and most of the shapes.
The only other decorating I did for this blog was simple stuff, such as candy eyes and other decors placed with a dab of white icing, and a few lines, dots, and stars drawn with icing on shapes.

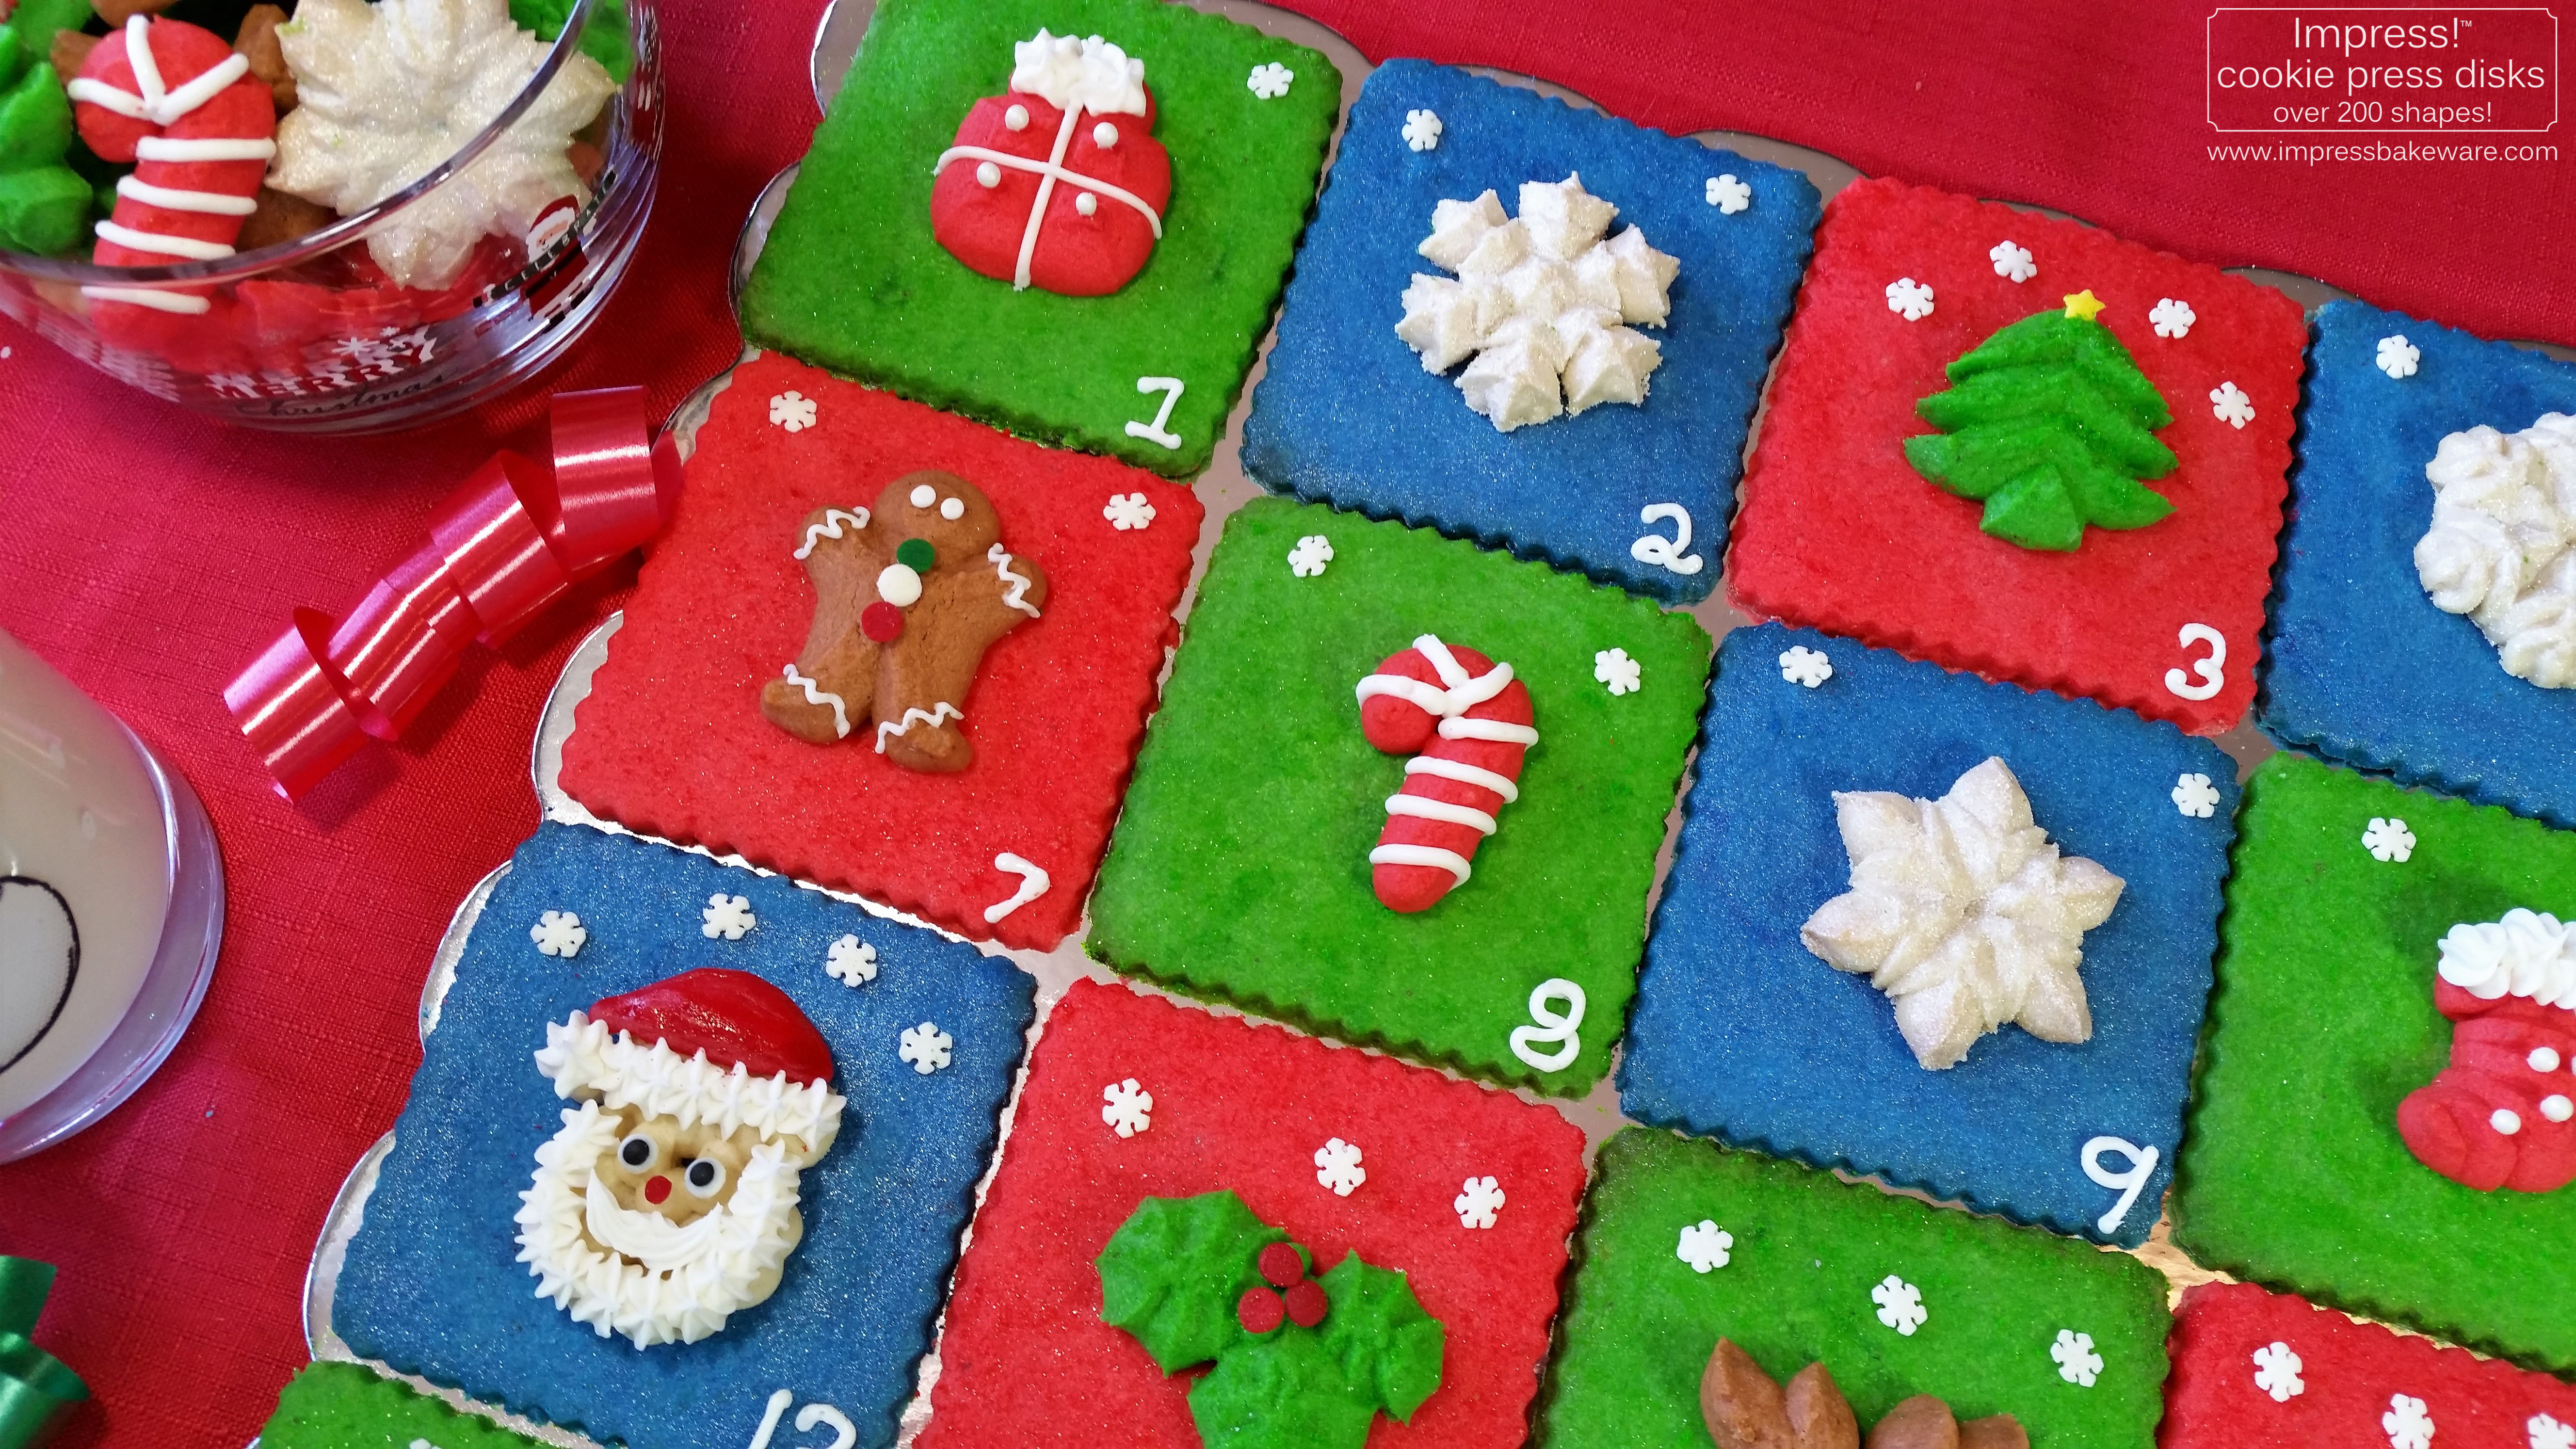
When I came up with the idea for the sculpture cookies and showed my first attempts to a friend, he said “It looks like an advent calendar!” and thus the idea for this blog was born.
I show a lot of shapes on here, and I hope I didn’t scare anyone away with the complexity! While this may look difficult, it is not, I assure you. These are not hard. Like, at all.
I mostly wanted to show the different varieties of shapes that could be done, but honestly you could easily just repeat 3 or 4 designs and it would be stunning. That would take some color guesswork out. Or do just a red-green checkerboard.
Our website has all of our 200+ disk shapes, cookie press, embossed rolling pins, baking accessories plus more about our Women/Family Owned company in beautiful Colorado Springs! Ordering HERE helps us the most and we appreciate it! 🙏impressbakeware.com
All products are on our Etsy shop.
Our cookie press and disks and embossed rolling pins are also available on Amazon .
⭐️Ten Year Anniversary SALE⭐️
Our cookie press disks, cookie press, embossed rolling pins, luster dusts, and baking accessories are on sale 15% off!
🎉Bake extraordinary things for the 2024 Holidays!
SALE November 28- December 12th 2024, on our website and Etsy shops ONLY! Sale excludes holiday gift sets and our recipe book.
Here’s a close-up of one section to give you a better idea of how it looks.

Okay let’s get to it! Here’s how to bake up this awesome display.
Ooh, I haven’t even mentioned the epic recipe yet. If you like almond spritz cookies you are in for a real treat. This is hands down, far and away the best recipe I’ve ever come up with. This isn’t just almond spritz. It’s almond heaven.
Impress! Incredibly Almond Spritz Cookies
1 1/2 cups (3 sticks) butter, softened (not melted) (I recommend Land O Lakes brand as I know it creams well. I have had trouble with some generic butters not creaming properly and making the dough hard to press)
1/2 cup plus 3 Tablespoons granulated sugar
1/3 cup canned Solo® Almond Cake and Pastry Filling
1 Tablespoon vanilla extract
1/2 Tablespoon almond extract
1 egg
4 cups all-purpose flour
3/4 teaspoon baking powder
1/4 teaspoon salt
GEL food coloring (NOT liquid)
Here’s a picture of the almond filling. It’s golden like honey and smells incredible.

Preheat oven to 400°F.
In a large bowl, combine the flour, baking powder and salt and set aside.
Cream the butter well. Perfect spritz cookies begin with super-creamed butter. I use an electric mixer and set it on “whip”. You want seriously fluffy butter.
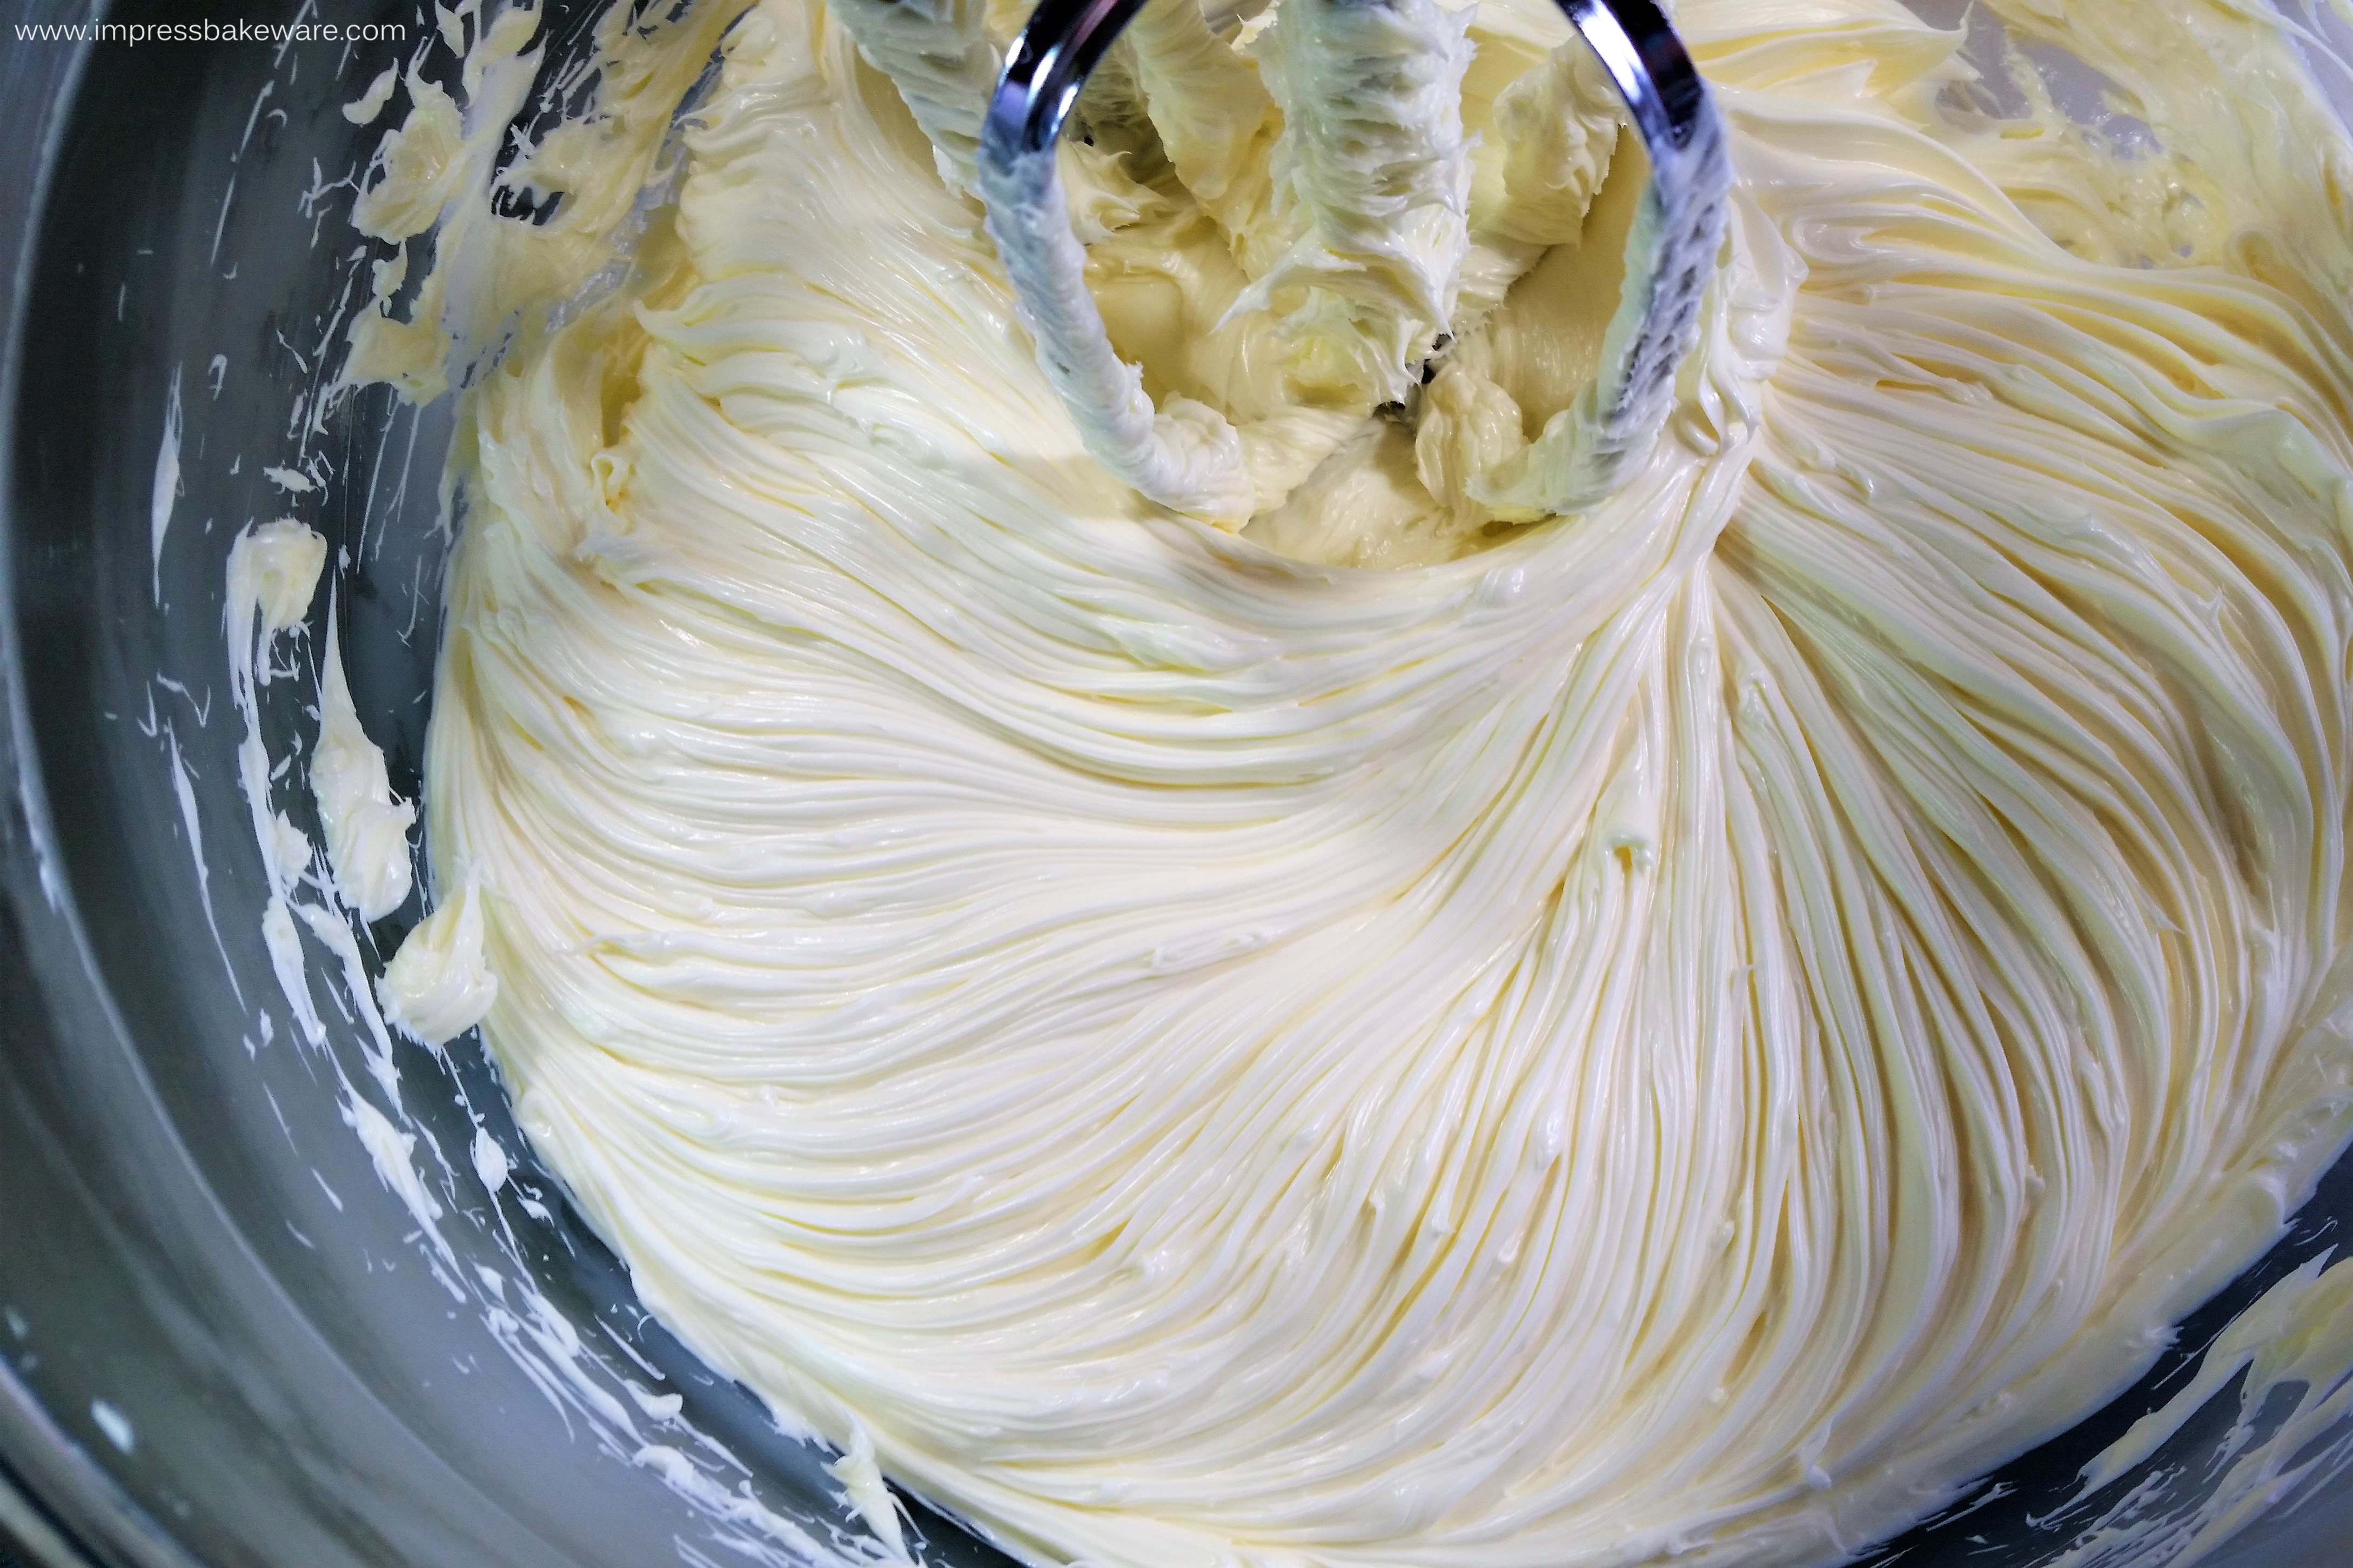
Next add the sugar and cream it well again. With every additional ingredient make sure you re-fluff the mixture.
Now add the almond filling and cream it again. Enjoy the aroma. 🙂 Add the vanilla and the egg and fluff it up once more time.
Add the flour mixture slowly on low speed until thoroughly combined.

Great spritz dough has a firm texture that doesn’t stick to your fingers too much. When you spread it with a spatula it separates in this distinctive pattern.
You can always troubleshoot a spritz dough by adding water or vanilla extract a teaspoon at a time to stiff, dry dough, or adding flour a tablespoon at a time to overly sticky or soft dough. Perfect spritz dough has a soft malleable texture that is not too sticky or too stiff.
Choose what colors you want in your calendar squares AND the top cookies and separate your dough into appropriate amounts. Add gel food coloring (liquid will thin the dough) to make your desired colors and work it in until you have a nice even color.
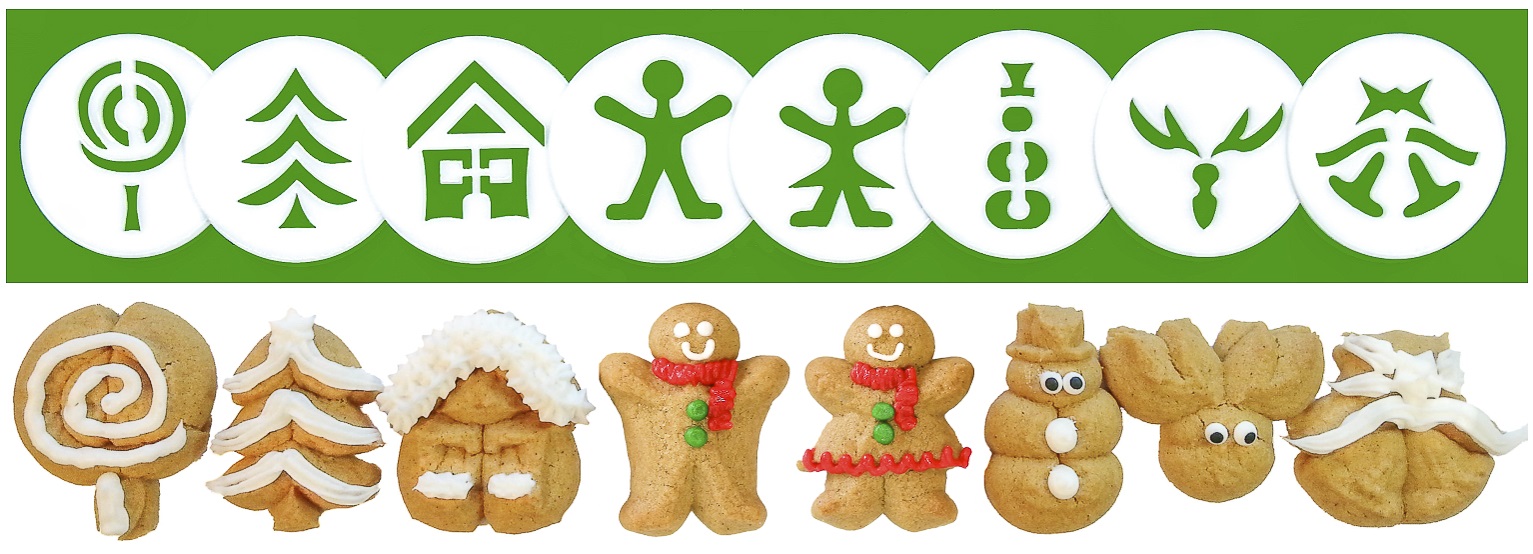
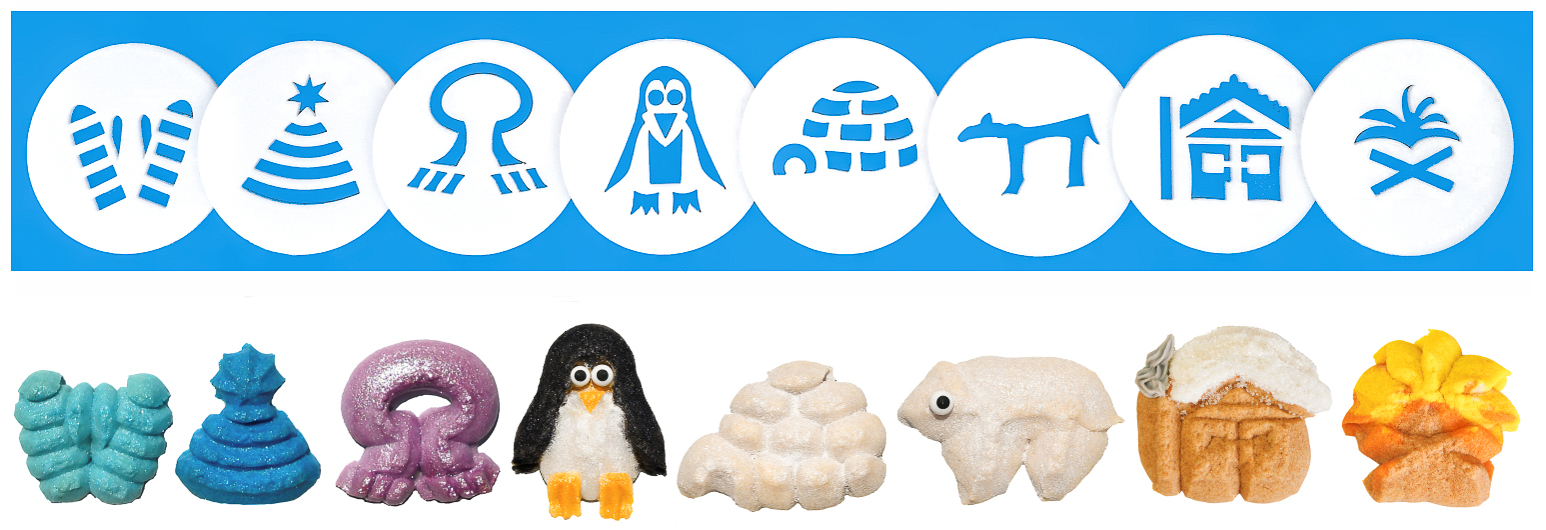
I used mostly red, blue, and green but set a little plain dough aside for angels, Santa, igloos and polar bears. I tinted a bit of brown dough for reindeer, pine cones, and gingerbread men.
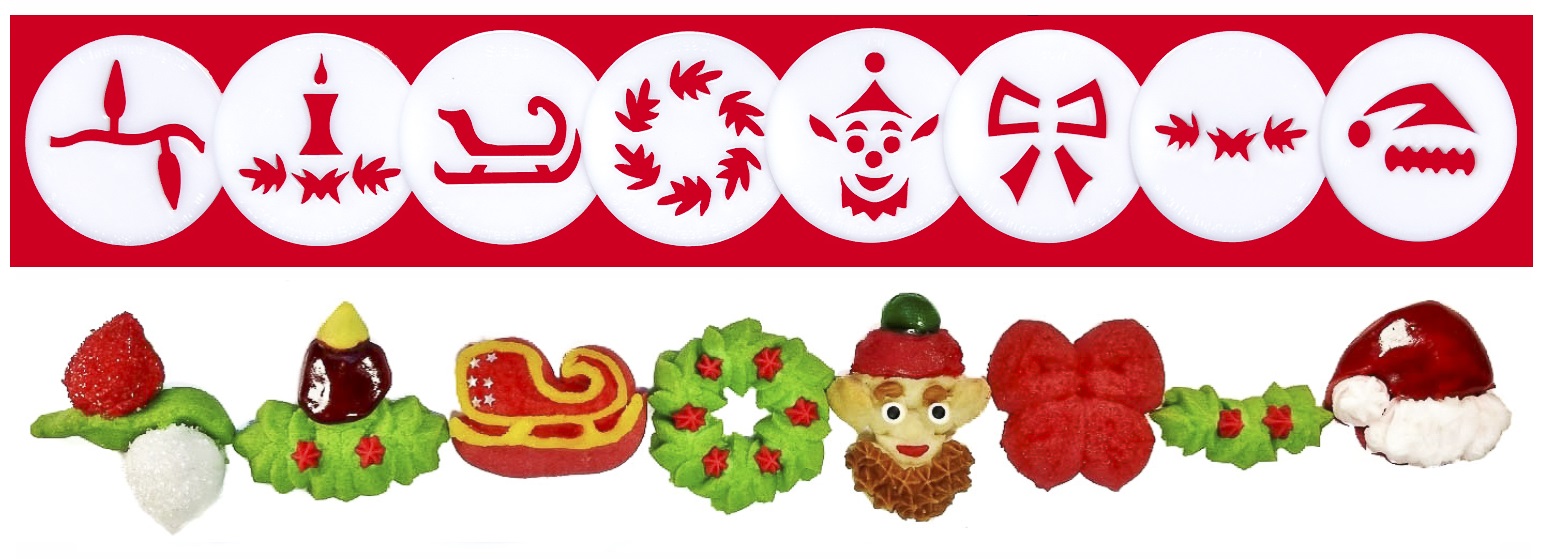
I listed the disks I used (and the sets they can be found in) at the bottom. We have 52 Christmas and winter themed disks, so you have plenty to choose from to make a nice display, even with just a few disks from one set.
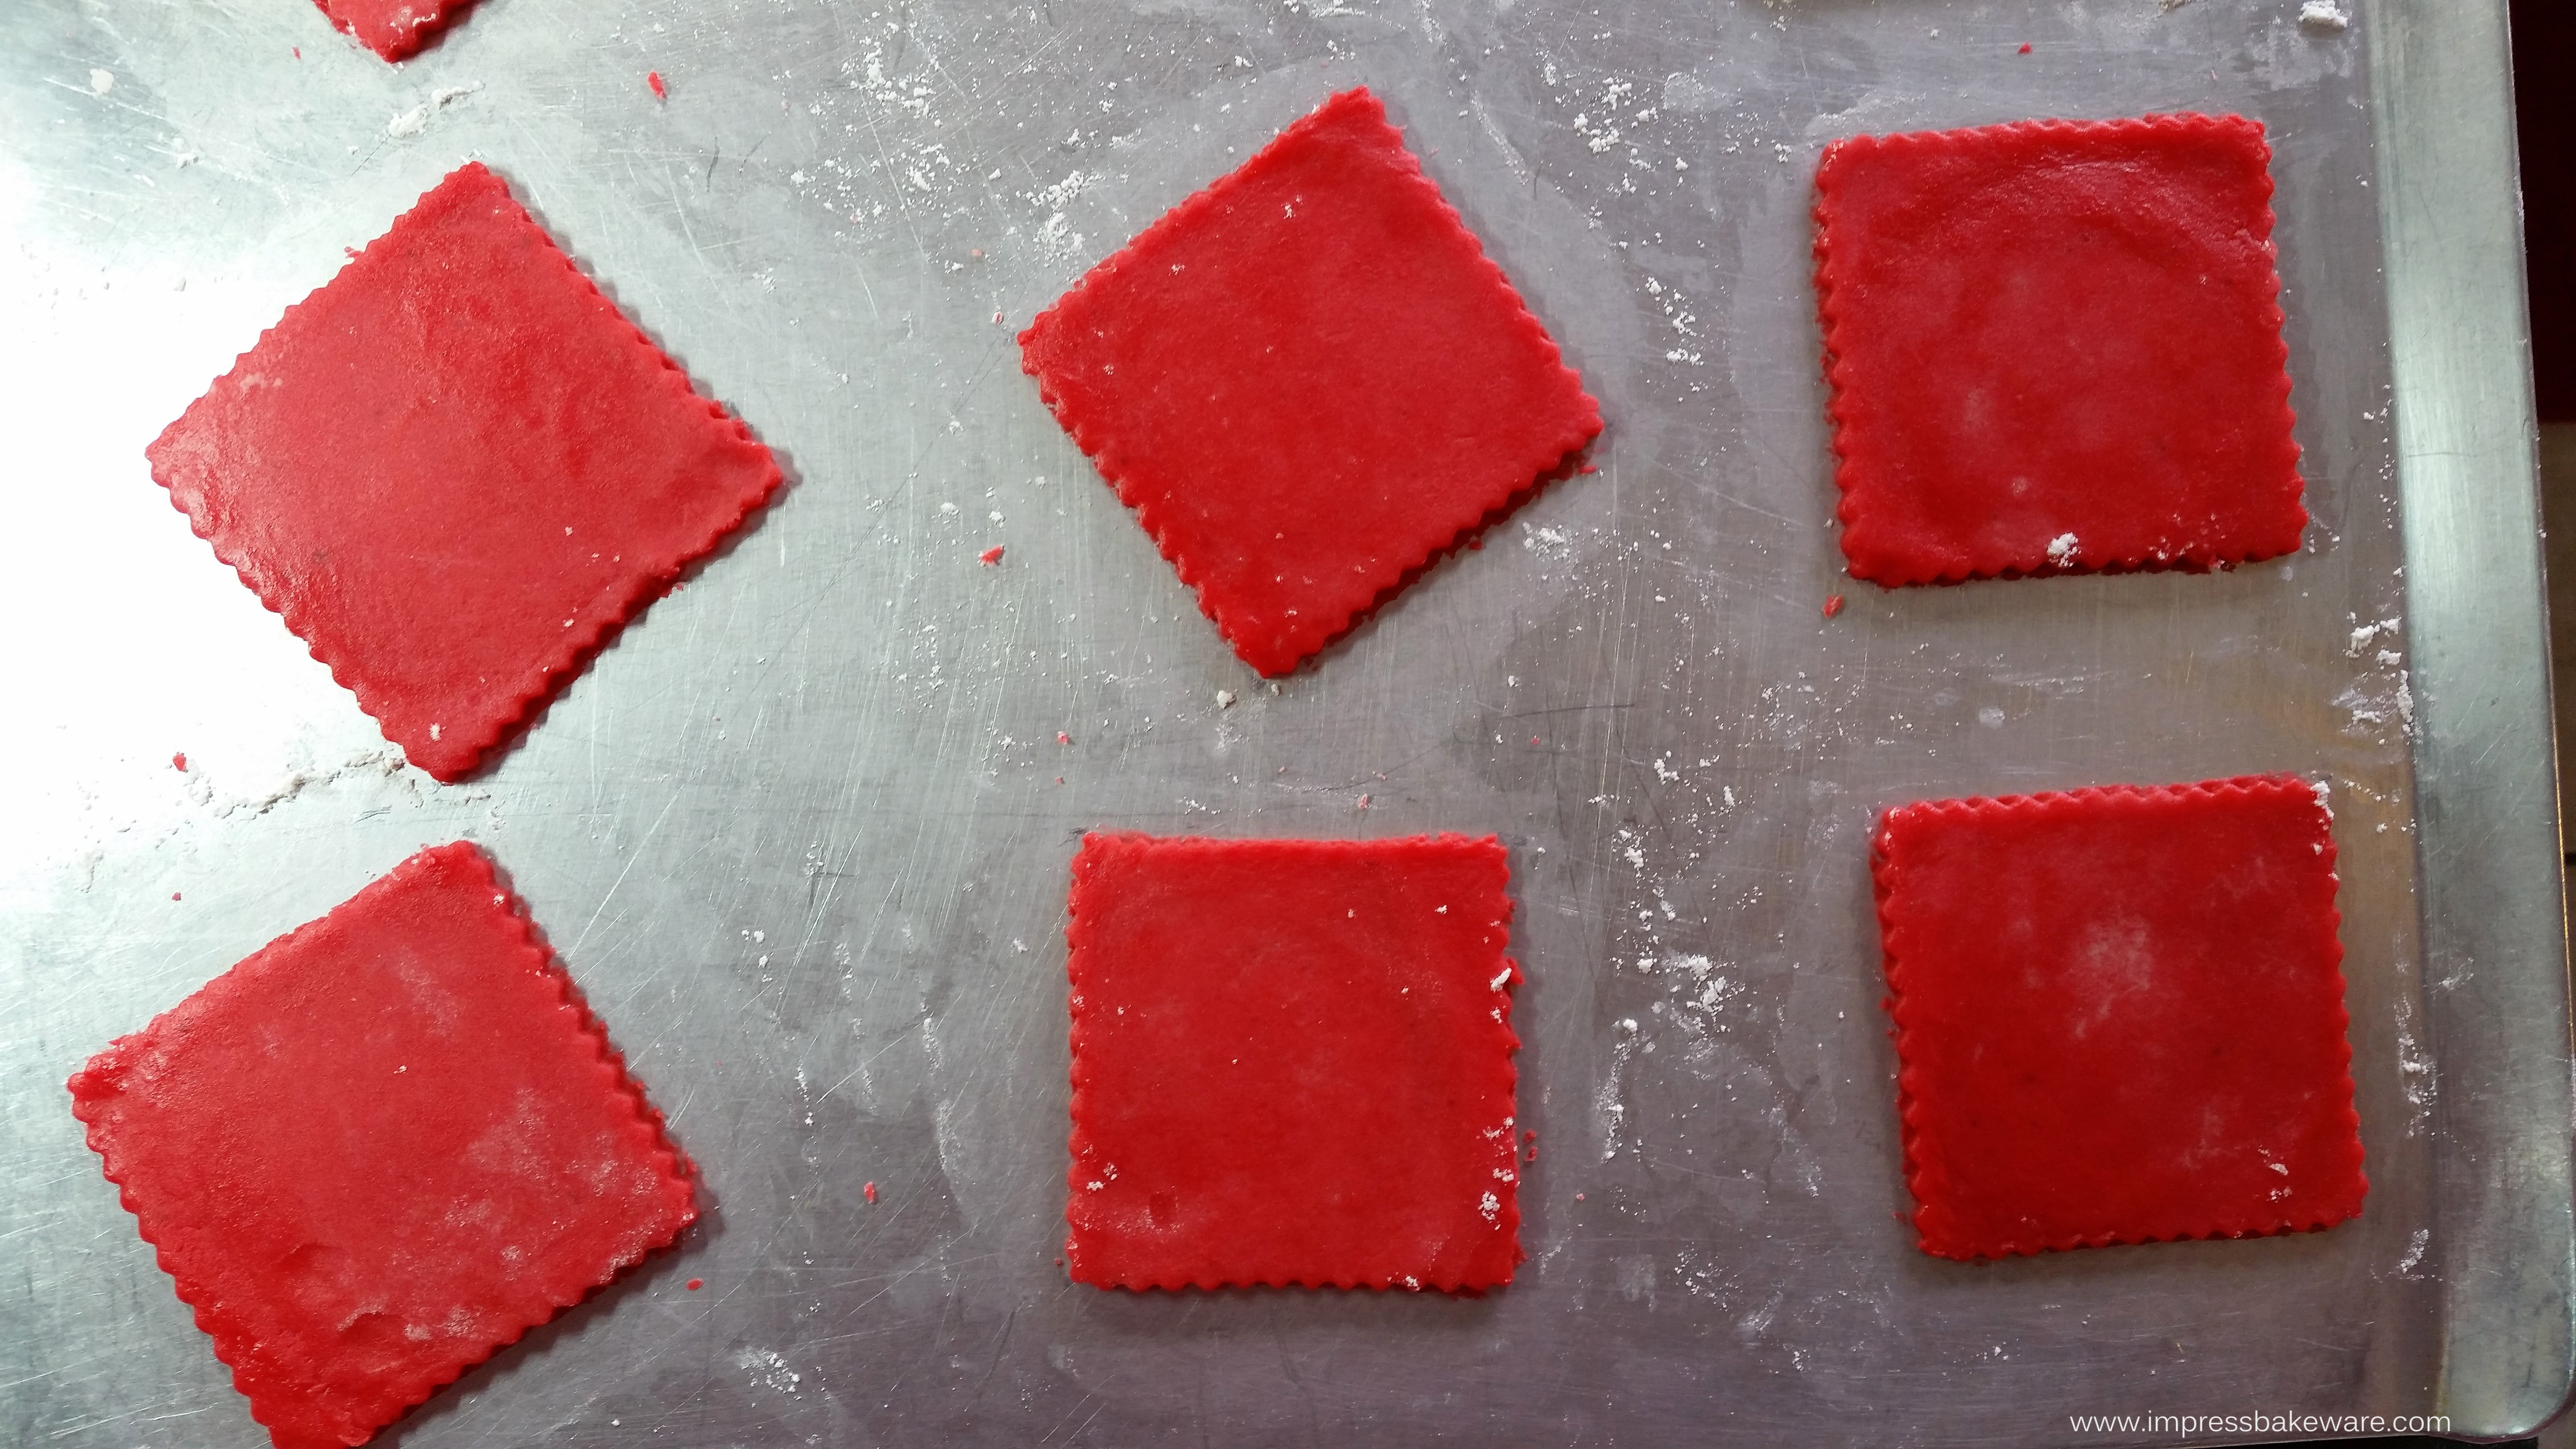
Once your dough is colored you can make the base cutout cookies. You will need 24 squares for a calendar. I used a very clean simple technique to make basic squares. Take an egg-sized piece of dough and roll it into a ball. It doesn’t have to be precise. Set it on your cookie sheet and dust the top of it lightly with flour.
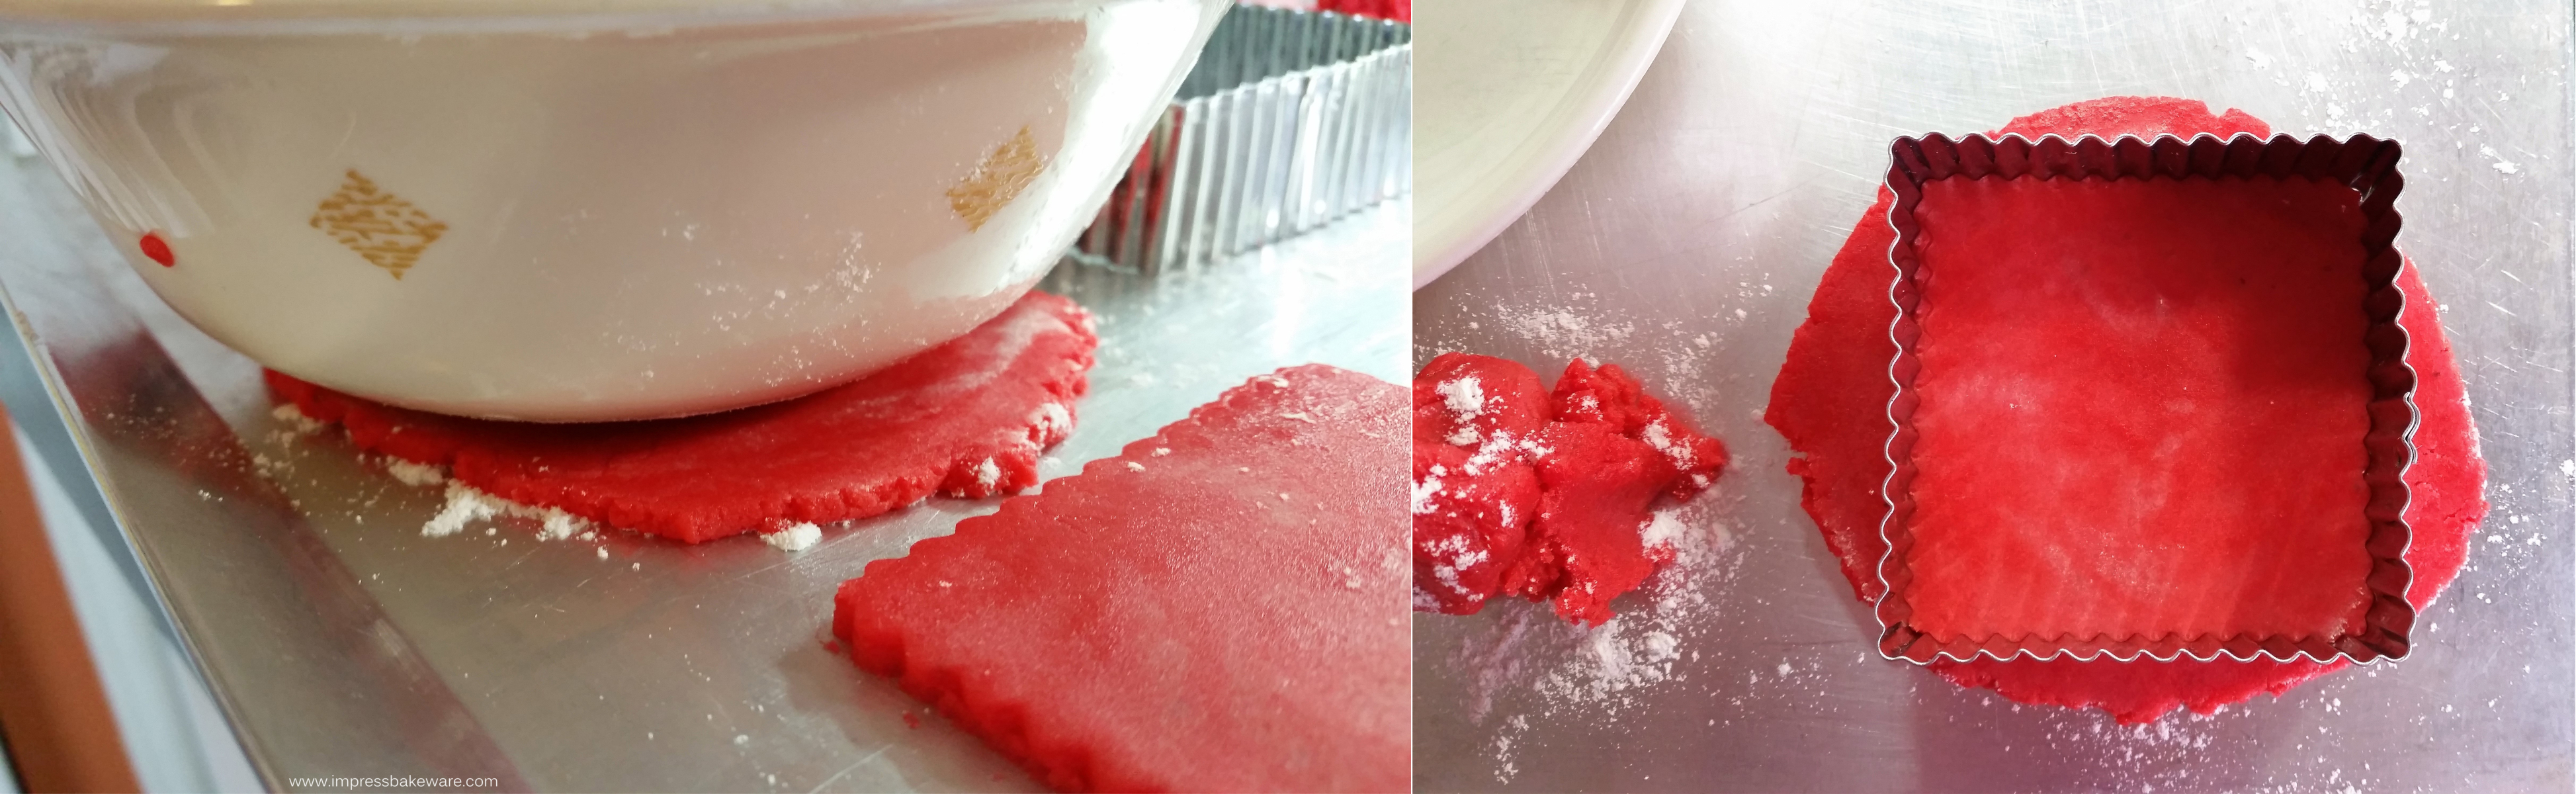

Dust the underside of a flat-bottomed bowl with flour (rub it with a little butter or dough first to make the flour stick) and use it to press downward on the dough ball. Rock it back and forth as needed to get an evenly flattened circle. Make the circle big enough to fit a square cookie cutter. I used a 3″ square. To measure the thickness, I made mine about the thickness of 2 1/2 or 3 quarters stacked up.
You want them thick enough to be sturdy. Make sure your corners aren’t too thin. Then just peel away the excess dough from the sides and throw it into the bowl to be re-used. I ran a fingernail along the cutter base to make a nice clean cookie edge.
2022 NOTE: This year we started selling embossed rolling pins and a rolling pin with thickness spacer rings to get a perfect cookie thickness. You could use the 1/4″ spacer to roll out these cookies and cut them out with a cookie cutter! Either method works.😊
Bake them for about 8 minutes, checking them early and often as all ovens are different. They do not need to brown on the edges to be done. Watch for a “set” look. Let them sit on the cookie sheet for about 3 minutes before removing to prevent breaking. There’s a time window where they’re not so soft or so stuck to the pan that they break. They should come up easily. Cool on a wire cooling rack.

Set your squares aside and start pressing your shapes. Load the cookie press with dough, using the back of a spoon to pack it in and remove air bubbles as you go along. Press your shapes onto un-greased (NOT non-stick) cookie sheets. It’s not uncommon for the first few shapes to come out wrong. Pressure has to build up in the barrel for the cookies to come out consistently. Once you’ve got a good shape, try to press in a consistent rhythm.
Here’s how some of the shapes I used look when pressed.
Wreaths, Christmas trees, and holly:

Angel and snowflake 2:

Santa:

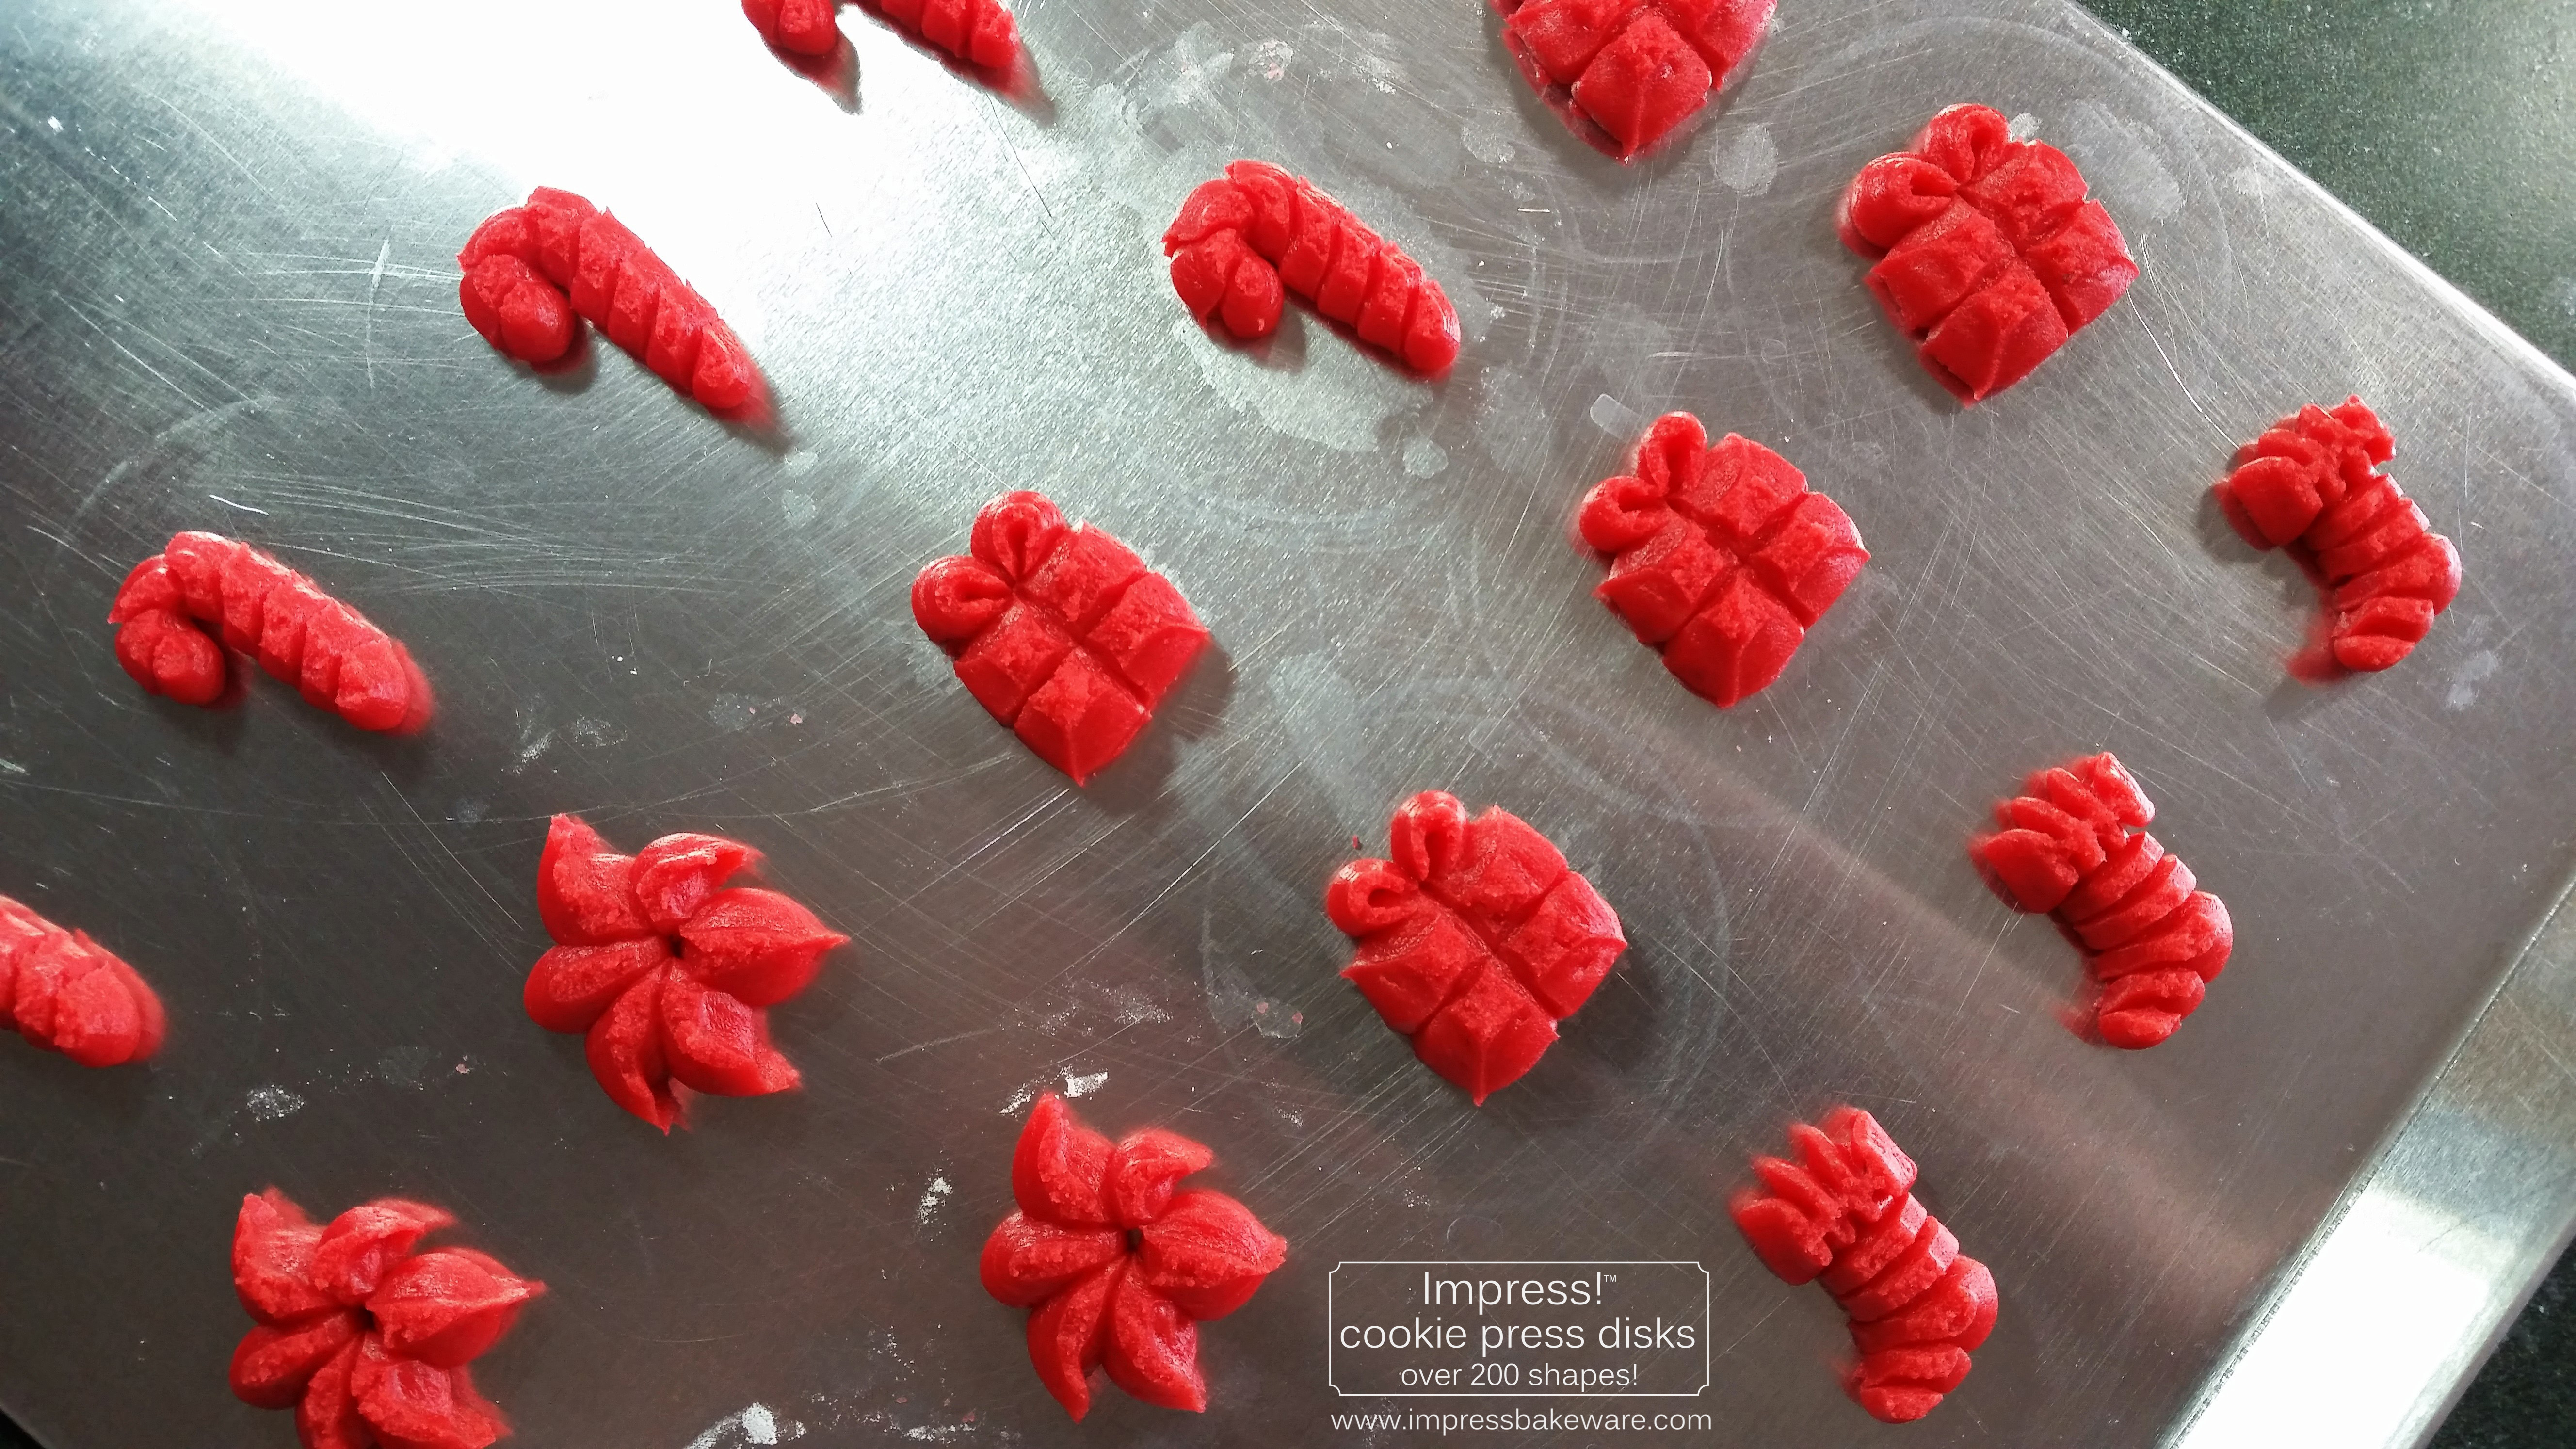
Stockings and gifts. Use your fingertip to straighten the edges of the gifts, as the dough often spreads as pressed. It just takes a second.
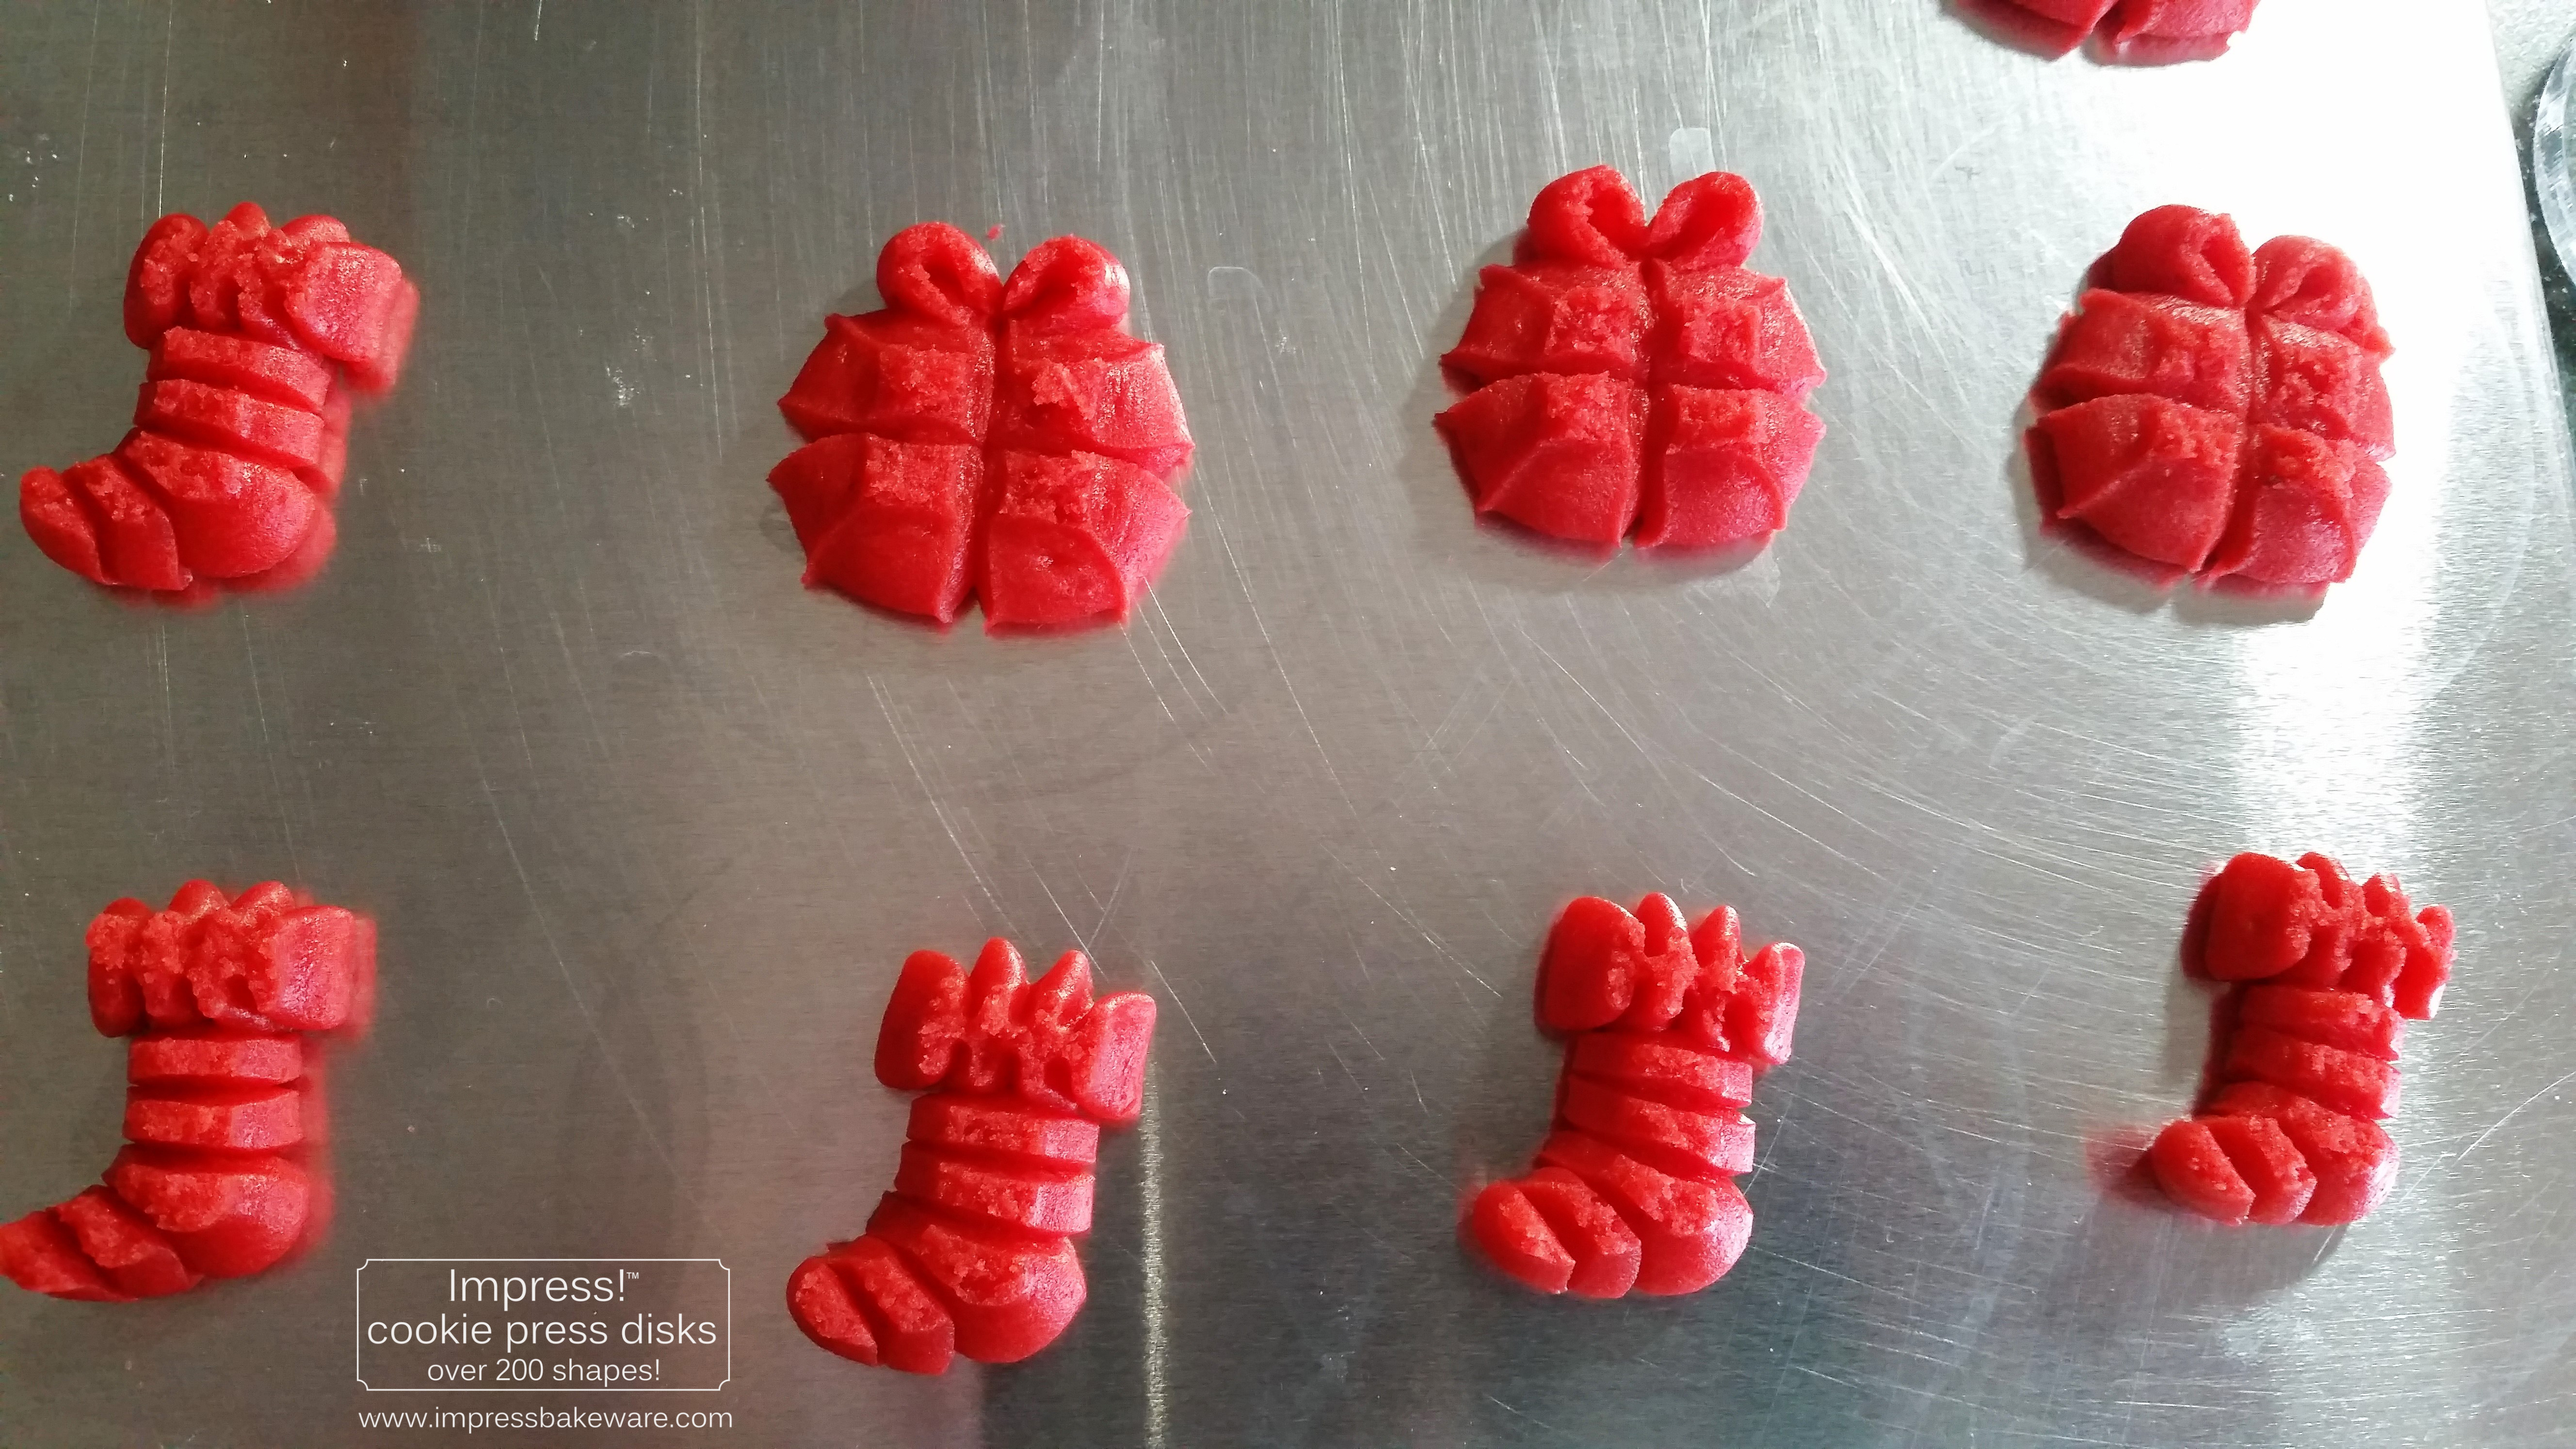
All straightened up!

Gifts with the candy canes and poinsettias. Press the candy canes thin. They often take less than one full click on one-click-per-cookie type presses.
Bake your pressed cookies for 6 to 9 minutes, again, depending on your oven. Check that first batch early and often. I watched mine closely and found that 7 1/2 minutes was perfect. Don’t over-bake these or brown them. As long as they look set or ever so slightly browned they’re good. The texture is simply amazing. Hang on to its wonderful richness by not over-baking.
Let them sit for 2 minutes before removing to a wire cooling rack.
Now to decorate.
If you’re using the luster dust method, simply apply the dust to the cookies with a food safe brush (they are in the cake decorating section of stores like Walk Mart, Hobby Lobby, or Michael’s, or online). Tap the brush into the jar of dust and paint it on the squares. Use more of a tapping method for the shapes. I like to fan out my brush as I begin as it holds and spreads more dust that way.
NOTE: Always make sure you are using EDIBLE dusts! Some lustre/pearl/glitter dusts on the market are “non-toxic” but that does not mean they are edible. Plenty of brands have actual food ingredients and are marked “edible”. ONLY use those for safety’s sake! 2022 NOTE: We are now selling luster dusts! We’ve partnered with Bakell, who makes exquisite dusts here in the USA. Their colors are luxurious and the dusts are fabulous to work with. They’re on our website and Etsy shop. 
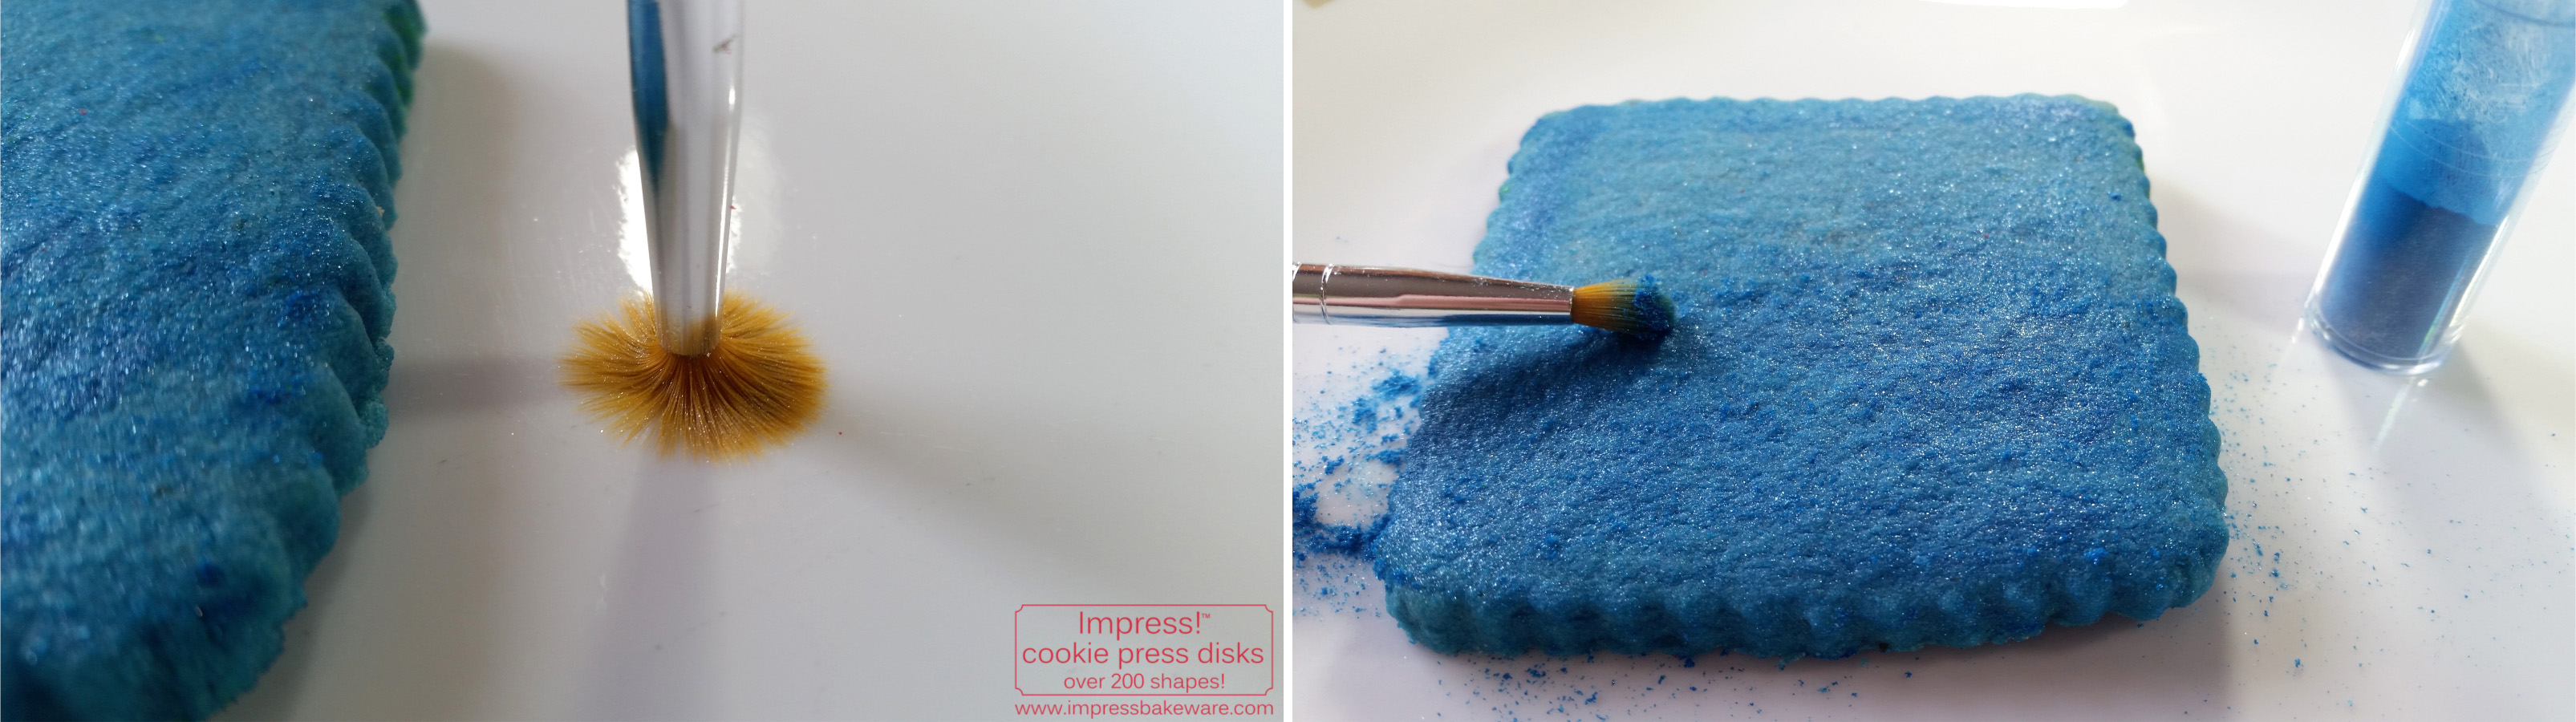
As you can see the blue cookie becomes noticeably darker as the dust goes on. It’s such a rich velvety look.
I’m going to highlight just some of the shapes I decorated. Most are pretty obvious how the decorating was done. You can use your own fabulous ideas or peruse my other blogs for more suggestions.
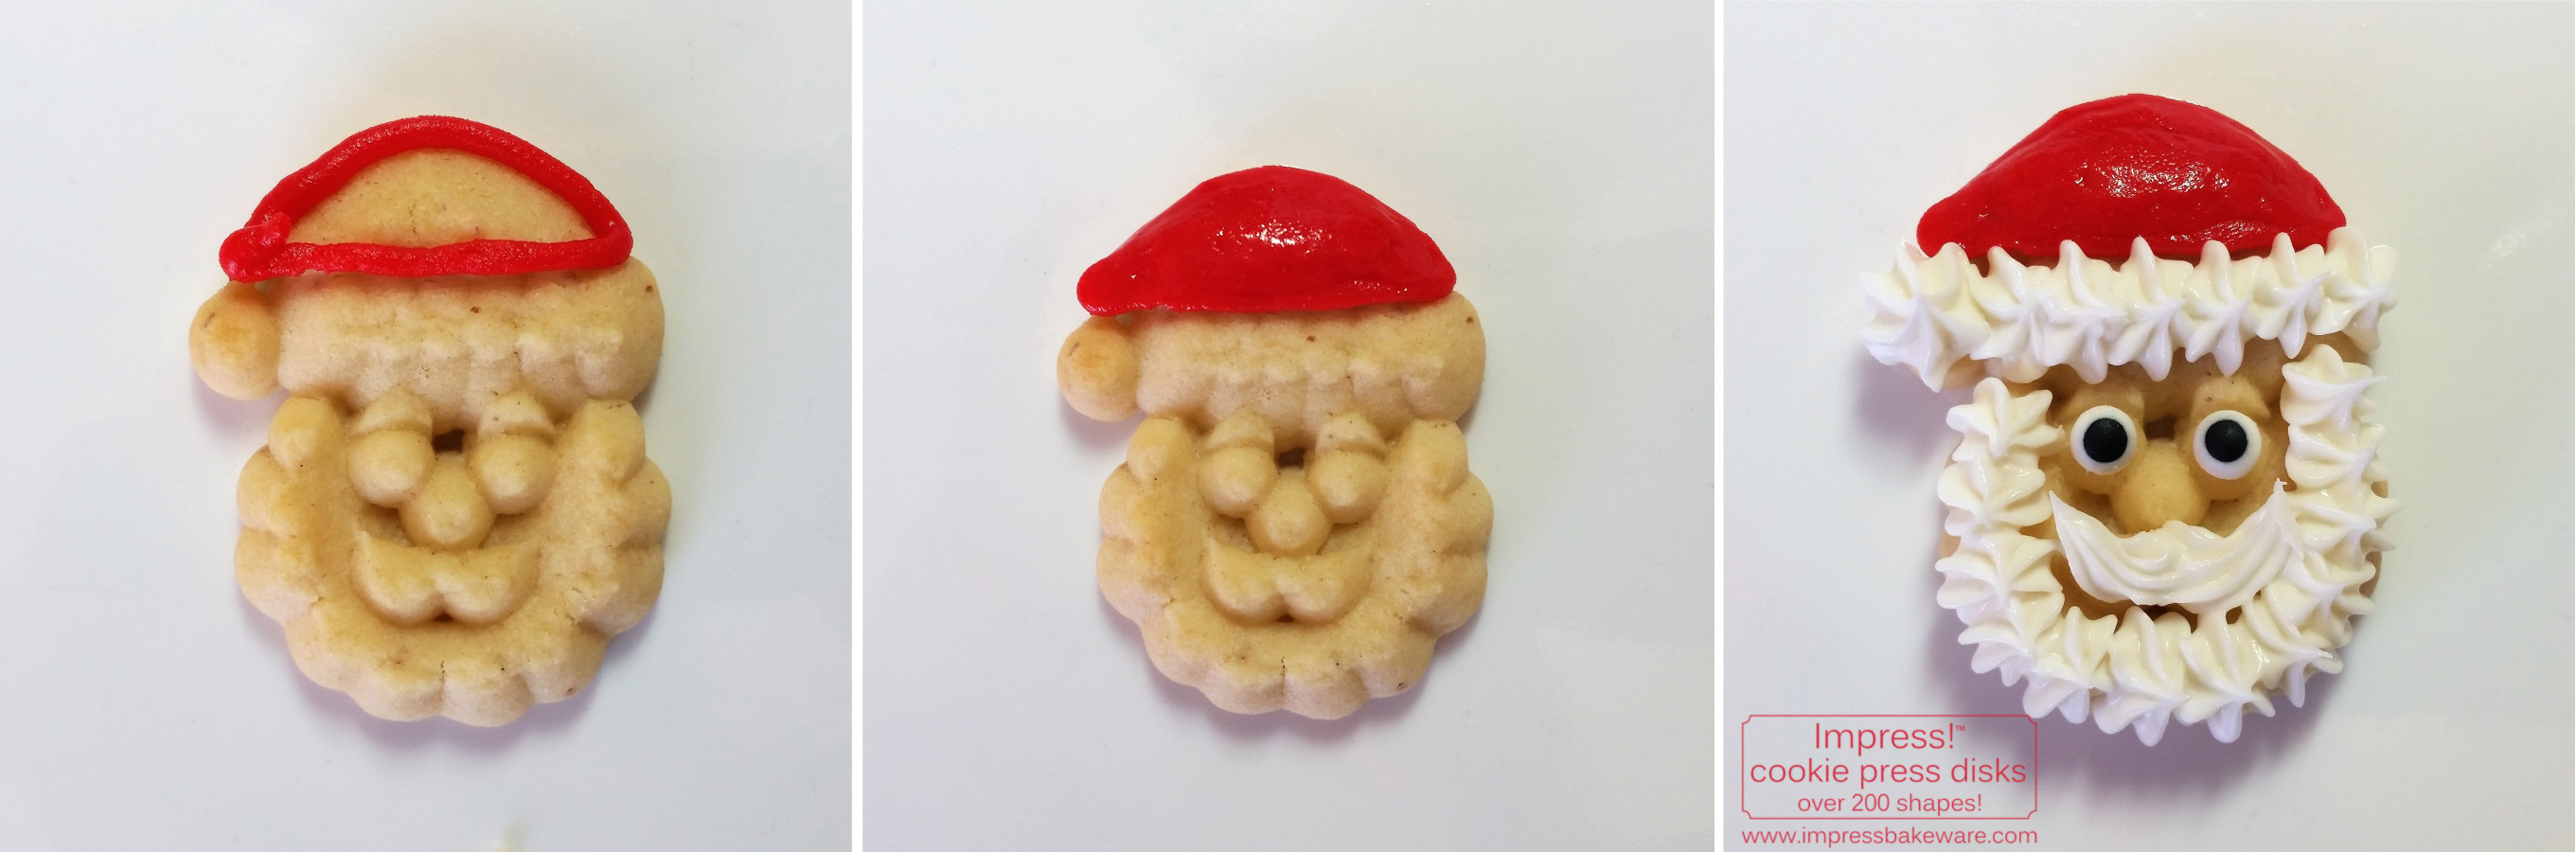
Santa was the most complicated cookie I made. And really, it’s just time-consuming, not hard. Outline Santa’s hat in red icing, then fill it in. Use a slightly wet finger to smooth it all out evenly. Let that set for a bit then add white stars for the hat trim, tassel, beard and mustache. I used round and star decorating tips. I added tiny candy eyes (link below) or you could use a dot of black icing.
The stocking, Santa /Elf hat, and gift were done much the same way. I used a dab of white icing to glue on white nonpareils.

The angels were the only other complicated cookie as they also take 2 steps. Pipe white icing onto the angel’s dress and smooth it with a wet finger. Then sprinkle on white sanding sugar. Use a brush to wipe away the excess. Let that set for a little bit then use gold pearl dust to color the wings. Use a tapping method to get the dust on then smooth it out.

They turn out angelically sparkly.

When your cookie shapes are finished, attach them – and any other fun decors like snowflakes – to the cutout squares with a little white icing. Then assemble the squares into the calendar. I used a disposable 13″ X 9″ cake platter to put my display on. It was just the right size for a calendar with twenty-four 3″ squares.
I absolutely adore the snowflakes (dusted with white pearl dust) on blue.

Use a round writing tip and white icing to add the calendar numbers.
Look at the wonderful height on these cookies! The have a totally unique look especially as light and shadow play on their 3-dimensionality. They will be the talk of any party.

Here is my attempt at icing the bottom cookies! I warned you, I am not very good at this. Outline the cookie edge but not so close to the edge that it will run over. Let the border set a bit then squiggle more icing into the center. Use a knife to spread it evenly. Let it set just a few minutes, then add your top cookie. It will sink in ever so slightly and be held perfectly in place.

Add decors to semi-set icing. Be careful! They can sink.

It is a really neat look and I like it a lot. As a family project I think that would be tremendously fun. So maybe when my daughter is home from college for Christmas we can play with this. Add a few mugs of cocoa and we’ve got a super fun afternoon.
Here are a few more ideas. The poinsettia:

The holly with an icing border and holly leaves and gold nonpareils:
Here is a shot of 3 of each: 3 pearl dusted and 3 iced.

They both have a rich look and each has its own merit. The dusted cookies are far less time consuming and easier, with a velvety look. The iced cookies are more work and time but have a fancy glossy look.
If you have leftover cookies, pour a cold glass of milk or make some hot cocoa then sit down and eat them! You’ve earned it after all that baking.

I started my Christmas baking fun with this project. One of my best friends, Wendy, and my niece Caitlyn helped out on this one, choosing cookie shapes and color patterns with me. We had a blast making this and we hope you do, too.
Merry Christmas and Happy Baking!
~Susie
Disk Designer/Co-Owner at Impress! Bakeware, LLC
Our website has all of our 200+ disk shapes, cookie press, embossed rolling pins, baking accessories plus more about our Women/Family Owned company! impressbakeware.com
All products are on our Etsy shop.
Our cookie press and disks and embossed rolling pins are also available on Amazon
Follow us on facebook!
The sets used in this post:
Christmas


Snowflakes

Christmas Two
Gingerbread
Ornaments

Winter
Woodland

Flowers

List of disks used (set it is sold in in parentheses) as numbered in the calendar:
- Gift (Christmas) 2. Snowflake 11 (Snowflakes) 3. Christmas Tree (Christmas) 4. Snowflake 2 (Snowflakes) 5. Poinsettia made by the Lily Disk (Flowers) 6.Wreath (Christmas Two) 7. Gingerbread Boy (Gingerbread) 8. Candy Cane (Christmas) 9. Snowflake 4 (Snowflakes) 10. Stocking (Christmas) 11. Santa (Christmas) 12. Cardinal (Christmas Ornaments) 13. Santa (Christmas) 14. Holly (Christmas) 15. Reindeer Head (Gingerbread) 16. Angel (Christmas) 17. Christmas Tree (Christmas) 18. Reindeer (Christmas) 19. Pine Cone (Woodland) 20. Polar Bear (Winter) 21. Wreath (Christmas Two) 22. Igloo (Winter) 23. Santa/Elf Hat (Christmas Two) 24. Holly (Christmas).

Thank you for putting these posts out, I really enjoy them, makes me want to get my disks out and play with them. And to get some more.
Sent from my iPad
>
LikeLike
Thank you Verna! That means a lot to me. I’m so happy that you enjoy them. 🙂
LikeLike