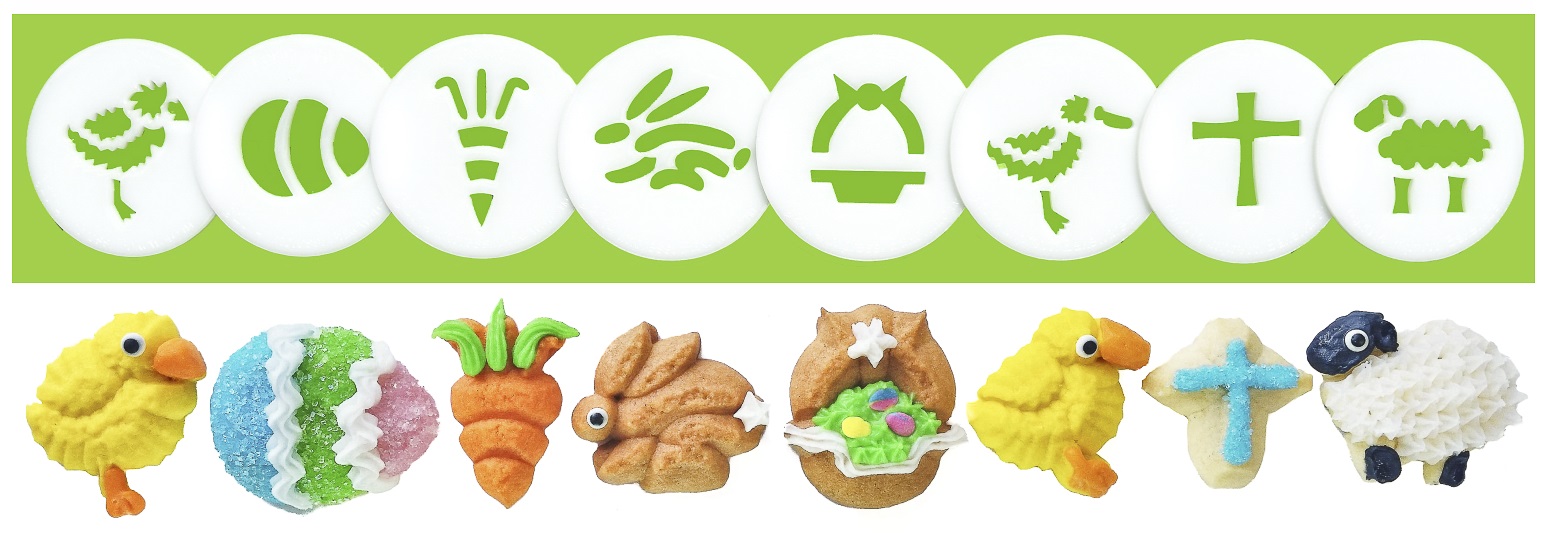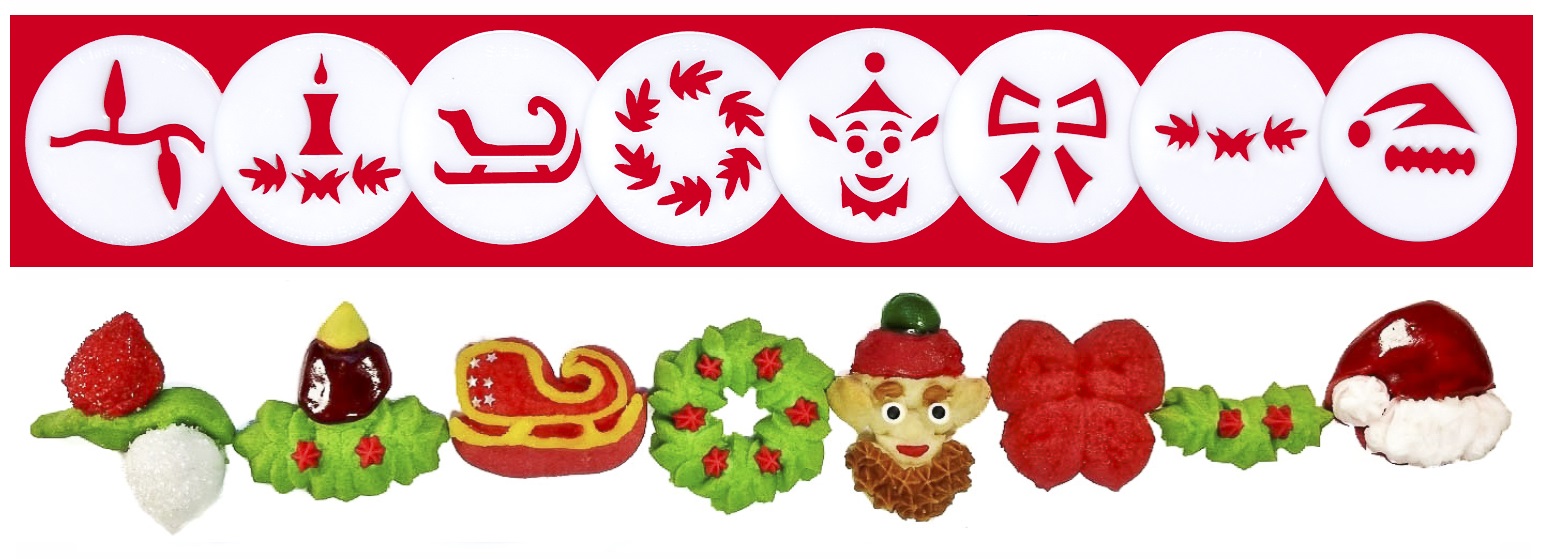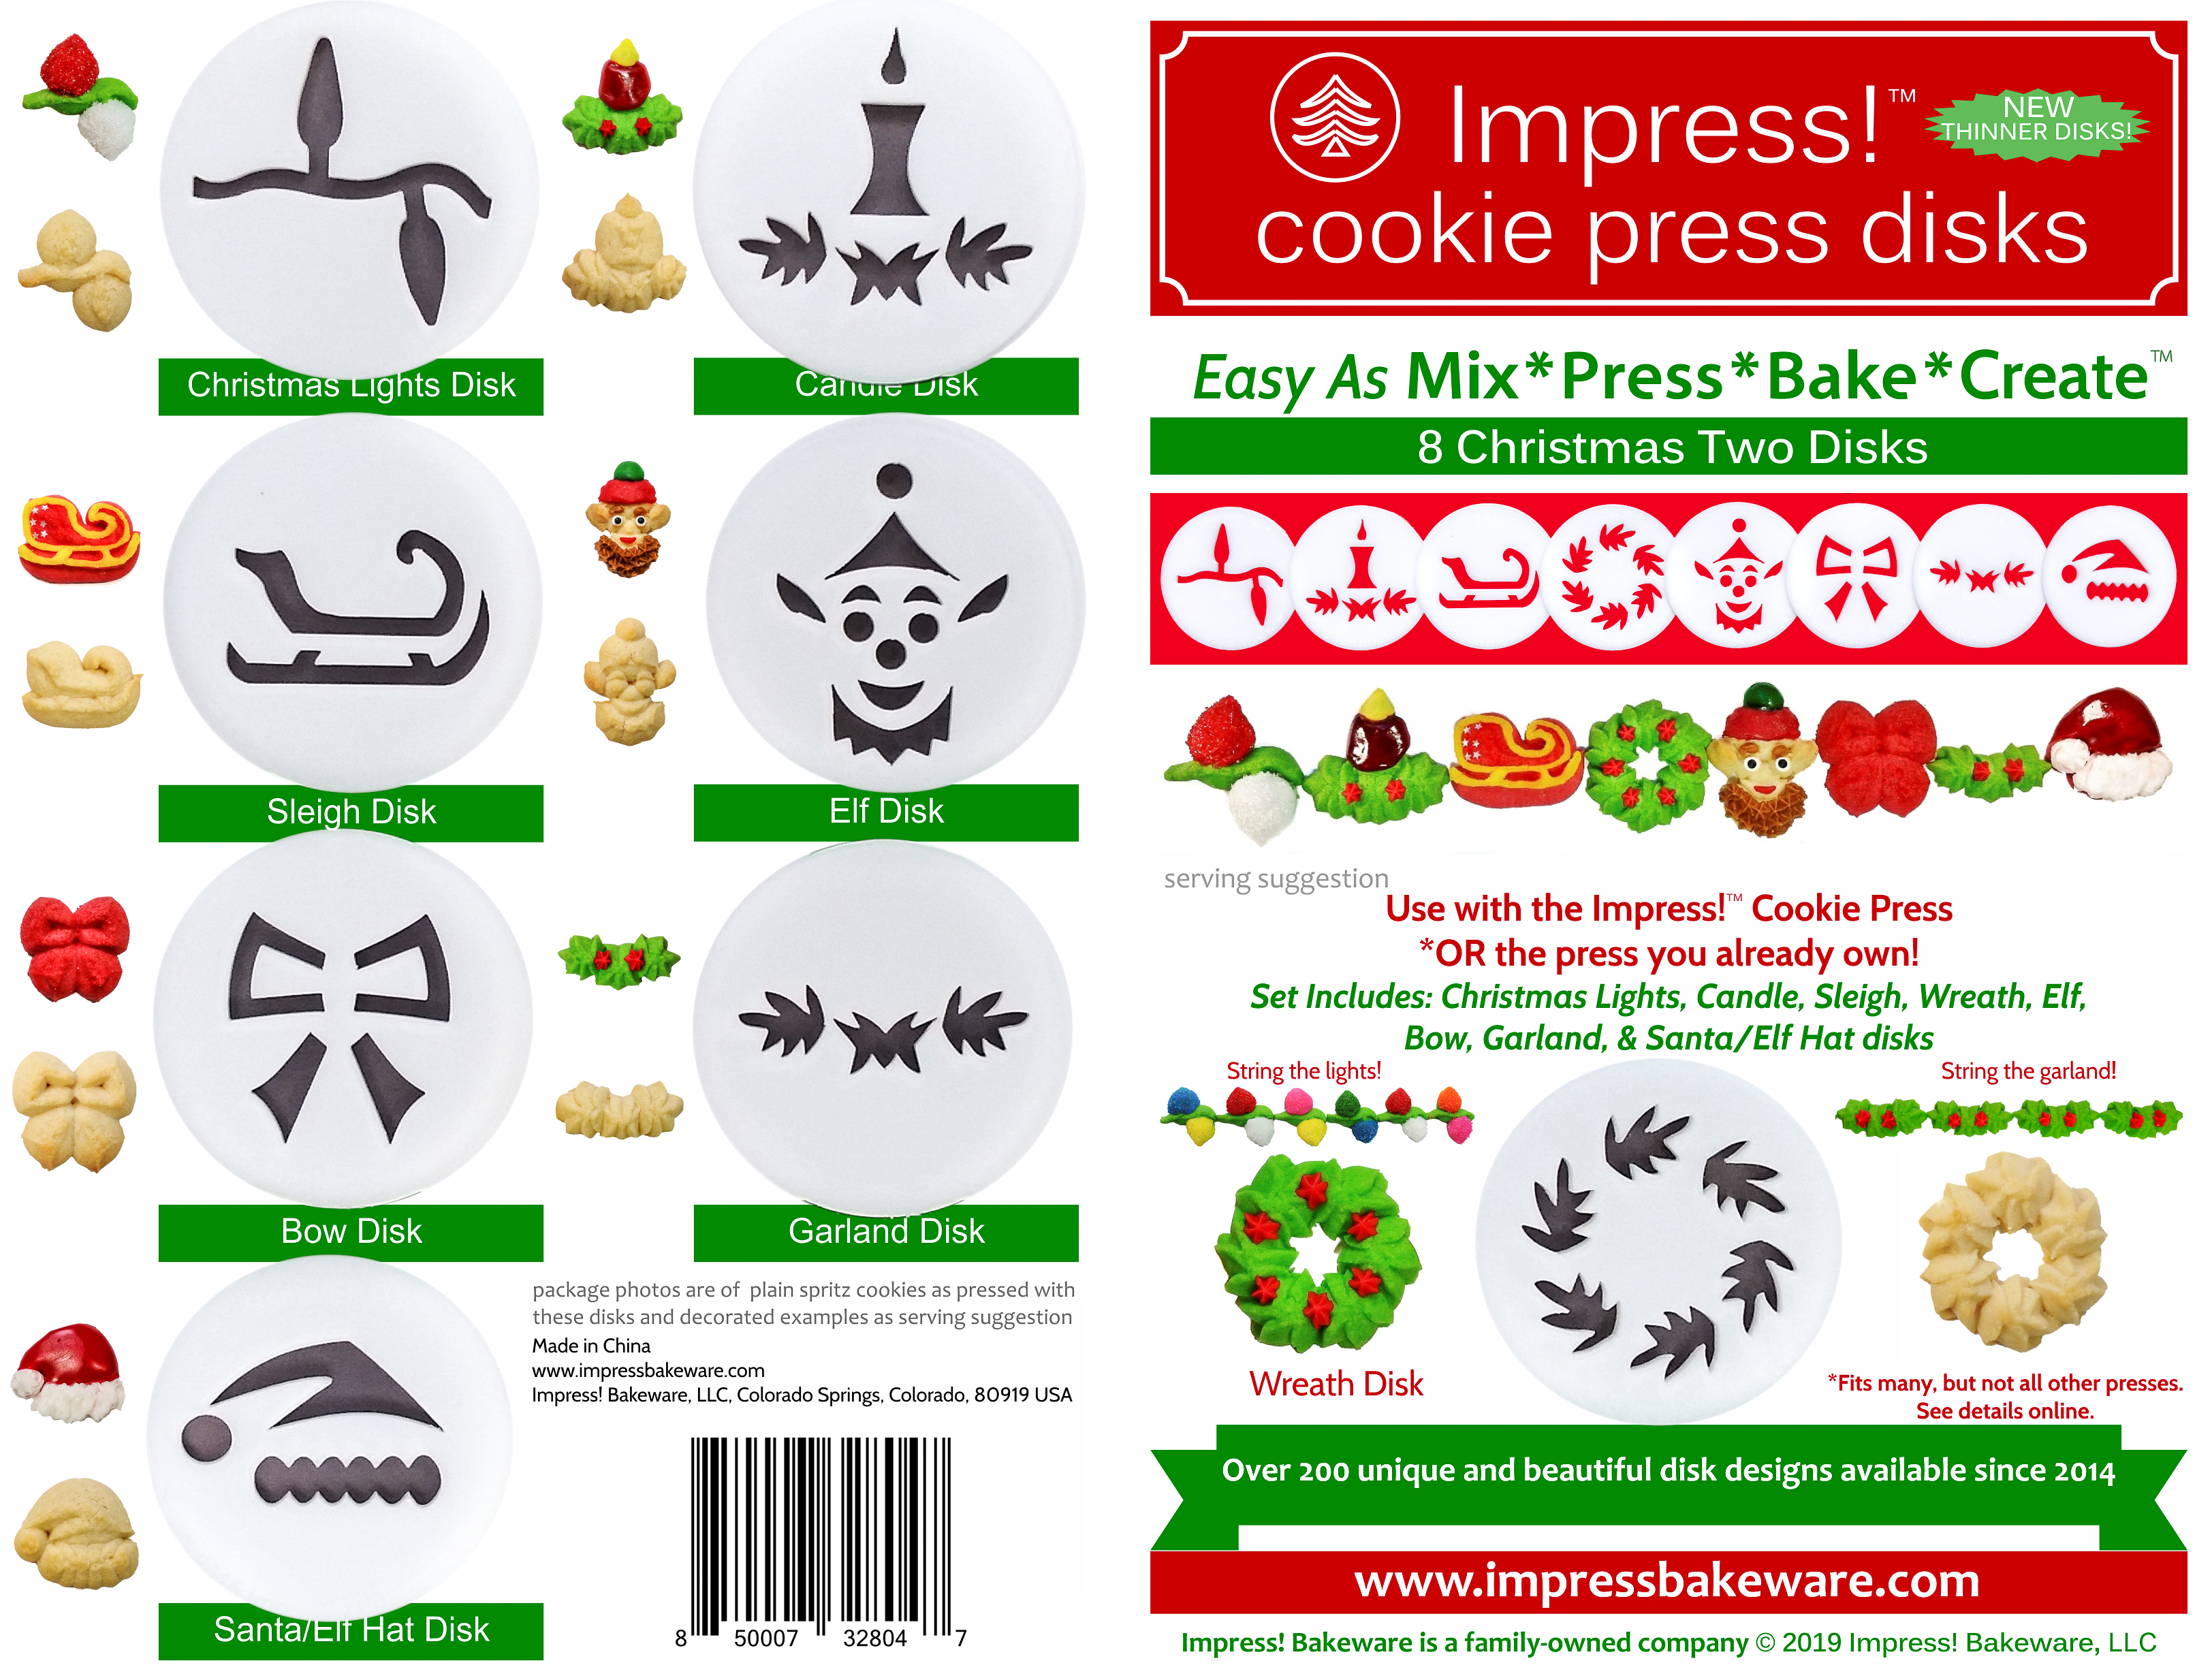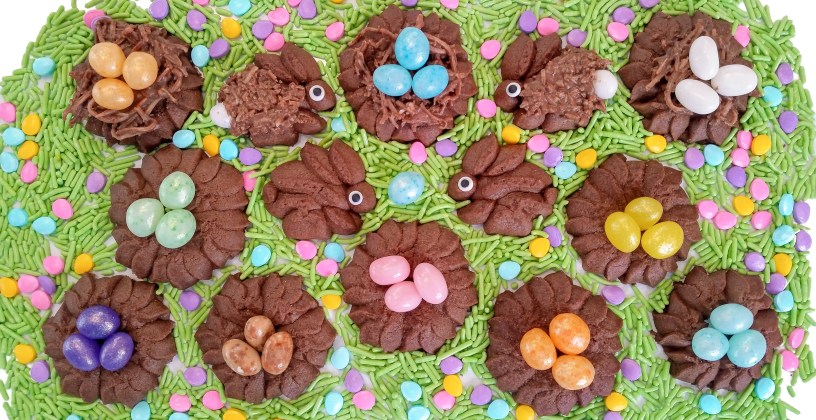

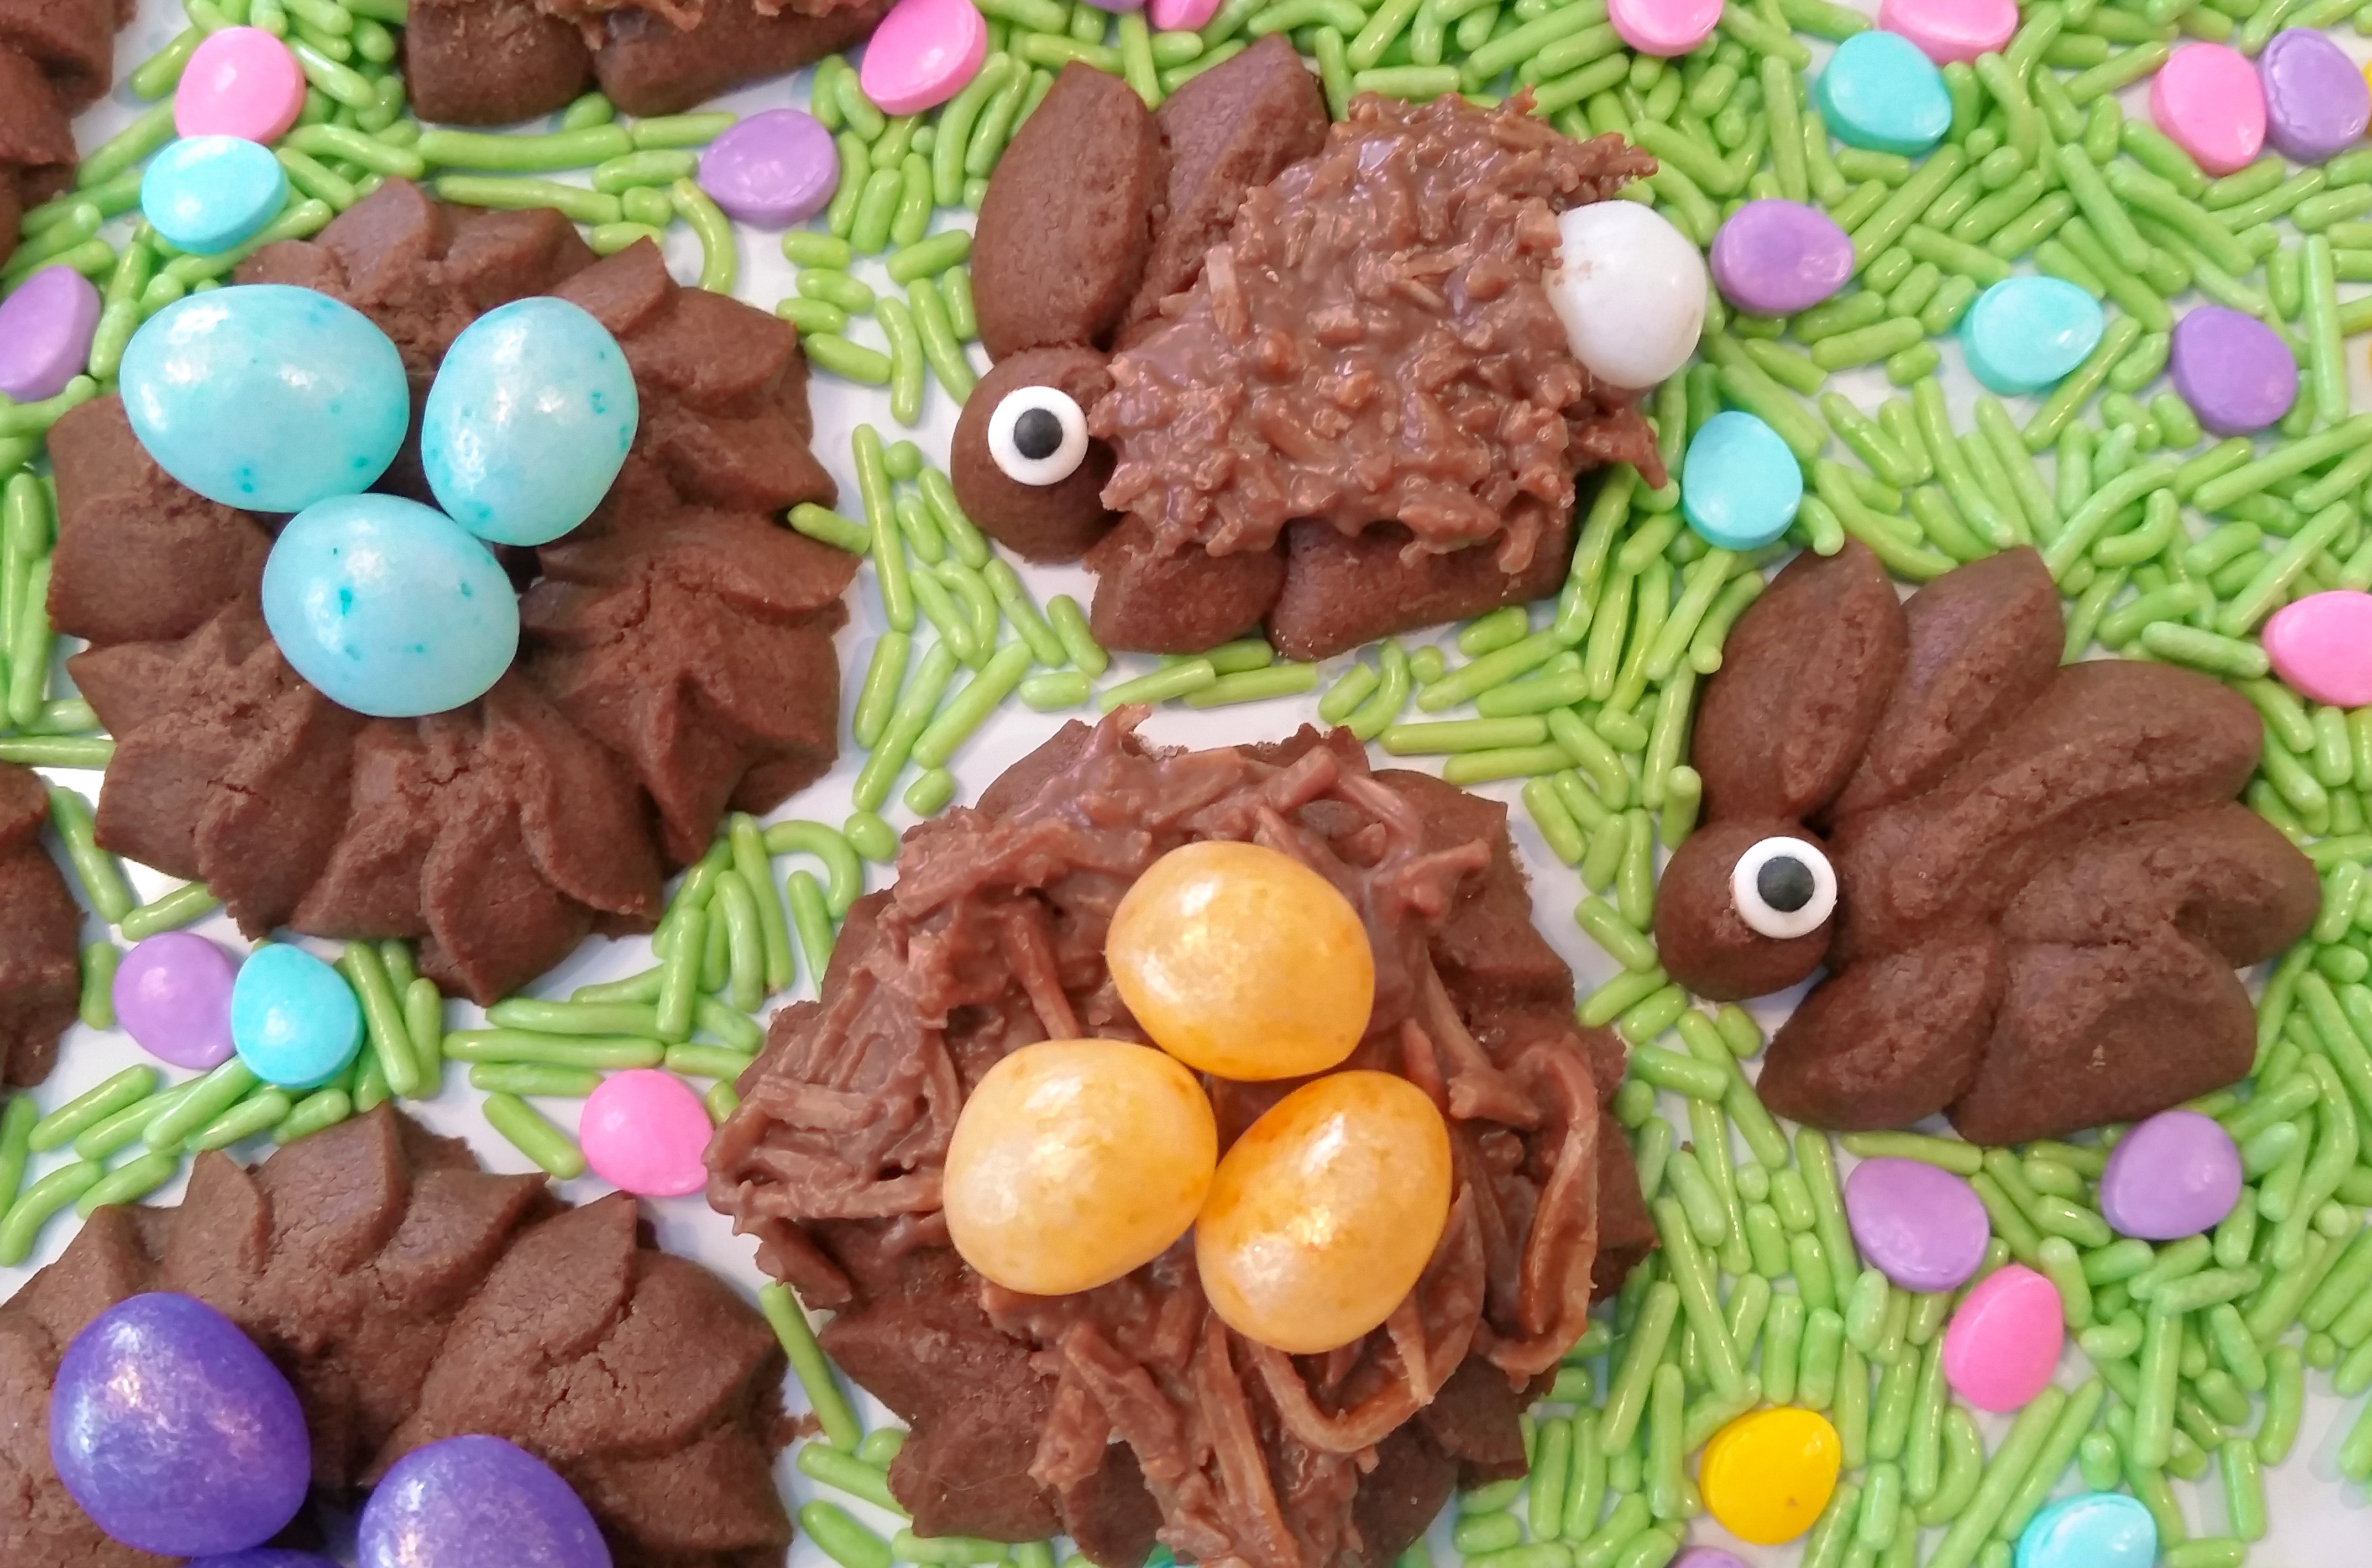
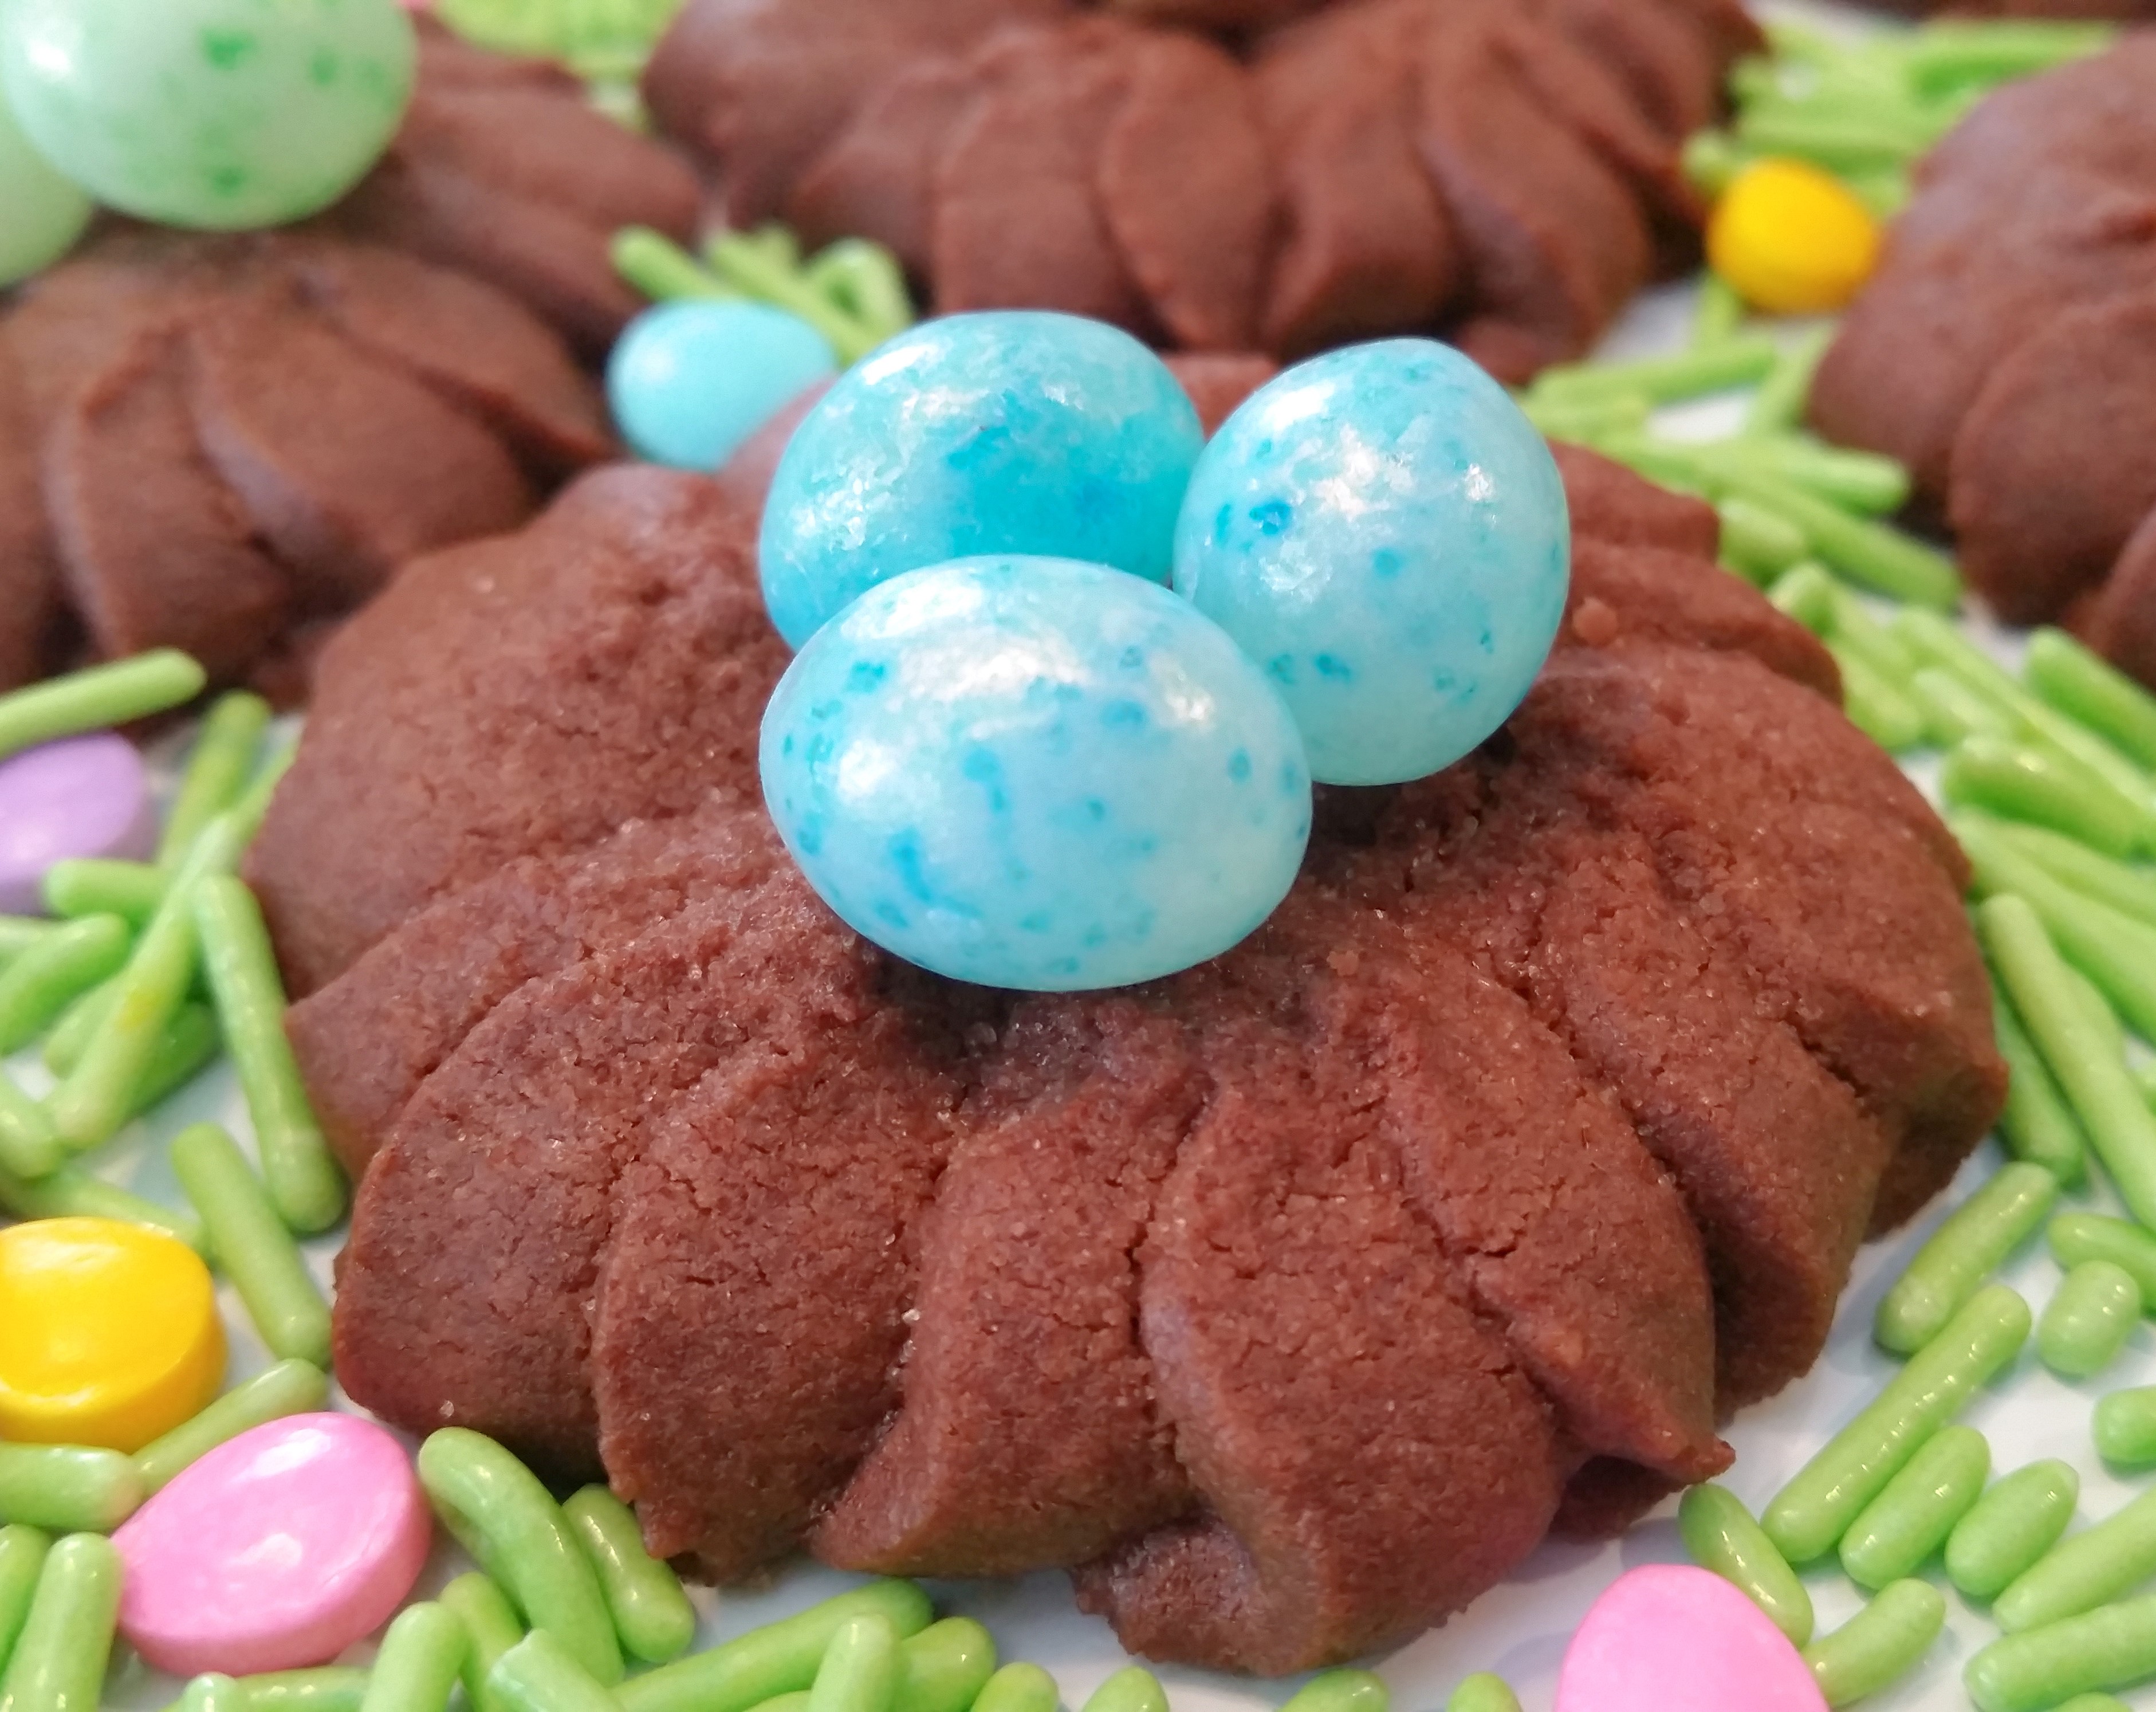
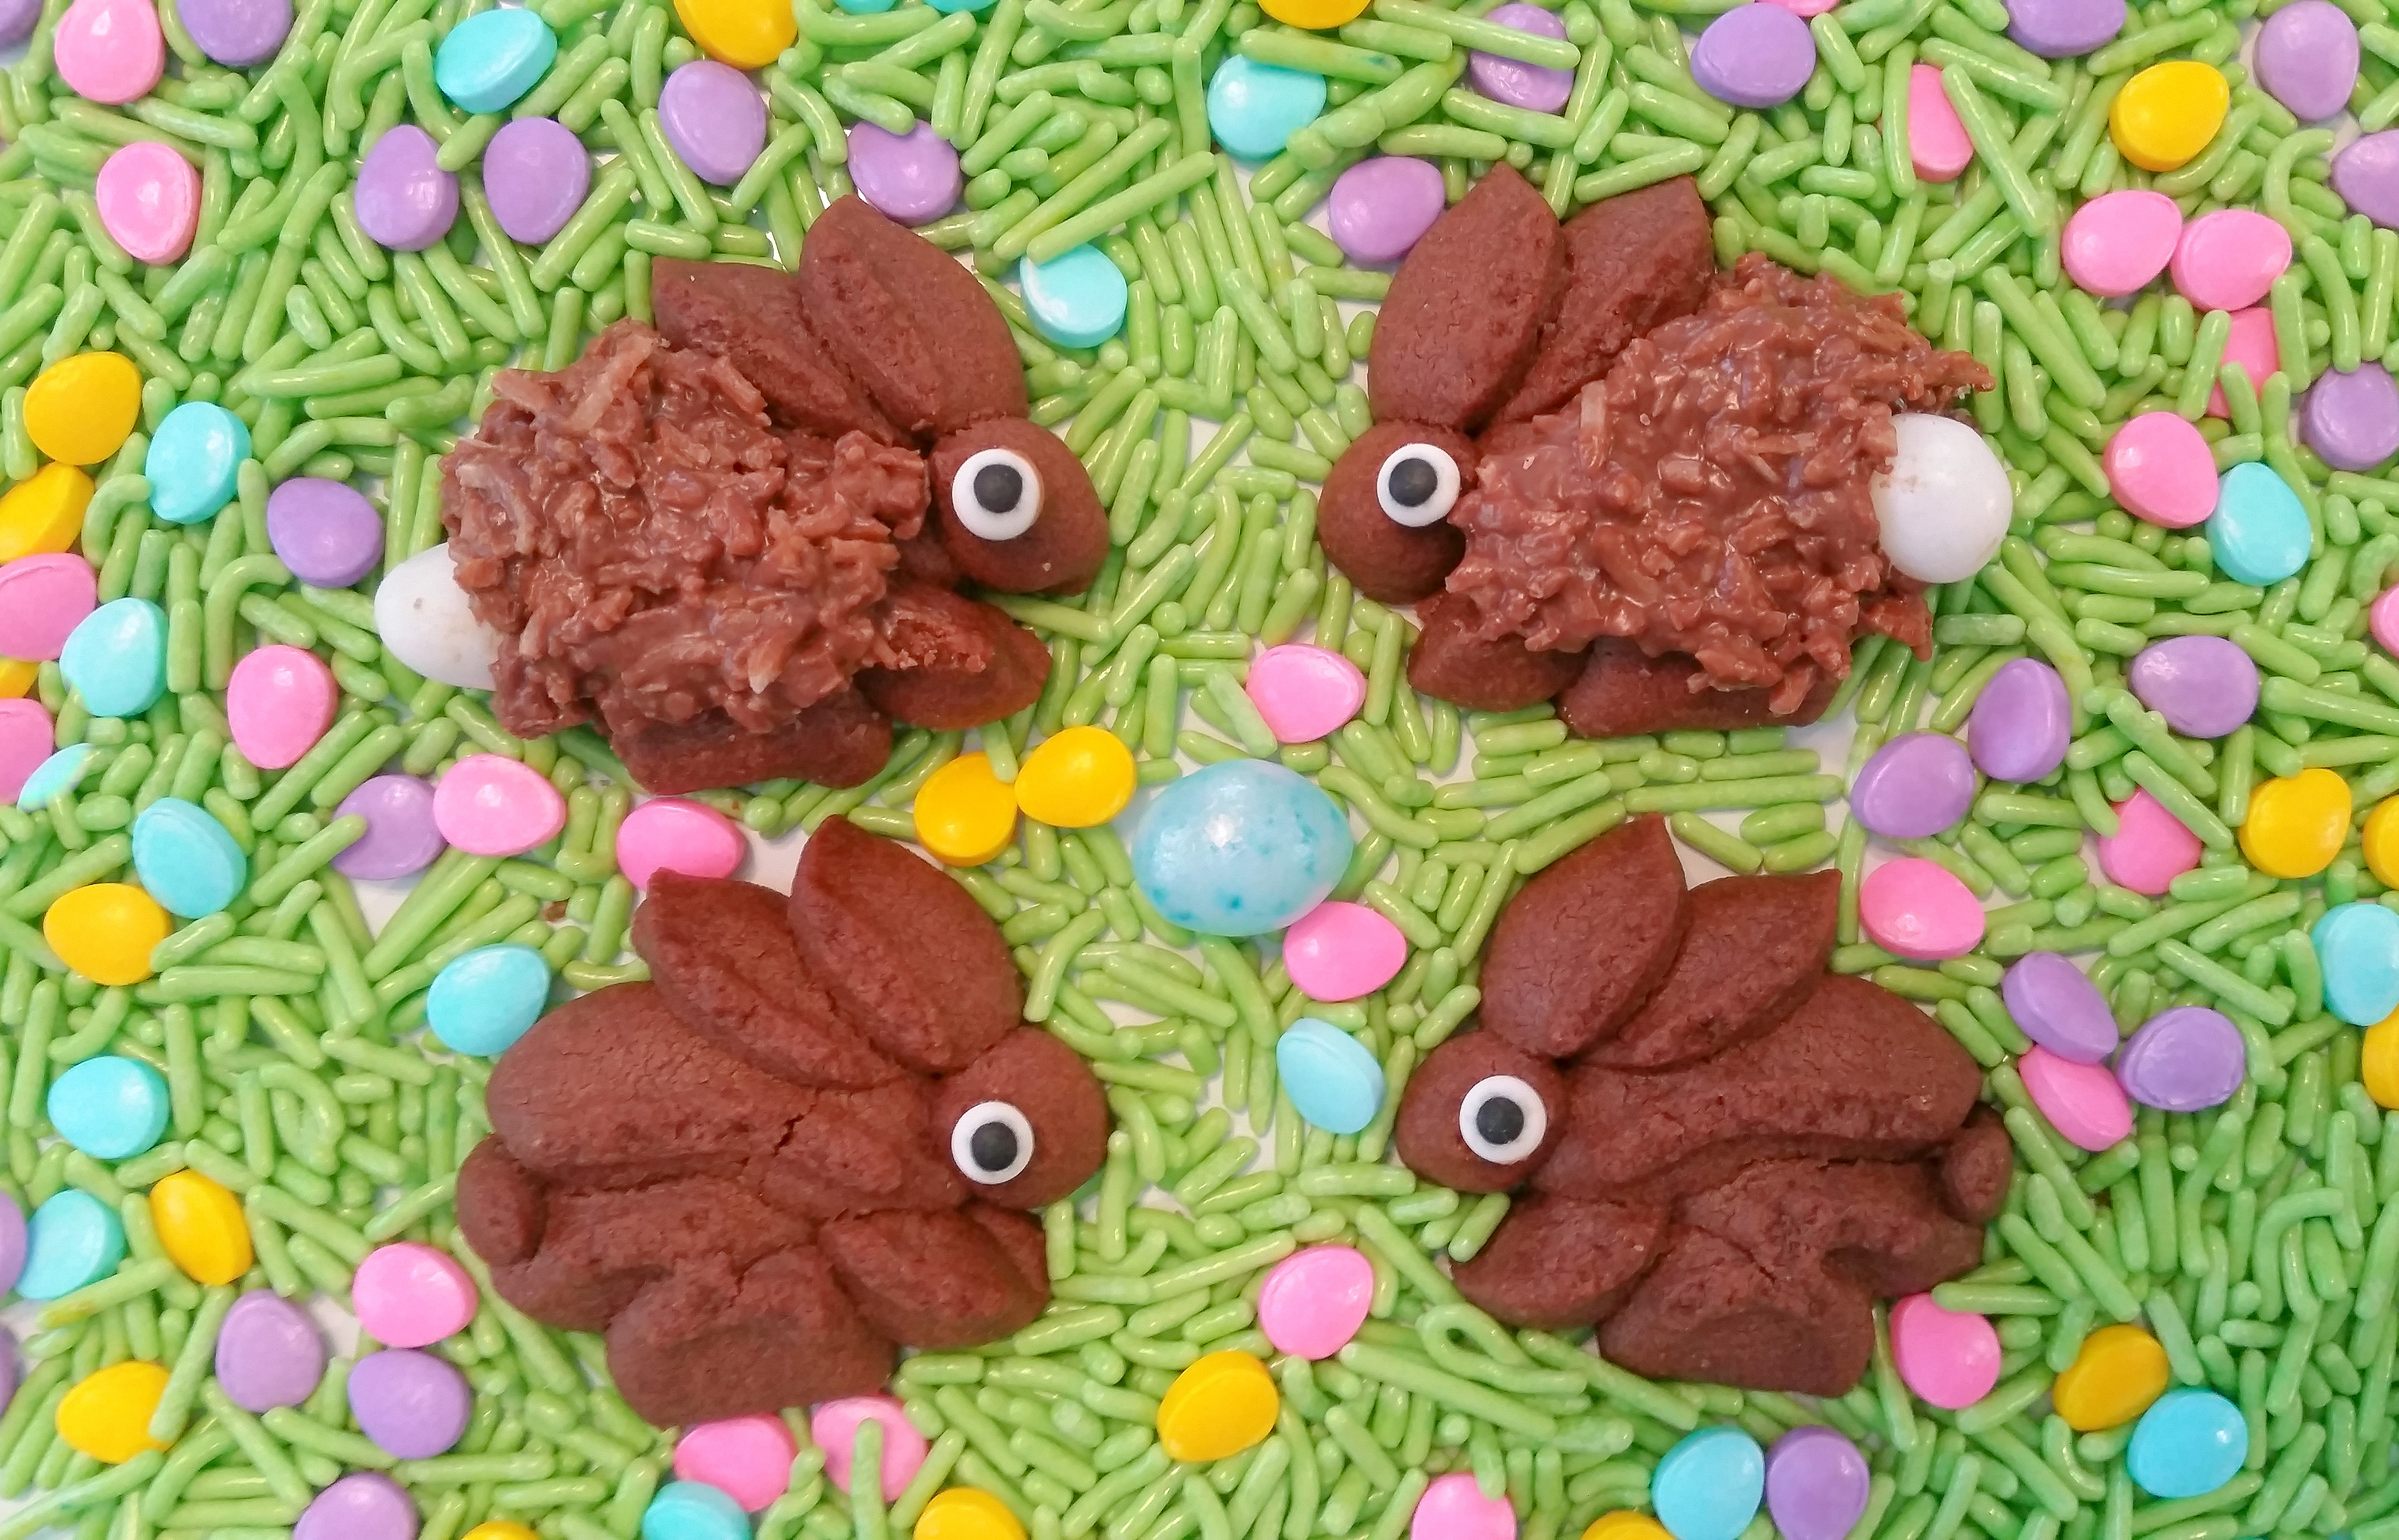
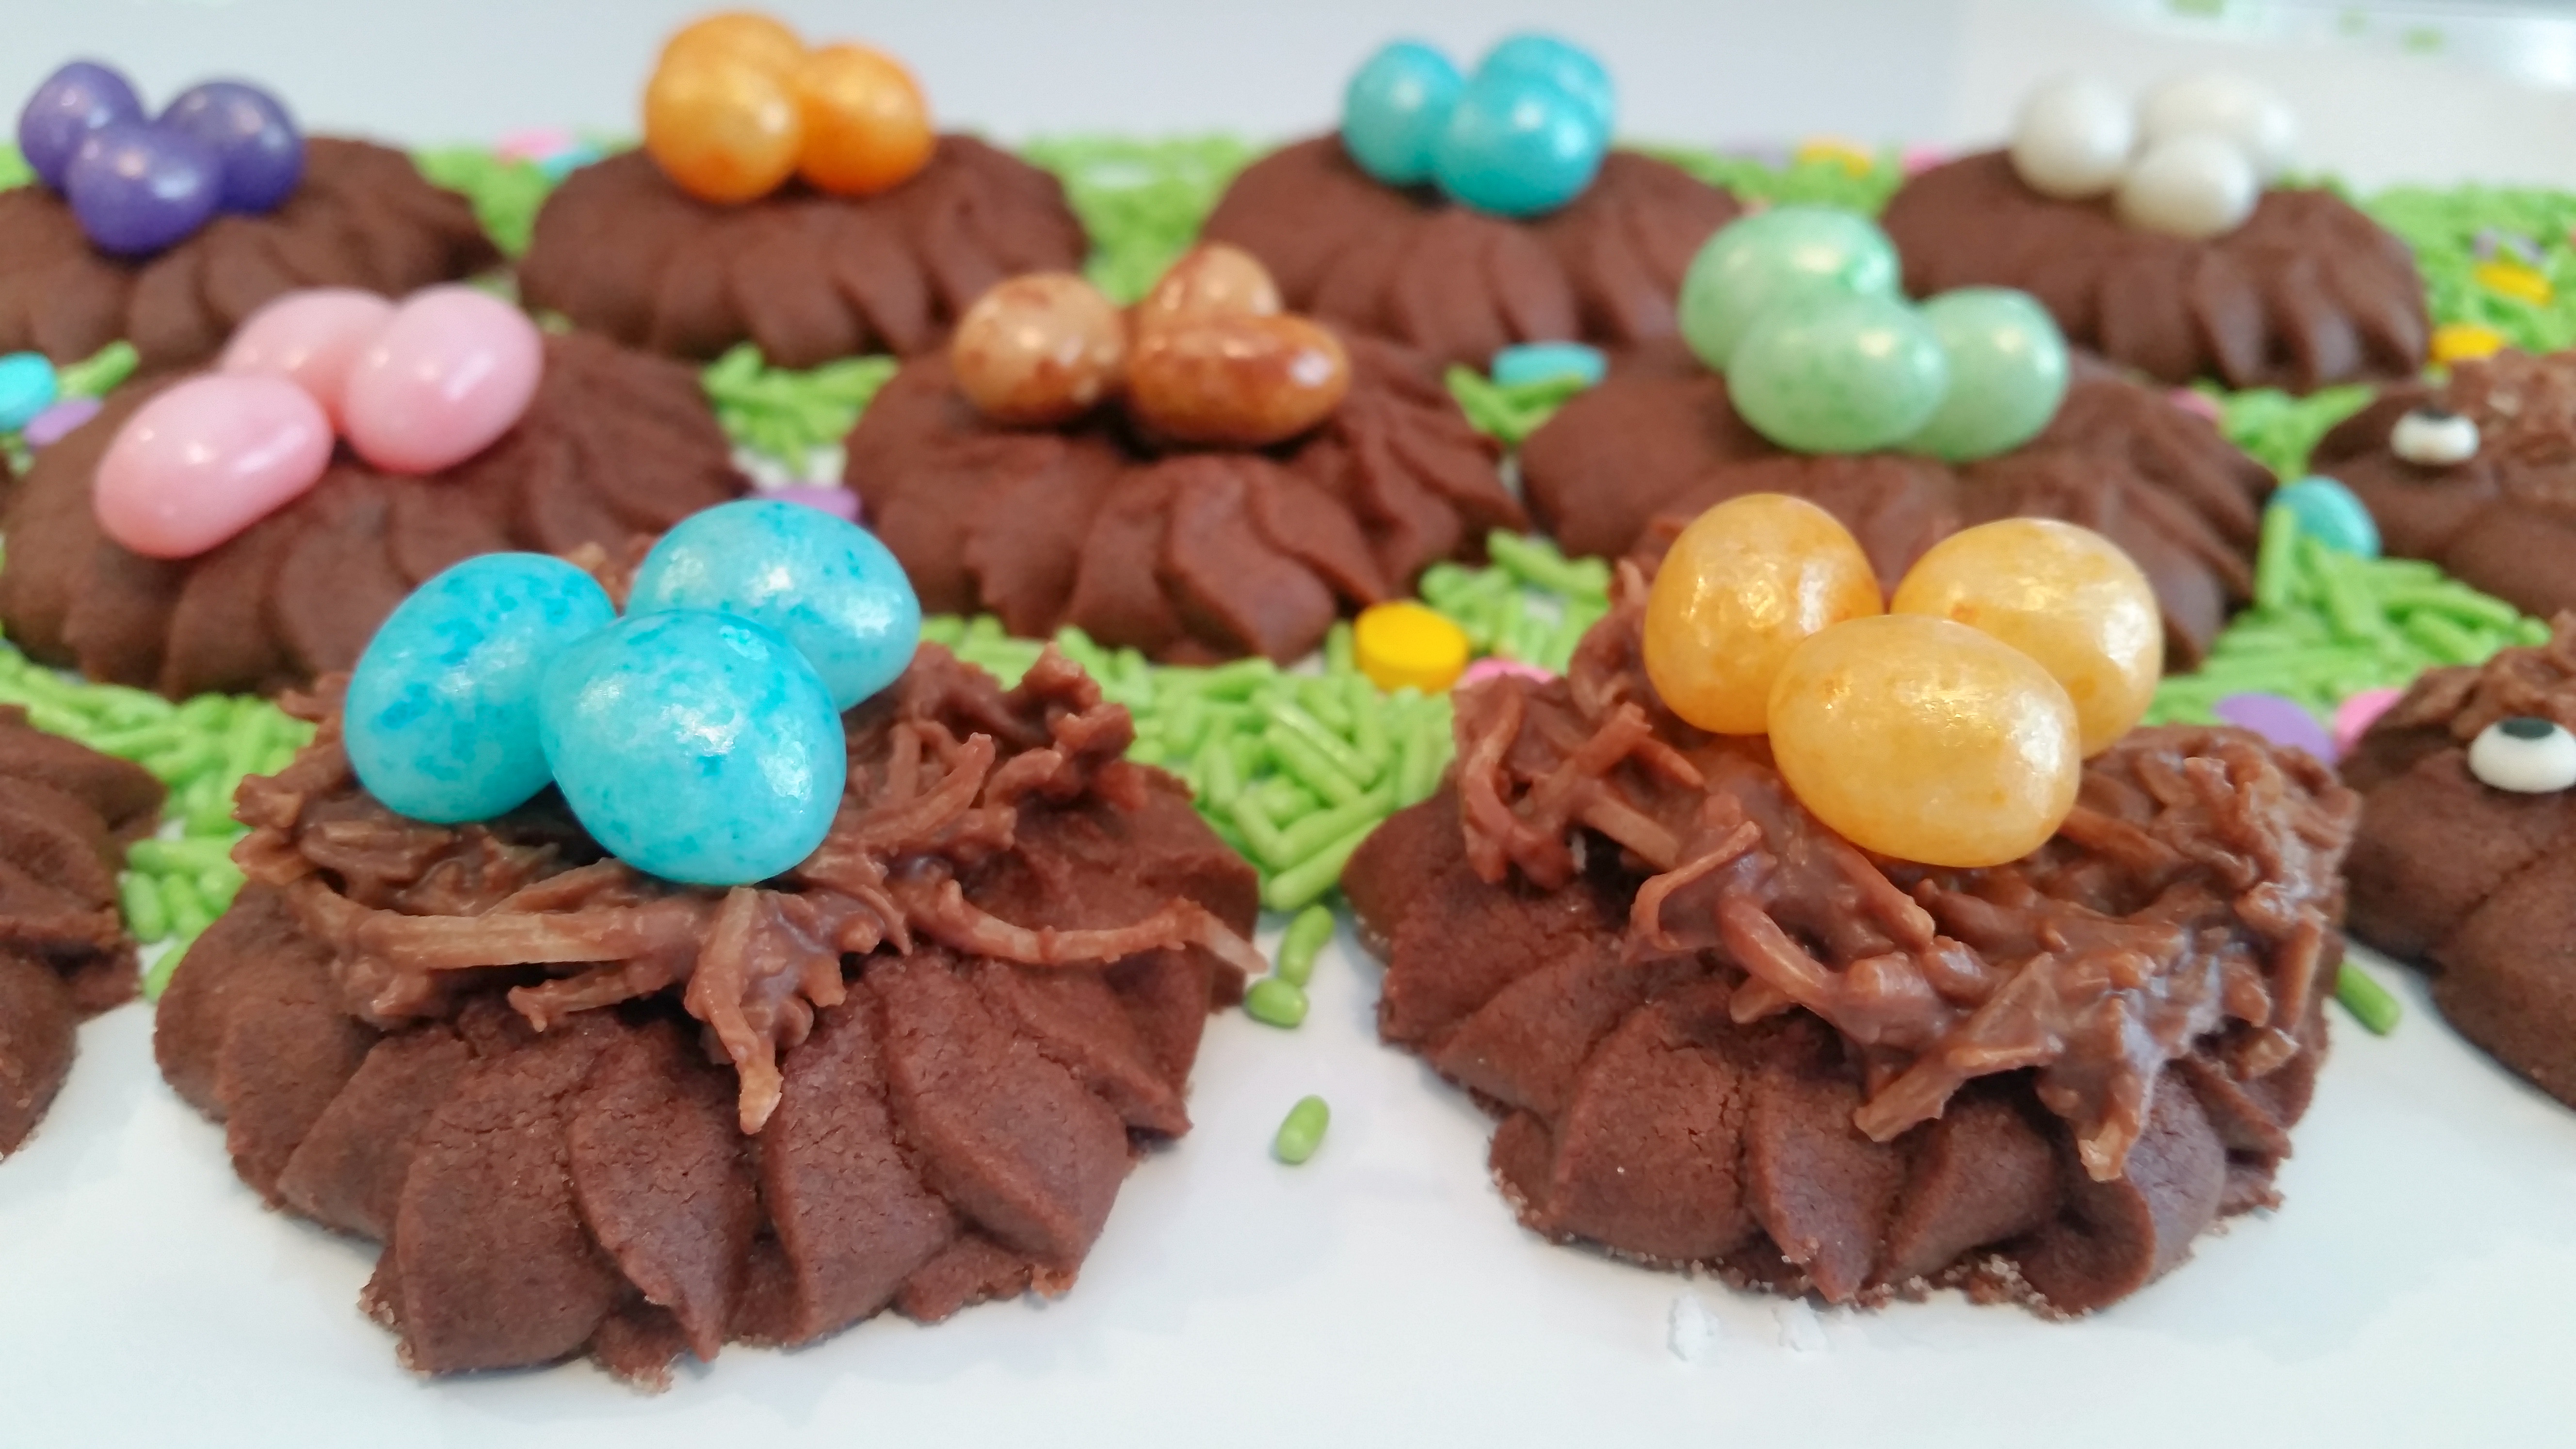
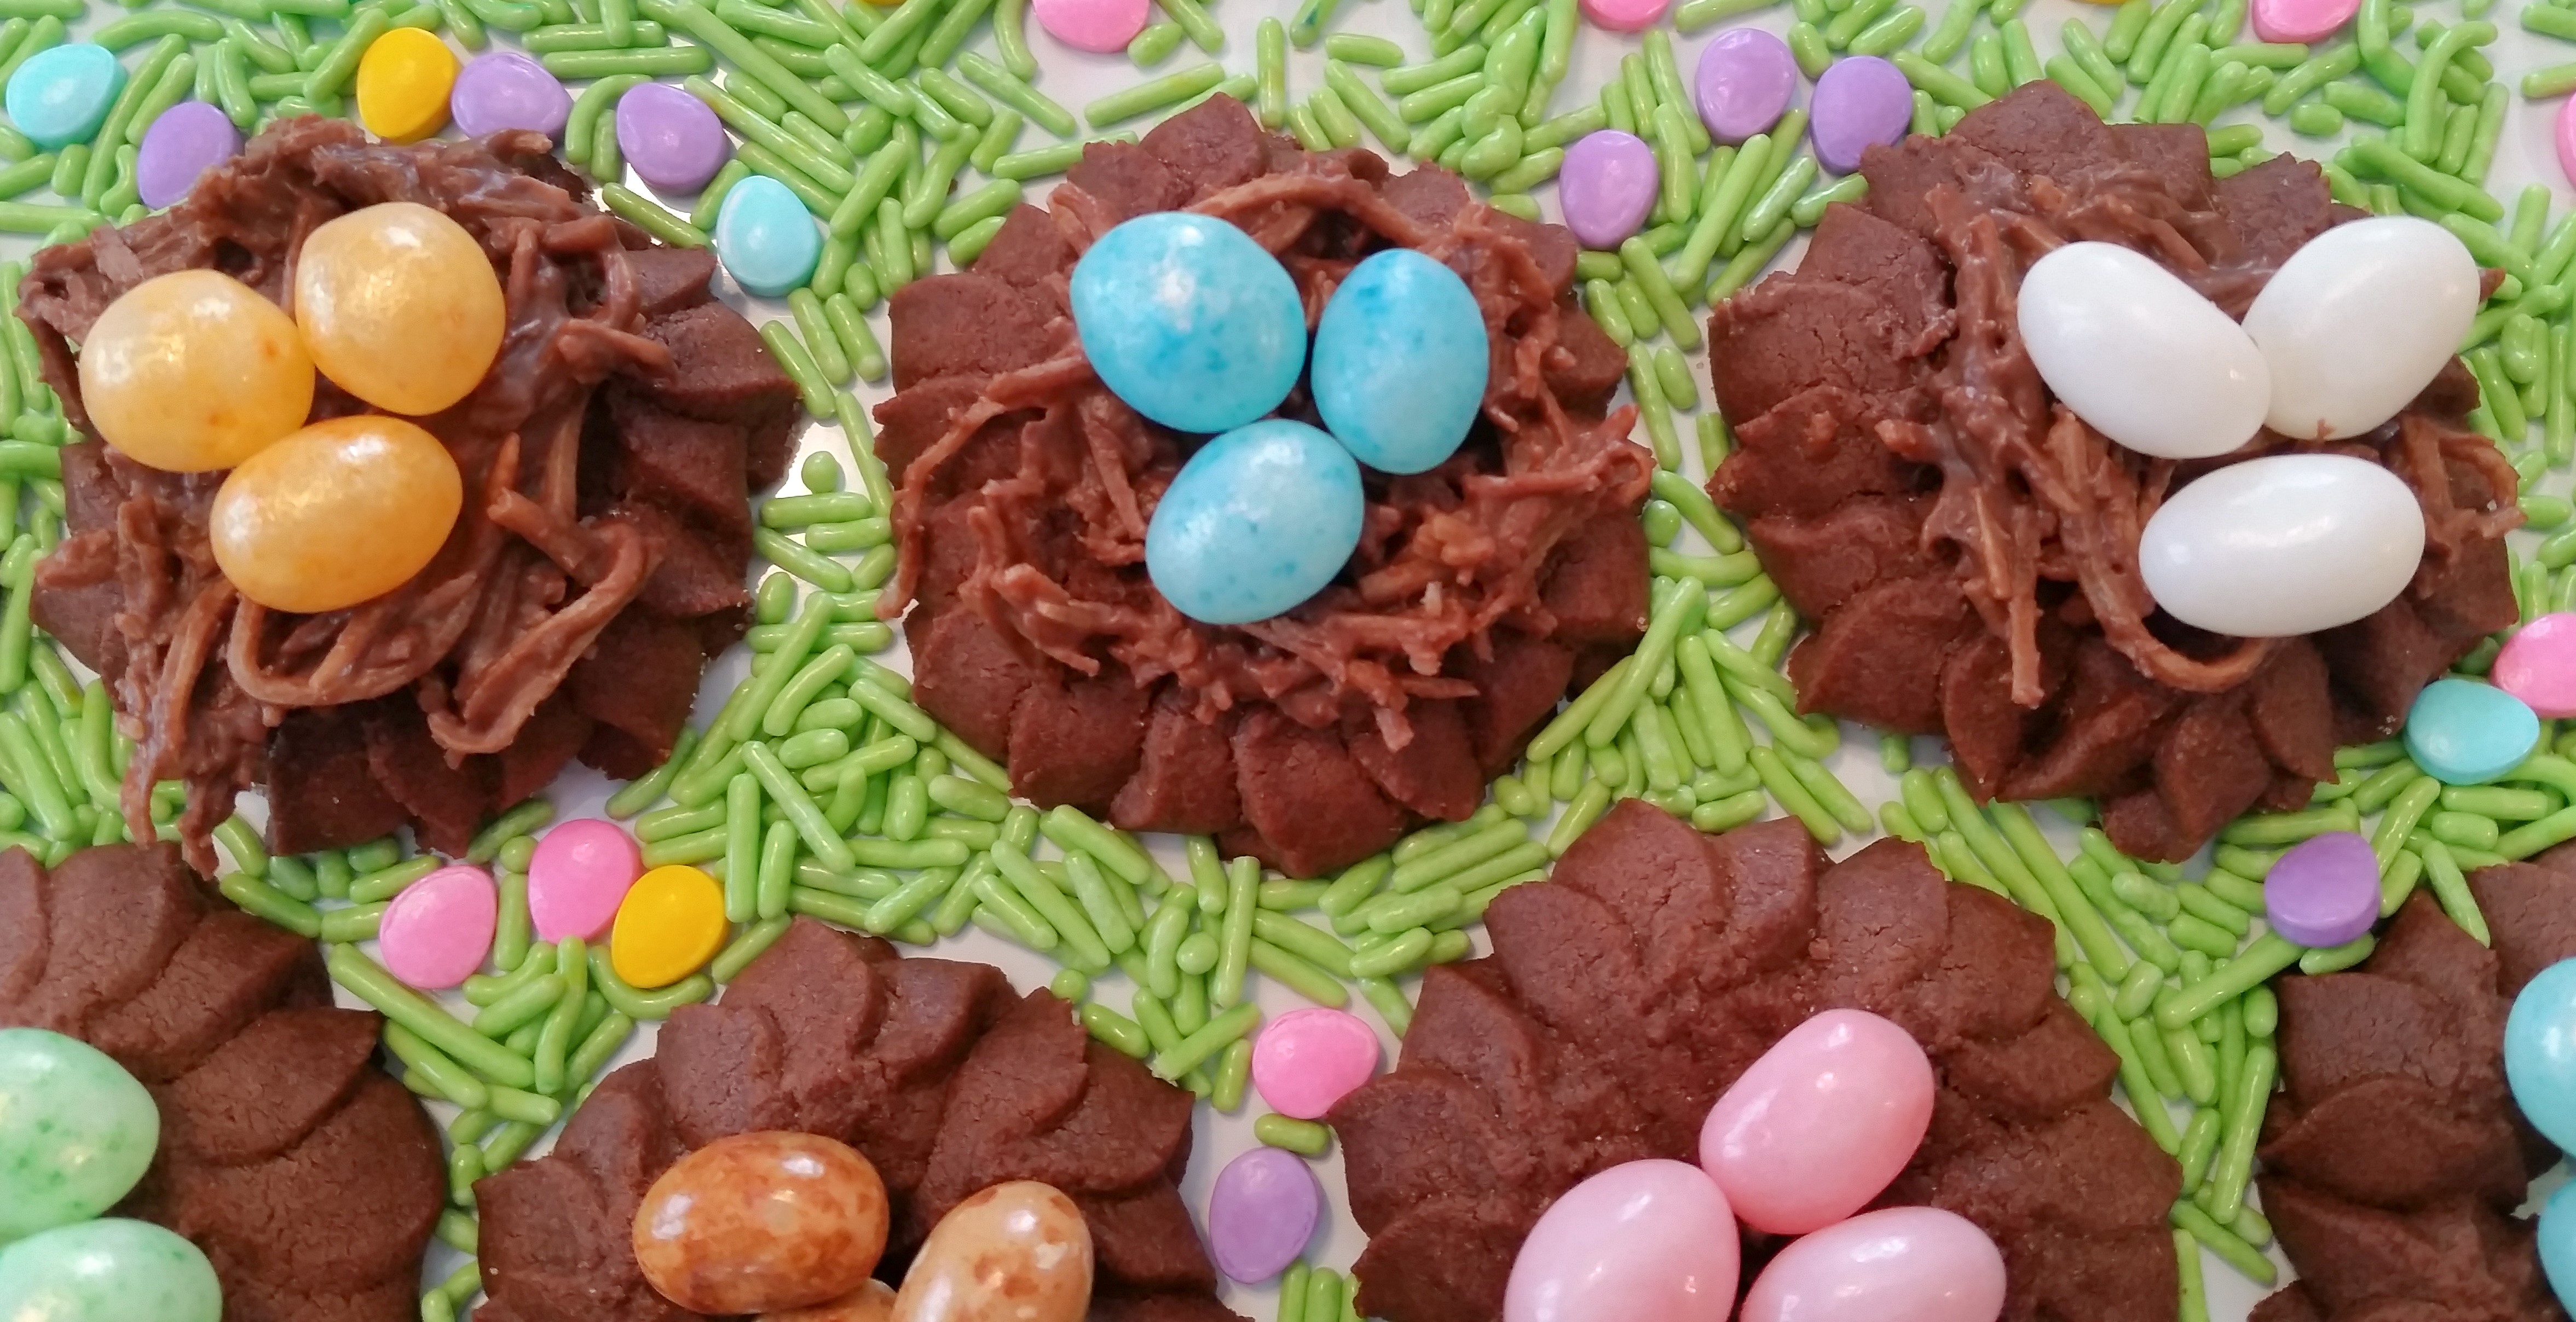
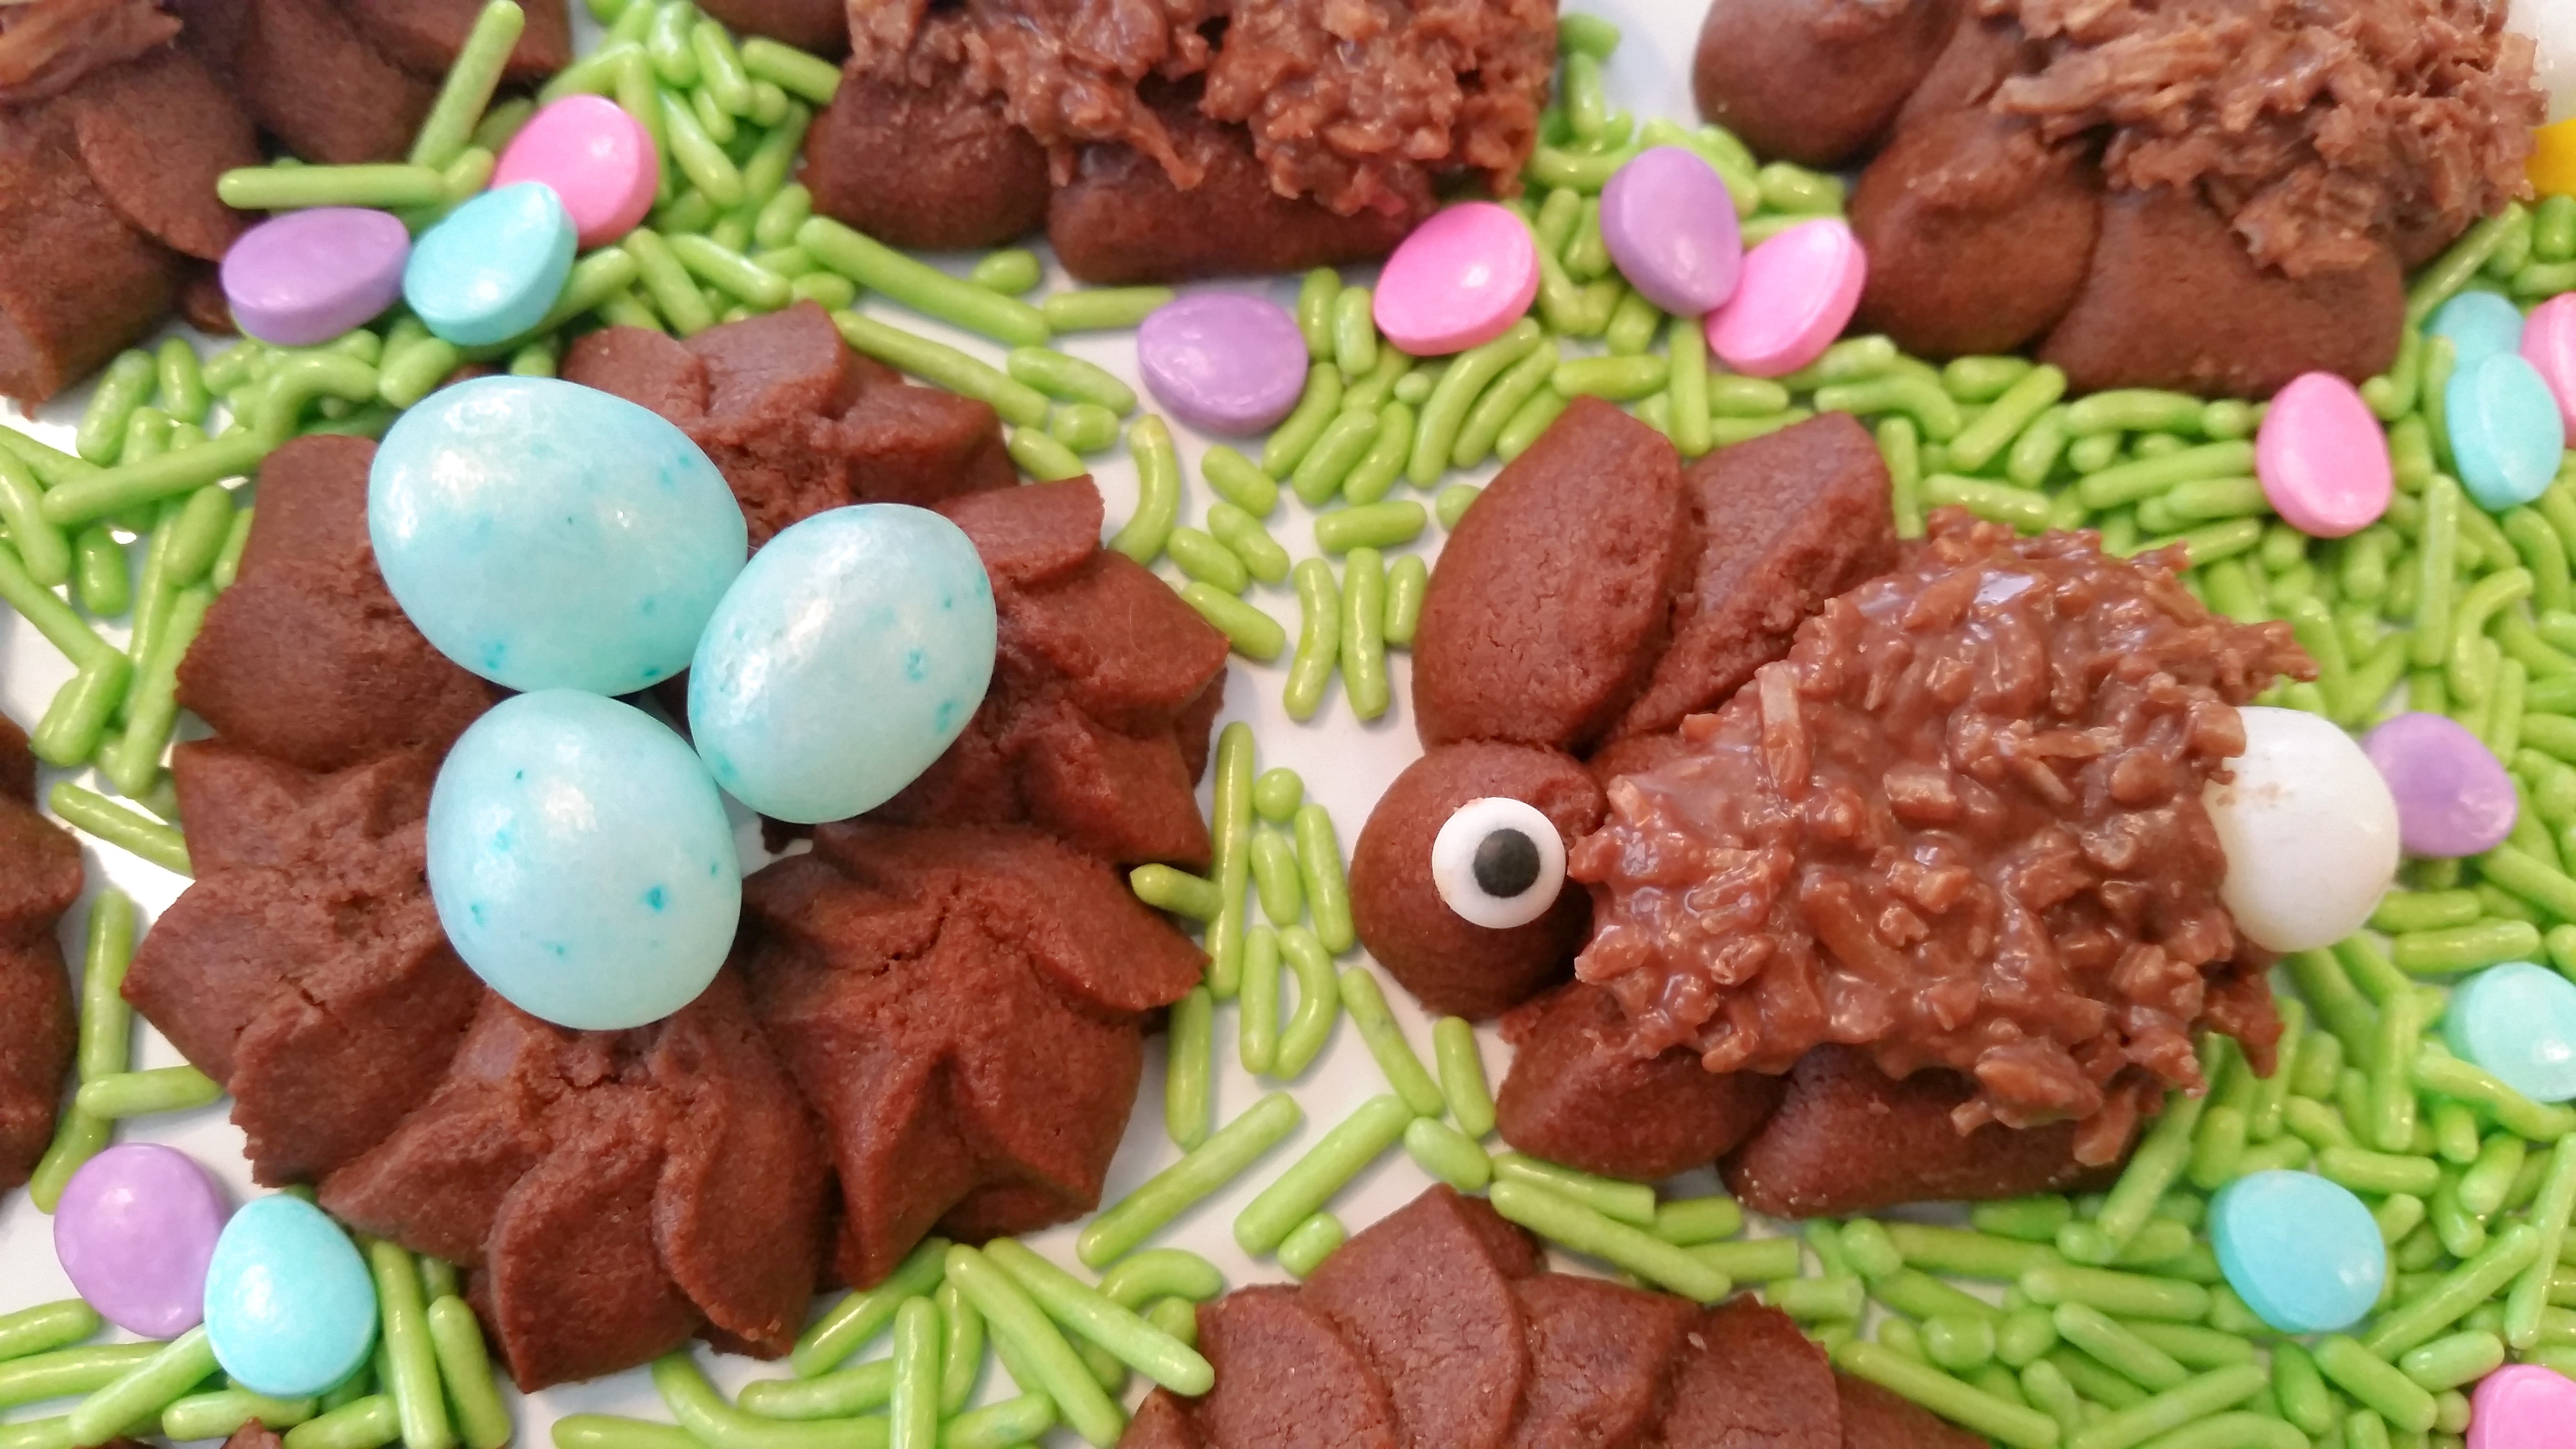
I love it when our disk shapes can be used in a new way! Here’s our Wreath shape from the Christmas Two Disk Set doubling as bird’s nests for Easter! Bake these up in chocolate spritz dough with some bunnies from the Easter Disk Set, with optional chocolate-drenched coconut for “fur” and “twigs”.
This idea features my chocolate spritz recipe that I used in the Oreo Spritz Cookies post, though we’re not stuffing the cookies this time. Instead we’re pressing them and simply topping them with some chocolate-coated coconut. Pretty simple!
I used shredded coconut instead of flake coconut because it has longer strands that look like “twigs” for the nests. I pulverized some of the coconut to make shorter strands that looked more like fur for the bunnies. Either way, it was a simple – if slightly gooey – process. There was a lot of finger-licking as I worked on this and I am SO not complaining! All I did was melt chocolate chips in the microwave, mix it with coconut and voila! Nests and bunnies.
I show them both ways in the photos – if you don’t like coconut, these are just as adorable plain. The wreaths look like little nests all on their own and the bunnies look like, well, bunnies! Just short-haired instead of angora. 😉
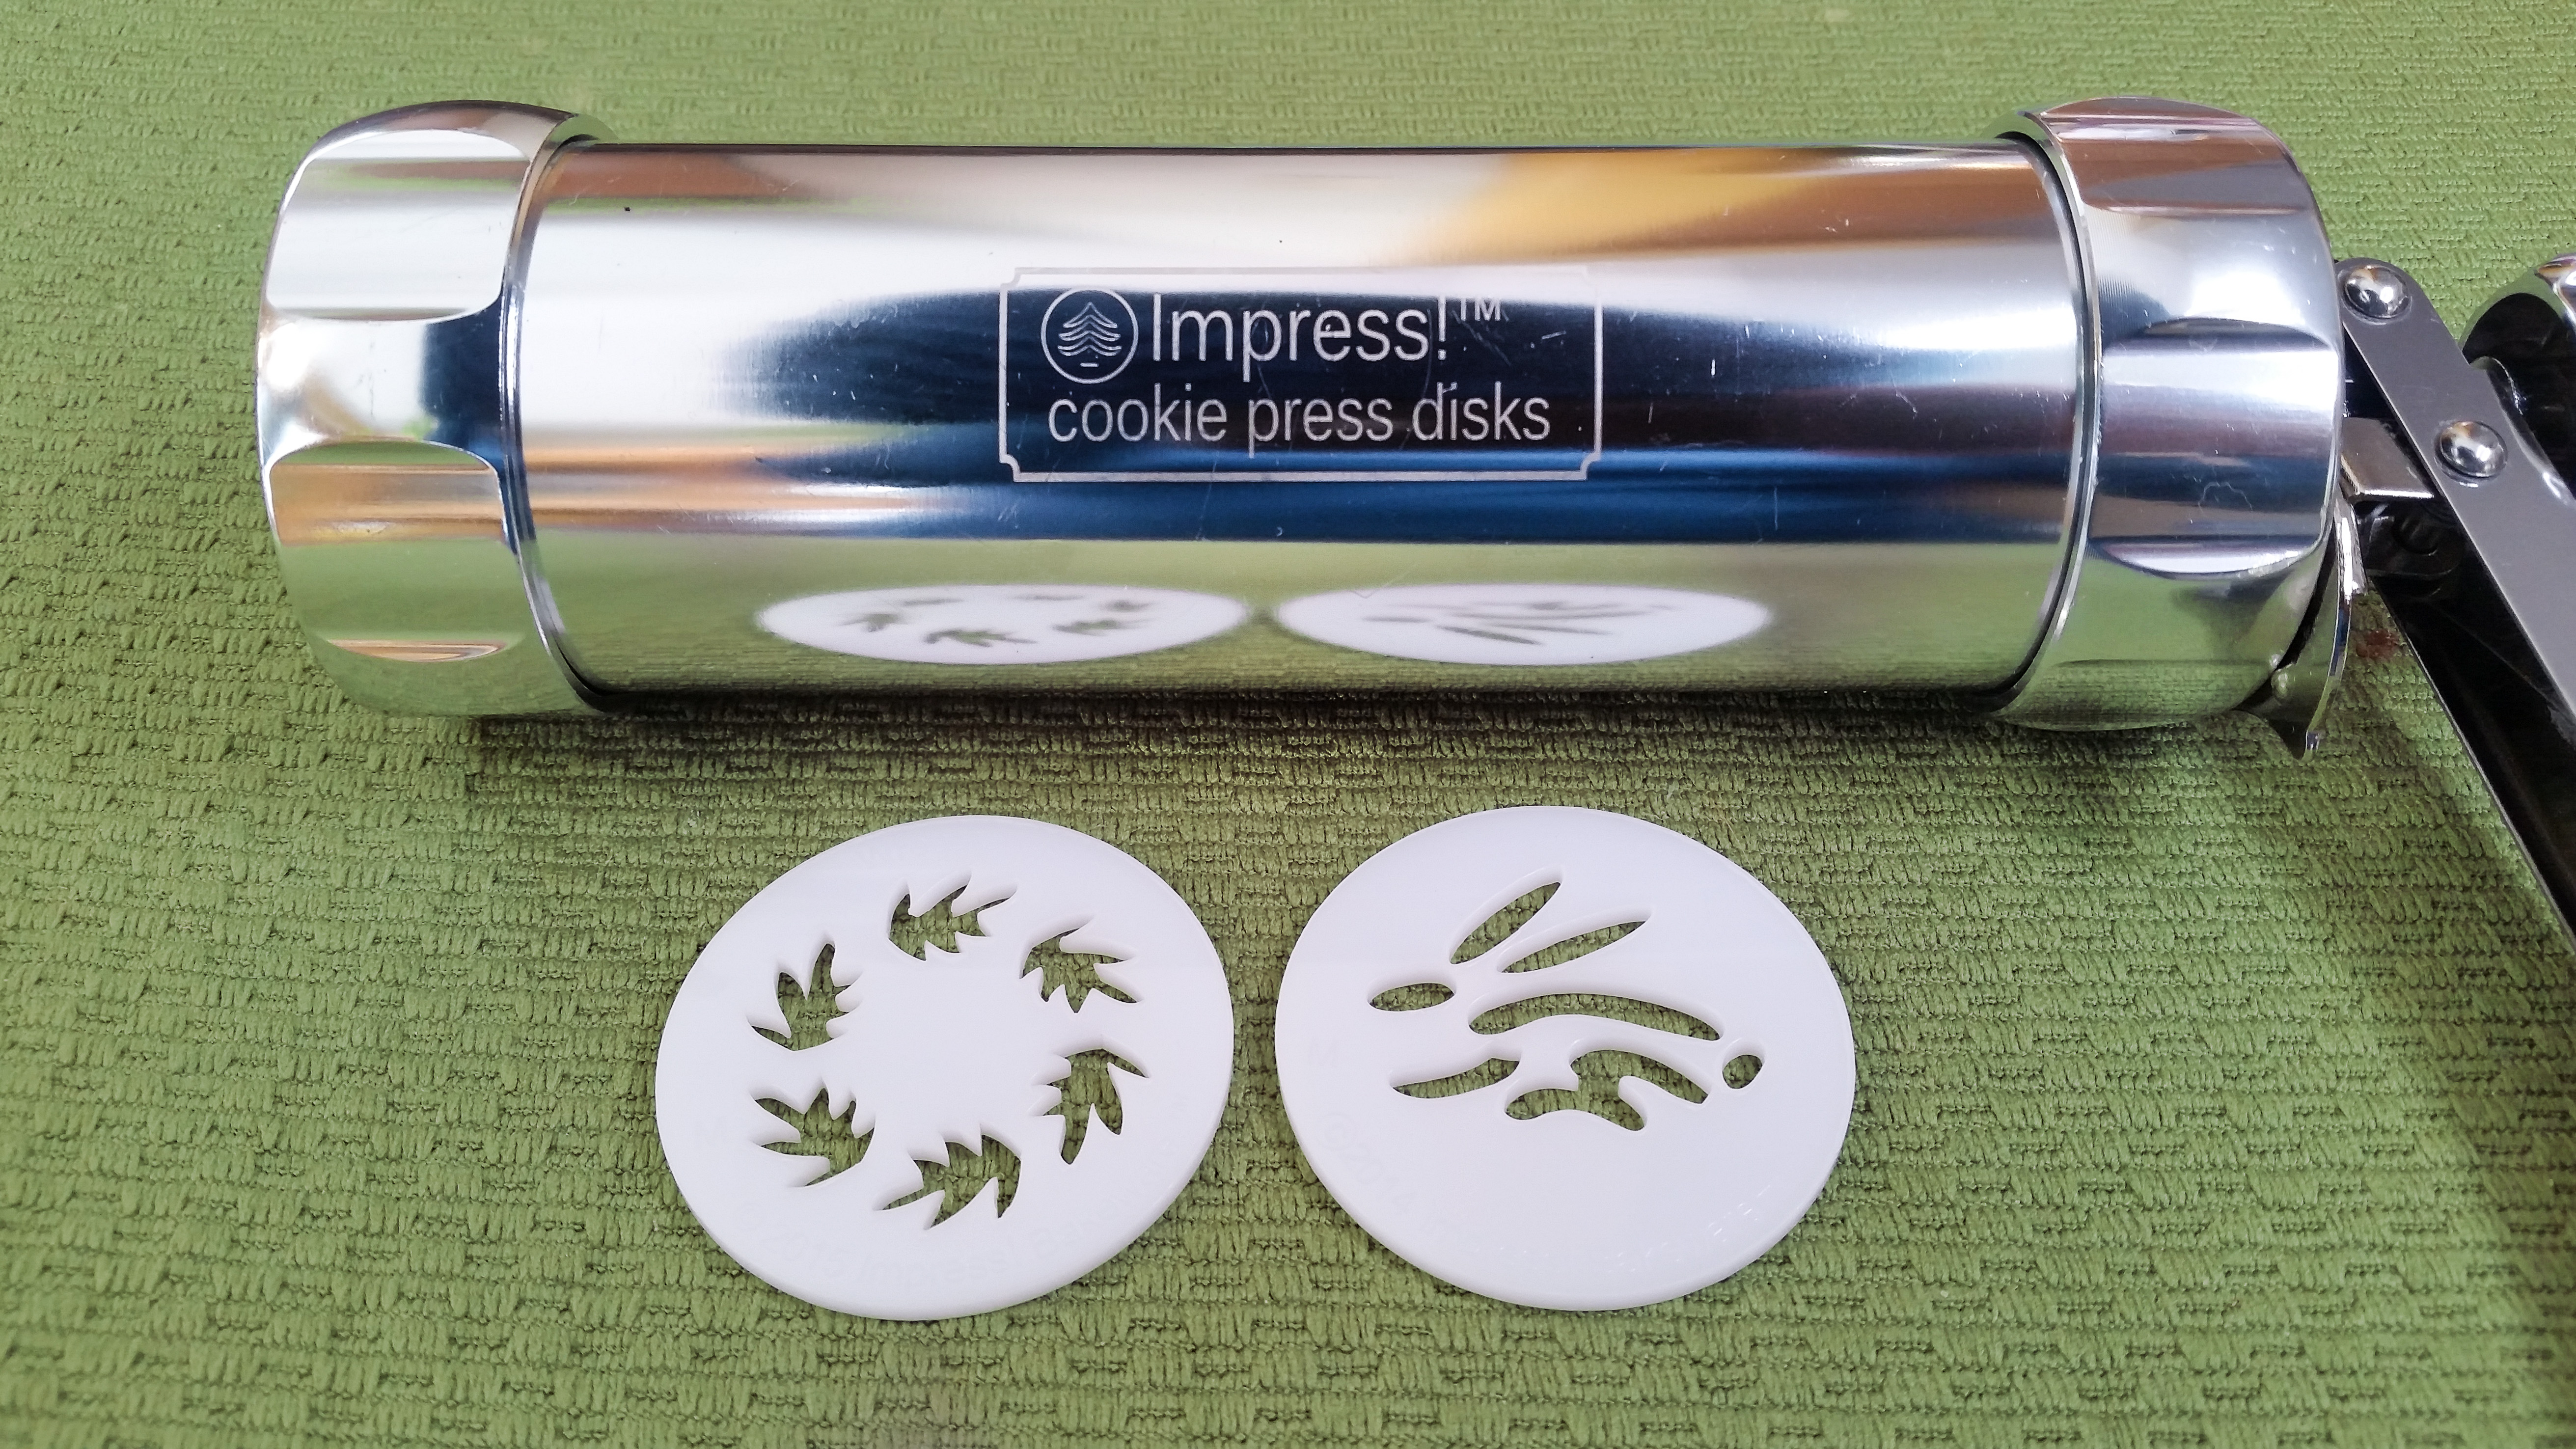
Here’s the wreath and bunny disks. Both the Christmas Two and Easter sets are shown at the bottom of the post, with links.
Our website has all of our 200+ disk shapes, cookie press, embossed rolling pins, stamps, baking accessories plus more about our Women/Family Owned company! impressbakeware.com
All products are on our Etsy shop.
Our Amazon shop has our cookie press and disks and embossed rolling pins.
Let’s bake!
Gather your ingredients. Just don’t forget the vanilla extract like I did in this picture!

Chocolate Spritz
Cookie ingredients
1 1/2 cups (3 sticks) butter, softened – not melted. I recommend Land O Lakes brand as I know it creams well. I have had trouble with some generic butters not creaming properly and making the dough hard to press.
1/2 cup granulated sugar
1/3 cup honey
1 Tablespoon vanilla extract
1 egg
3 1/4 cups all-purpose flour
2/3 cup unsweetened cocoa powder
3/4 tsp baking powder
1/4 tsp salt
Coconut mixture:
One bag of shredded sweetened coconut
Any melting chocolate of your choice! I used Ghirardelli Milk Chocolate Chips
Preheat your oven to 400°F
In a large bowl, combine the flour, baking powder, salt, and cocoa powder. Mix until thoroughly combined. Set aside.
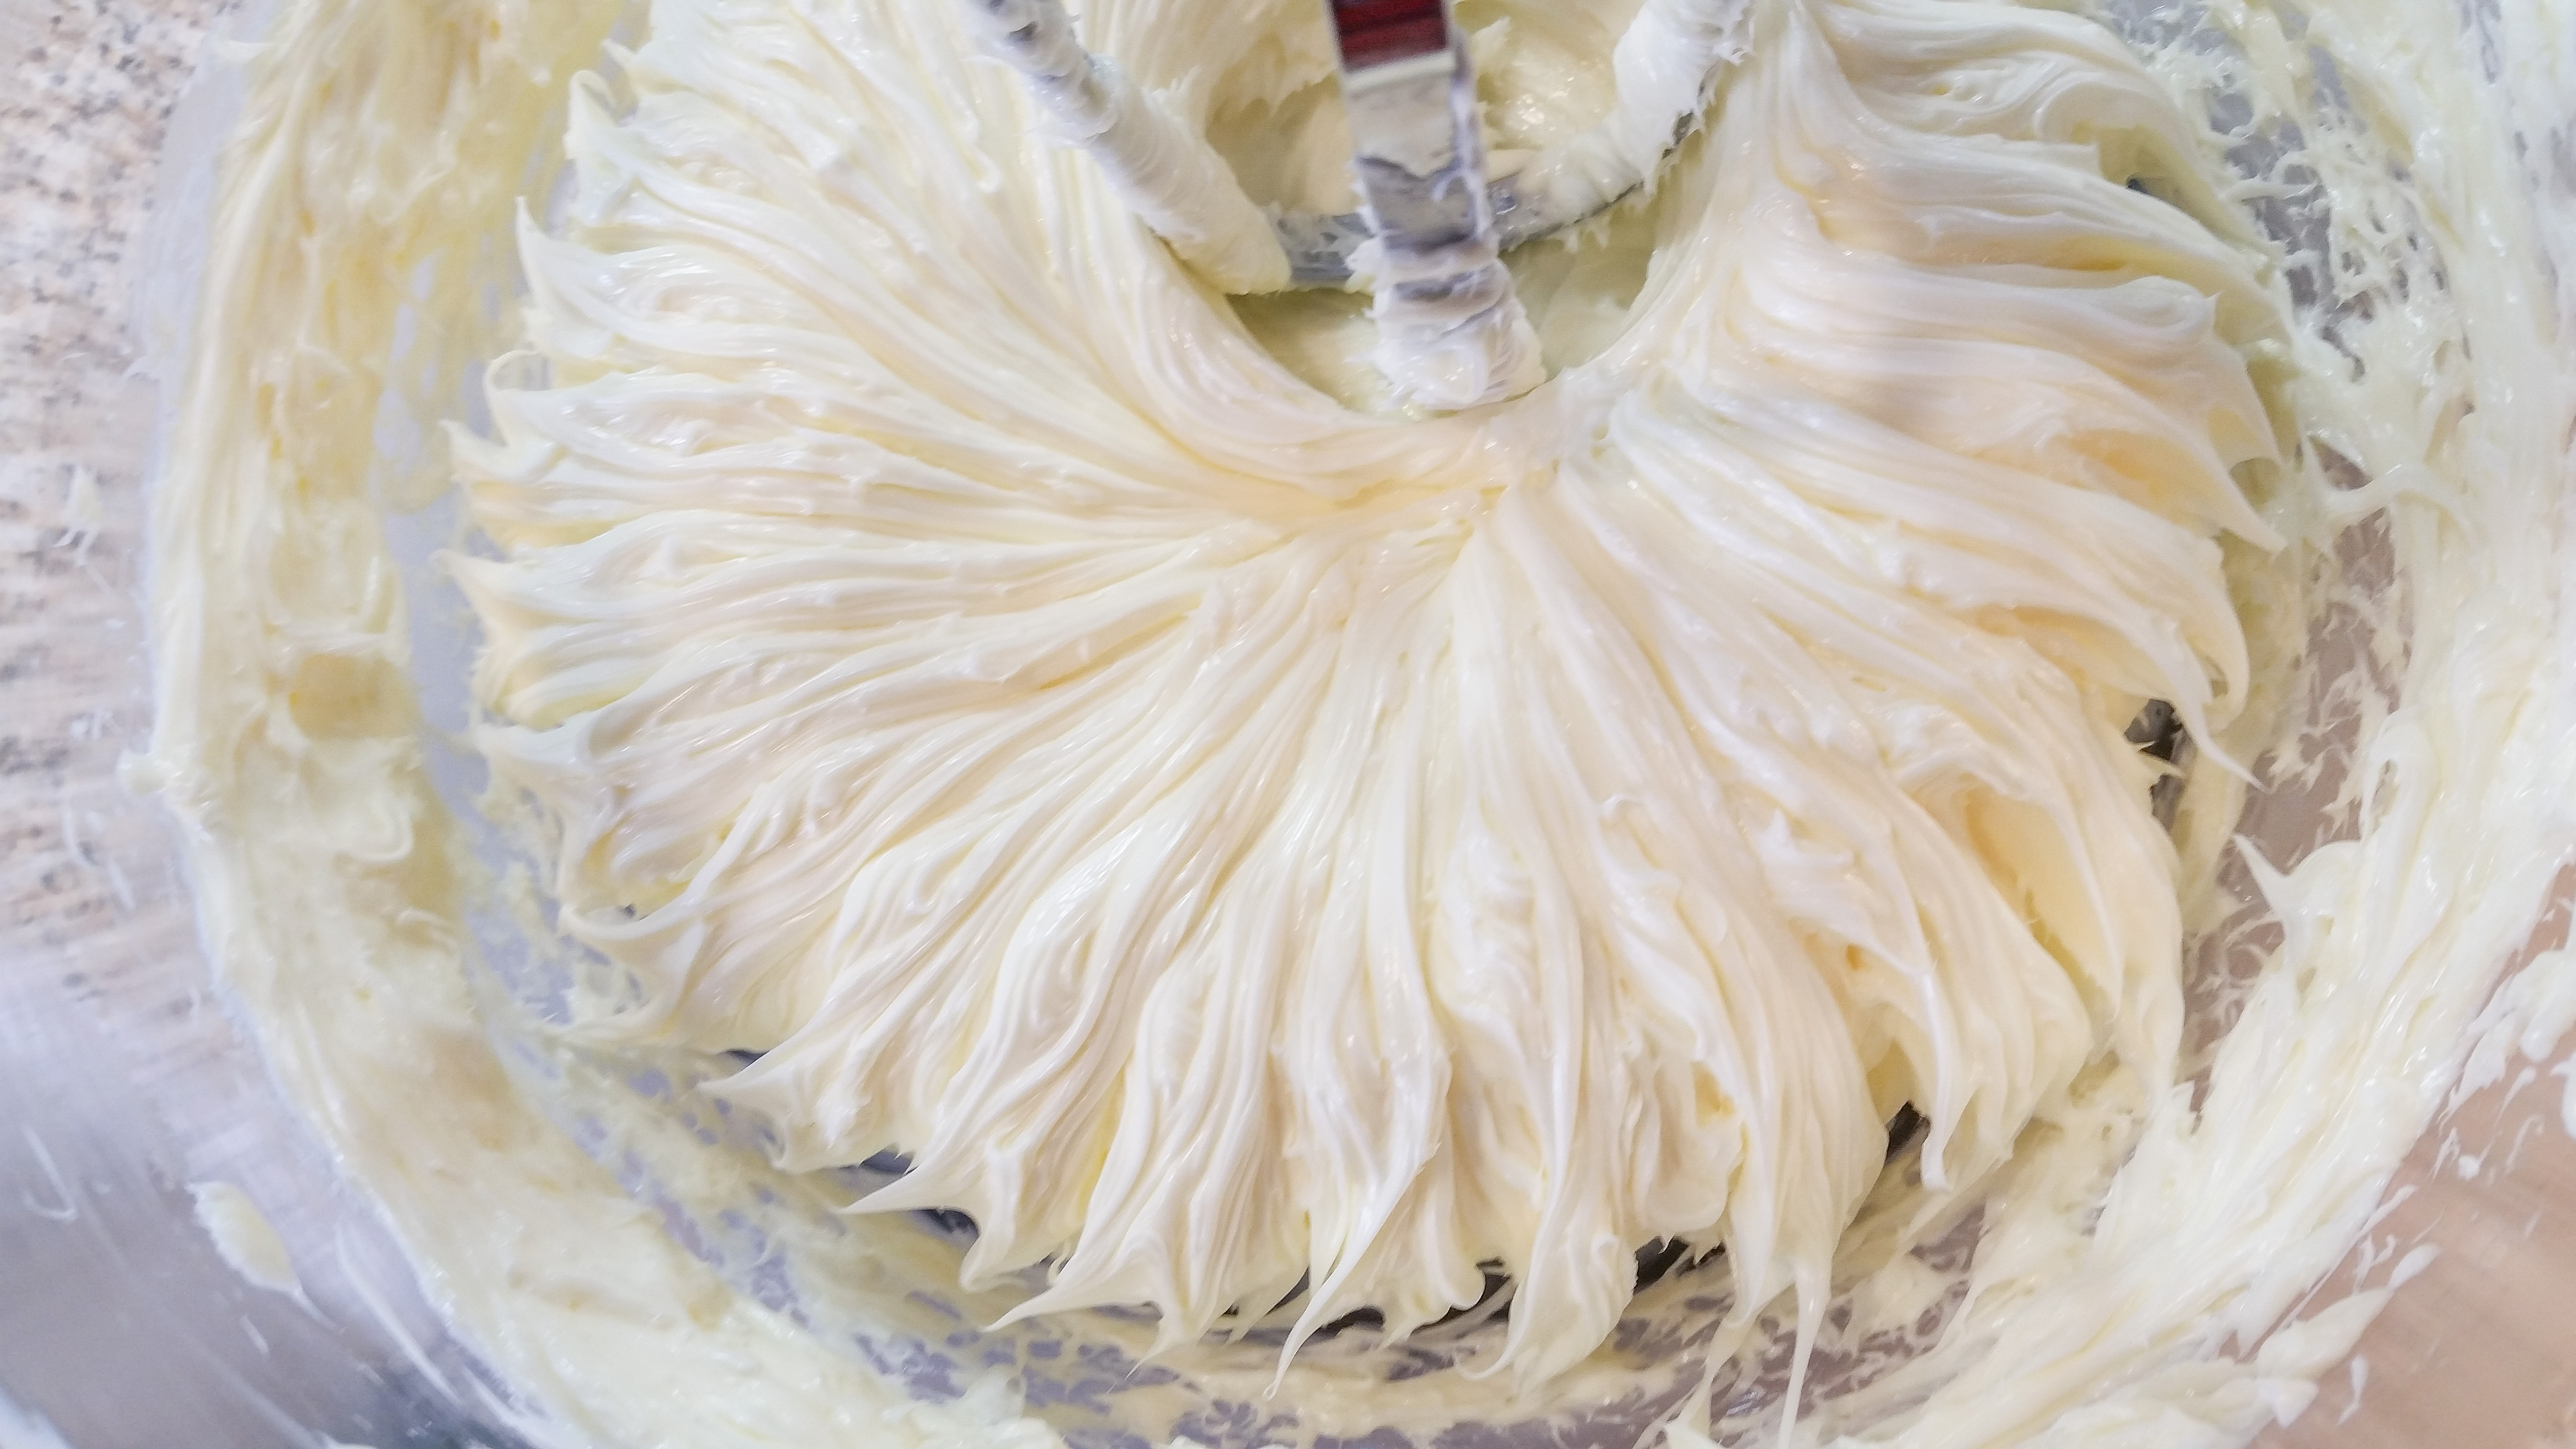
The first step to fabulous spritz cookie dough is creaming the butter. I have to say this, as always, for those new to my blog! Use an electric mixer to cream the butter very well. Set that mixer on the highest setting and pretend you’re making frosting. Well-creamed butter is the basis for a fabulous spritz dough. It should have nice little peaks and be slightly lighter in color.
Next add the egg and vanilla, re-creaming and whipping after each addition.
Add the flour/cocoa mixture a little at a time to the butter base until a smooth chocolate dough forms. Make sure all of it is incorporated evenly. It’s gorgeous and the smell is intense chocolate!
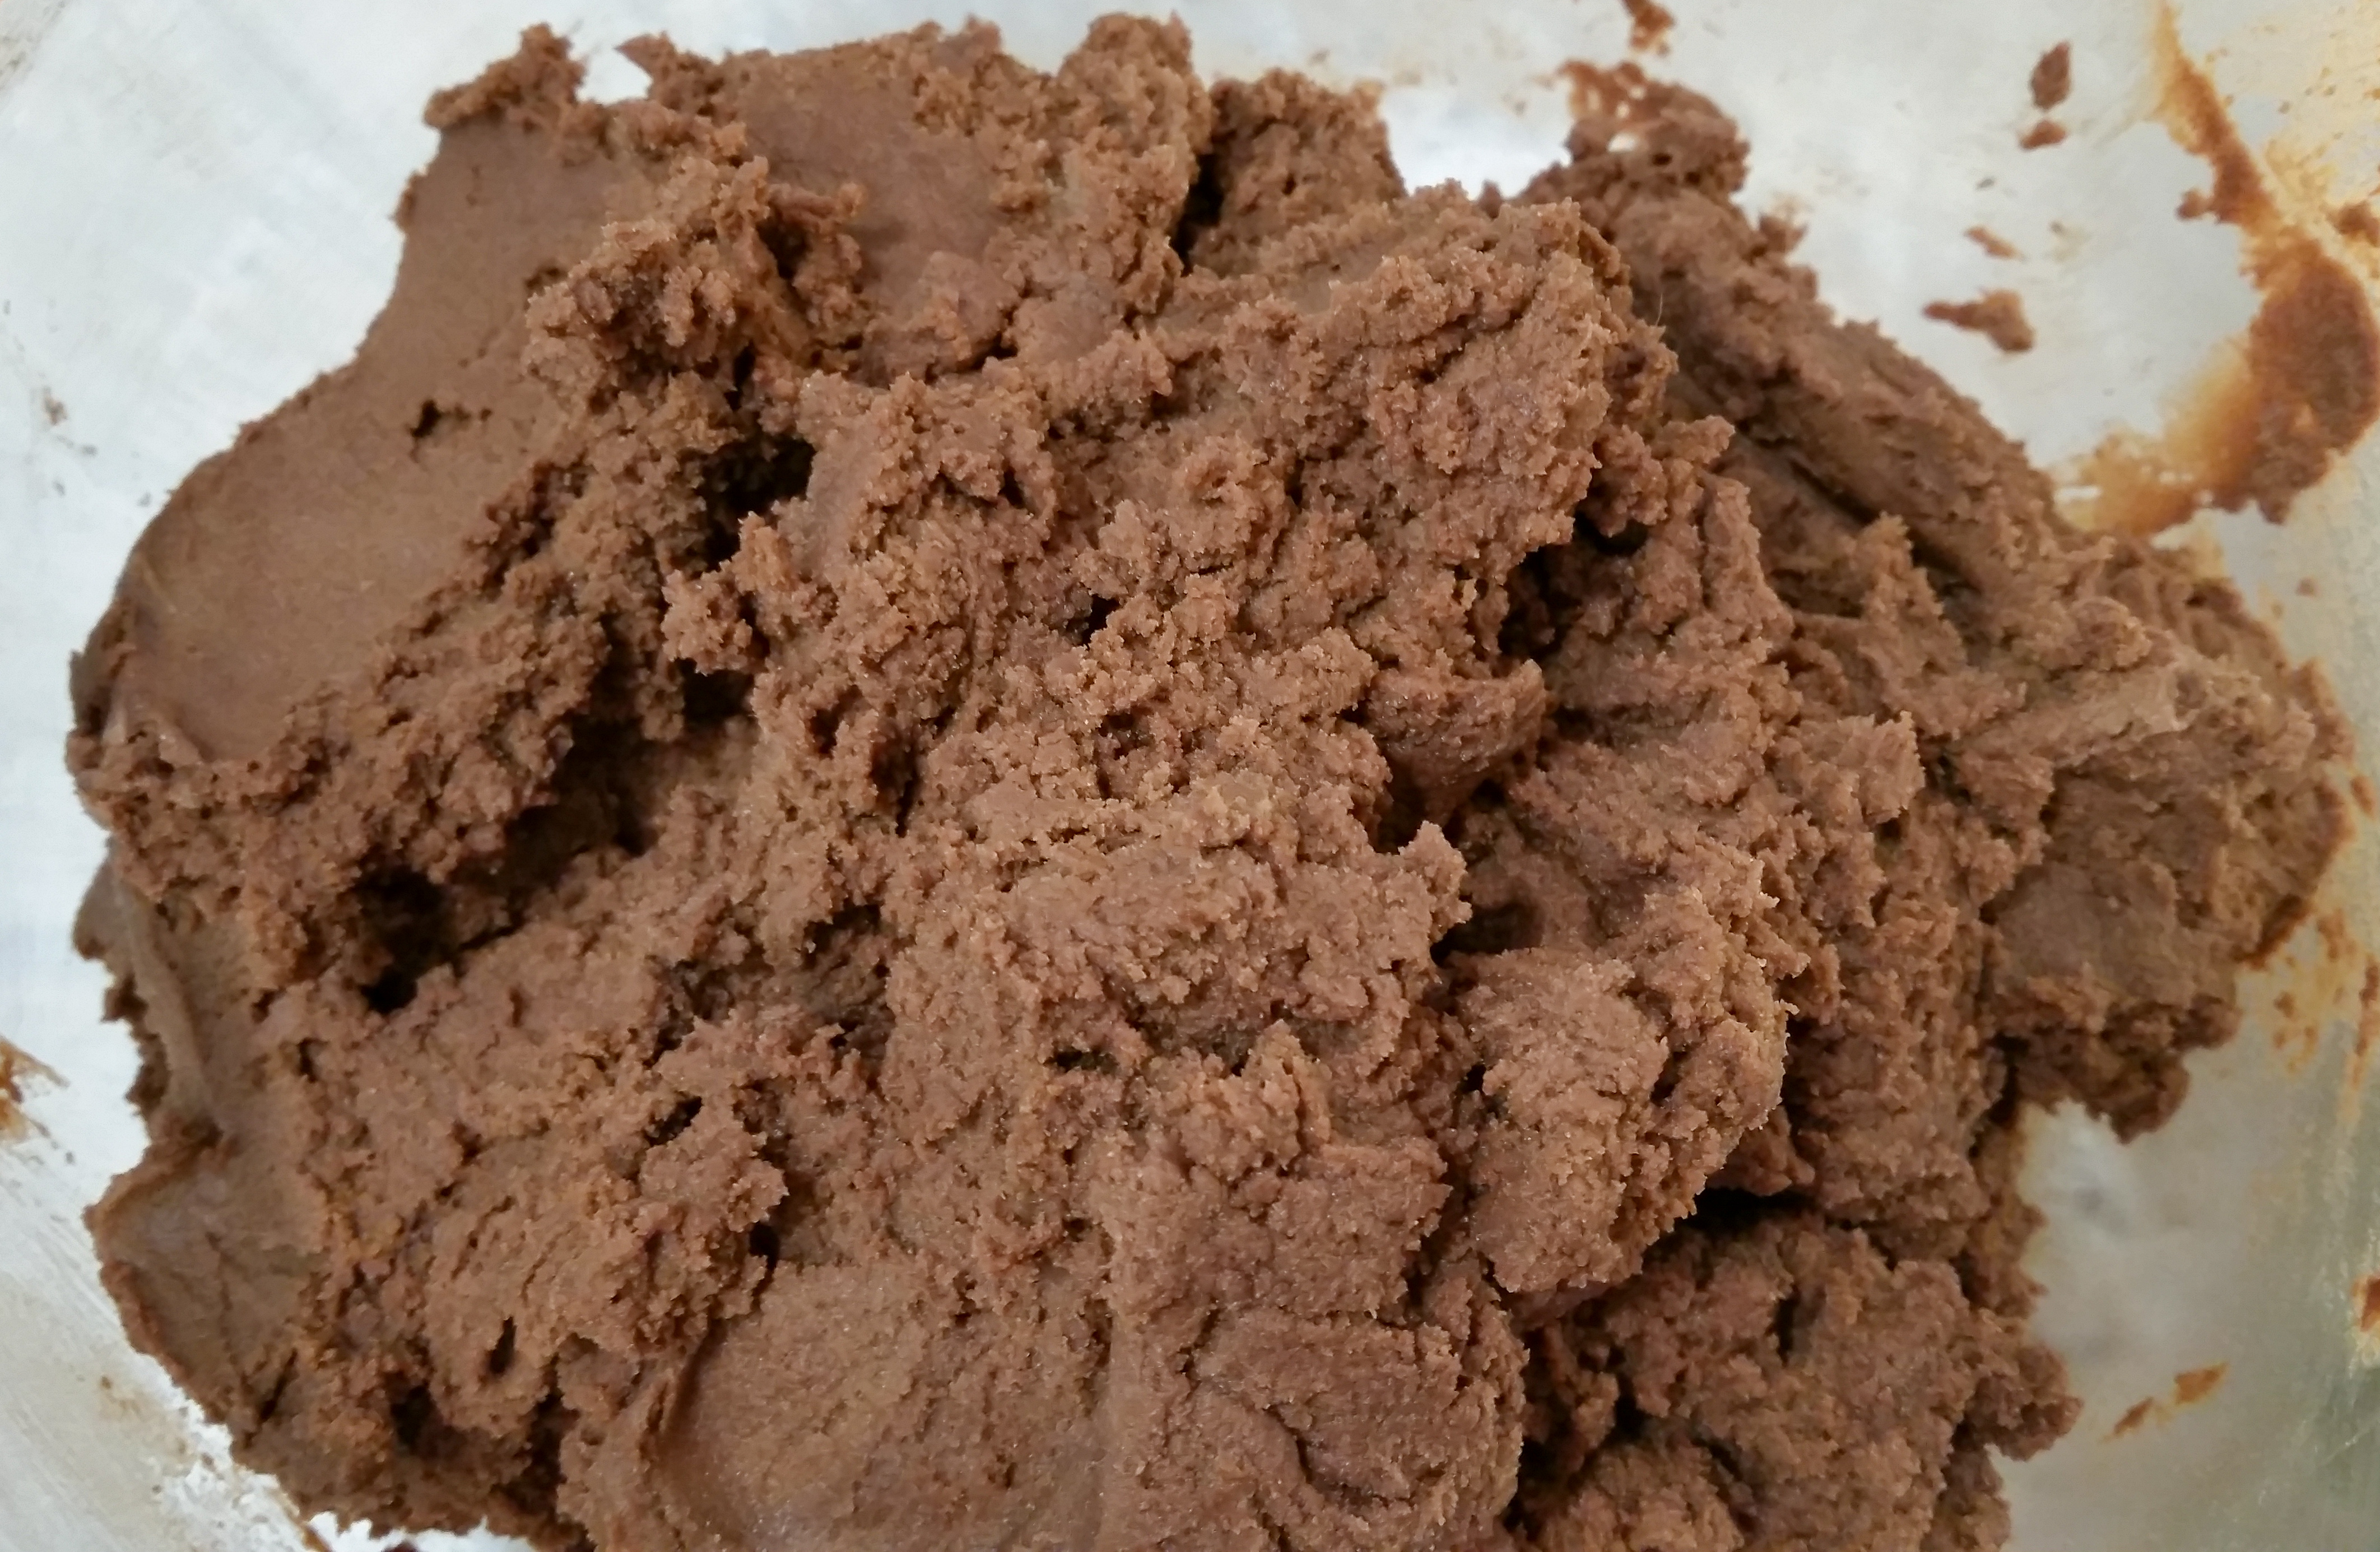
It’s best to let this dough sit for five to ten minutes before using. The cocoa is still absorbing liquid, and the dough will become drier, less sticky, easier to handle, and more pressable as you go. Keep an eye on it especially if it’s very warm in your kitchen. Warm dough separates and becomes hard and is never very pressable.
Always remember that you can tweak overly stiff dough by adding more vanilla a teaspoon at a time (or by the tablespoon if it’s particularly stiff), or tweak overly soft or sticky dough by adding flour a tablespoon at a time. Watch some of my videos to see what a correct spritz dough texture looks like.
Load your press with dough using the back of a spoon to remove any air pockets as you go. Choose your first disk and start pressing. Remember that often it takes a few mis-shaped cookies before correct pressure builds in the barrel. Once you have a good shape, try to keep a consistent rhythm.
One really big note here:
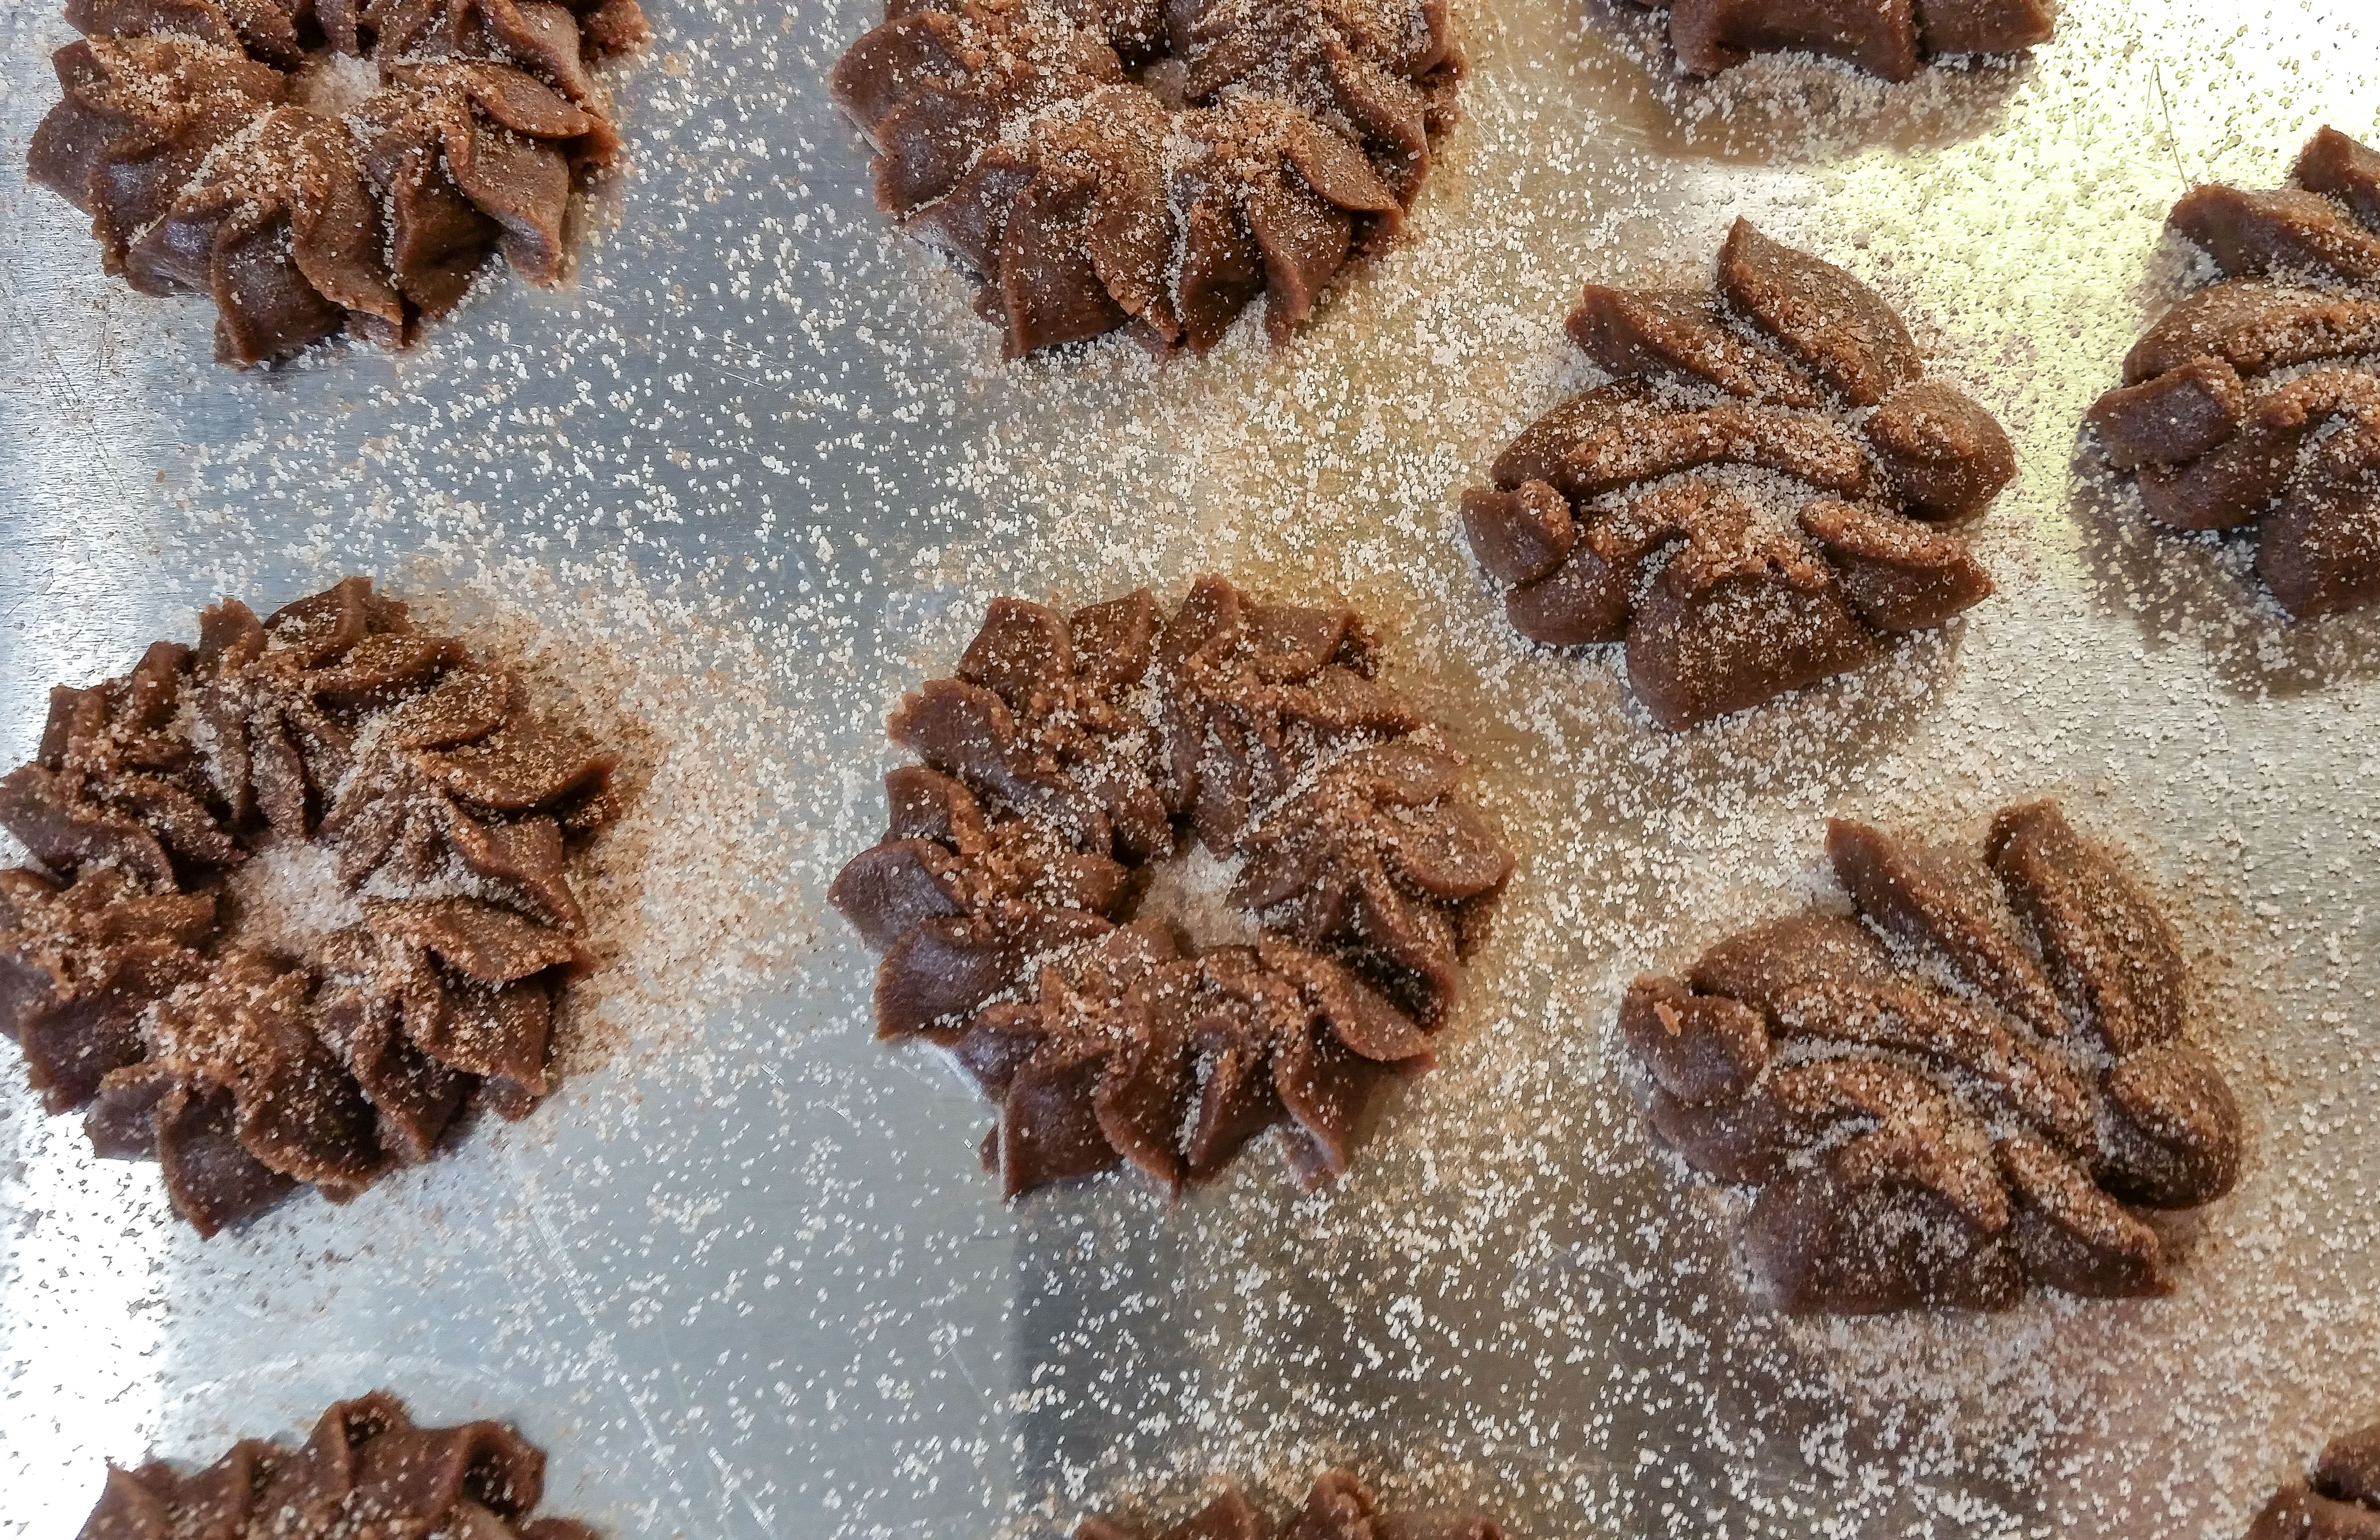
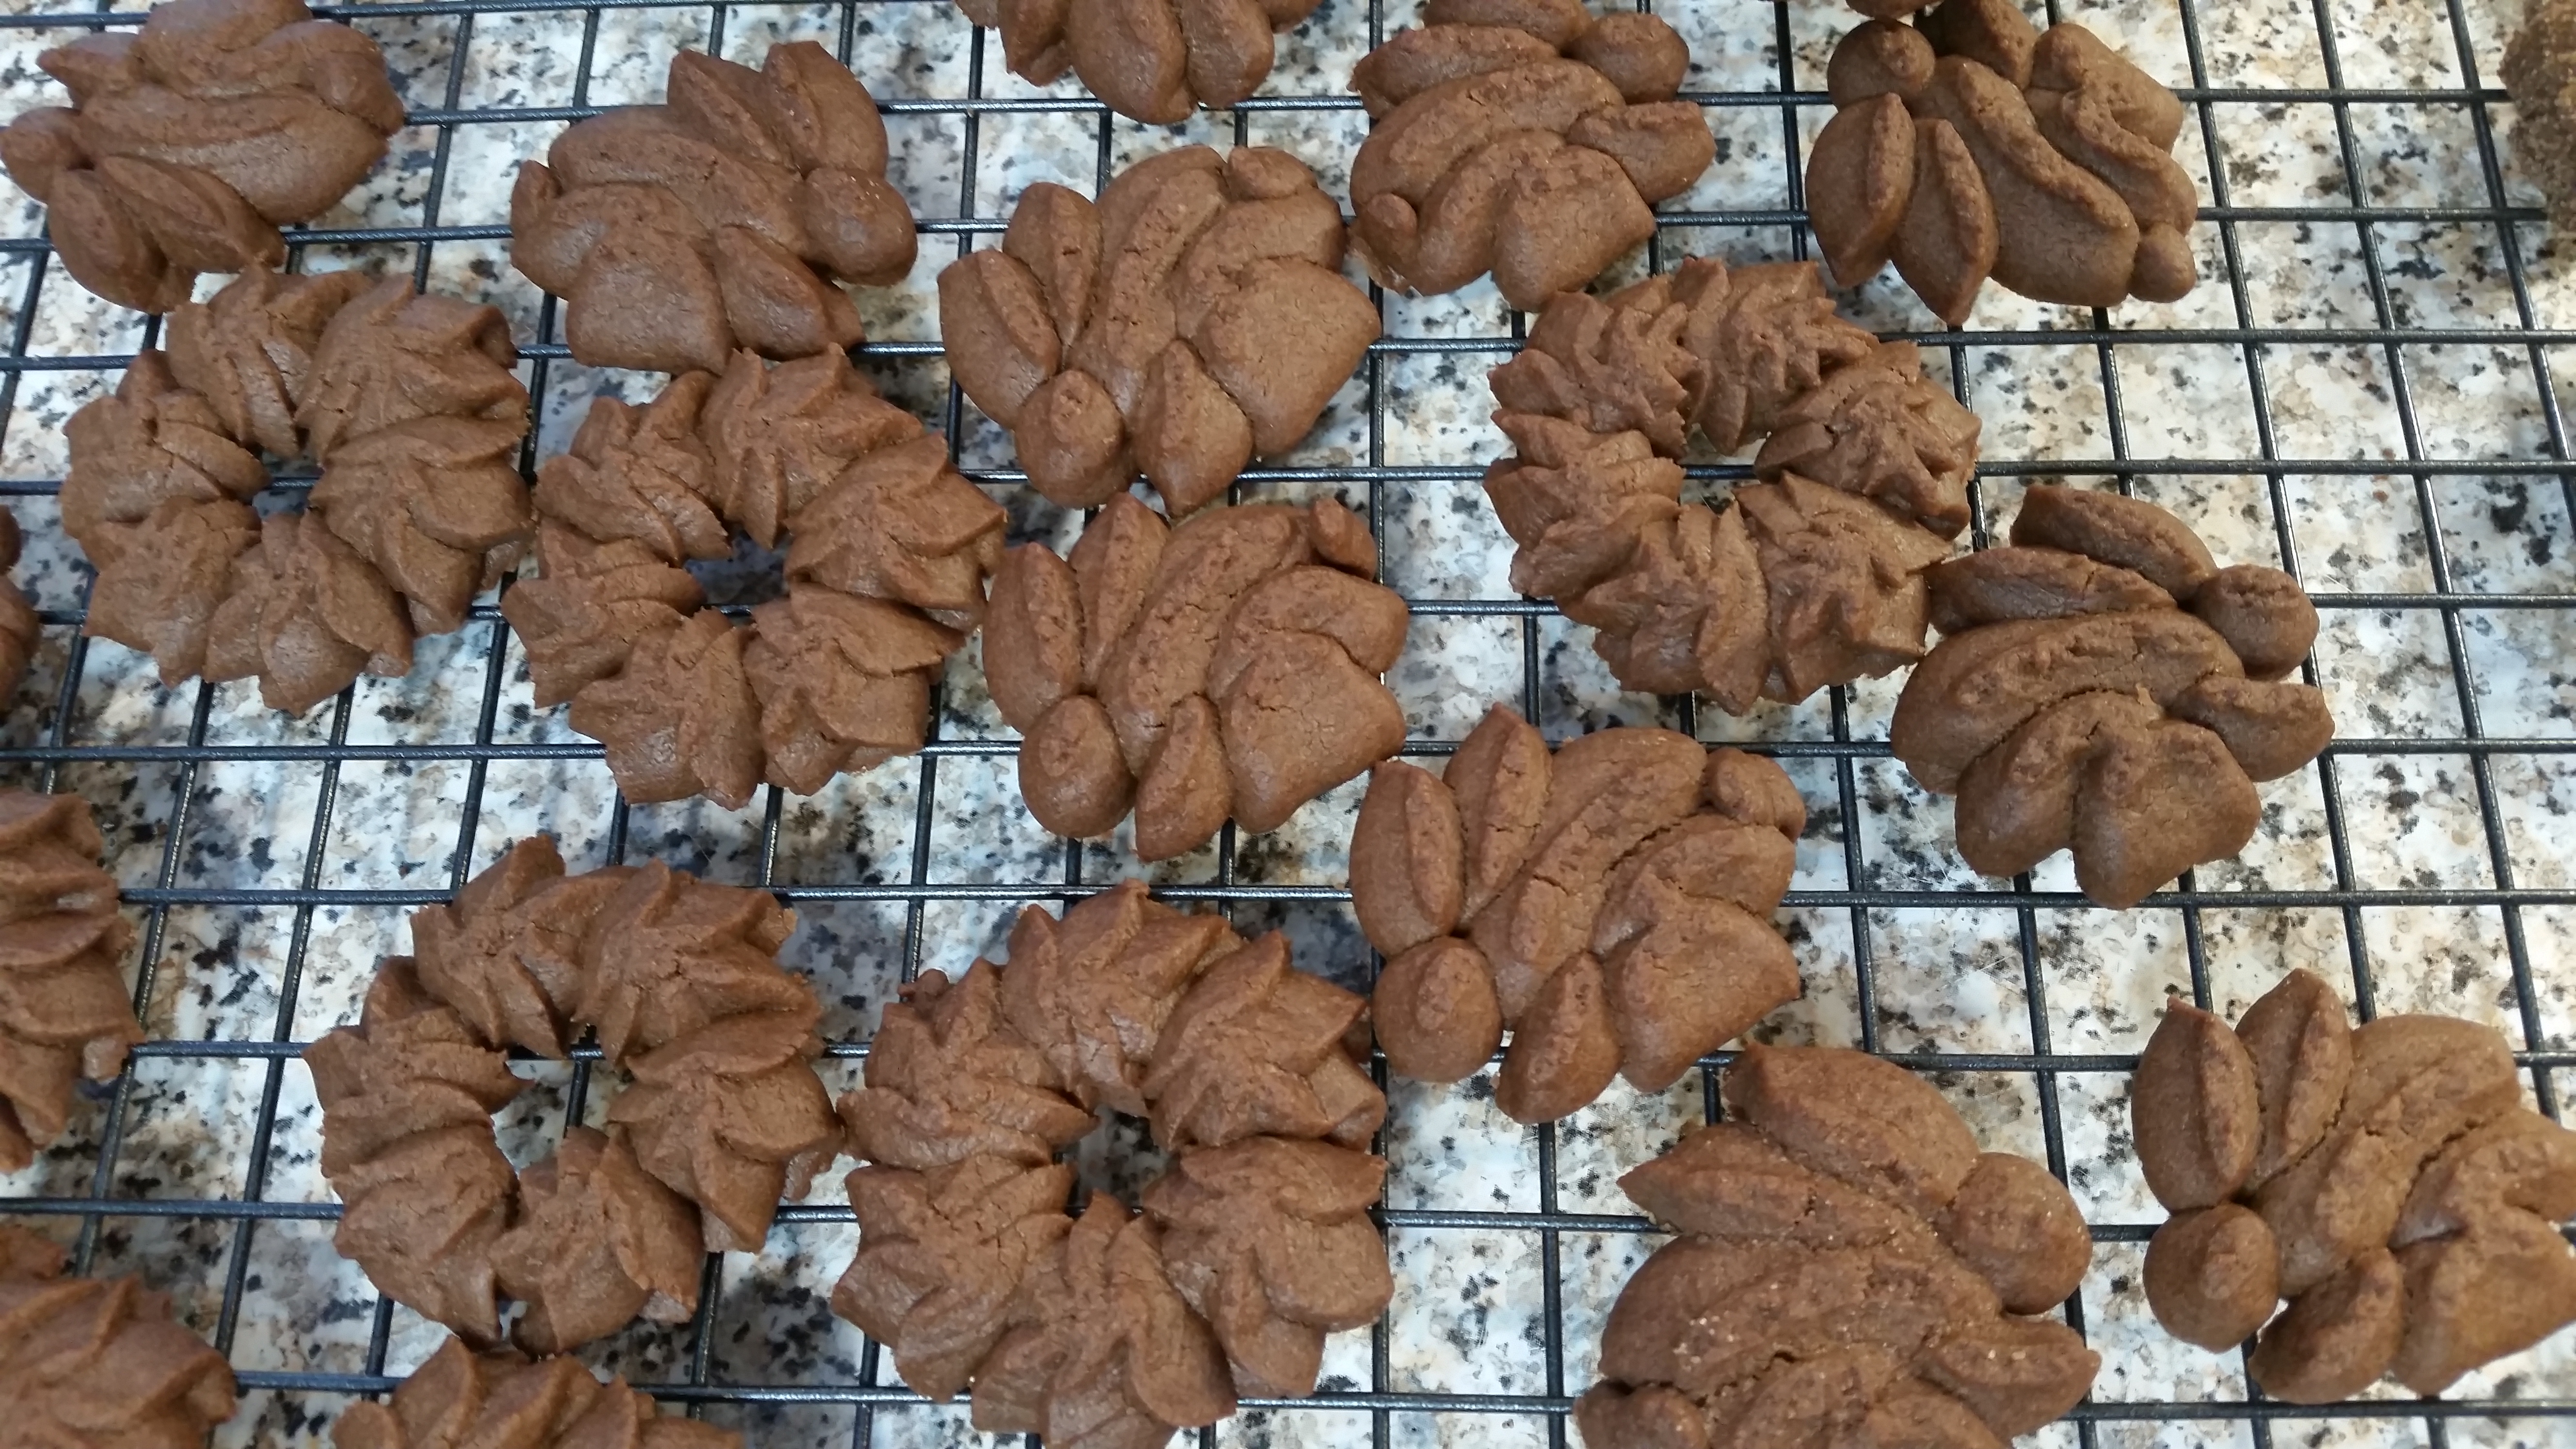
I normally say to try and press your cookies petite and with well-defined shapes. Well, not this time! Go ahead and press your “wreaths” – aka “nests” – as big and squishy and sloppy as you want! The bigger the better, actually. You don’t want an empty ring like a wreath, with a hole in the bottom that your cute jelly bean eggs will fall out of LOL. You want a solid-ish nest. A small hole is fine, because 1) these will spread on baking, 2) jelly beans aren’t very big, and 3) they’re not real nests so no need to worry. 😉 Do press your bunnies petite, though, especially if you are leaving them plain. You want them to hold their bunny shape and look like rabbits not blobs.

This dough presses quite beautifully. The shapes are consistent and are easy to press.
If you’re having trouble, though, try clicking into the air a few times and wiping away the dough to start over. It resets the pressure. Remember also with “once click per cookie” presses it’s completely fine to use more or less than a click. Think of the press as just a dough-pumping mechanism. Clicking is how you get the dough to come out. Feel the cookies stick to the sheet and you’ll get the hang of it. Always use un-greased sheets and never use non-stick. Even the most experienced pressers throw goofed up cookies back in the bowl all the time. Don’t be discouraged! Watch my videos if you want to see me troubleshoot on the fly.
I added a touch of sprinkled sugar to mine. Use a mesh spoon or regular spoon to tap plain granulated sugar onto the tops of the pressed cookies. I actually combined a little granulated sugar with some unsweetened cocoa- about even amounts- and sprinkled that on top to add some sweetness. These cookies are not overly sweet on their own. They’re more like a rich chocolate flavor. So if you want sweet, sprinkle away!
Bake for 7 to 10 minutes, checking the first batch early and often as all ovens are different and spritz brown very quickly once they start.
Let them sit on the cookie sheet for about 5 minutes before removing to a wire cooling rack. This helps prevent breakage. Keep your spatula nice and flat as you take them off so they don’t bend while they’re still soft.
While the cookies are cooling, set up to drench your coconut in chocolate. You’re going to want to work in small batches because the chocolate will start to harden once you mix it with the coconut.
If you’re not adding coconut just add jellybeans or other egg-resembling candies to your nests and eyes to your bunnies. Candy eyes (3/16″) can be found online (try etsy!)
To mix the coconut and add “twigs” and “fur”, melt your chocolate in a small bowl in the microwave per directions on the package. Usually it’s at half power. I put my bowl of melted chocolate over a slightly bigger bowl of hot water to keep it as melted as possible to avoid lots of reheating. It worked quite well. I also pulverized some of the coconut to make shorter strands that looked more like “fur” for the bunnies. A few seconds in my Magic Bullet was all it took.
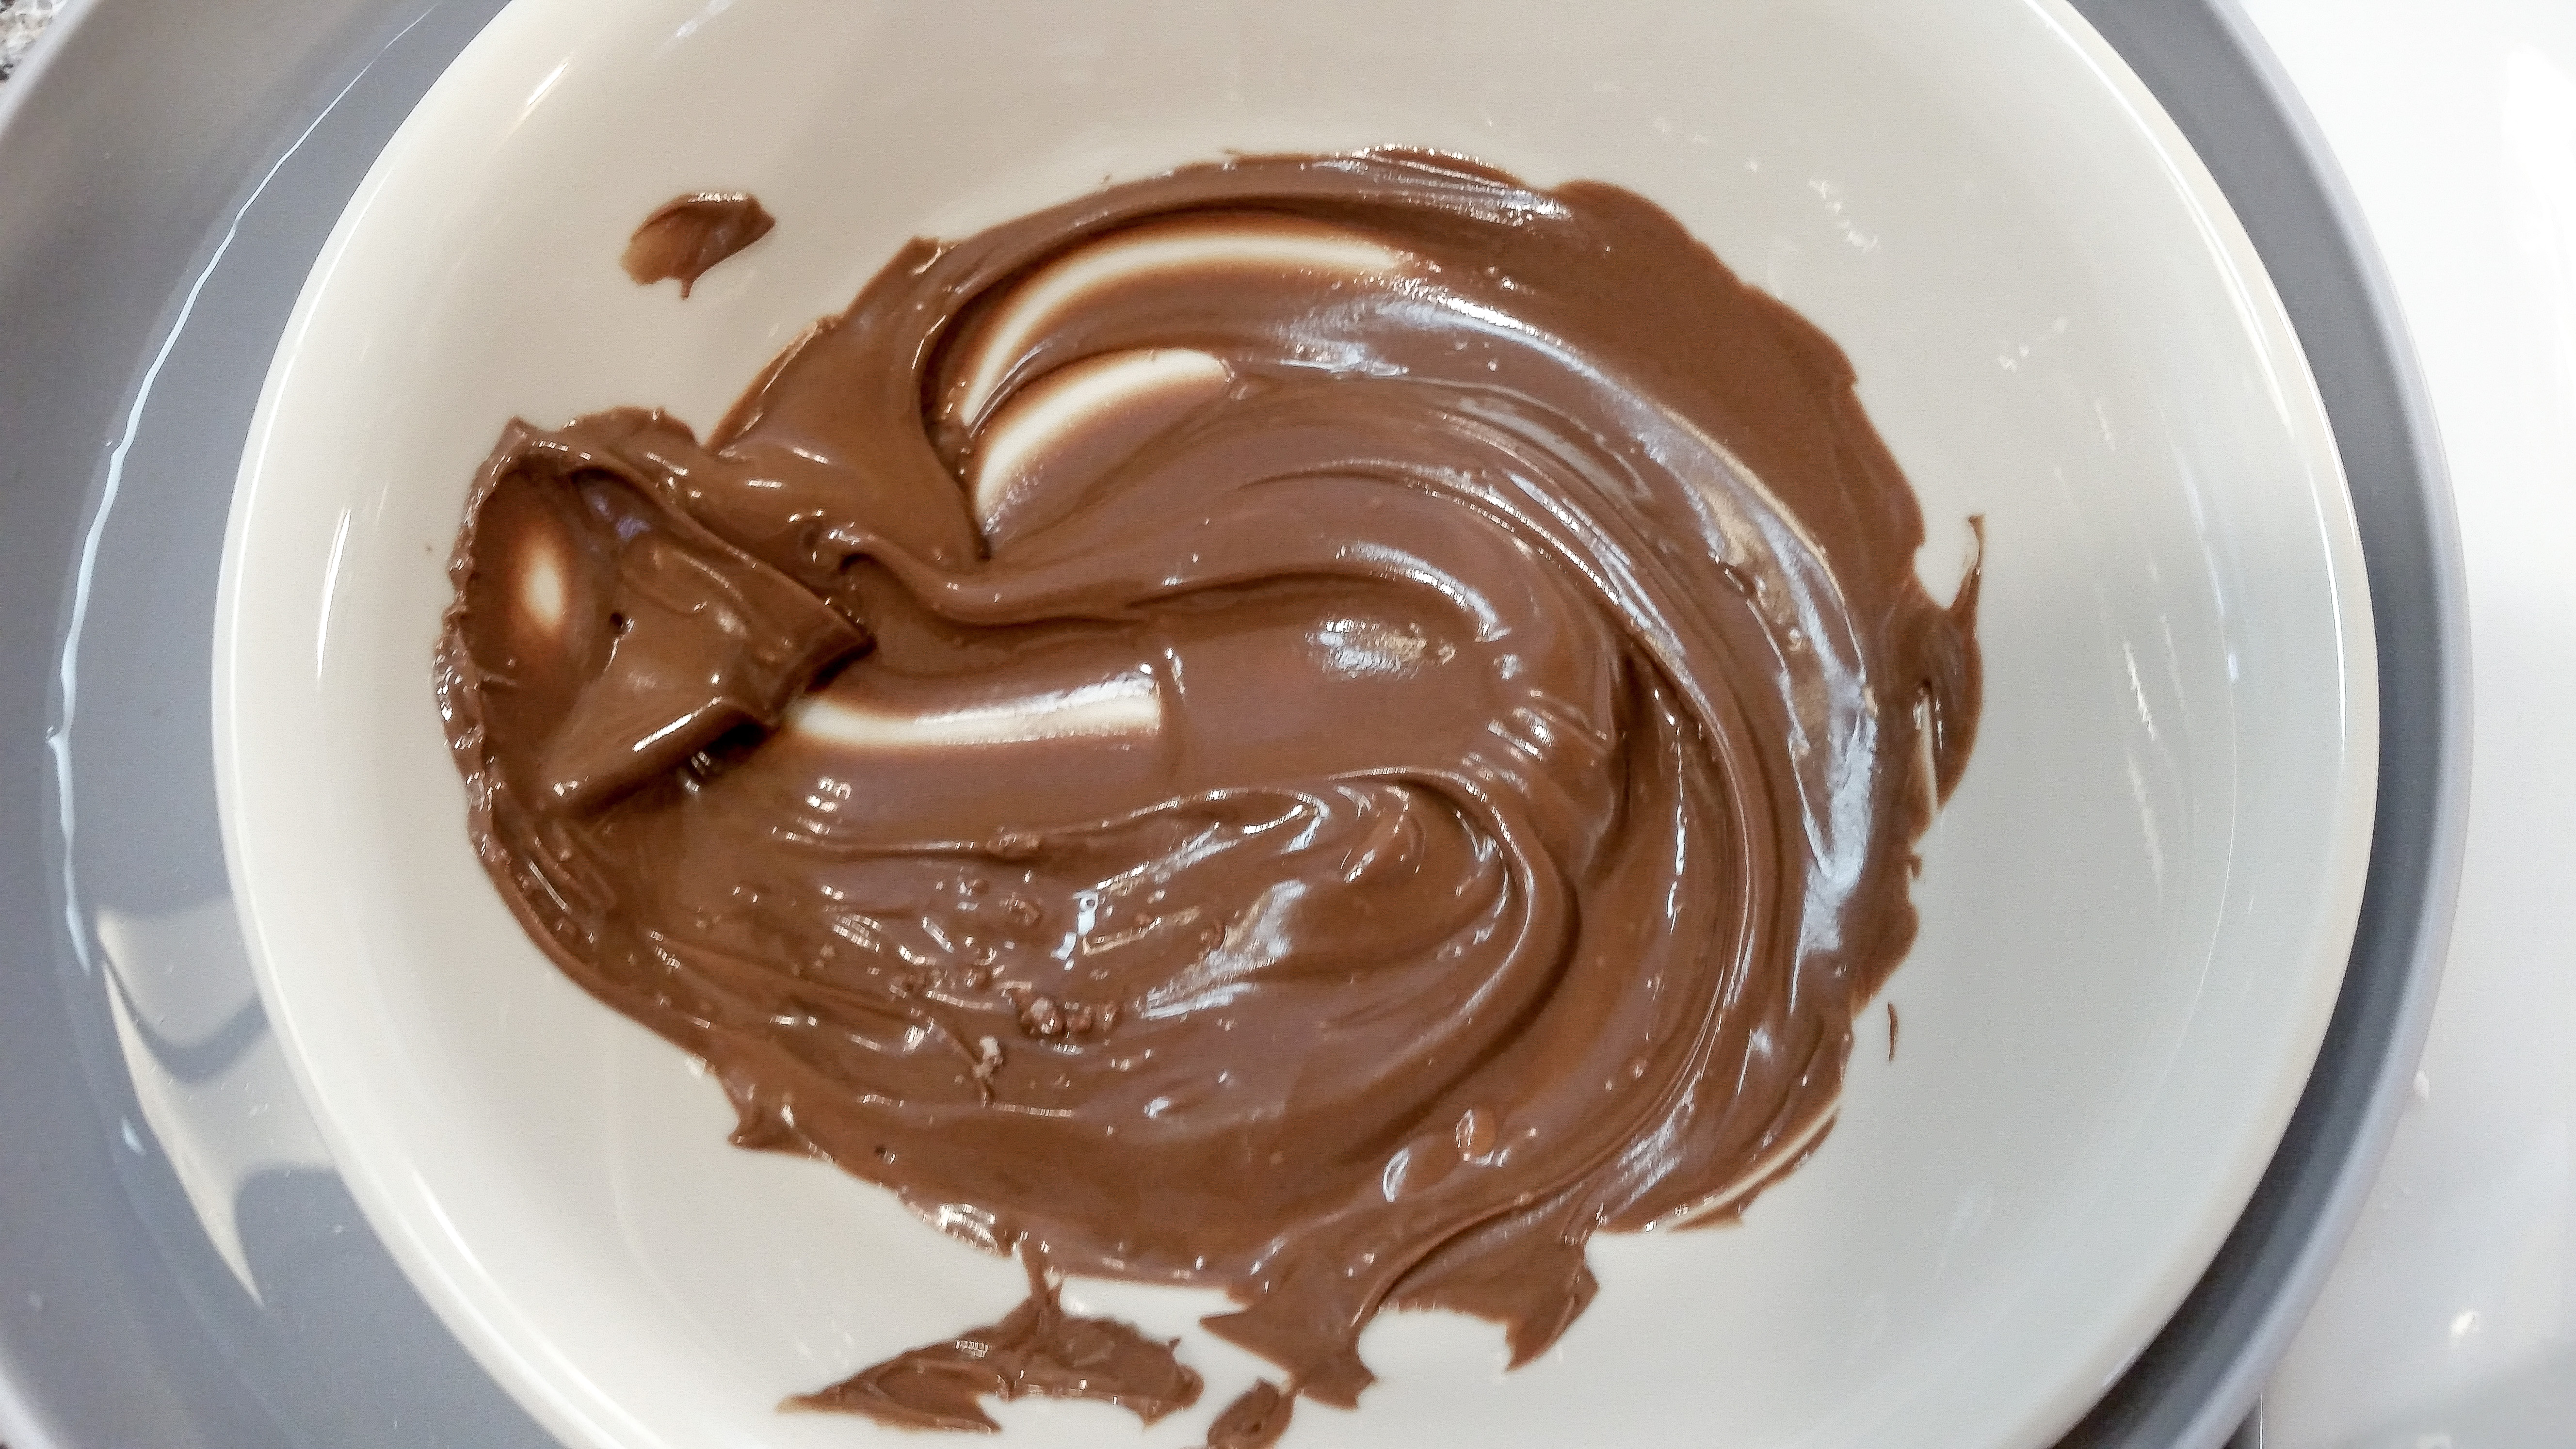
Work on a small plate or waxed paper or a silicone mat. Place a few tablespoons of coconut on the plate next to a tablespoon or so of chocolate. Mix it up with a spoon, kind of smooshing the coconut into the chocolate, until it’s all coated. Add more of either to get a consistency you like! I found that more drippy chocolate was good for the long strands of coconut for the nests, and higher portion of coconut made it “furrier” for the bunnies. Experiment!


I tried to take picture of putting these together but I didn’t have a helper today and besides, it’s pretty self-explanatory.
Keep a small dish of warm water handy to dampen (not wet, I mean just damp) your fingers so they don’t stick to the mixture. Scoop up a teaspoon or so for the bunnies and shape it as you place it on their backs. Don’t cover the ears or feet, and leave a space for a half-jellybean tail on that back end. If it’s having trouble sticking to the cookies, smear a little melted chocolate onto them first. It’s like glue for the coconut mixture.
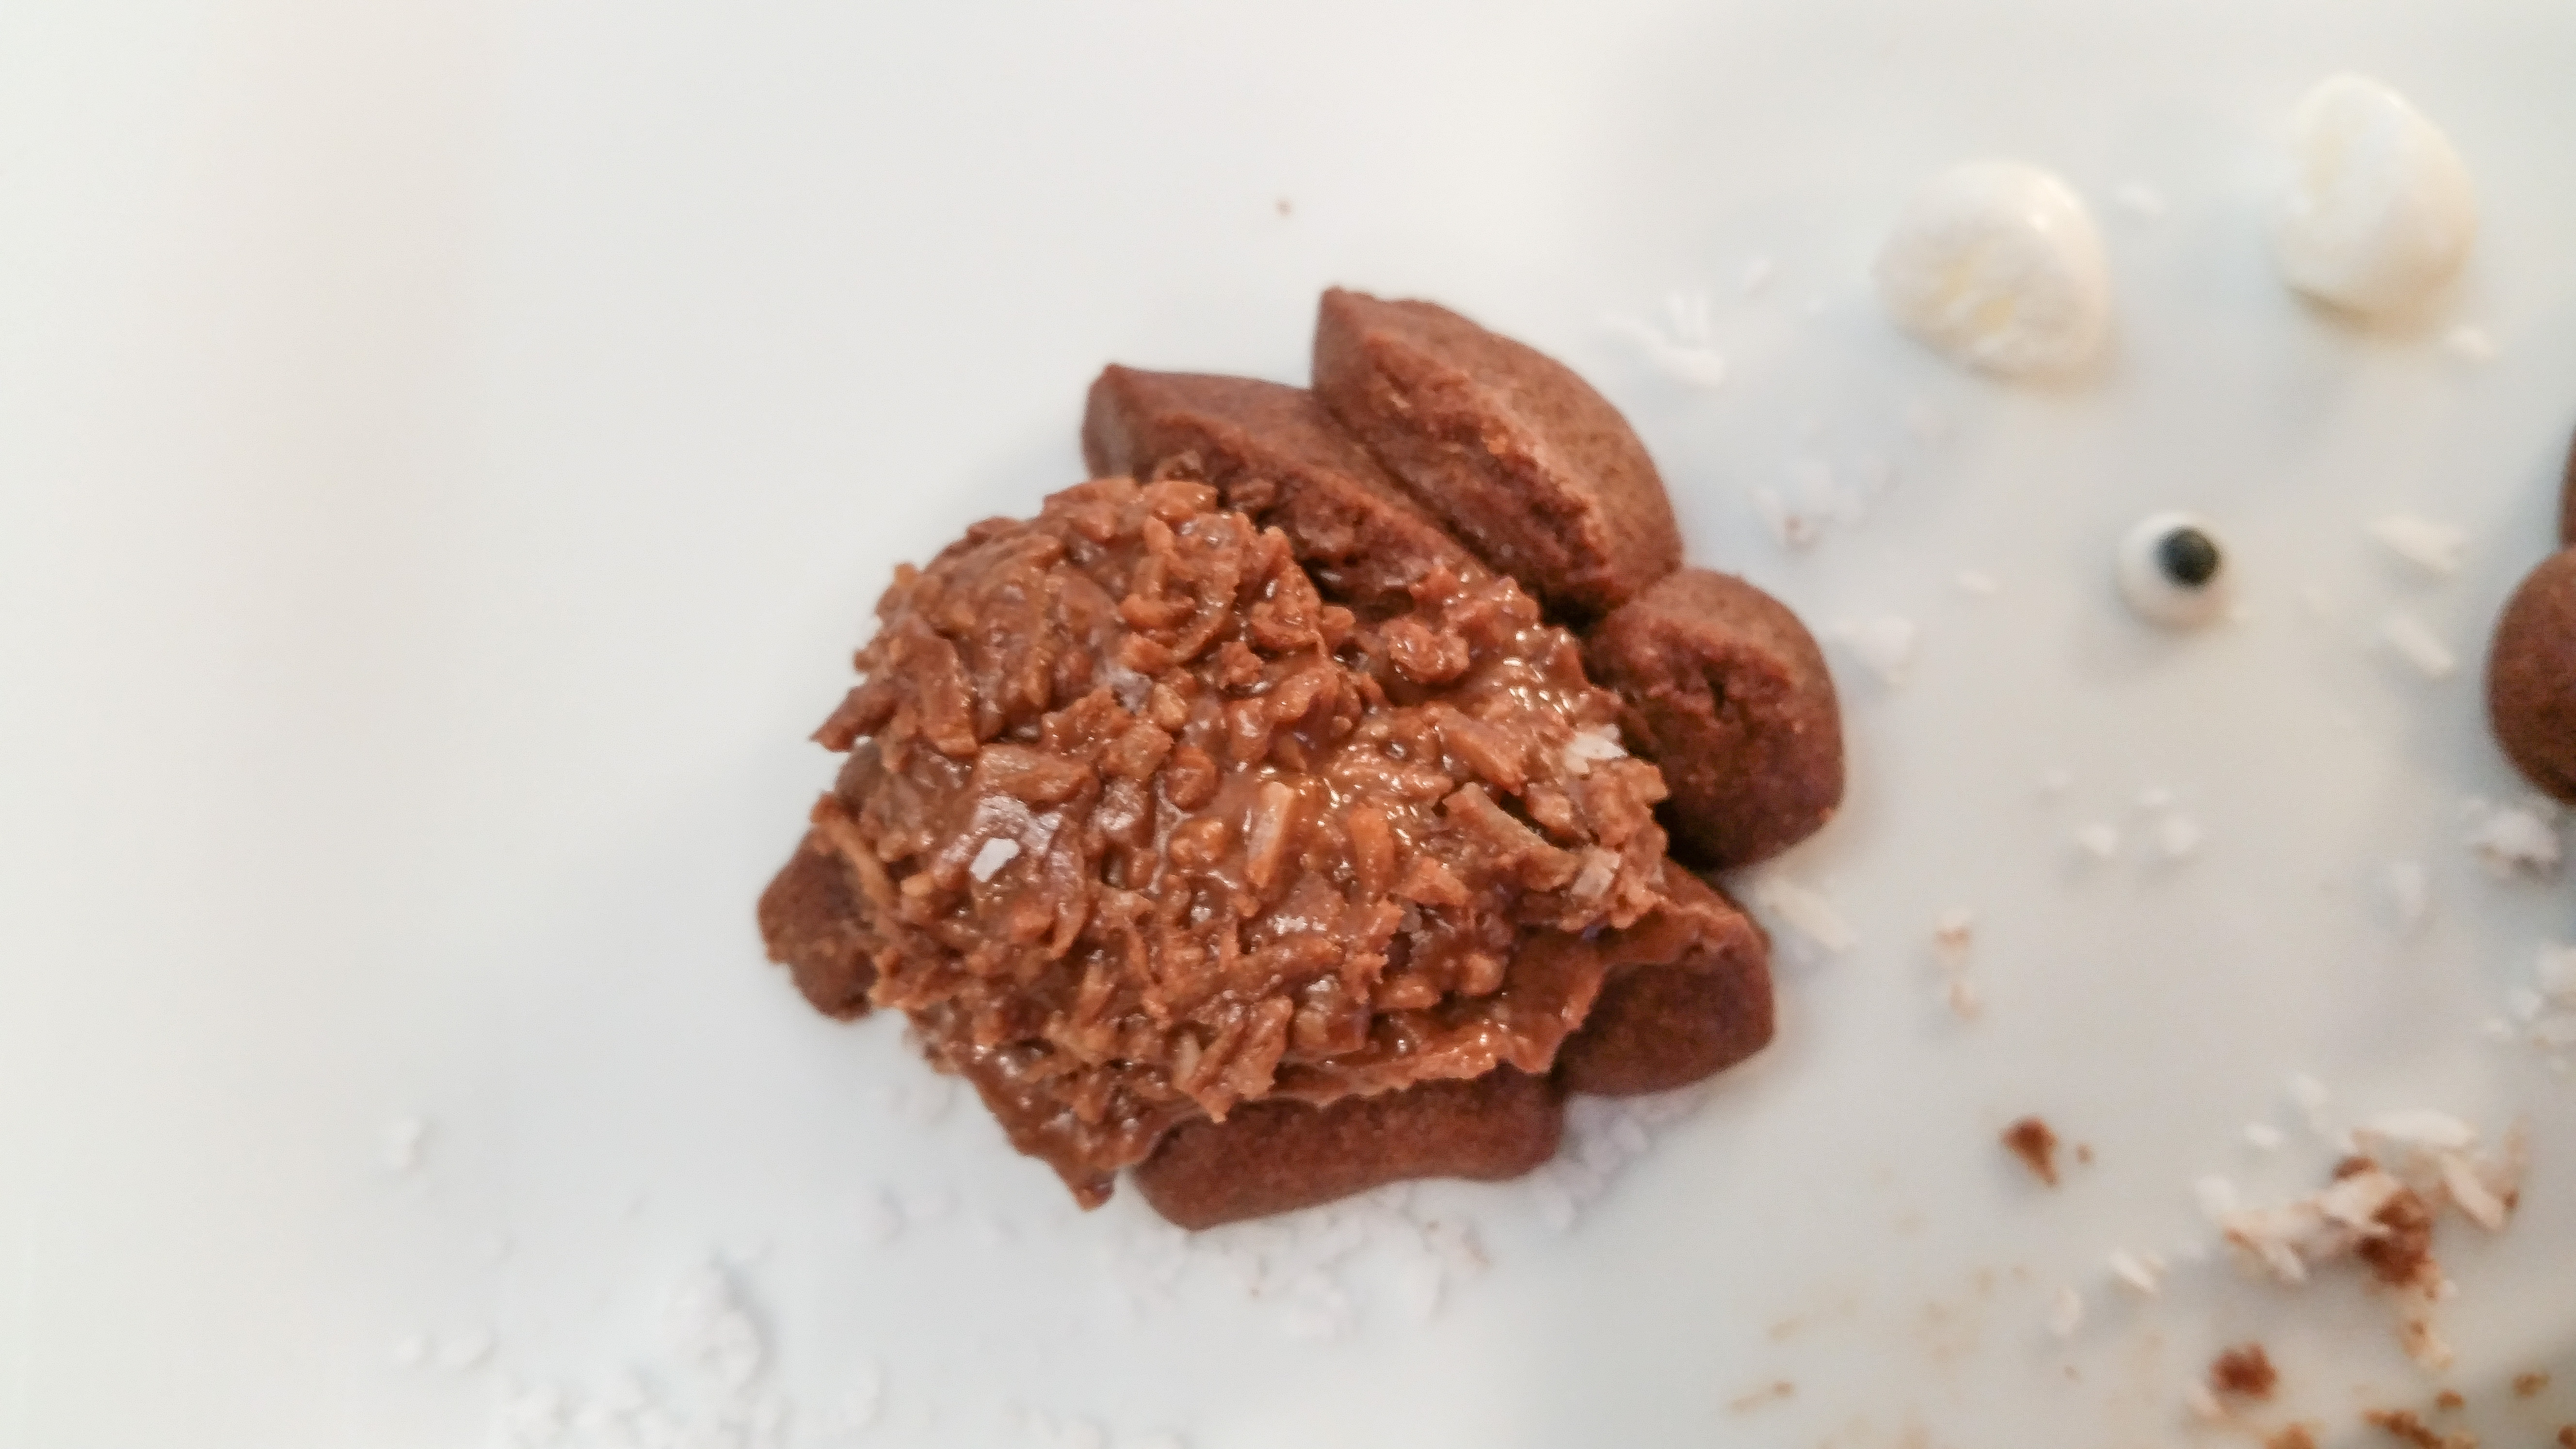
For the nests, use a couple of teaspoons’ worth of the mix and shape it till it looks twiggy and nesty to you.
That’s it!
Easter Chocolate Coconut Bird’s Nests & Bunnies. Here’s some more pics of how mine turned out.

I wish you all a very Happy Easter and invite you to “Press the possibilities!” Thanks so much for stopping by. 🙂
Happy Baking!
~Susie
Disk Designer/Co-Owner at Impress! Bakeware, LLC
Our website has all of our 200+ disk shapes, cookie press, embossed rolling pins, stamps, luster dusts, baking accessories plus more about our Women/Family Owned company! impressbakeware.com
All products are on our Etsy shop.
Our Amazon shop has our cookie press and disks and embossed rolling pins.
Follow us on facebook!
The Easter and Christmas Two disk sets: