
(From 2021) Mother’s Day is coming up, so this one’s for my mom. ❤
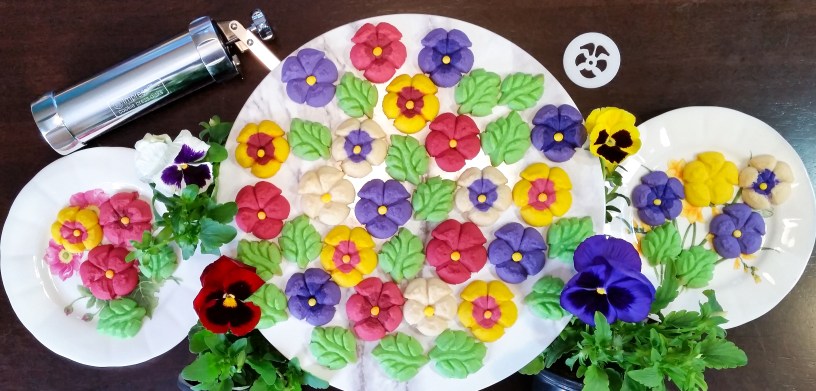
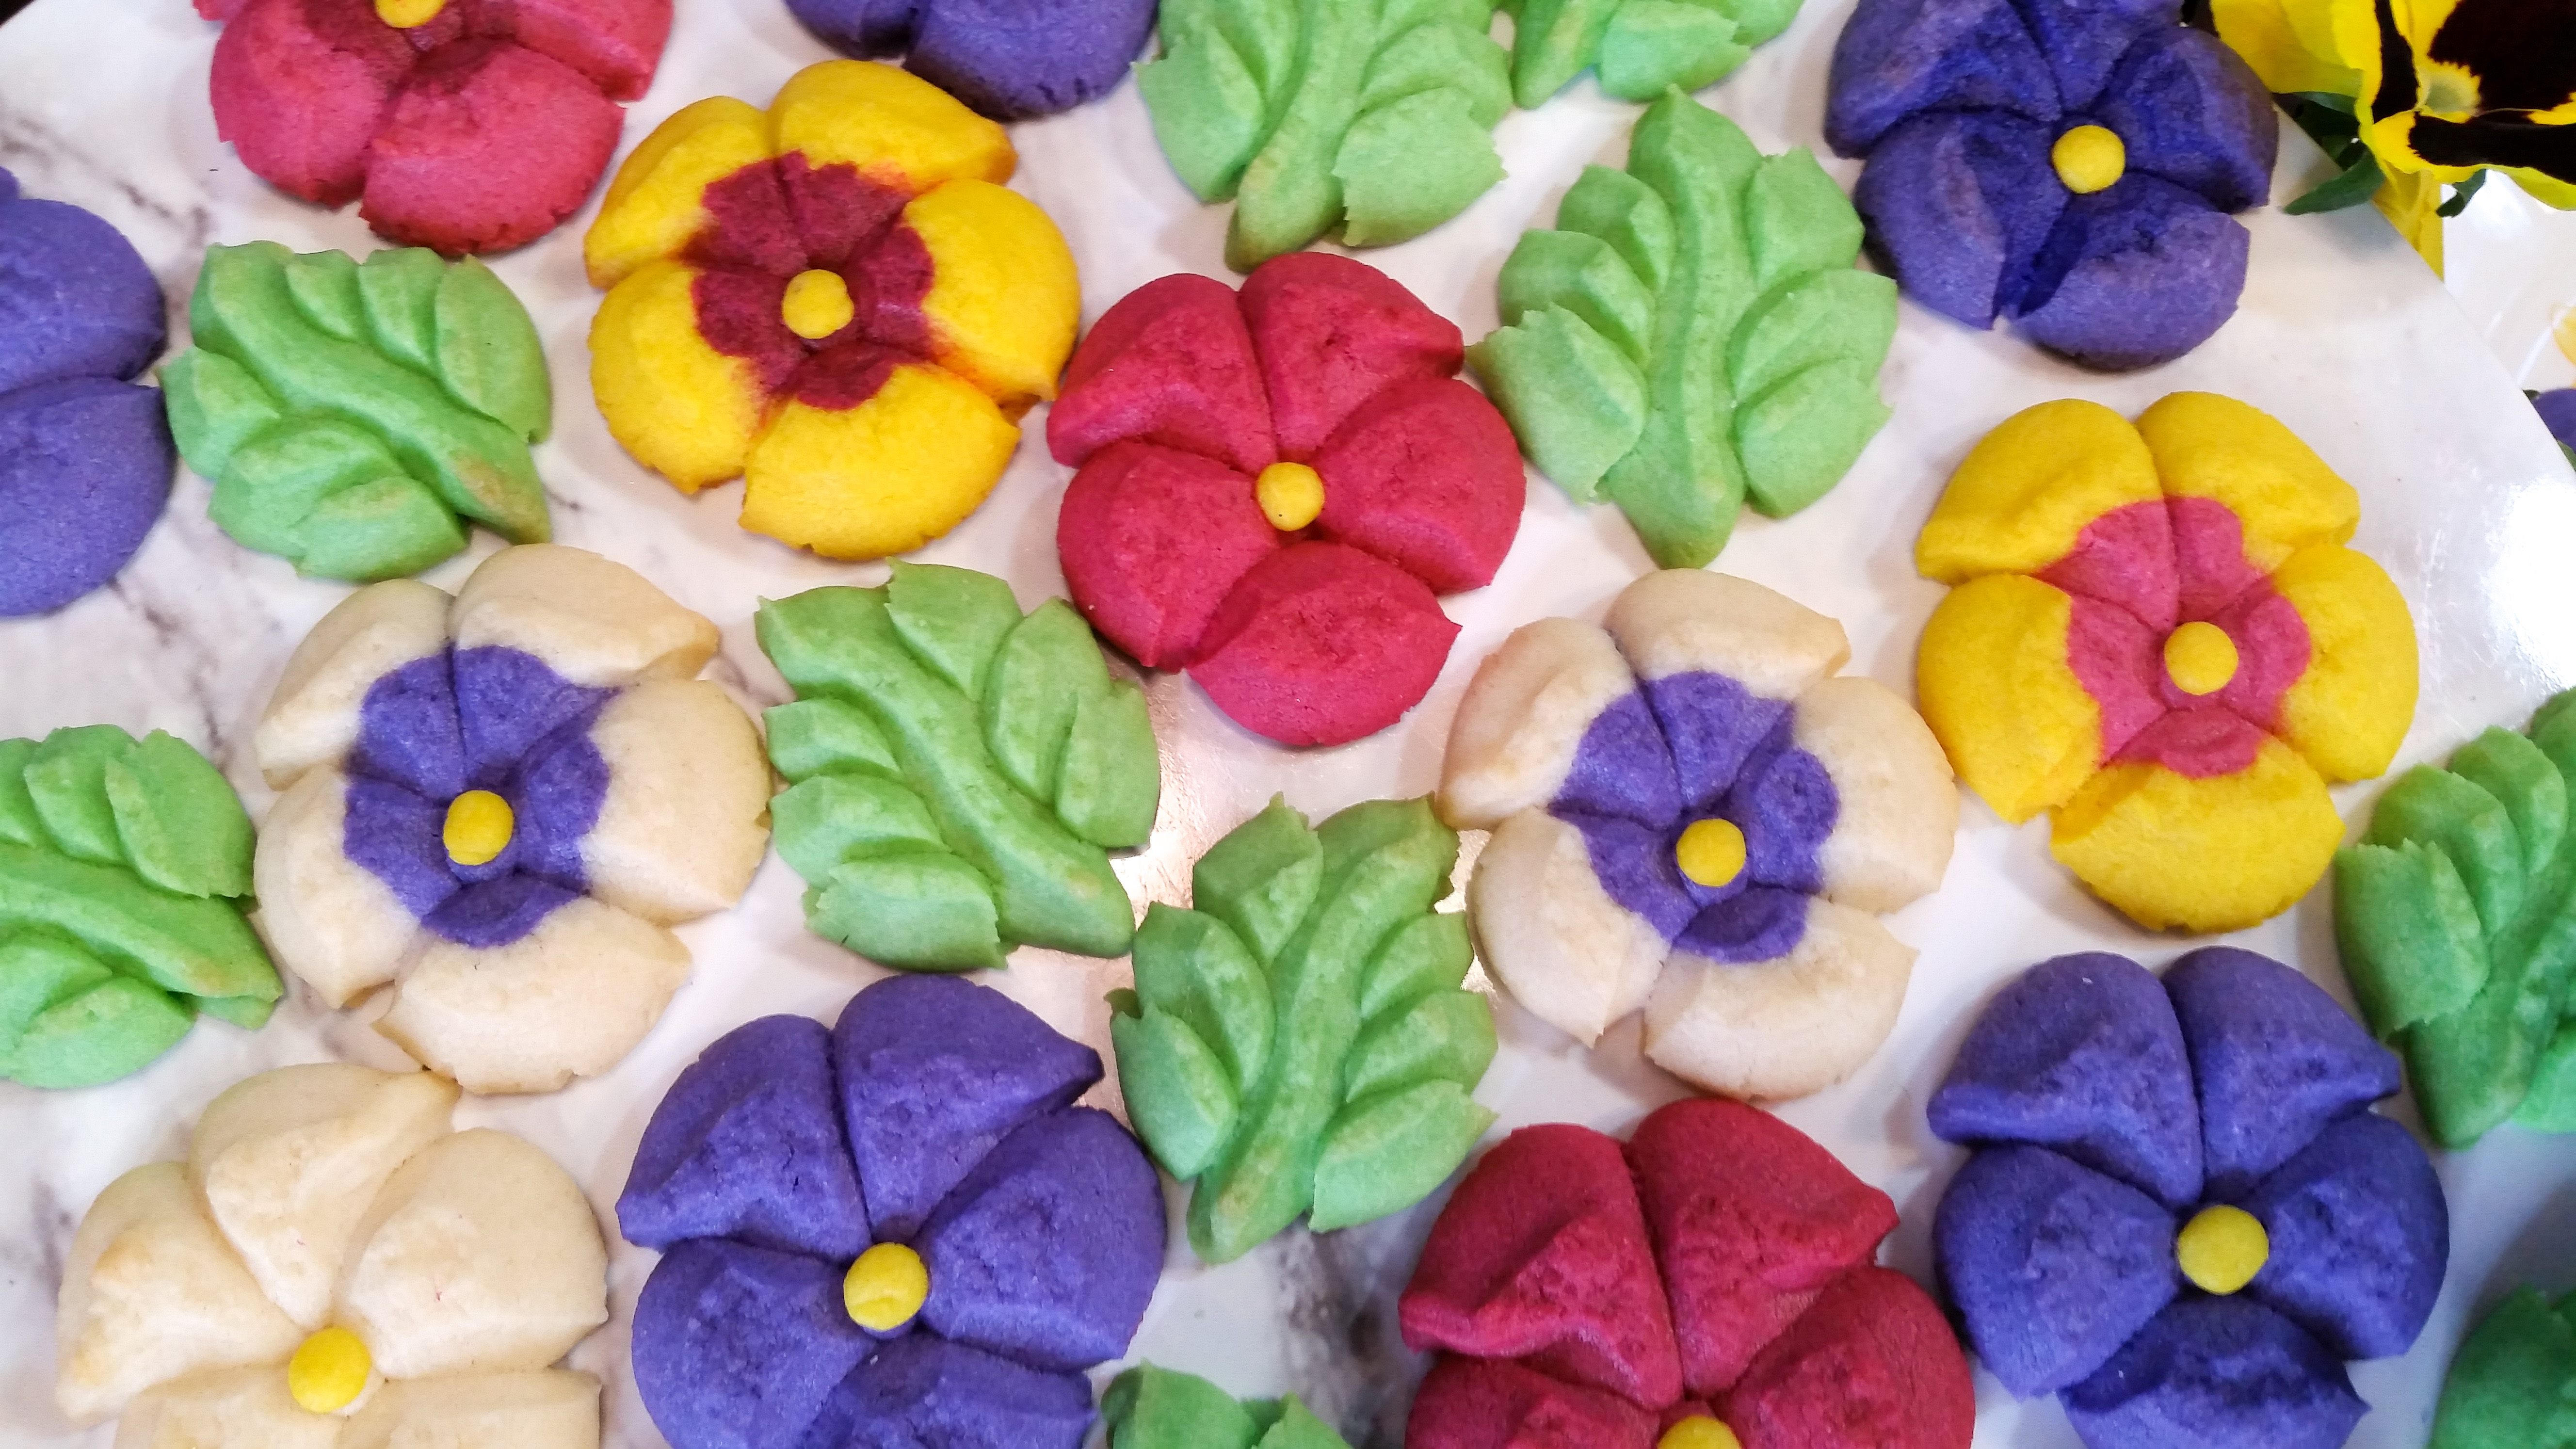
My mom taught me to use a cookie press when I was barely old enough to hold one. I honestly can’t remember a time when I didn’t know how to press cookies. It’s so interwoven into my family’s traditions, especially holidays, that it’s just a part of my identity. Spritz cookies weren’t the only things I learned from mom. She also taught me kindness, gentleness, and honesty. She taught me to love animals and plants, and when I was 8 years old she taught me to garden. I’d been watching her grow magnificent flowers and a jungle of houseplants for as long as I could remember. I watched in awe as her epic snapdragons reached ridiculous heights. I was playing in the yard one day and noticed a blank patch of grass in a corner. I asked if we could put a tiny garden there that would be all my own. With a smile and no hesitation mom grabbed a shovel and we dug out the little corner with a semi-circle edge, lined it with some pretty rocks, and headed off to the garden center. I knew exactly what I wanted. Pansies. I adored their velvety petals and sunny happy faces. I thought they were the cutest things in all the plant world. So decades after mom was gone, when I made the first disks for Impress, the first flower I designed was the pansy. This one’s for you, mom. Thanks for the love of cookies and flowers.
I’ve been debating which spritz cookie recipe to use for this post. I’ve been wanting to do lemon poppy seed for years (a family favorite in this house!) but pansies would look goofy with black specks on them LOL! So in a moment of inspiration I thought to tweak my cream cheese spritz recipe with lemon extract. The result is a denser, chewier spritz than the usual light and airy texture, but it accents the flavor beautifully and I’m quite pleased with it! I hope you guys like it, too. 🙂

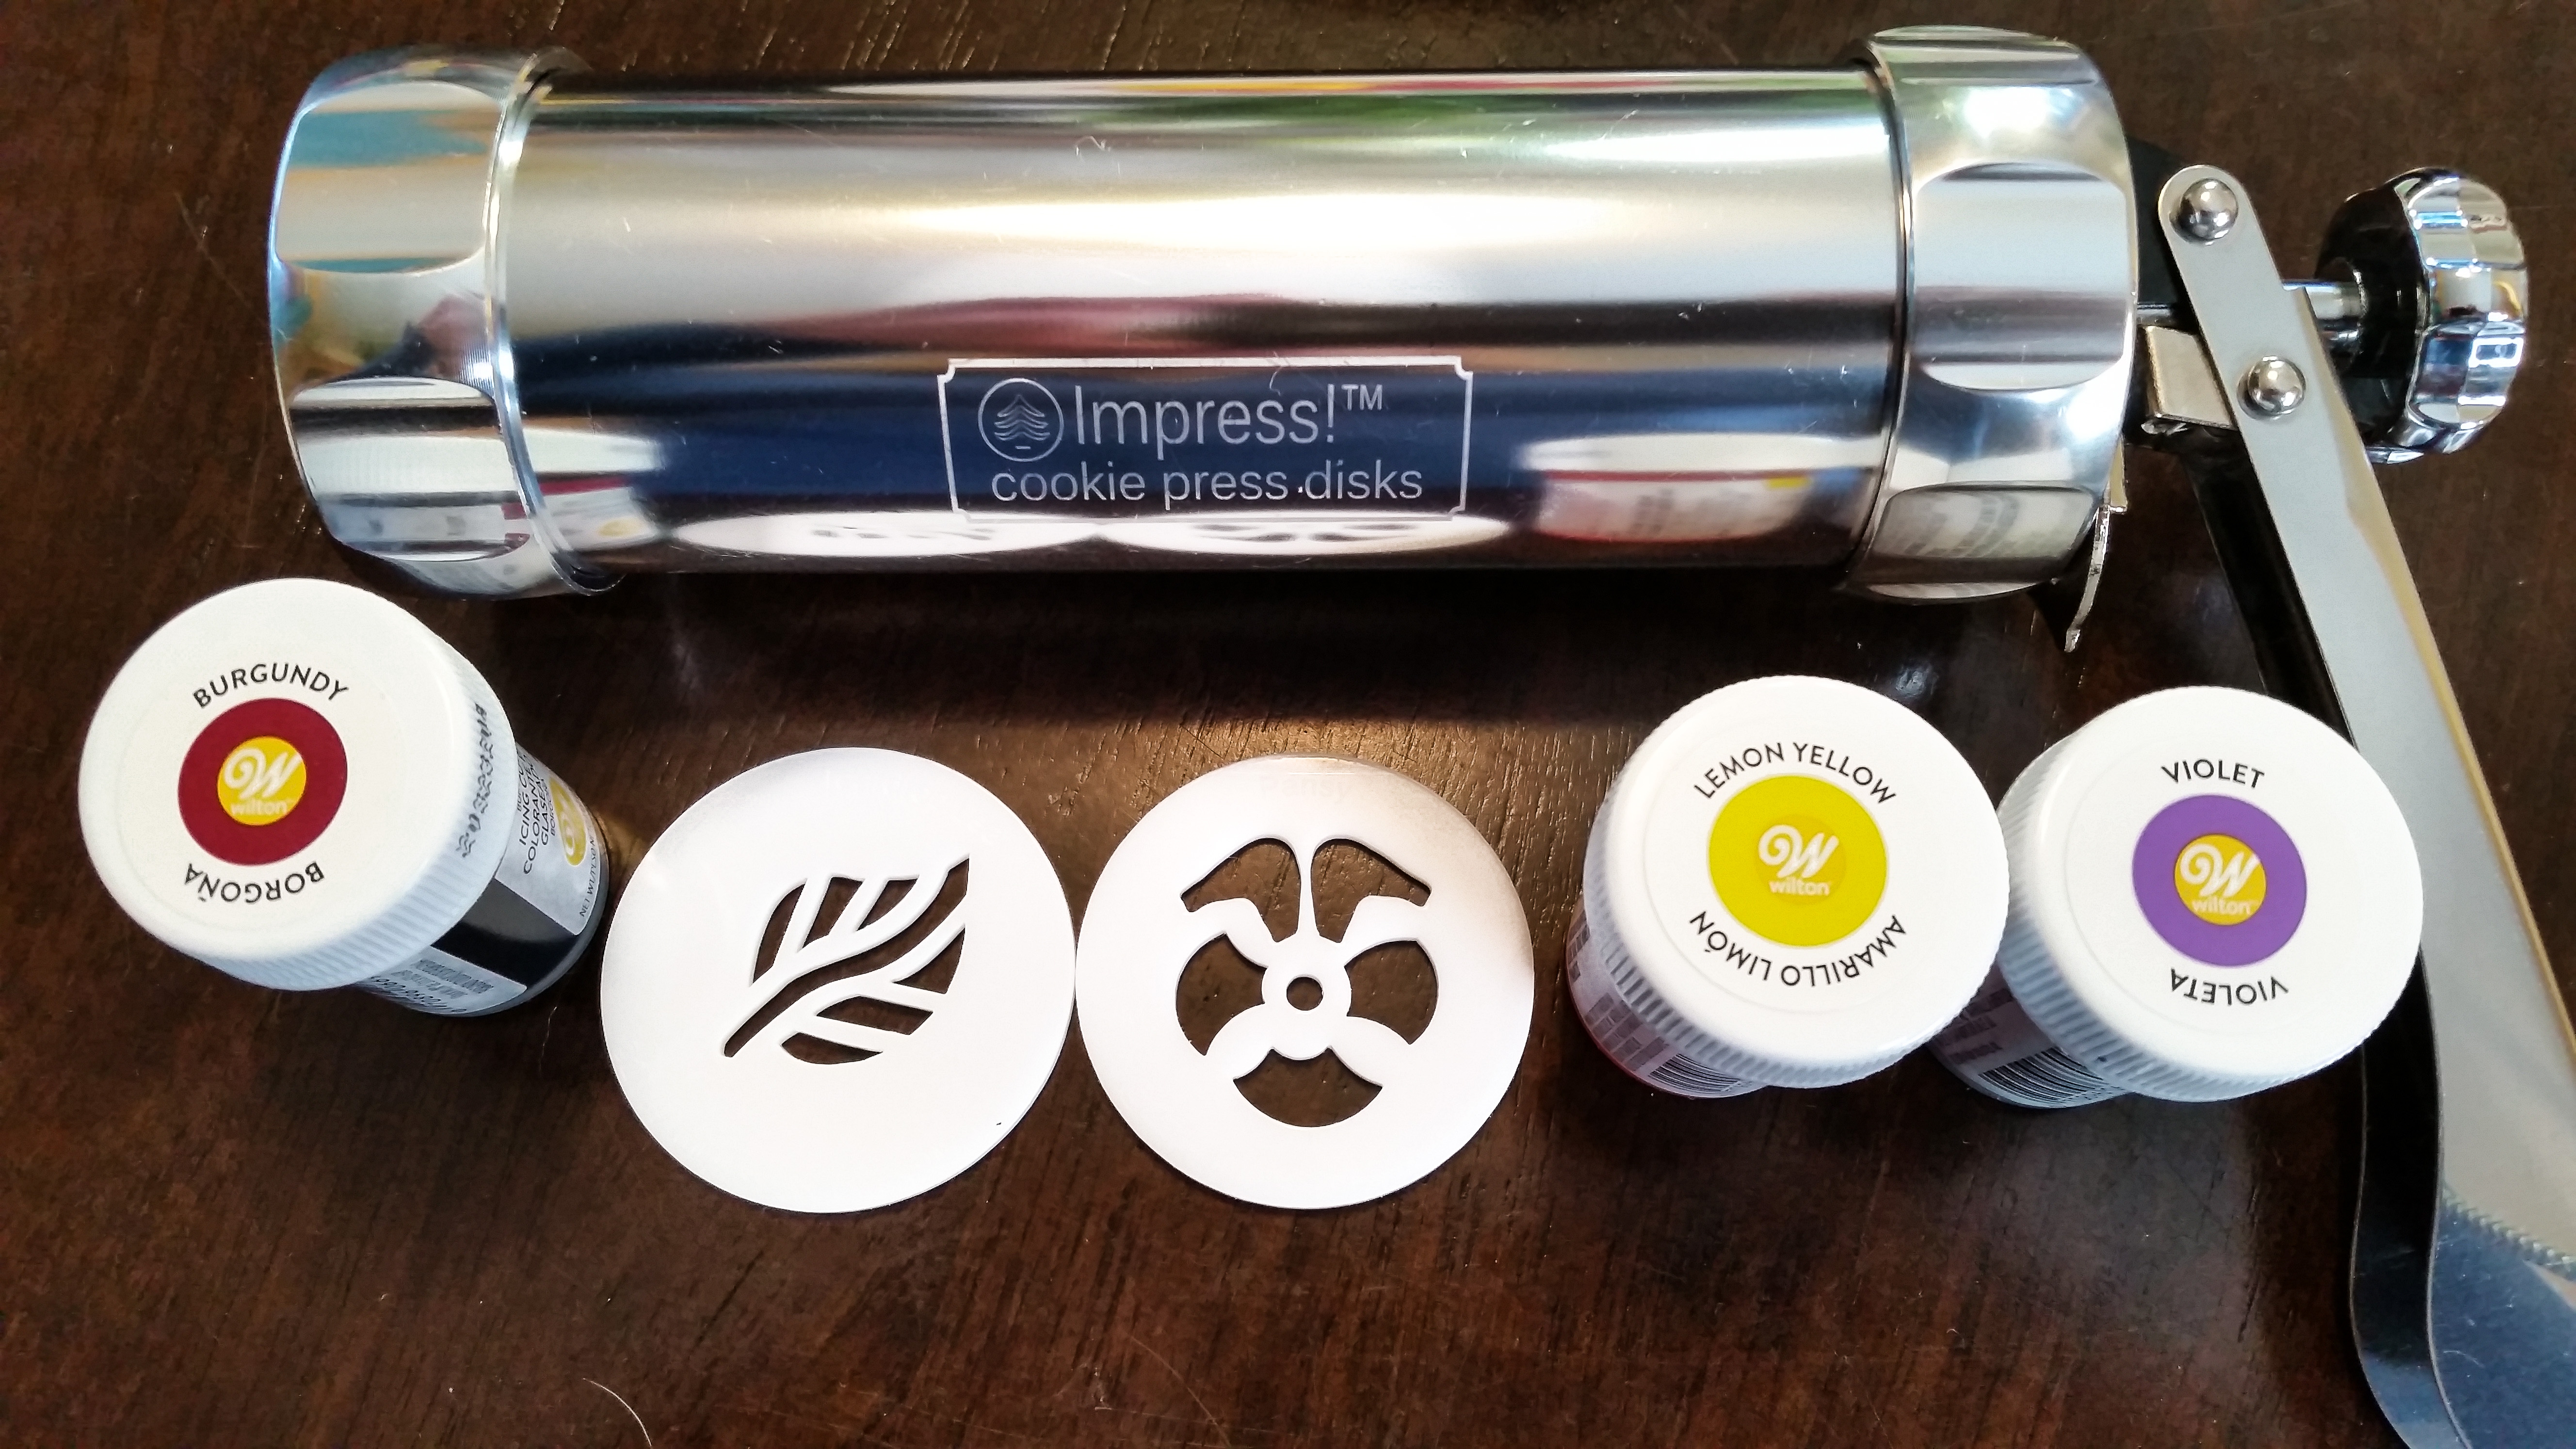
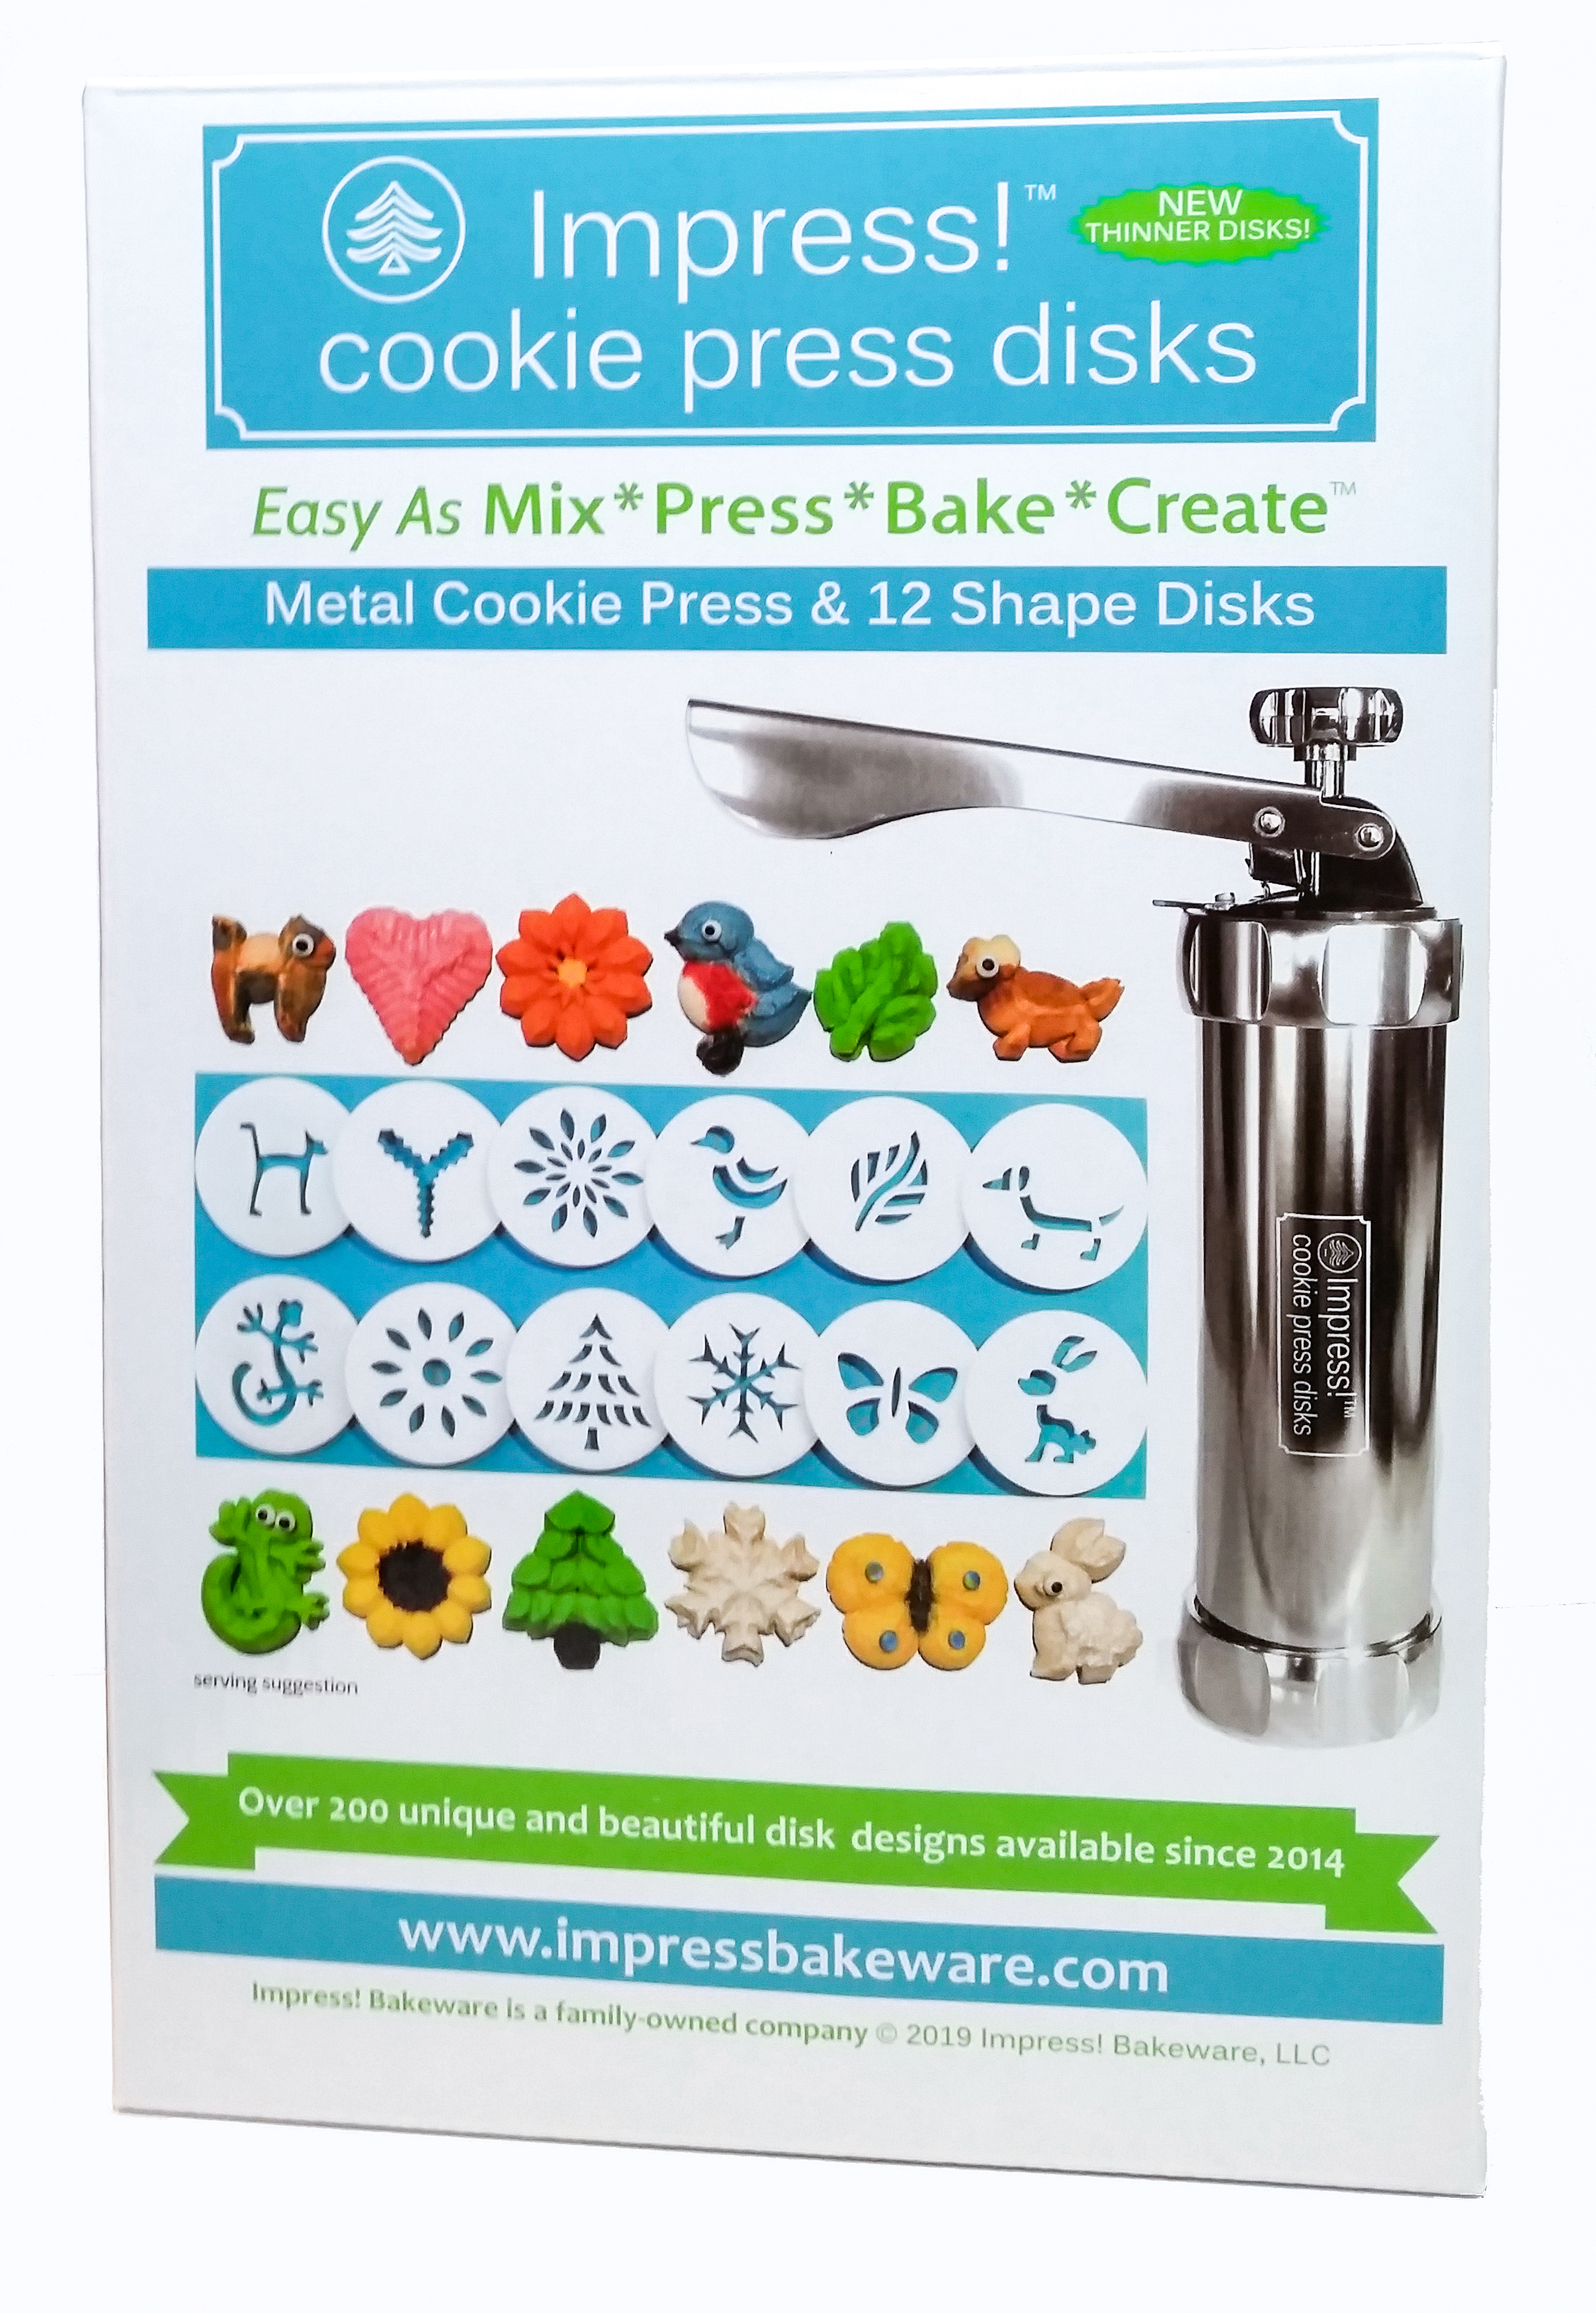
I used the Pansy disk from our Flowers disk set and the Teardrop Leaf from the disk set that comes with the Impress! Cookie Press (that disk set is also sold separately on our website). The dogwood leaf from the Leaves set would be just as cute! Pictures of these sets at the bottom of the post, plus links to purchase on our website or Amazon. You’ll also need gel food colors to tint your dough. Oops, I forgot to show the leaf green gel food color in this photo. 😉
Our website has all of our 200+ disk shapes, cookie press, embossed rolling pins, baking accessories plus more about our Women/Family Owned company! impressbakeware.com
All products are on our Etsy shop.
Our Amazon store has our cookie press and disks and embossed rolling pins .
Let’s bake!
Cream Cheese Spritz
1 cup (2 sticks) butter, softened (not melted)
3 ounces softened cream cheese
1 cup granulated sugar
1 egg
1 teaspoon vanilla extract
1 1/2 teaspoons lemon extract
3 1/4 cups all-purpose flour
1 Tablespoon cornstarch (optional, enhances texture!)
1/2 teaspoon baking powder
1/4 teaspoon salt
Gel food coloring (liquid changes dough consistency too much)
Preheat oven to 400 degrees
Combine the flour, salt, cornstarch (if using), and baking powder and set aside. Cream the butter and cream cheese very well with an electric mixer on its highest setting. Awesomely creamed butter is the basis of great spritz recipes that melt in your mouth.

This recipe is beautiful at this stage! The butter and cream cheese is nice and fluffy.
Next add the sugar and cream again until it’s light and fluffy. Add the vanilla, lemon extracts, egg, and then mix thoroughly. Add the flour mixture a little at a time and mix until all ingredients are evenly combined , but do not over-mix as that can make spritz dough too stiff.
You can always troubleshoot a spritz dough by adding water a teaspoon at a time to stiff, dry dough, or adding flour a tablespoon at a time to overly sticky or soft dough. Perfect spritz dough has a soft and malleable texture that is not too sticky or too stiff.
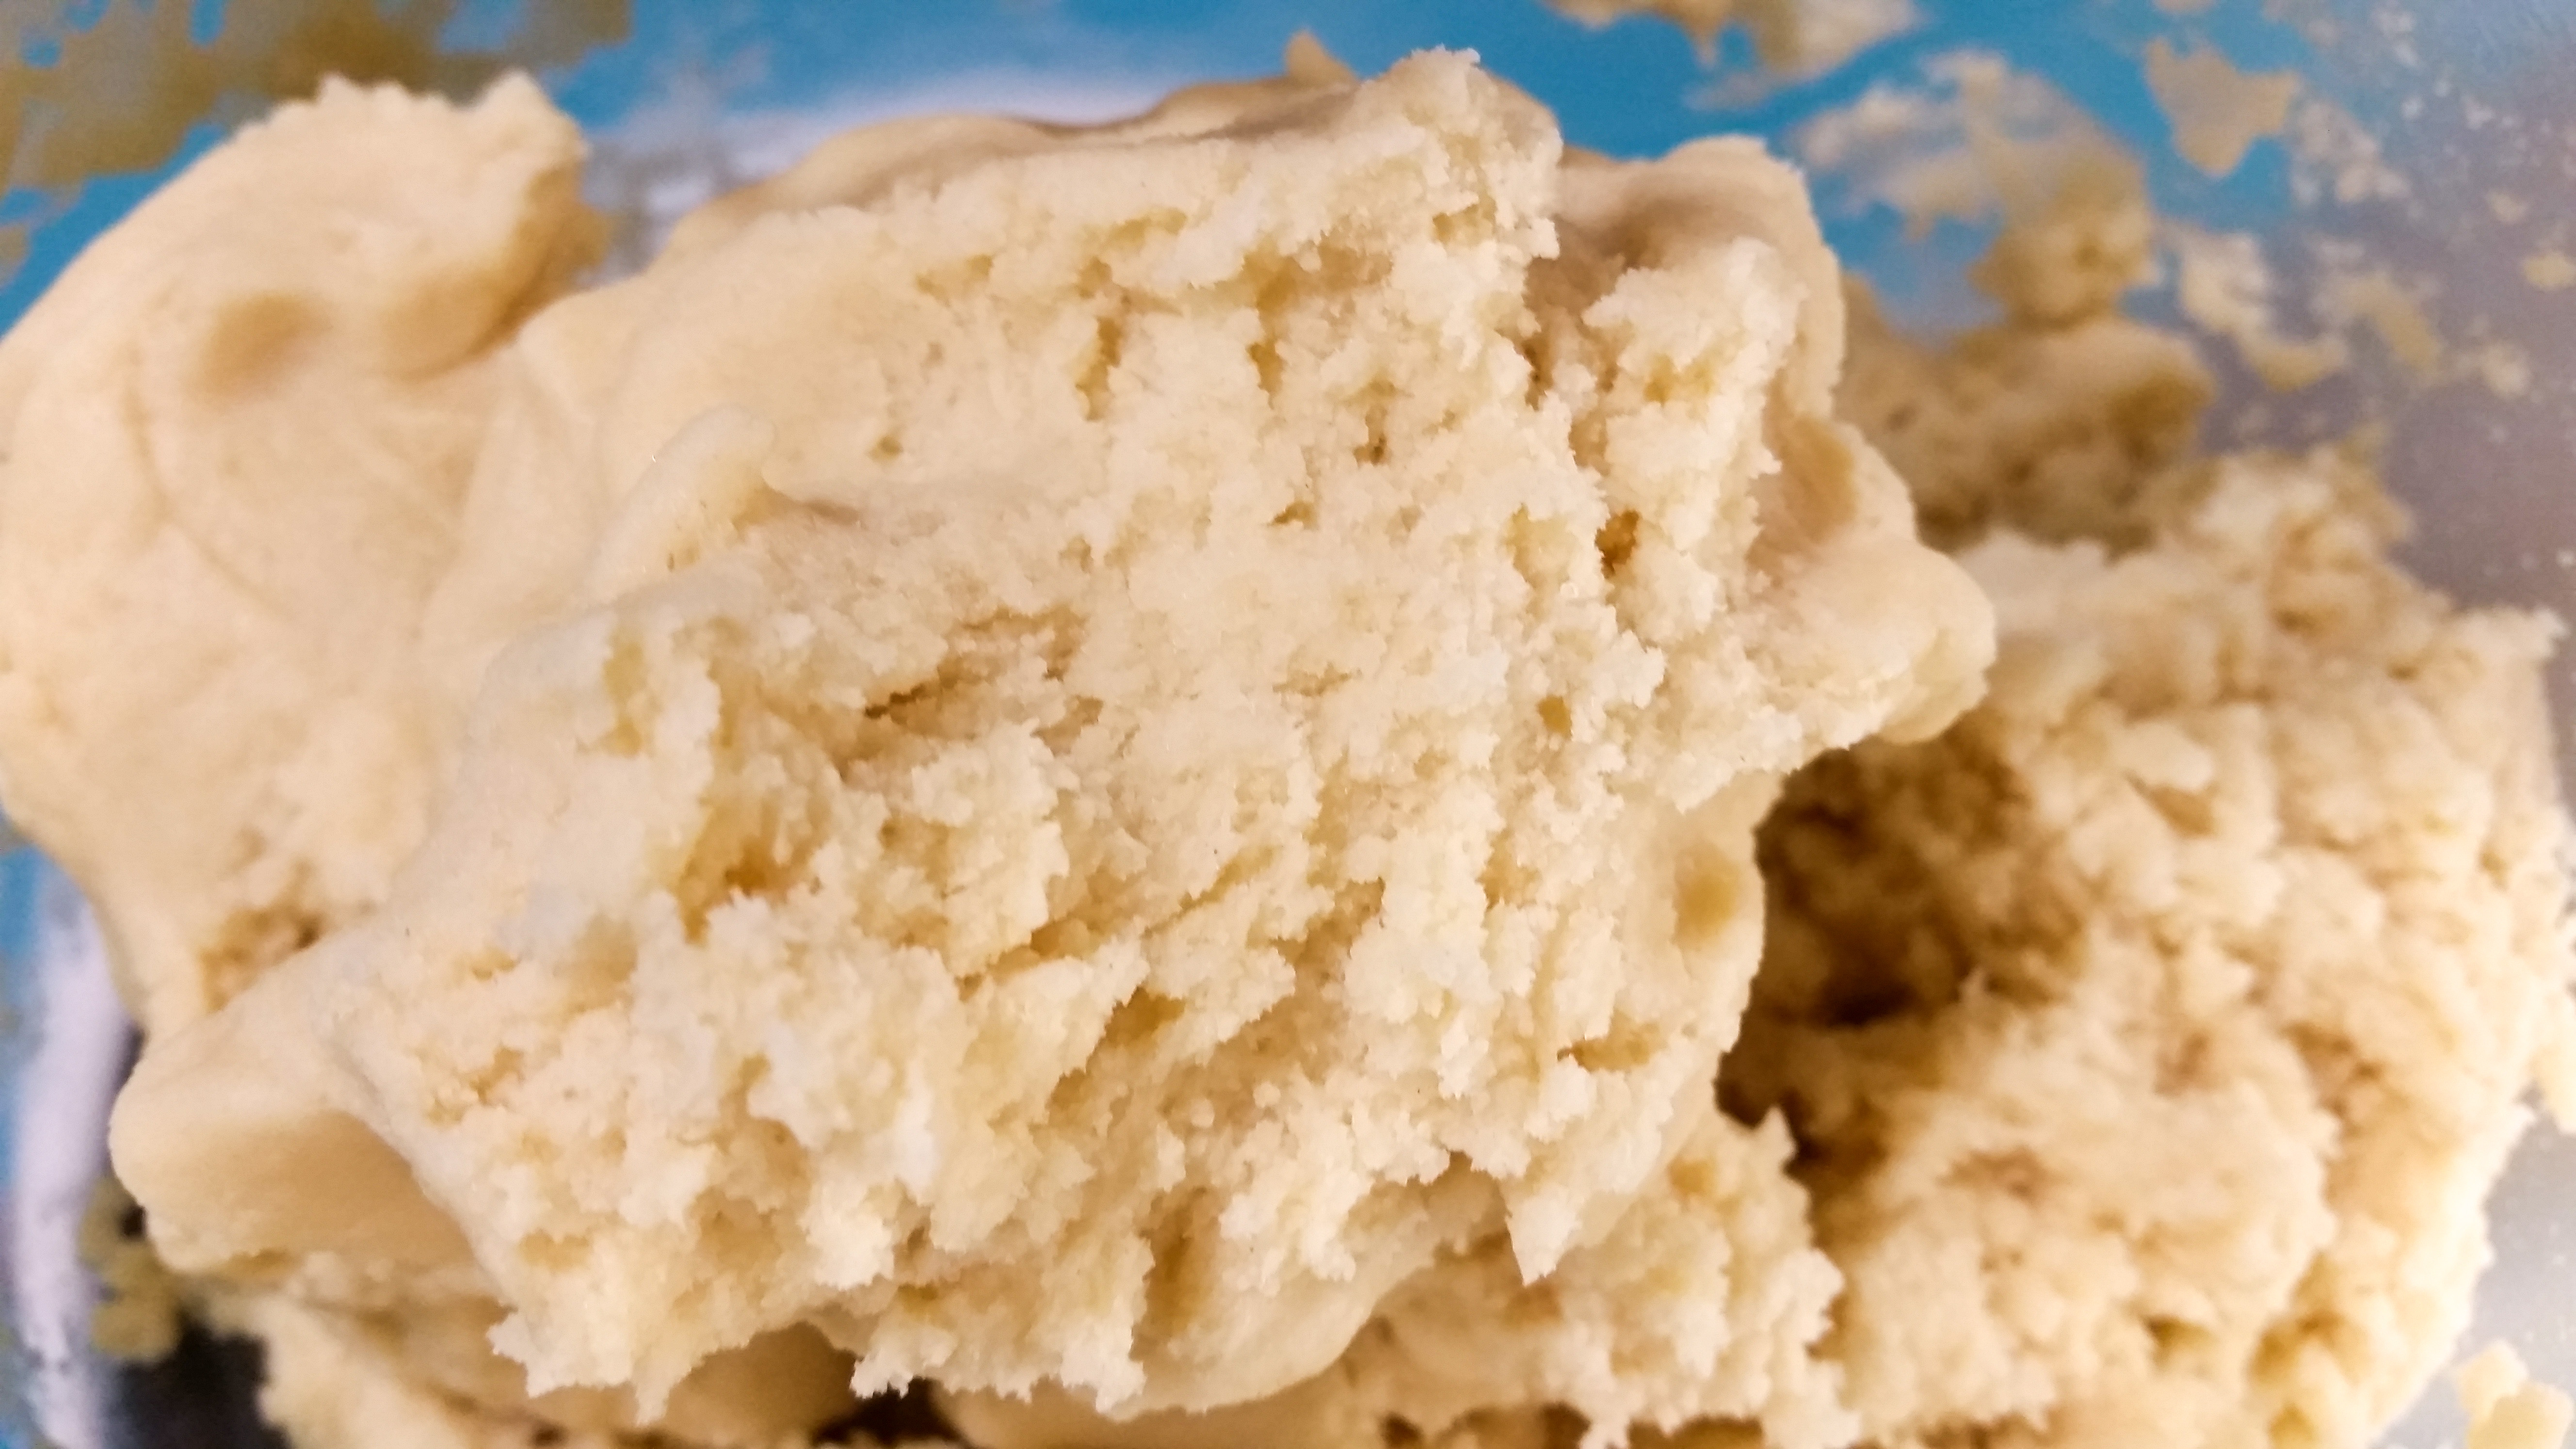
It looks like this if you break a blob of it apart. Spritz cookies break off from the disk when pressed, so this texture has to be right.
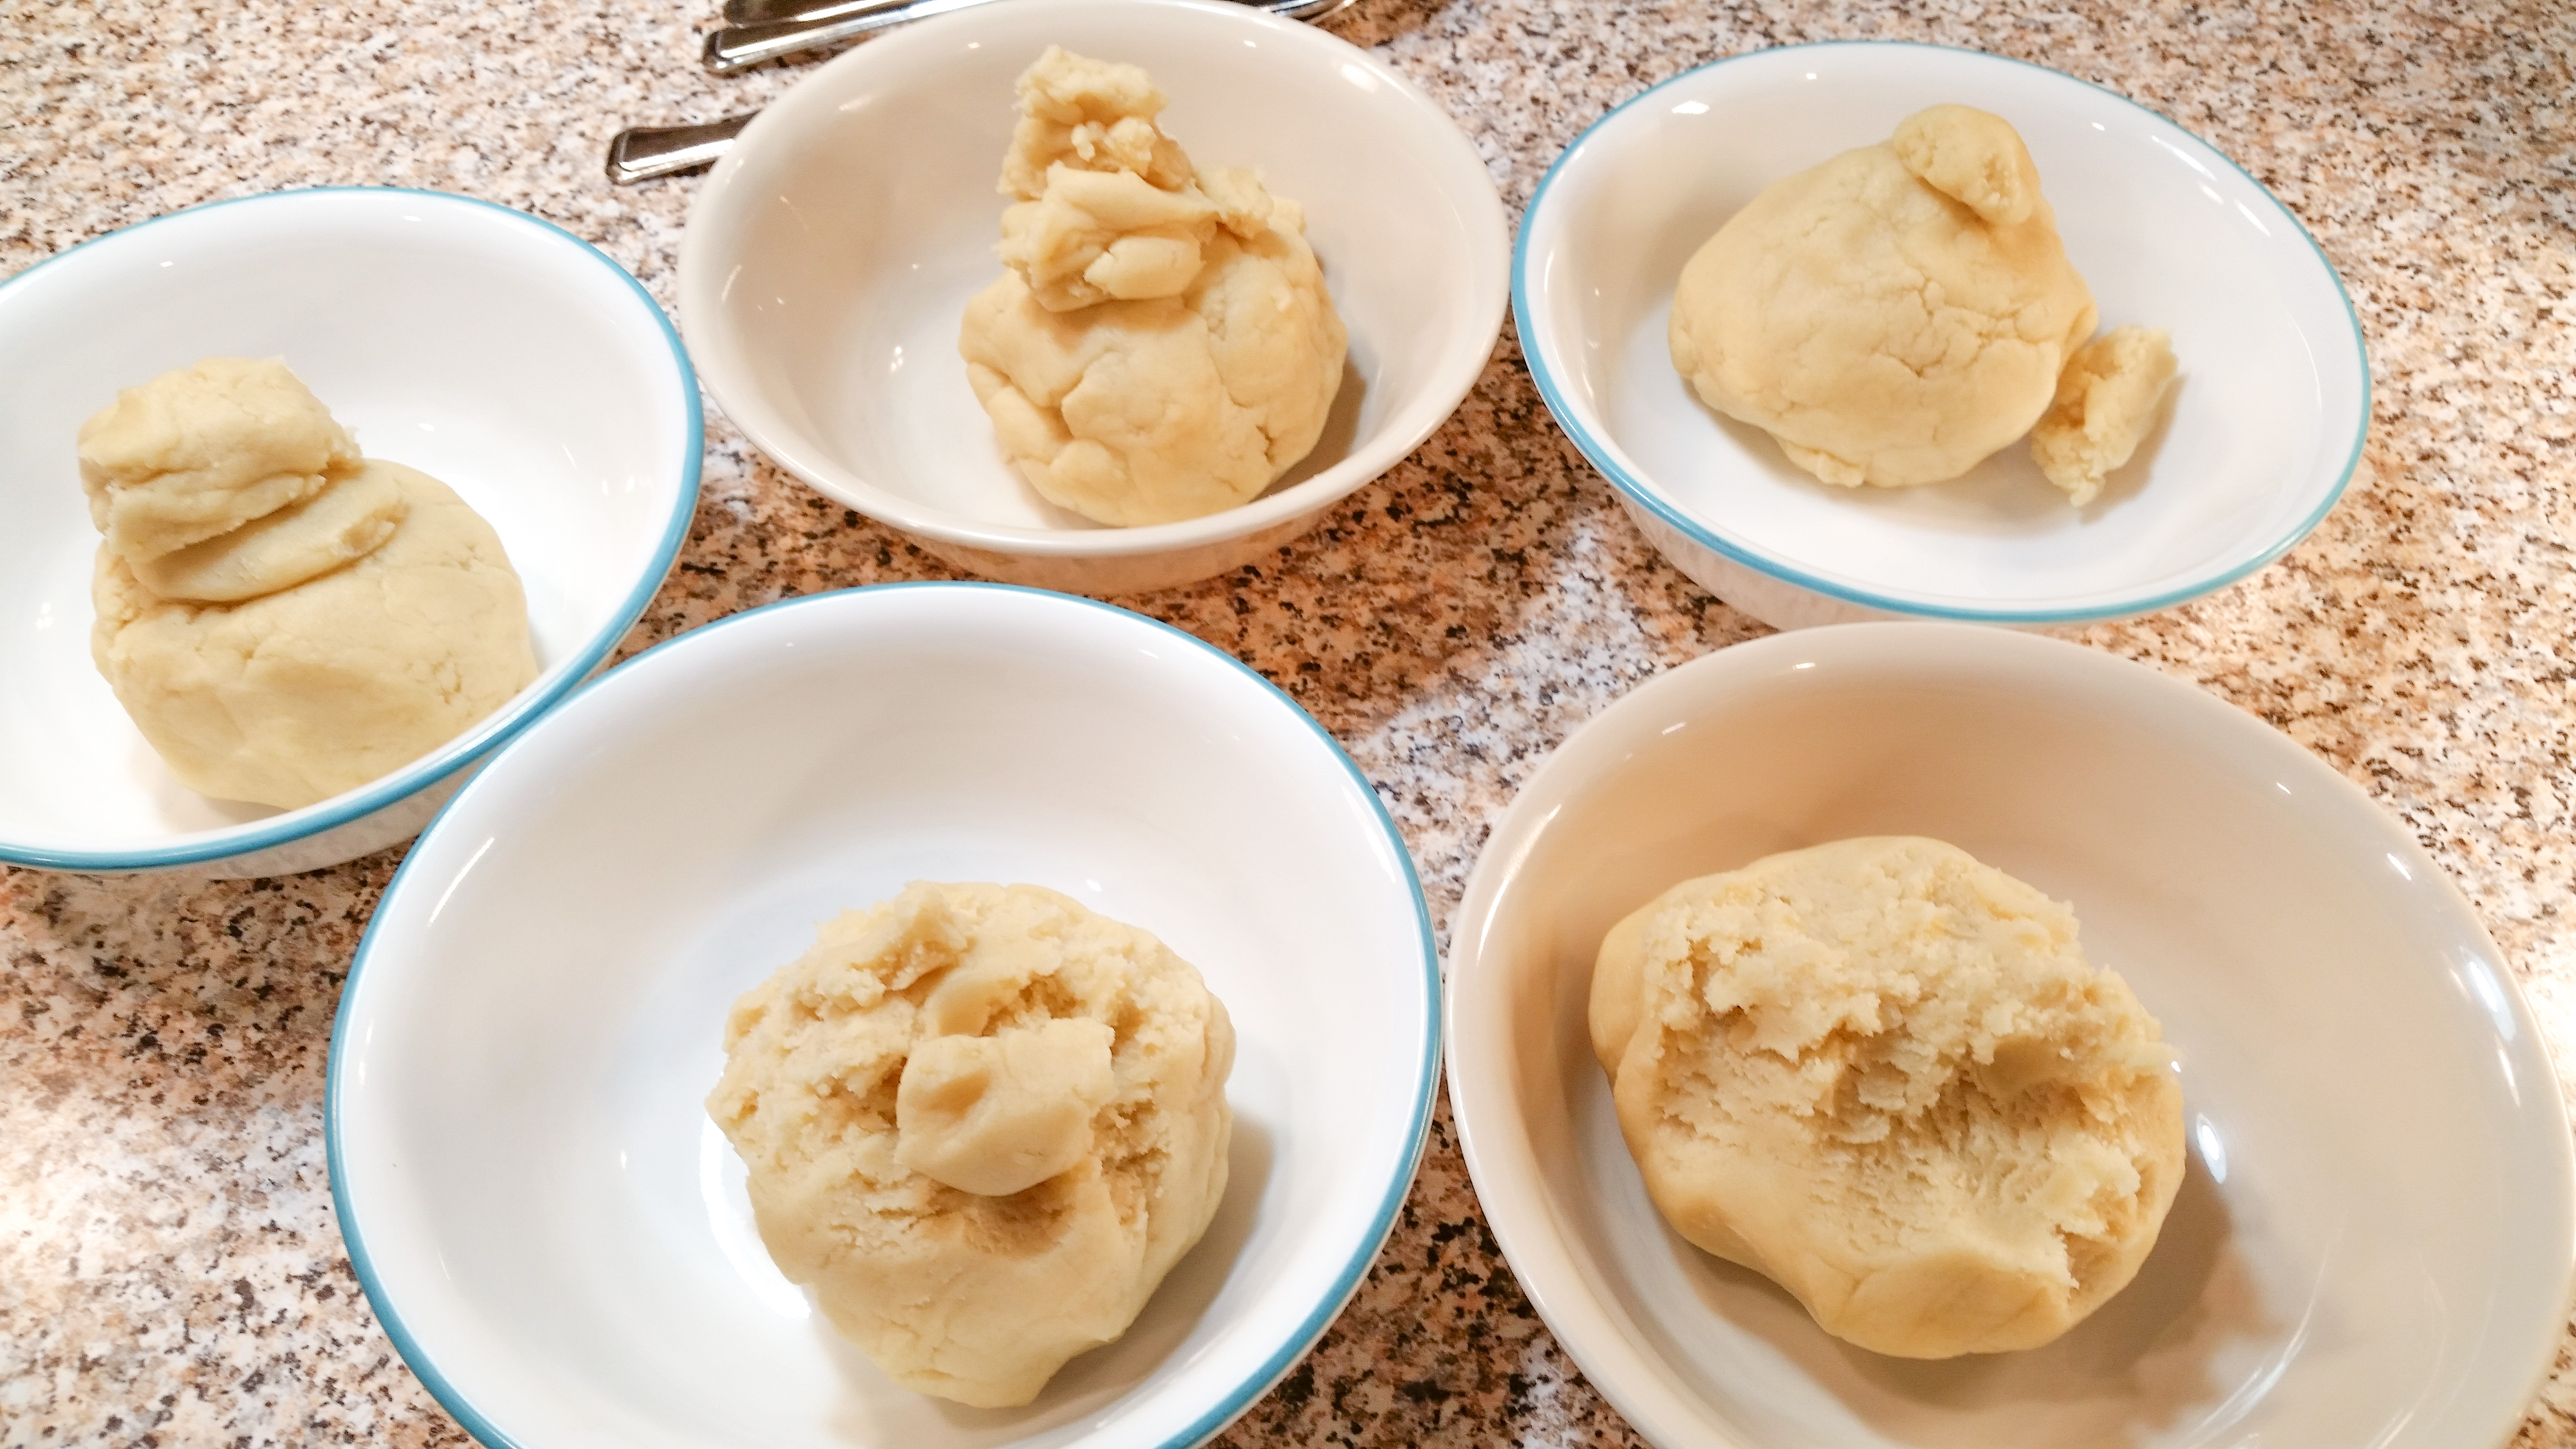

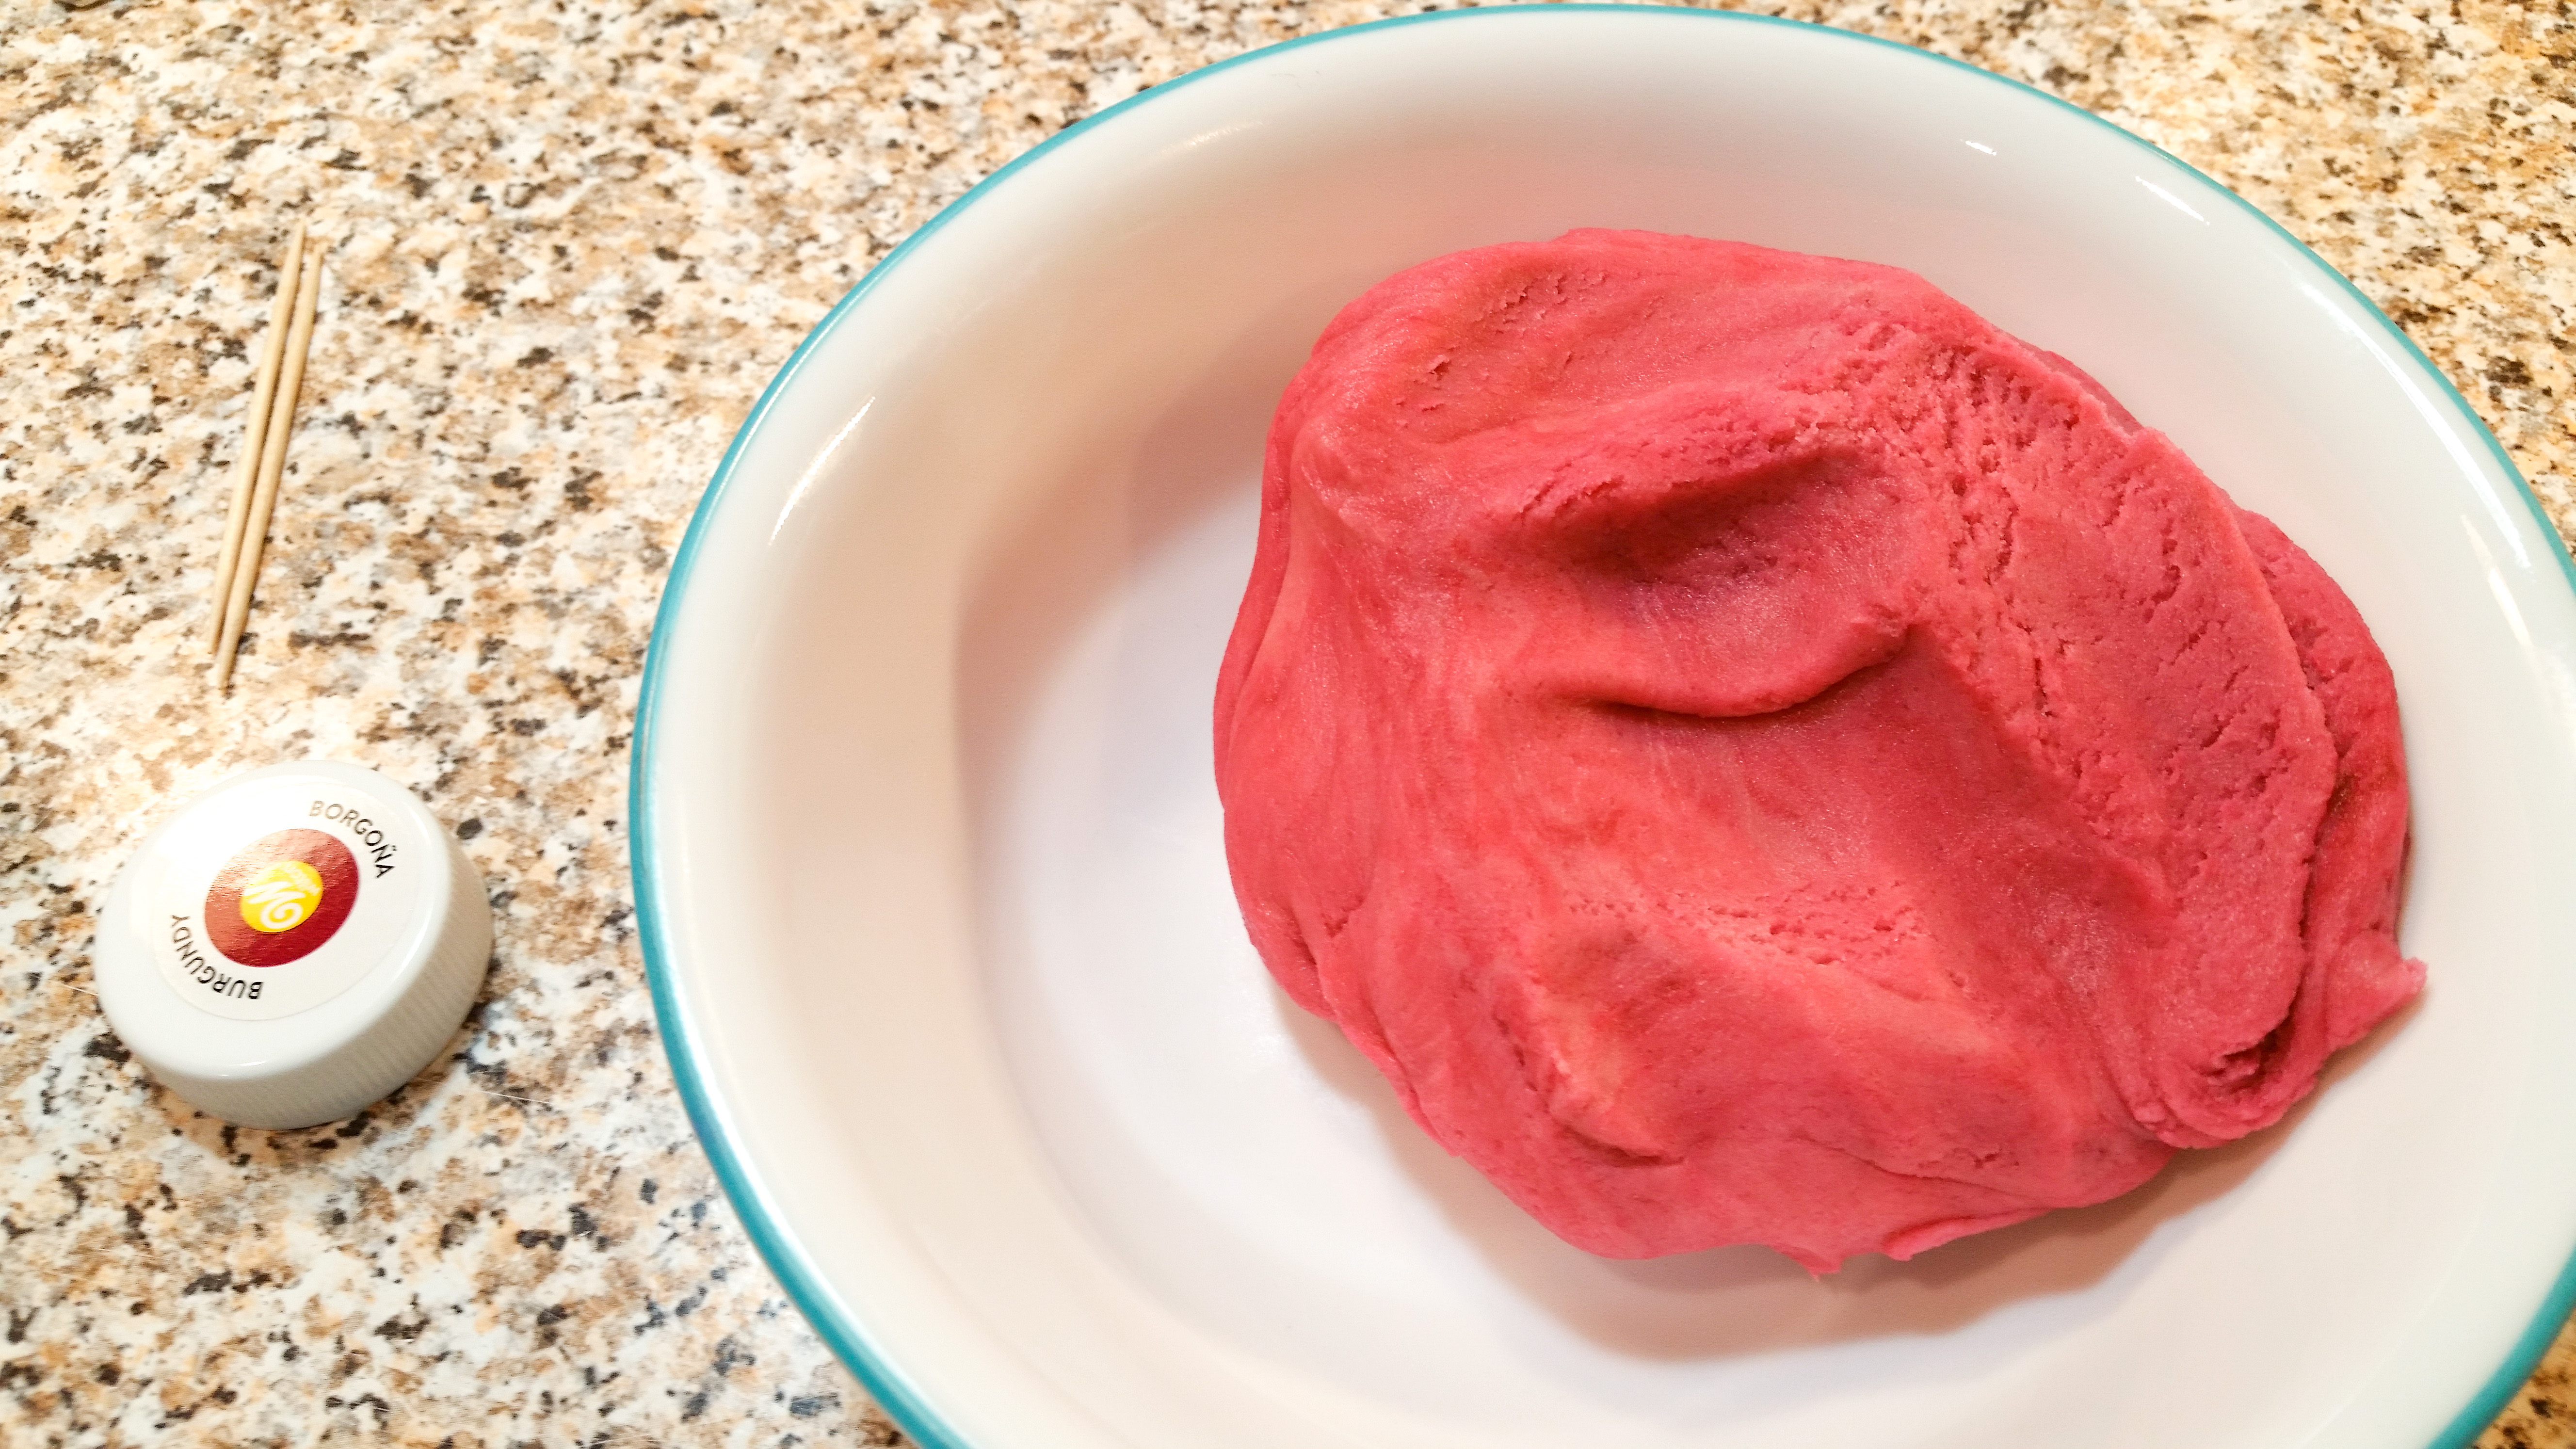
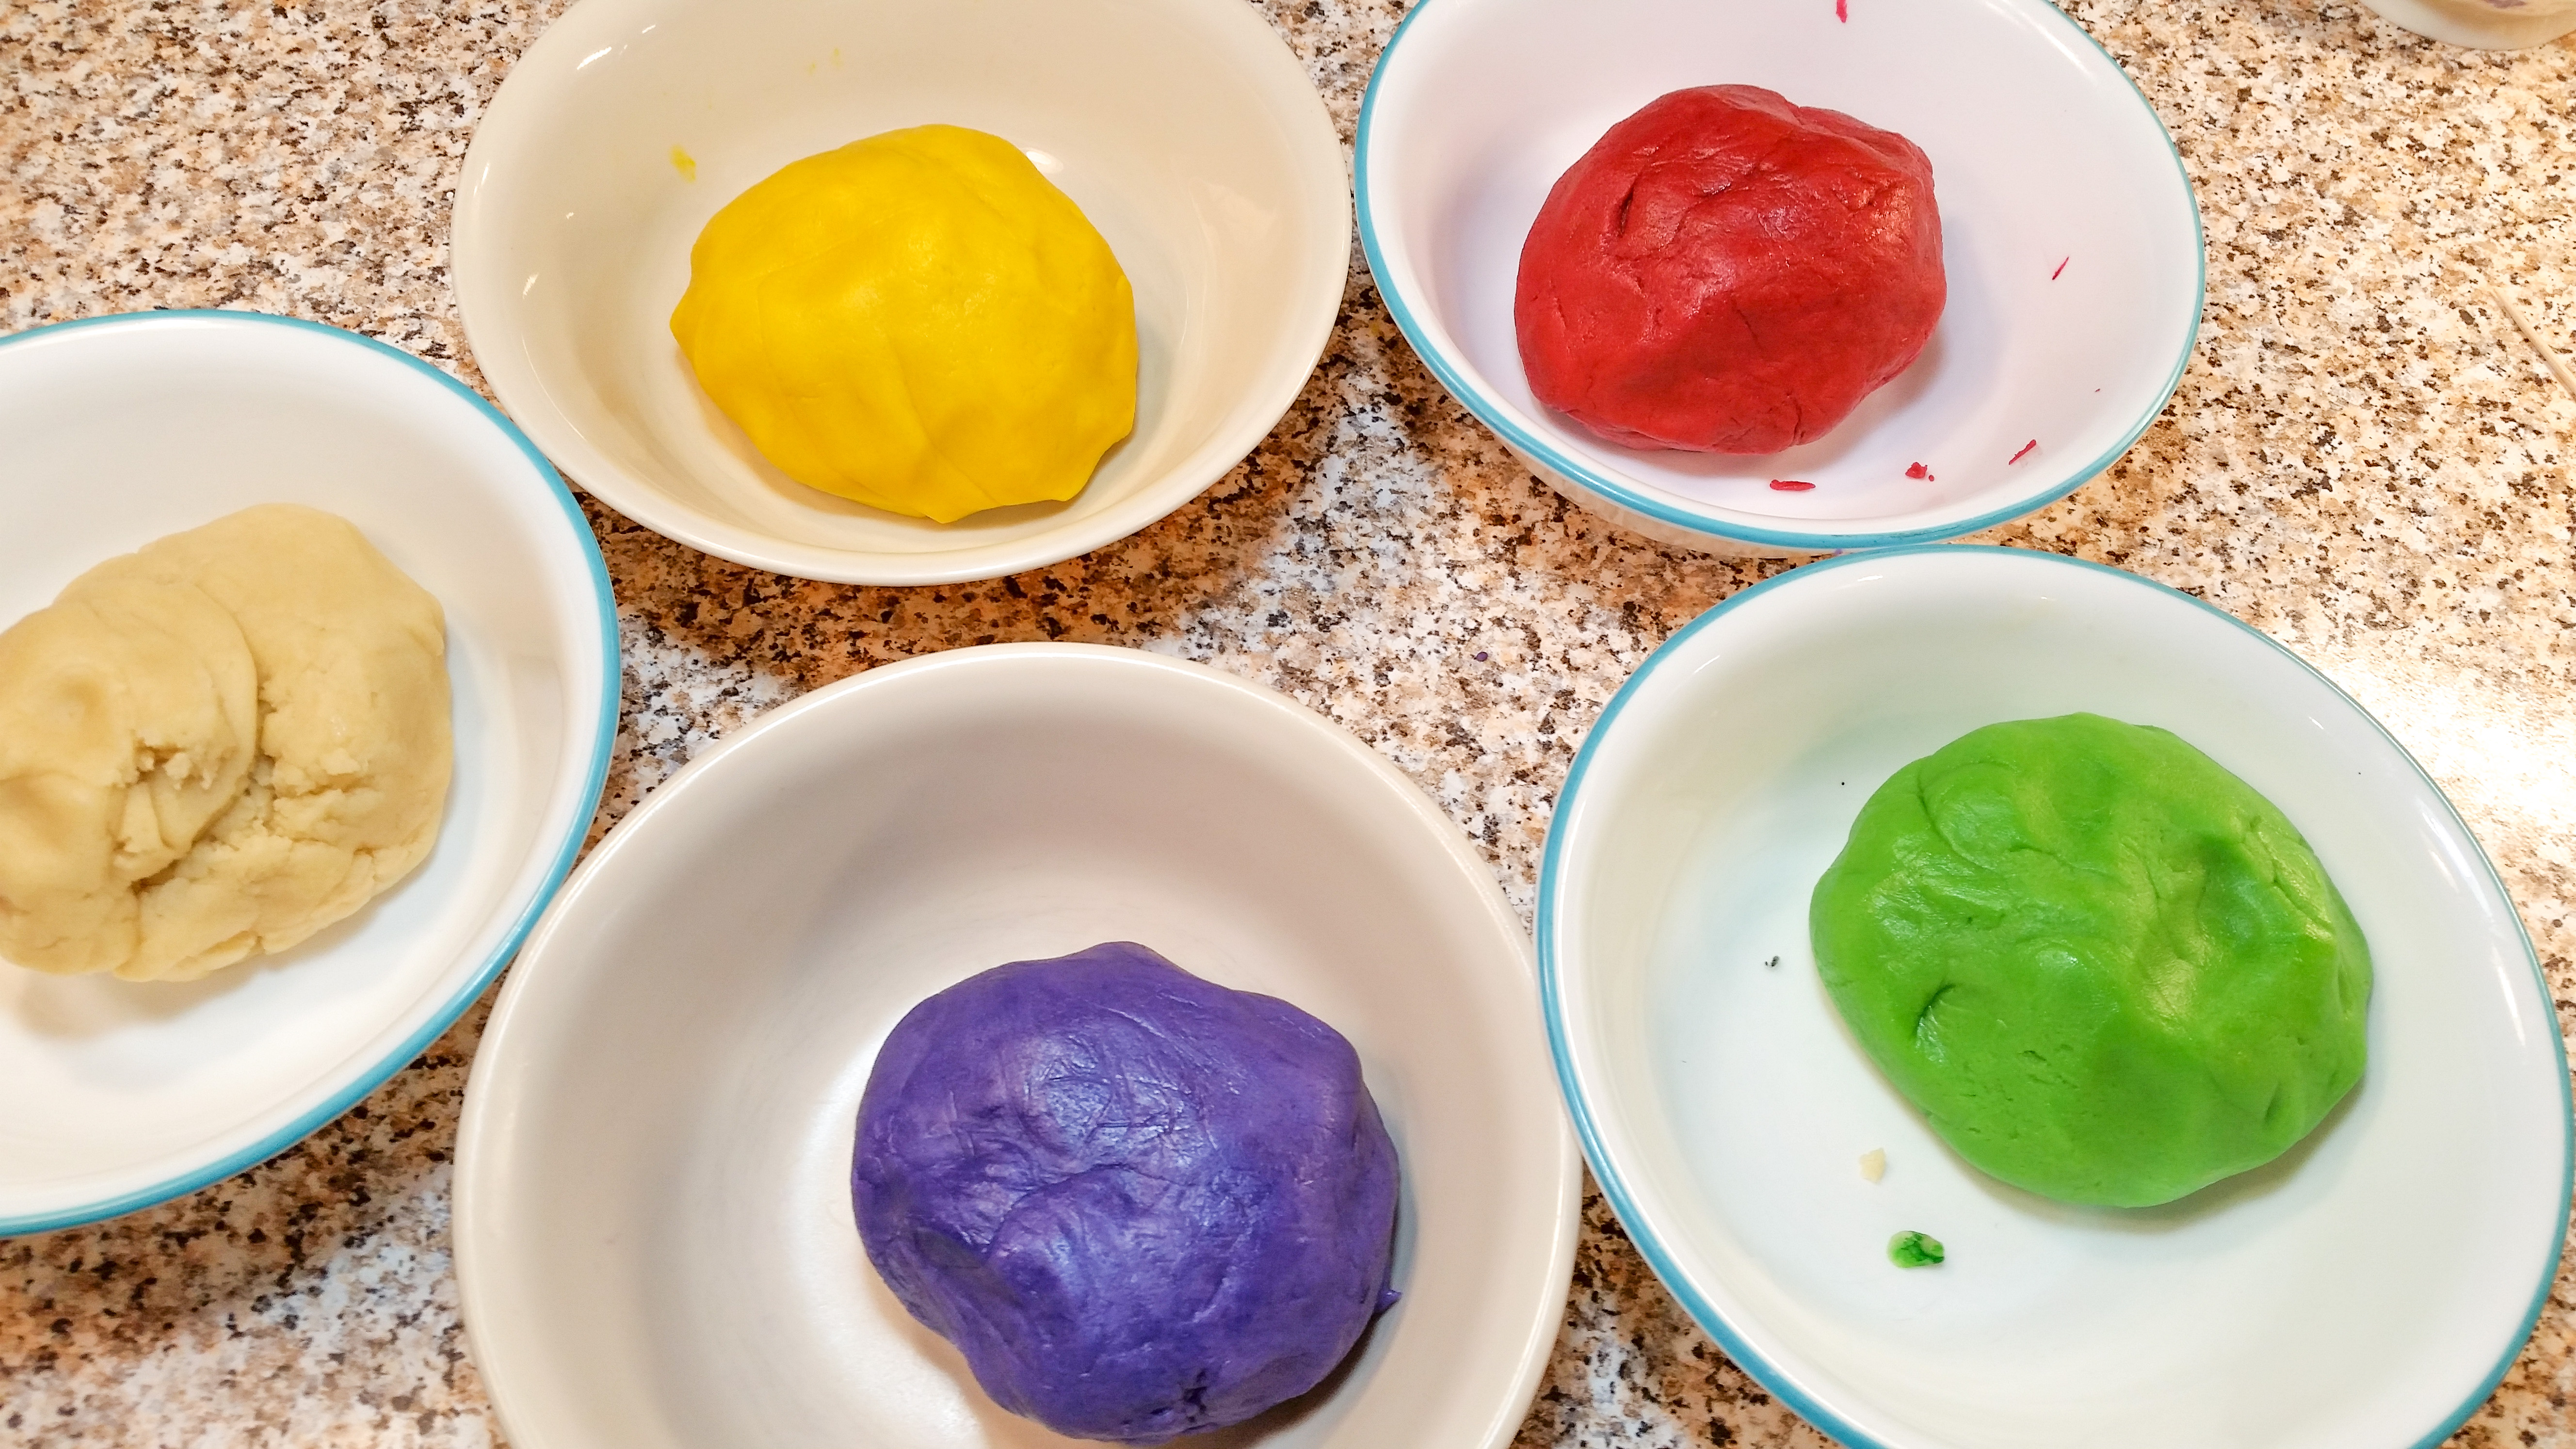
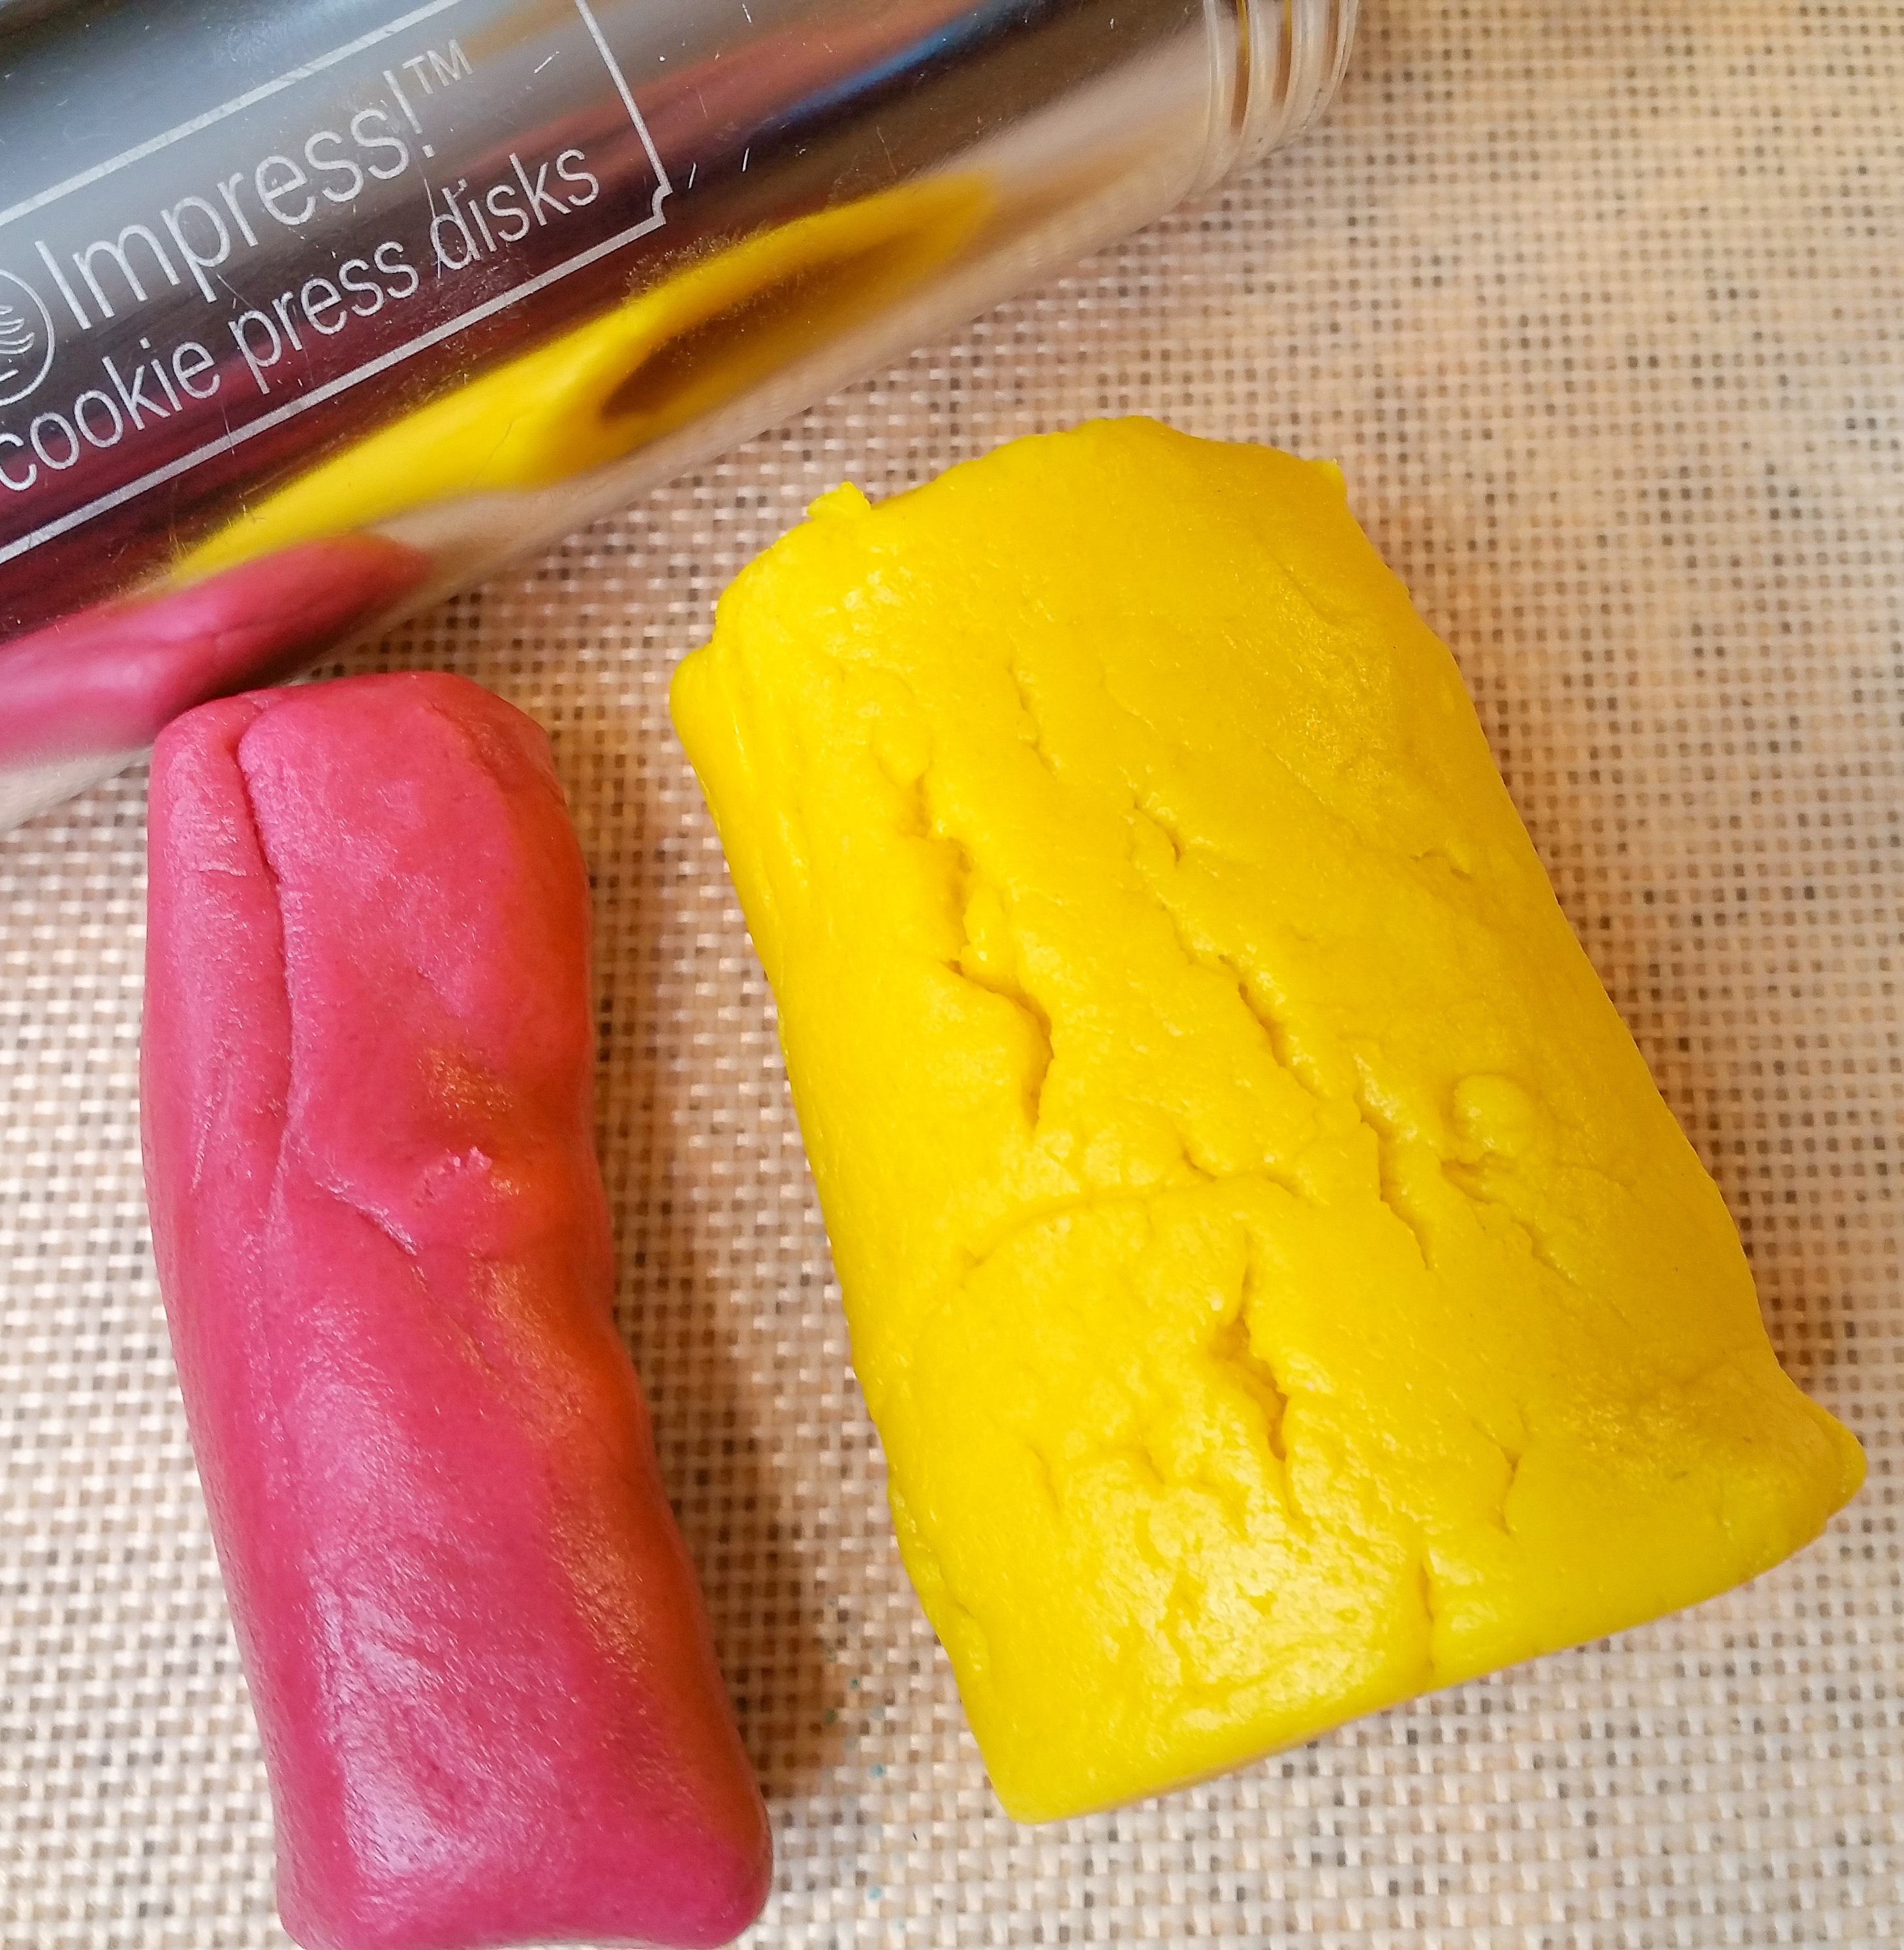
Divide your dough into separate bowls for however many colors you want to make. I left some plain, and did green for the leaves plus yellow, burgundy, and purple for the pansies.
I use toothpicks to add the color to my dough. When making multiple colors, I knead each color by hand. When making just one color, I use the mixer. Remember to start with just a little color. You can always add more but you can’t take it out! And never double-dip into your color. Keep it clean by using fresh toothpicks or a cleaned knife.
Load your press with dough using the back of a spoon to remove any air pockets as you go. Choose your first disk and start pressing. Remember that often it takes a few mis-shaped cookies before correct pressure builds in the barrel. Once you have a good shape, try to keep a consistent rhythm.
If you’re having trouble, try clicking into the air a few times and wiping away the dough to start over. It resets the pressure. Remember also with “once click per cookie” presses it’s completely fine to use more or less than a click. Think of the press as just a dough-pumping mechanism. Clicking is how you get the dough to come out. Feel the cookies stick to the sheet and you’ll get the hang of it. Always use un-greased sheets and never use non-stick. Even the most experienced pressers throw goofed up cookies back in the bowl all the time. Don’t be discouraged! Watch my videos if you want to see me troubleshoot on the fly.

I’m first showing you how the individual colors pressed. The only unique thing I did to these was to roll tiny amounts of yellow dough into balls then flatten them into the centers of each pansy. This eliminated the need to color the centers after baking, but you could just as easily have added yellow icing dots after baking – especially if you like a touch of added sweetness.
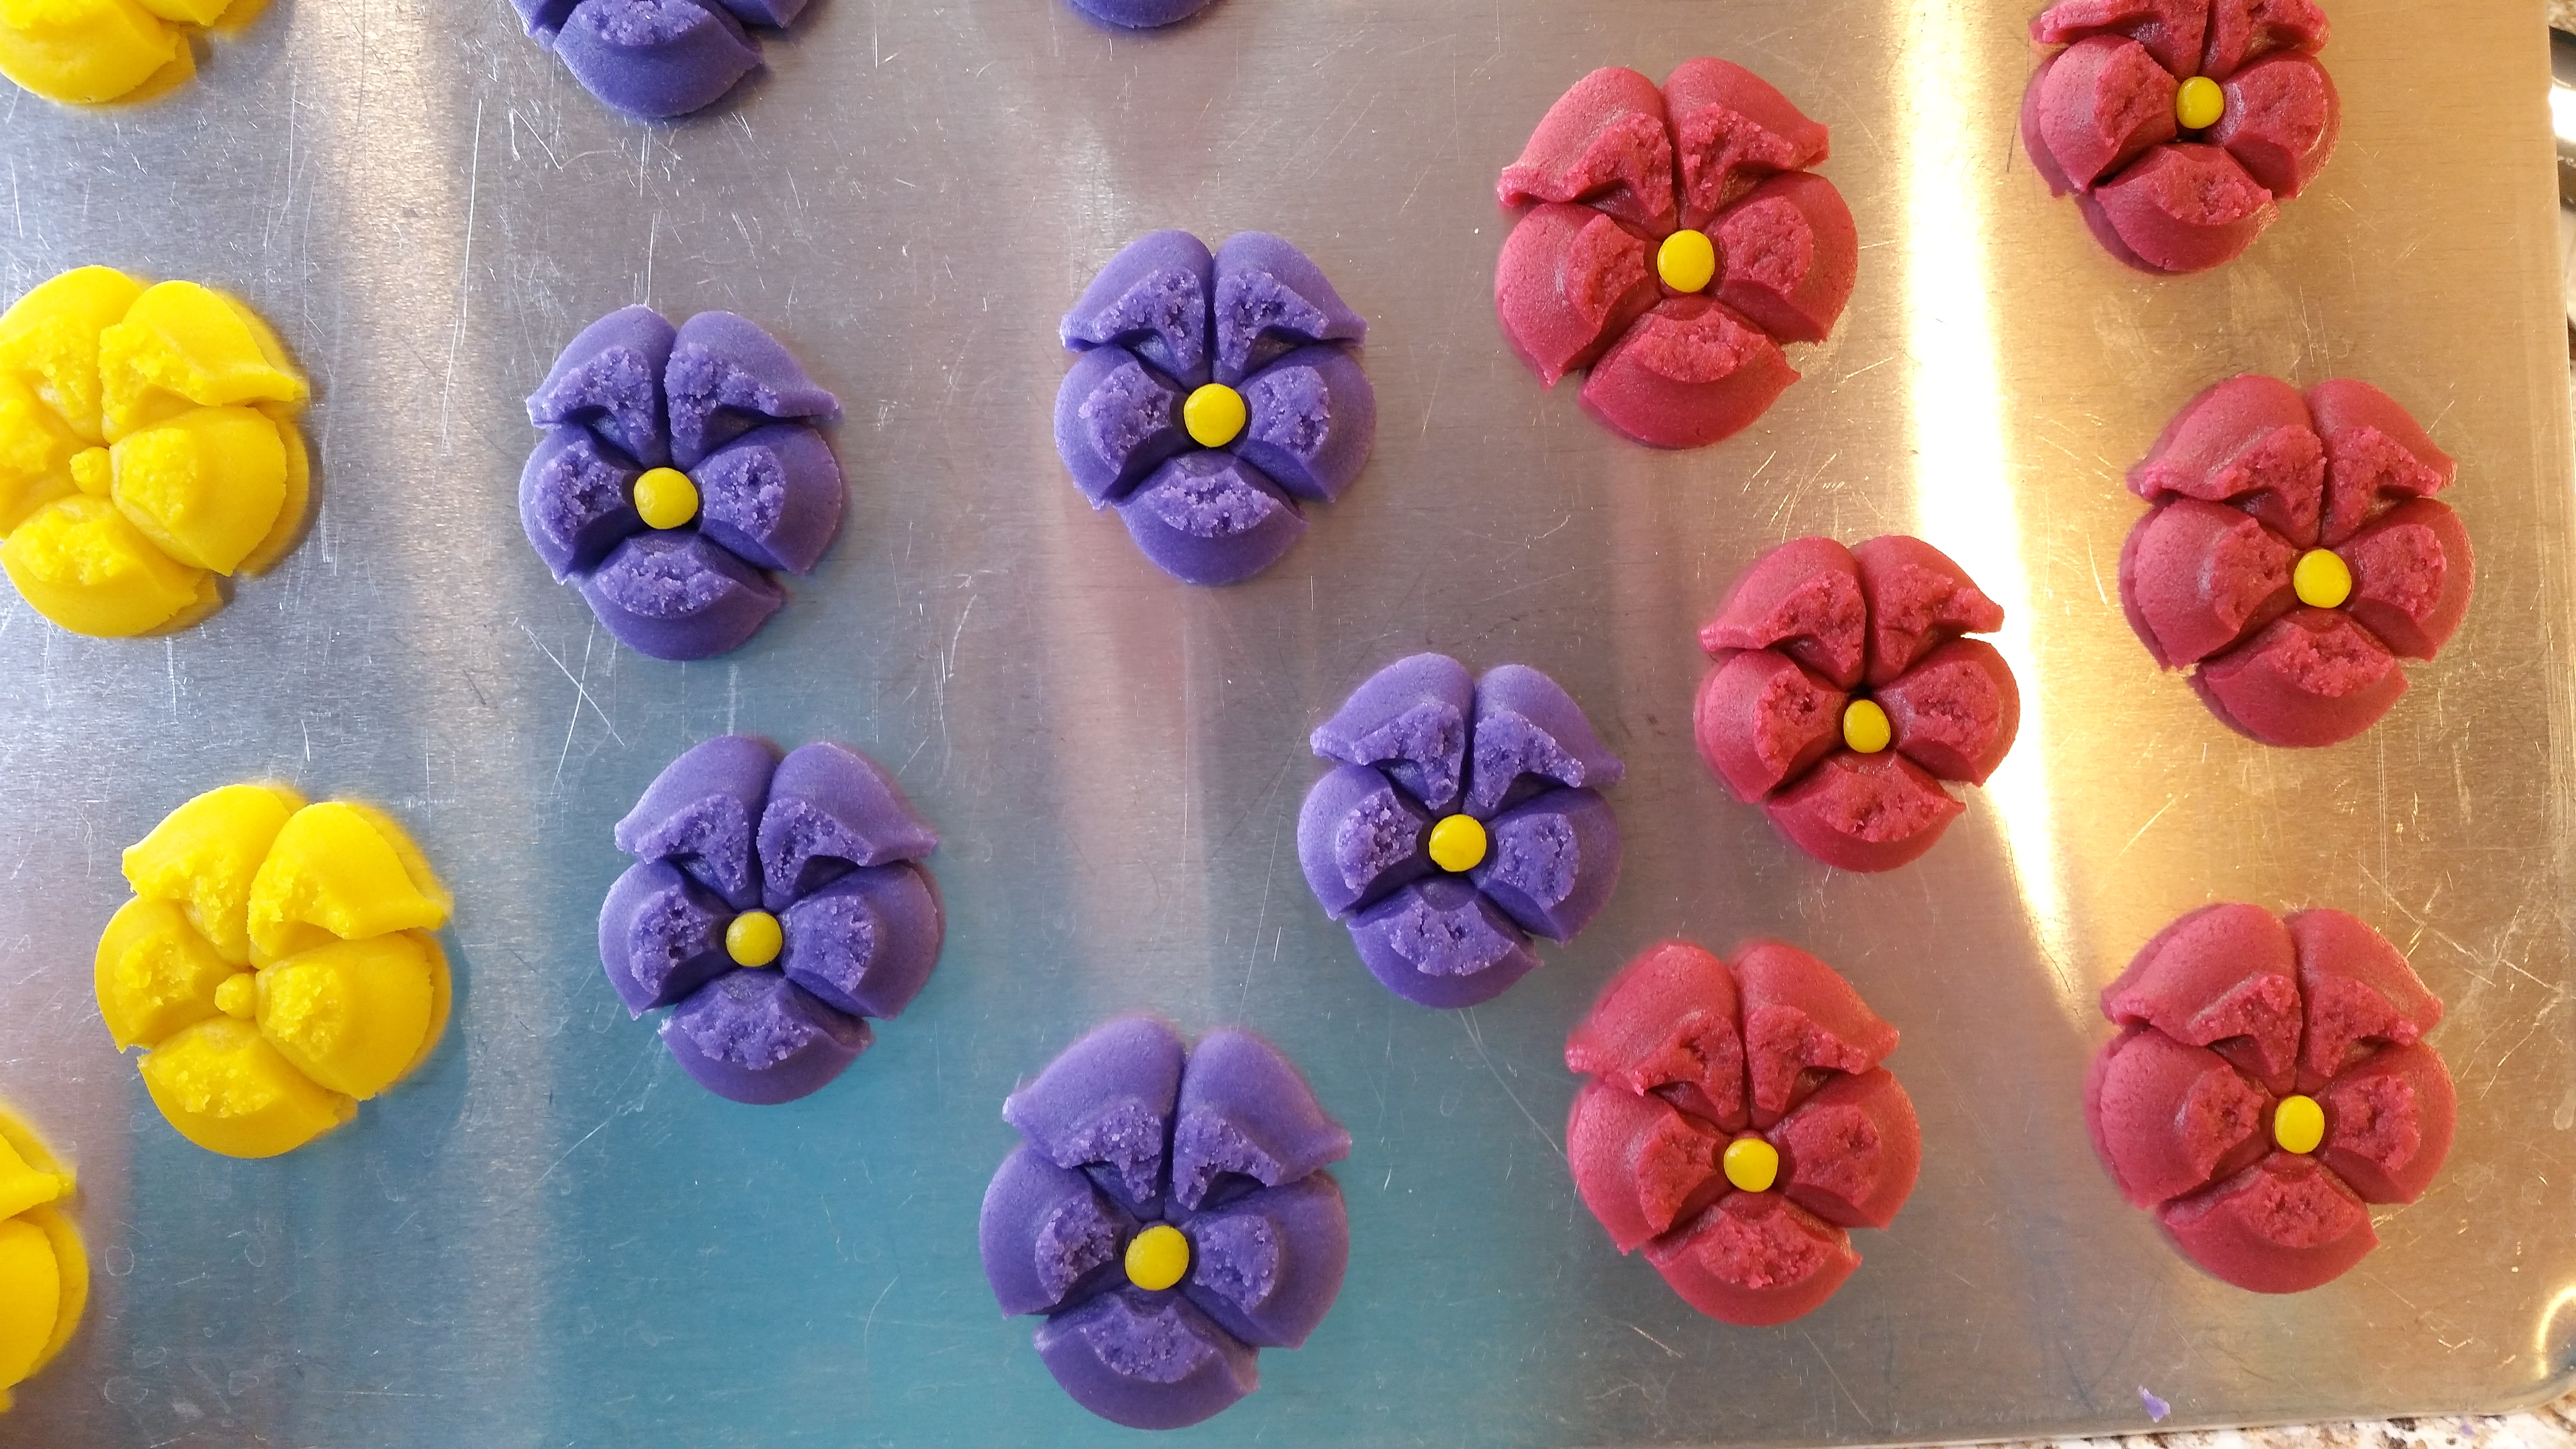
Wow these are just so colorful and cute on the cookie sheet! The shapes are consistent and are easy to press. So pretty!


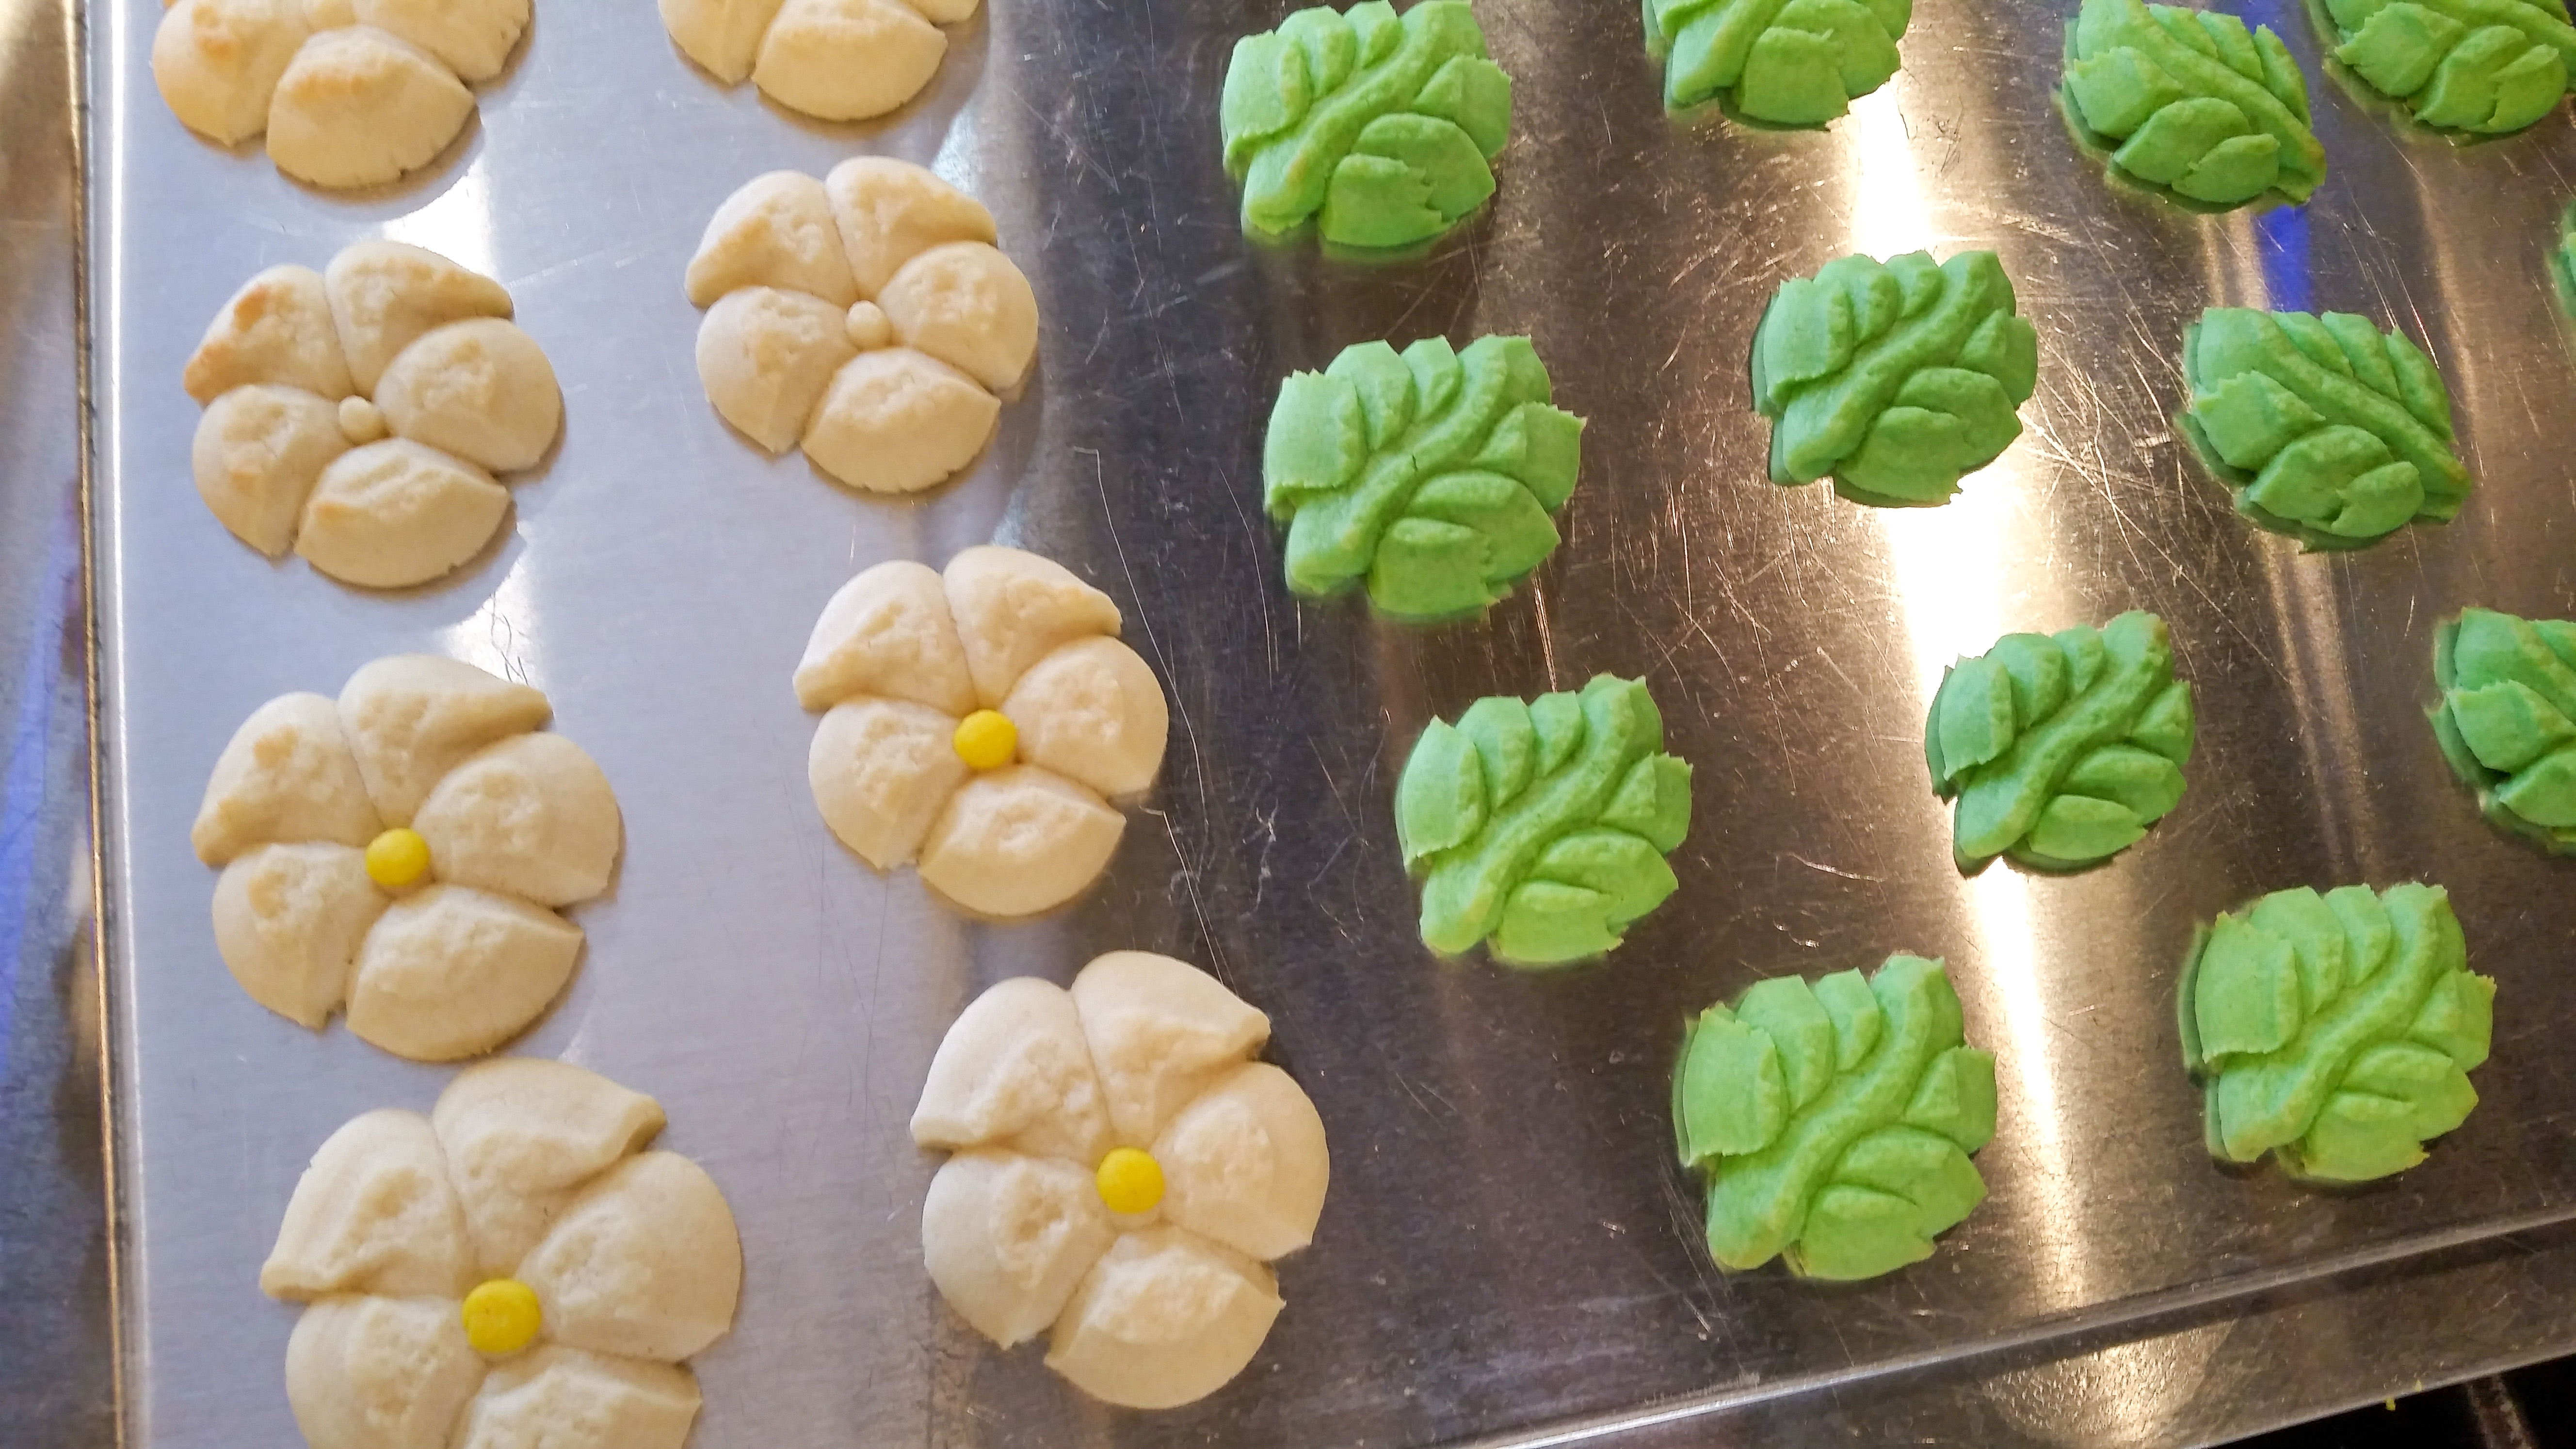
These all baked up nicely!

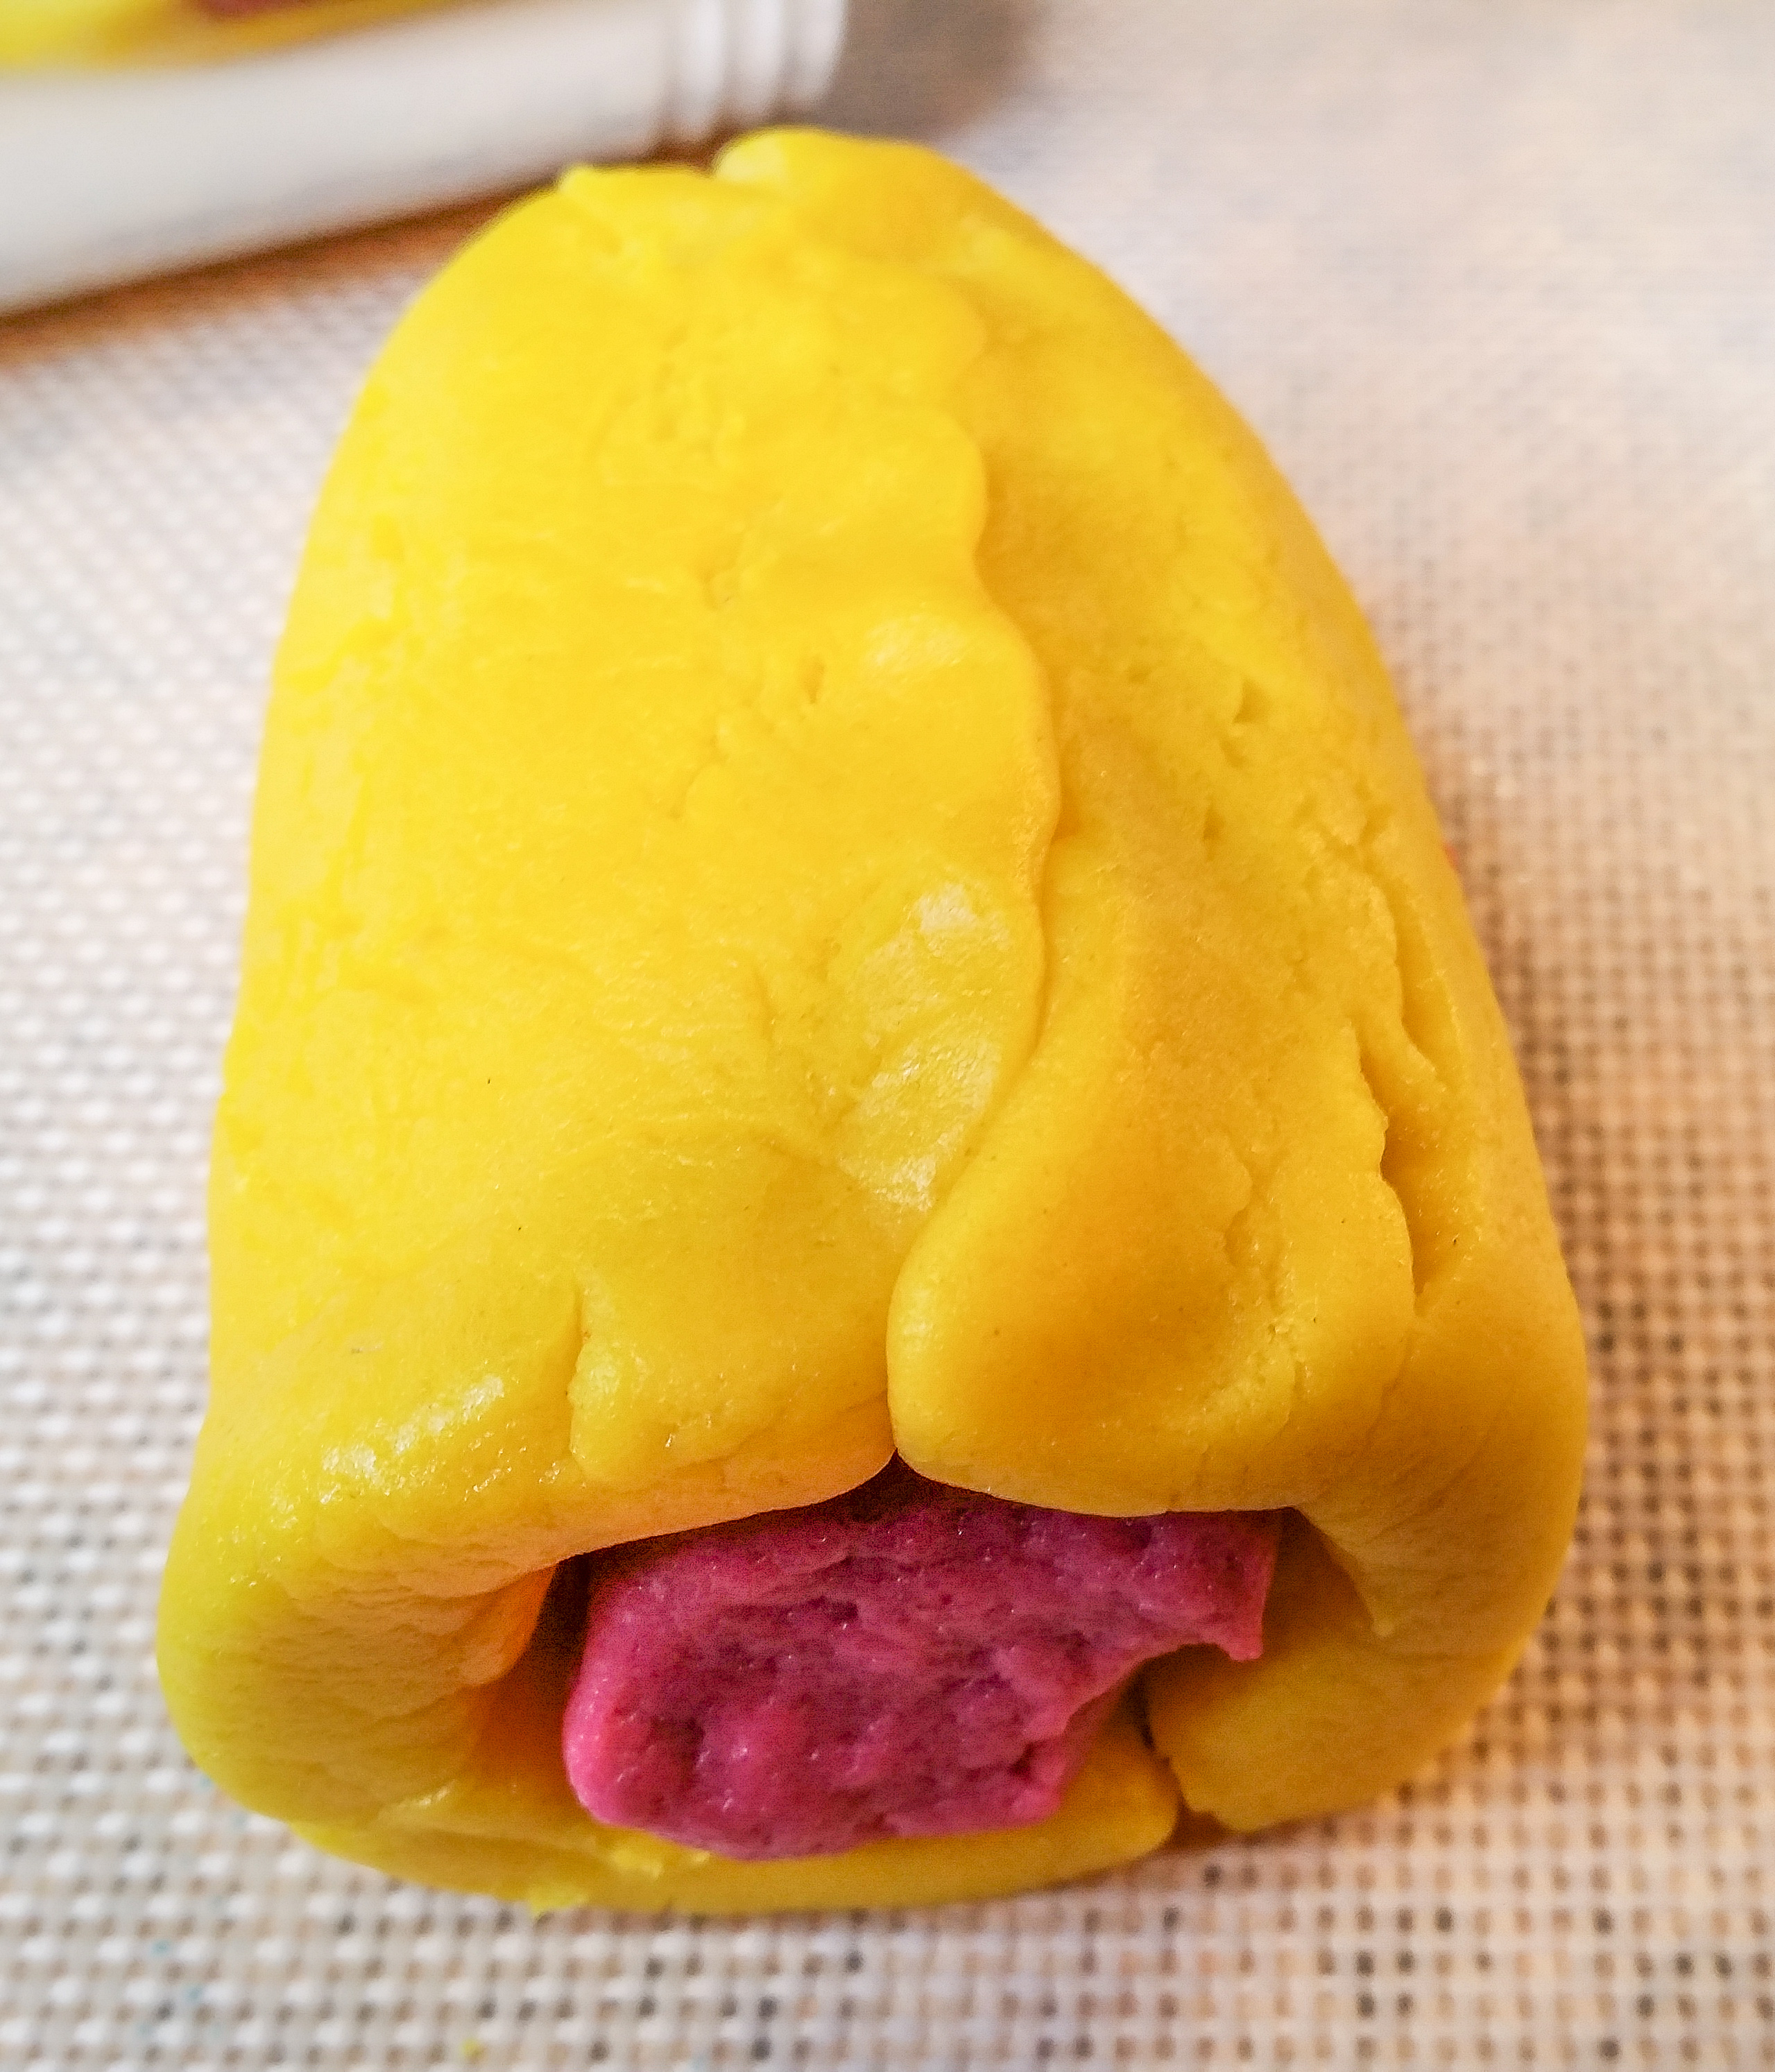
Now I’m showing you how to do 2-color pansies. All you need to do is flatten out a small rectangle of one color that will be the outside of the flower, and roll this around a tube of another color. Roll the tube evenly in your hands until it’s the right size to slide easily into your press barrel. In the middle photo I had test rolled my yellow dough into a hollow tube to make sure it was close to the right size. Then I opened it back up and rolled it around the burgundy dough tube.

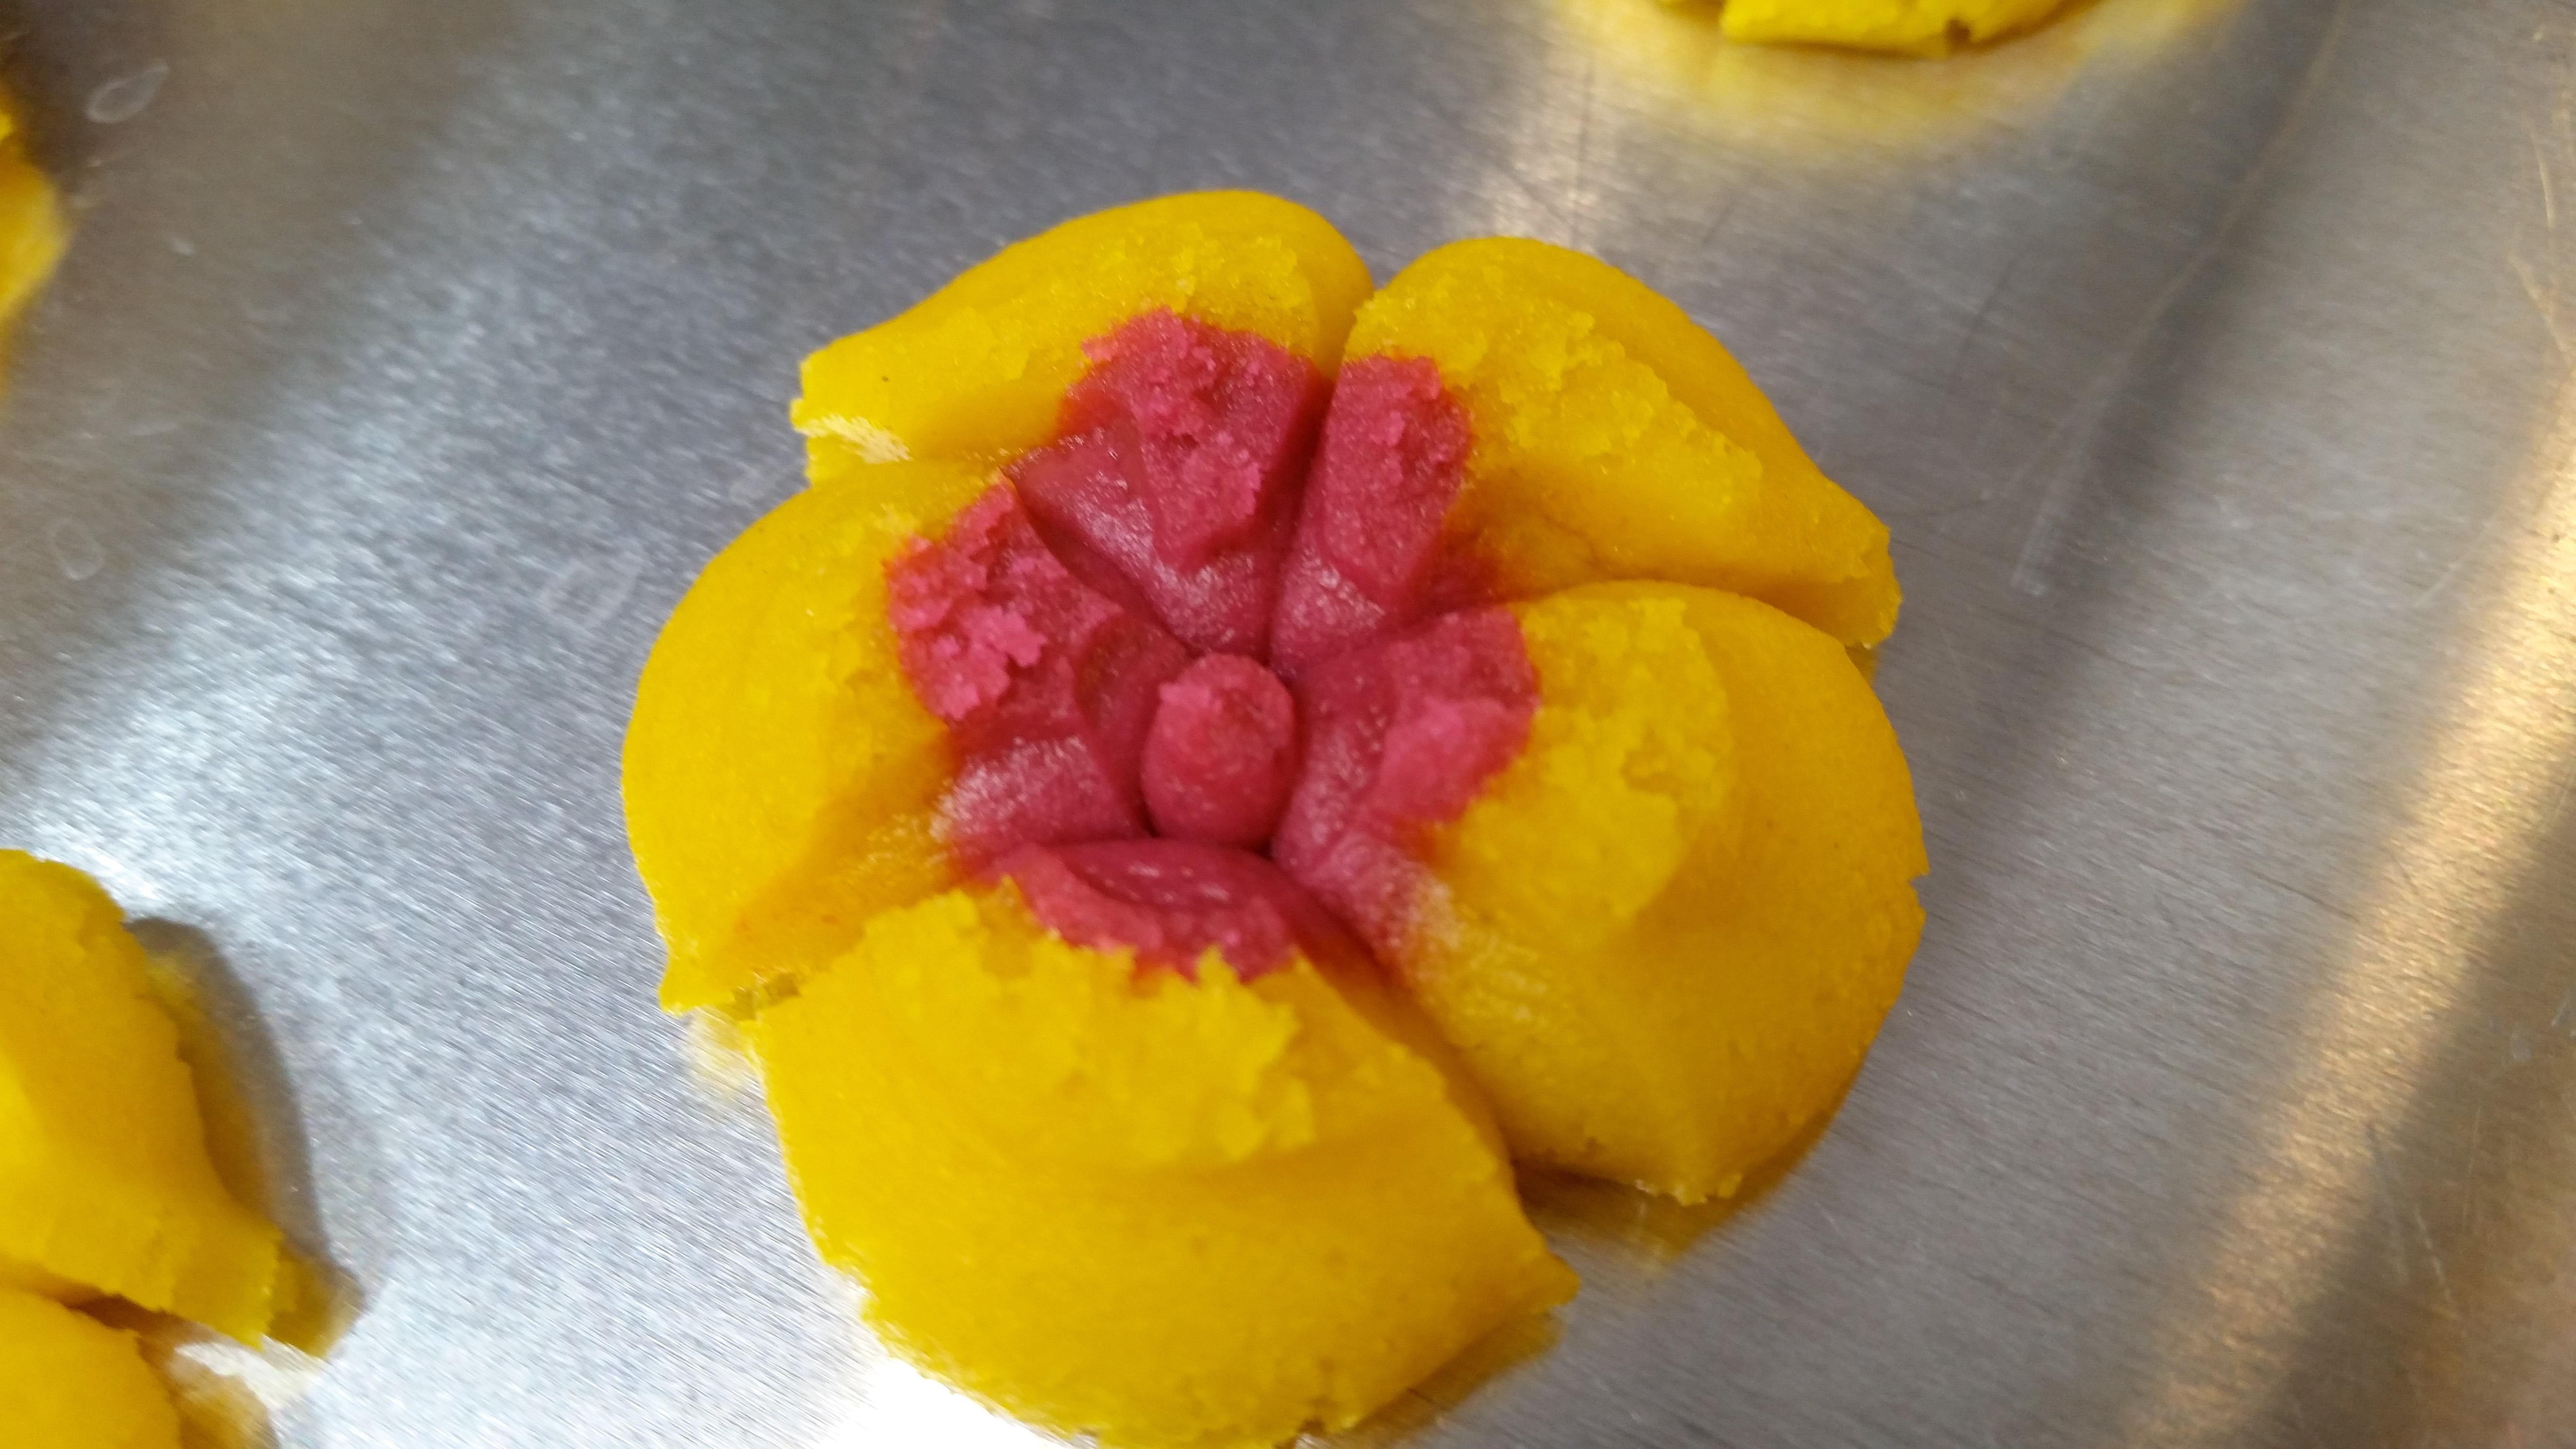
With the 2-color dough loaded in your barrel, start pressing!

I should mention here that you can tap down the rough surface to make smoother flowers if you like. Here’s a rough and smoothed out side-by-side comparison. Just lightly tap with your fingertips to make it look how you want. 🙂

Aren’t these just darling?

I also did white and purple!

Now bake these for 7 to 10 minutes, checking the first batch early and often as all ovens are different and spritz brown very quickly once they start. They should be just starting to brown around the edges when they’re done.
Let them sit on the cookie sheet for about 5 minutes before removing to a wire cooling rack. This helps prevent breakage. Keep your spatula nice and flat as you take them off so they don’t bend while they’re still soft.
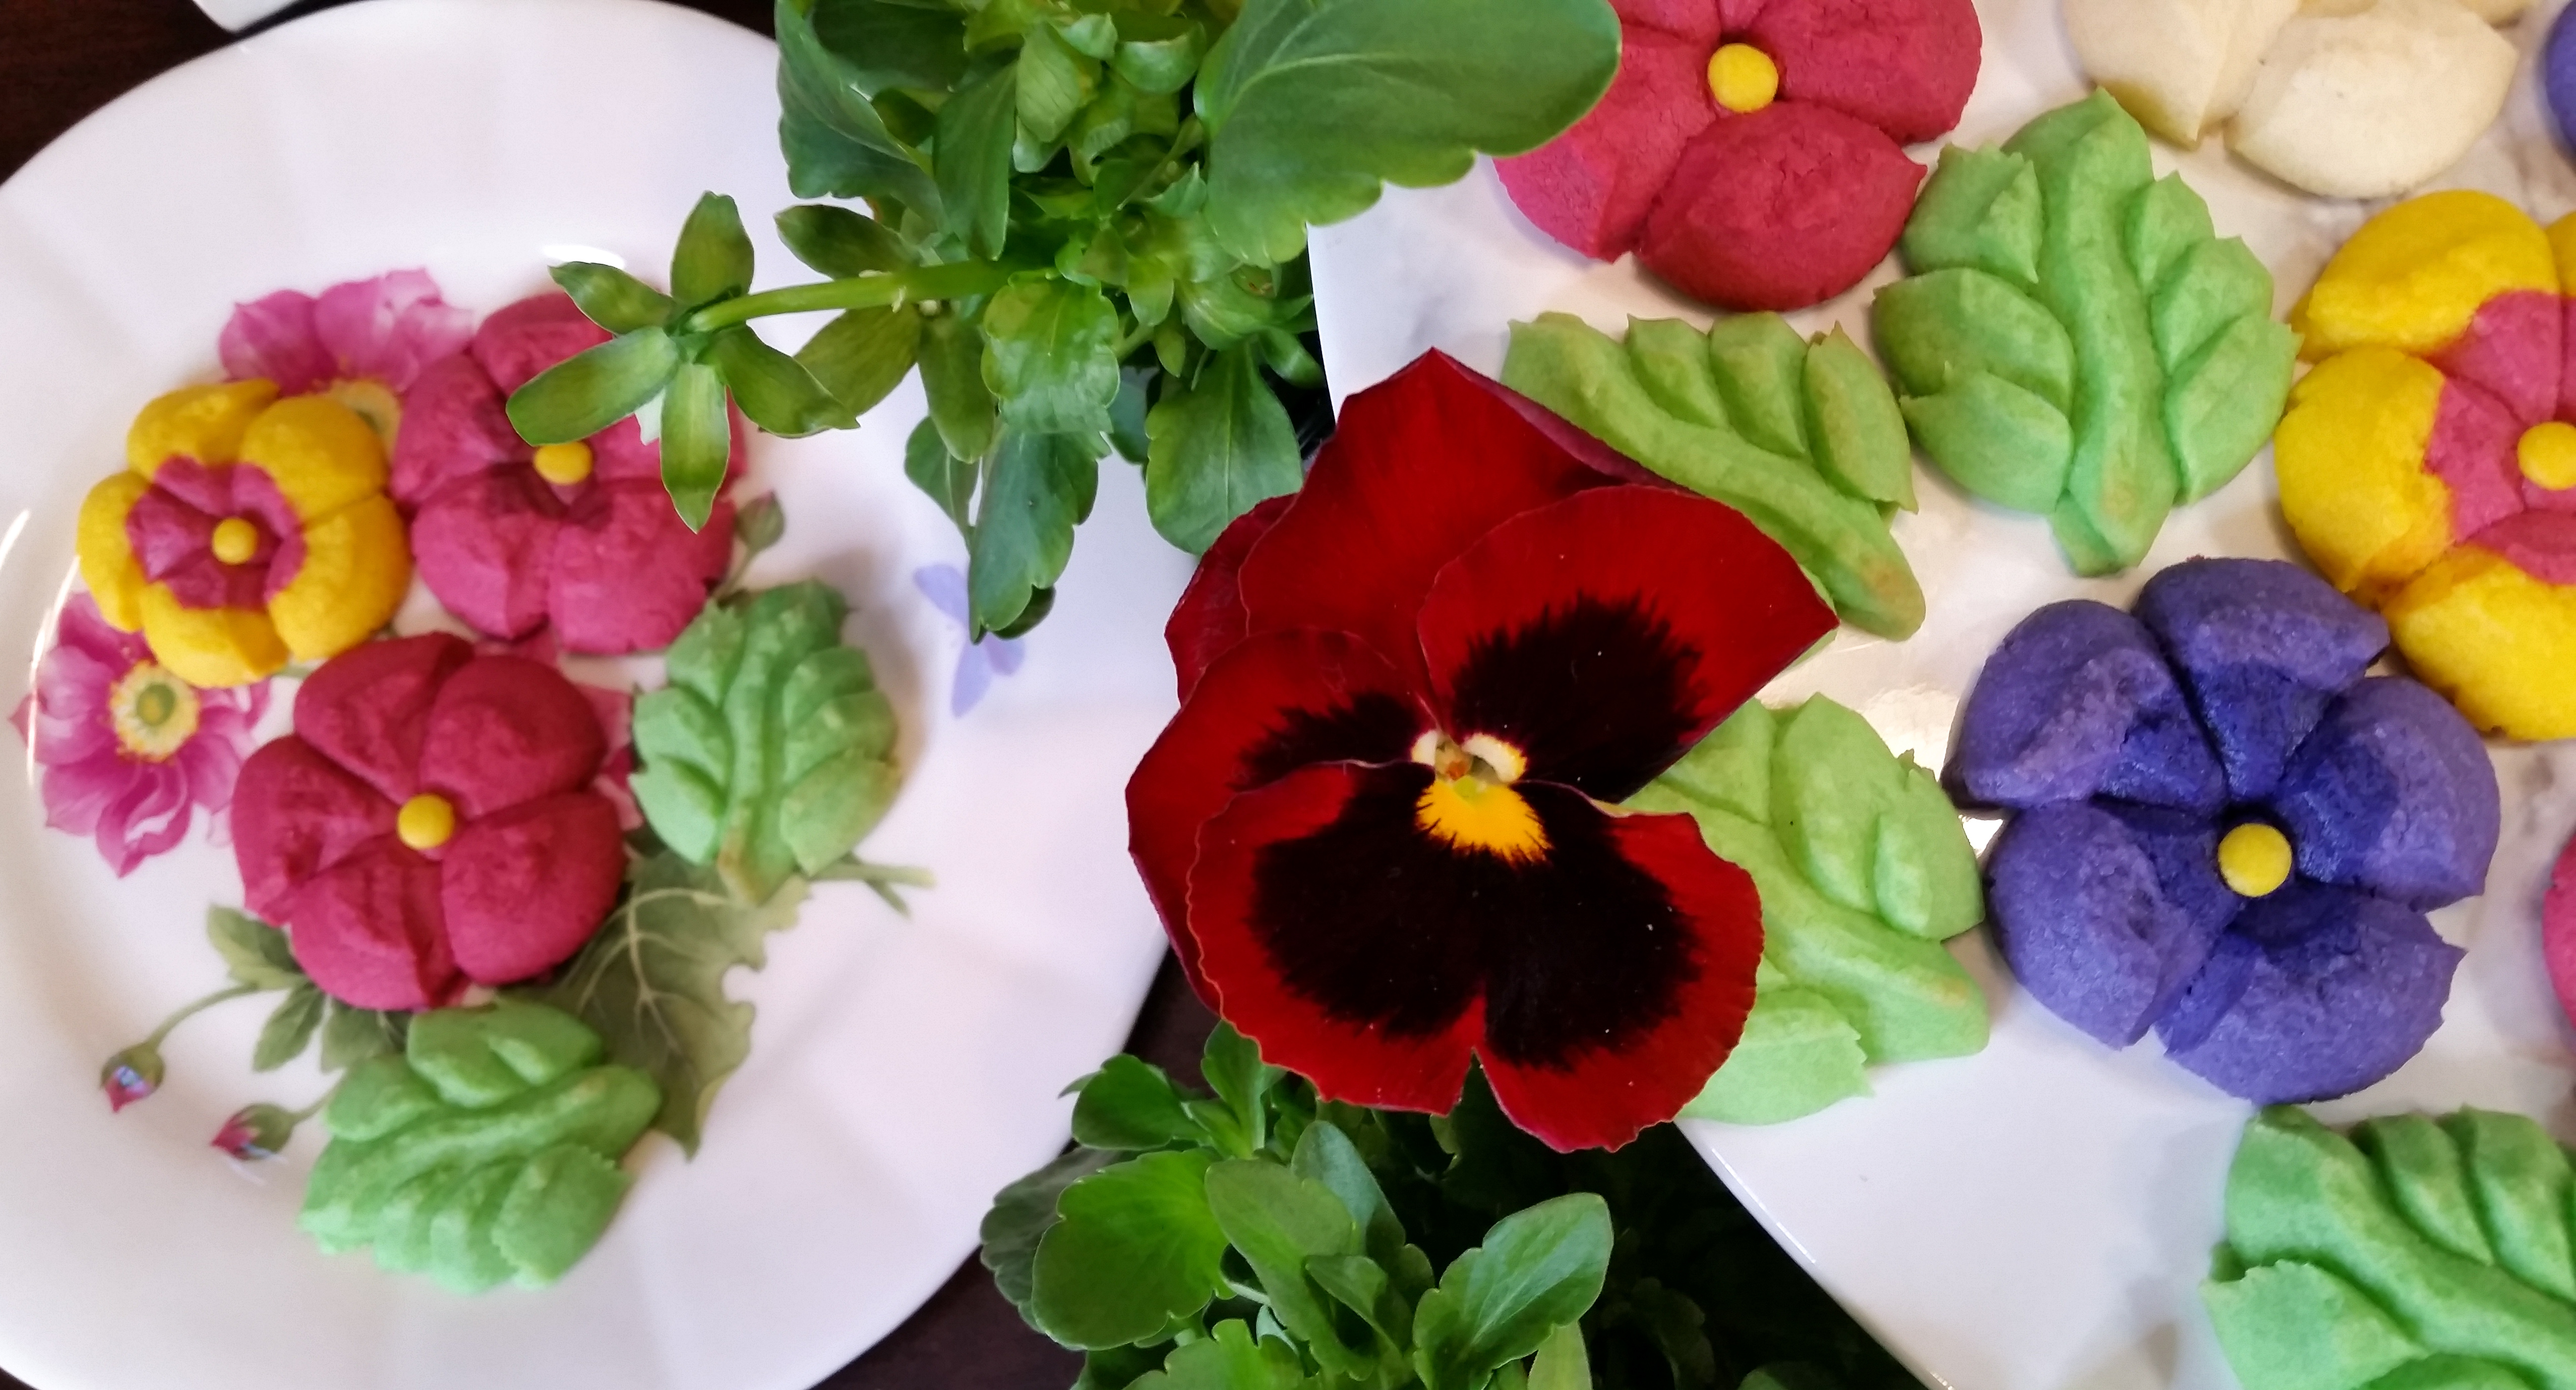
A few more photos of how mine turned out, posing sweetly with real pansies.

I wish you all a wonderful Spring, a Happy Mother’s Day, and invite you to “Press the Possibilities!”.
Thanks so much for stopping by. 🙂
Happy Baking!
~Susie
Disk Designer/Co-Owner at Impress! Bakeware, LLC
Our website has all of our 200+ disk shapes, cookie press, embossed rolling pins, stamps, luster dusts, baking accessories plus more about our Women/Family Owned company! impressbakeware.com
All products are on our Etsy shop.
Our Amazon store has our cookie press and disks and embossed rolling pins .
Follow us on facebook!
The Flowers, Cookie Press Box Set, and Leaves disk sets:


Question! In the ingredient/recipe list, it states “baking powder”, but in the written instructions, it says to combine the “baking soda” with the dry ingredients… Which is supposed to be used, please
LikeLike
Apologies for the typo! I can’t believe no one else has called it out! Definitely baking powder. Sorry for the confusion and thank you so much for letting me know. Happy Baking! ~Susie the Disk Designer
LikeLike
Susie you’re the best. thanks for the super quick response Also I’m sorry I think I commented twice 🤦♀️ I am making cookies to send to my kids at summer camp again this year. (Woodland creatures, birds, and camping discs) They were a huge hit last year. I’m also making the ones with the bear naked triple berry granola. So happy to support your awesome company!!
LikeLike
Thank you so much for this encouraging comment! Those are some of my favorite sets and I just love the berry granola recipe. Great choices for summer camp! We truly appreciate your support of our company. We’re still not as big as we need to be, and every year is a question of do we keep going, so hearing that we’re appreciated helps us stay in the game. Spread the word if you can! We want to keep doing what we do and it warms our hearts to have our cookies be a part of peoples’ lives. 🙂 ❤ ~Susie
LikeLike