
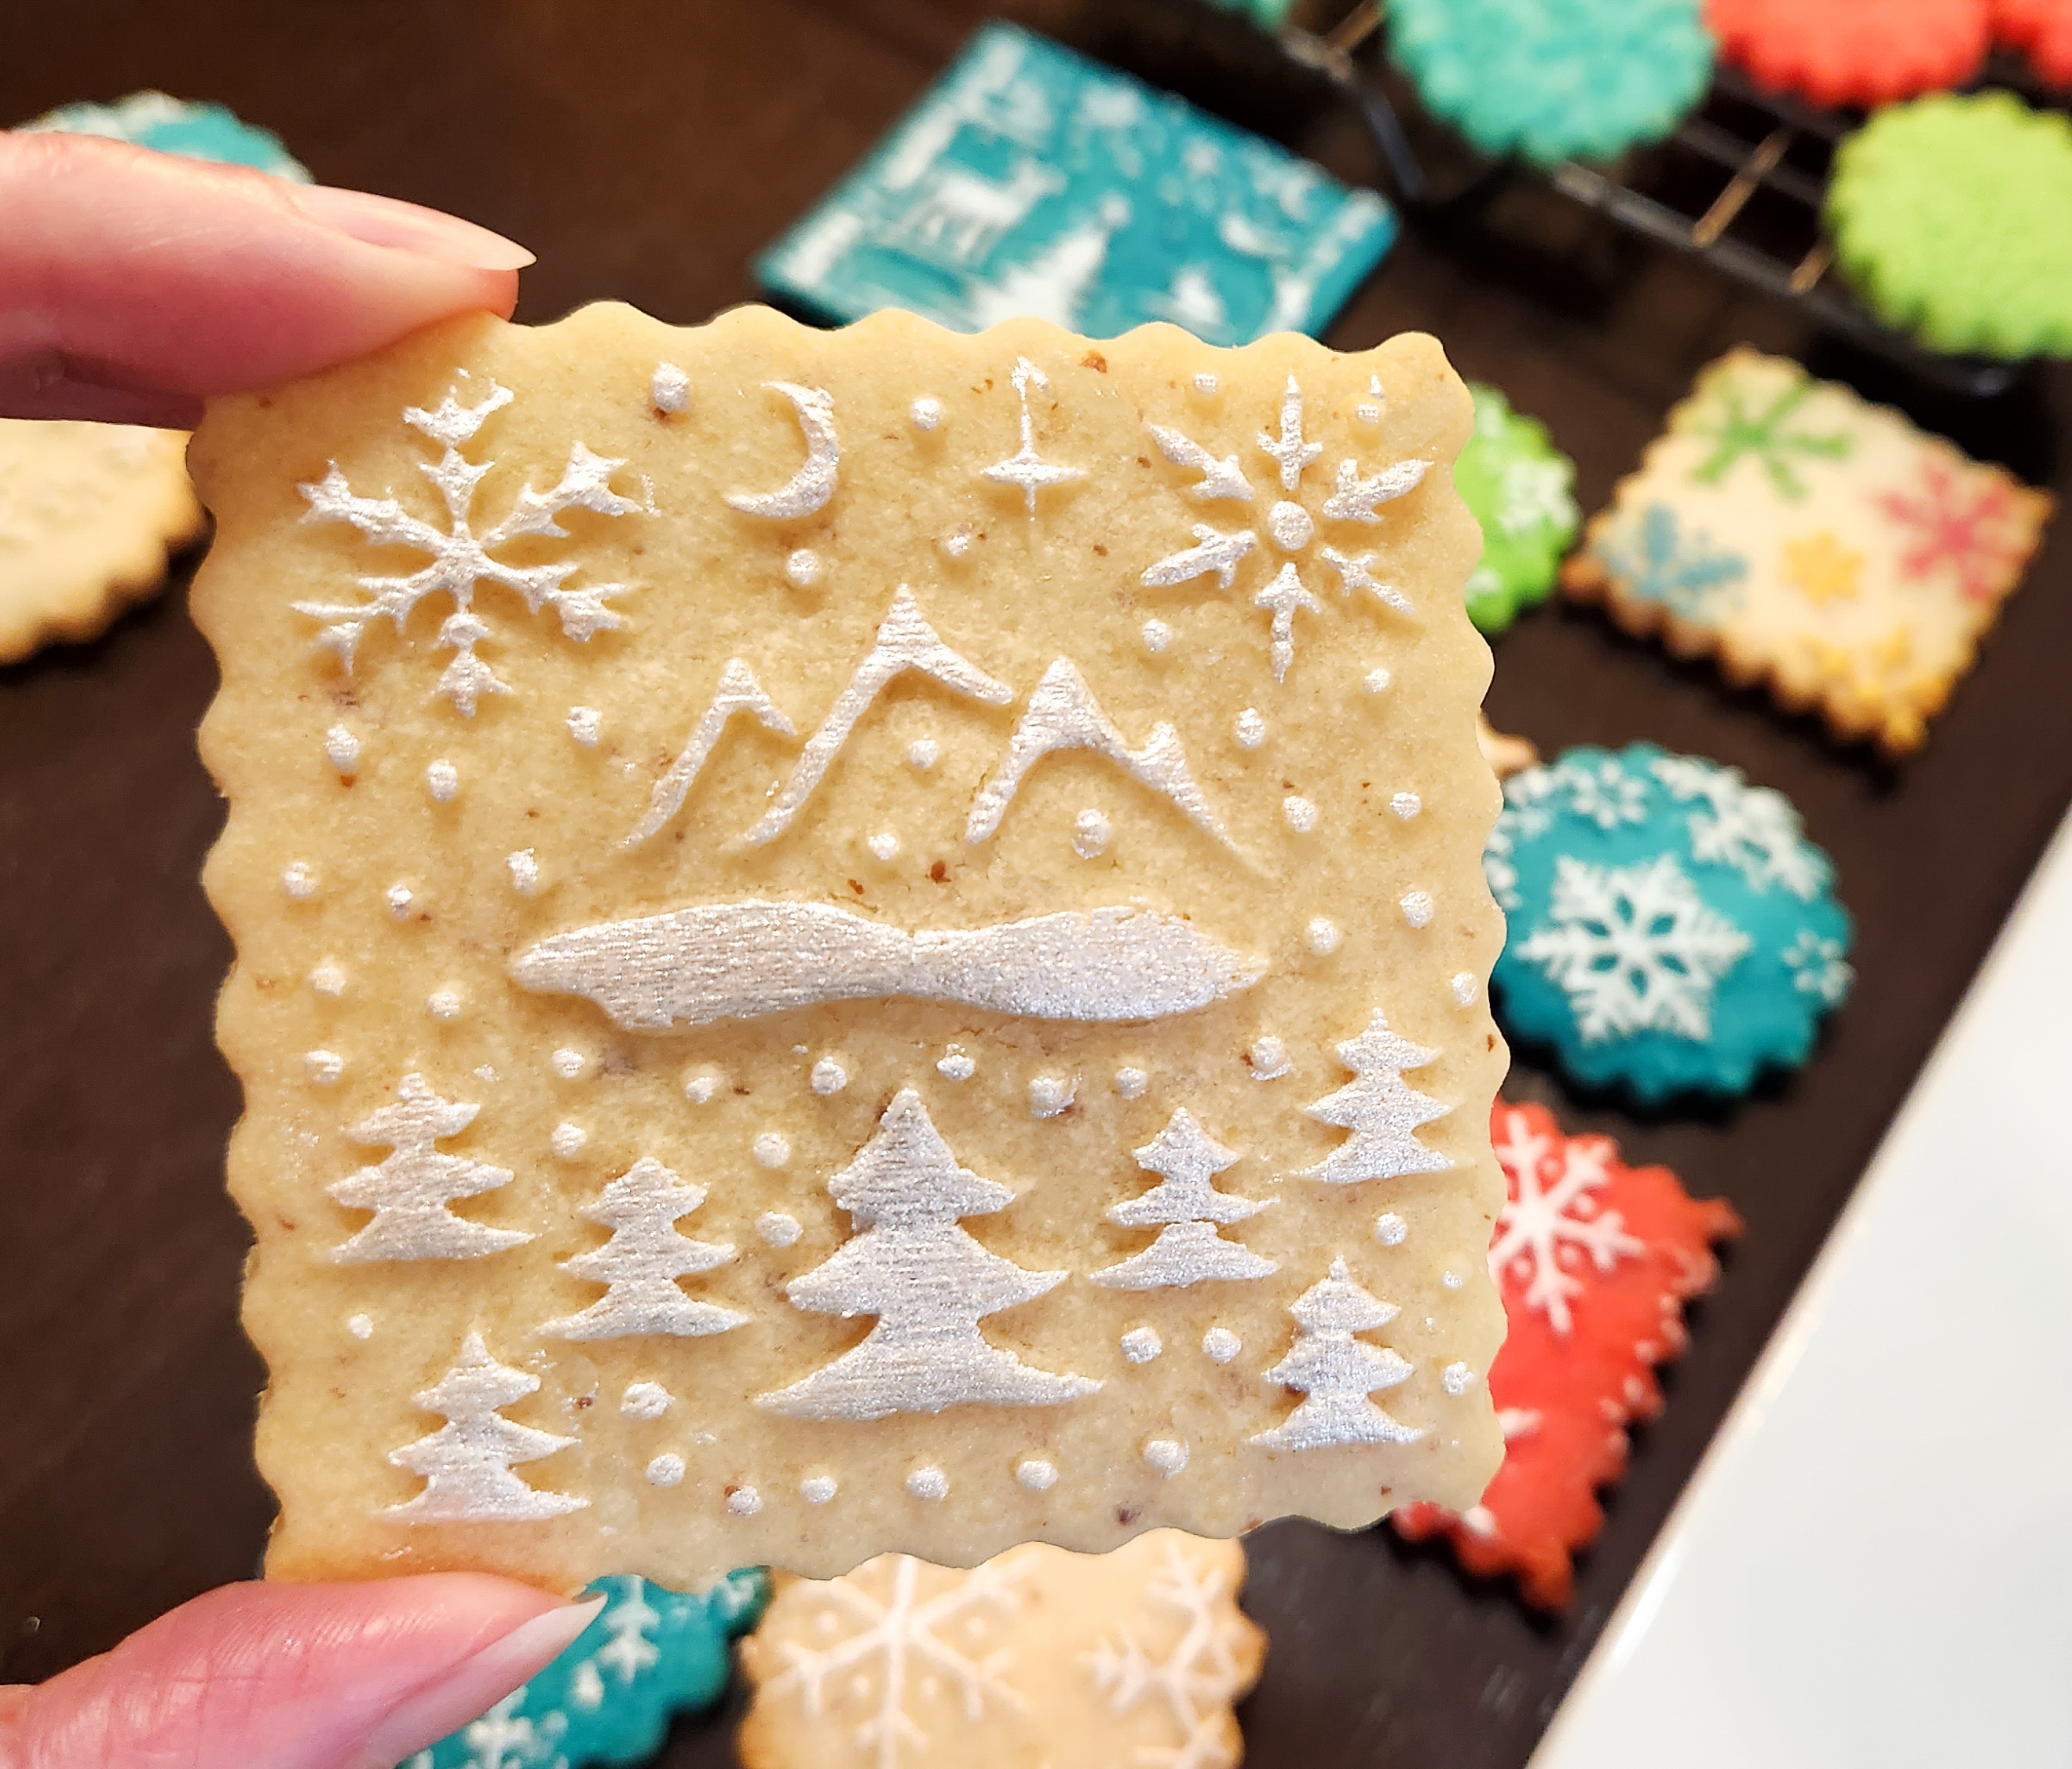
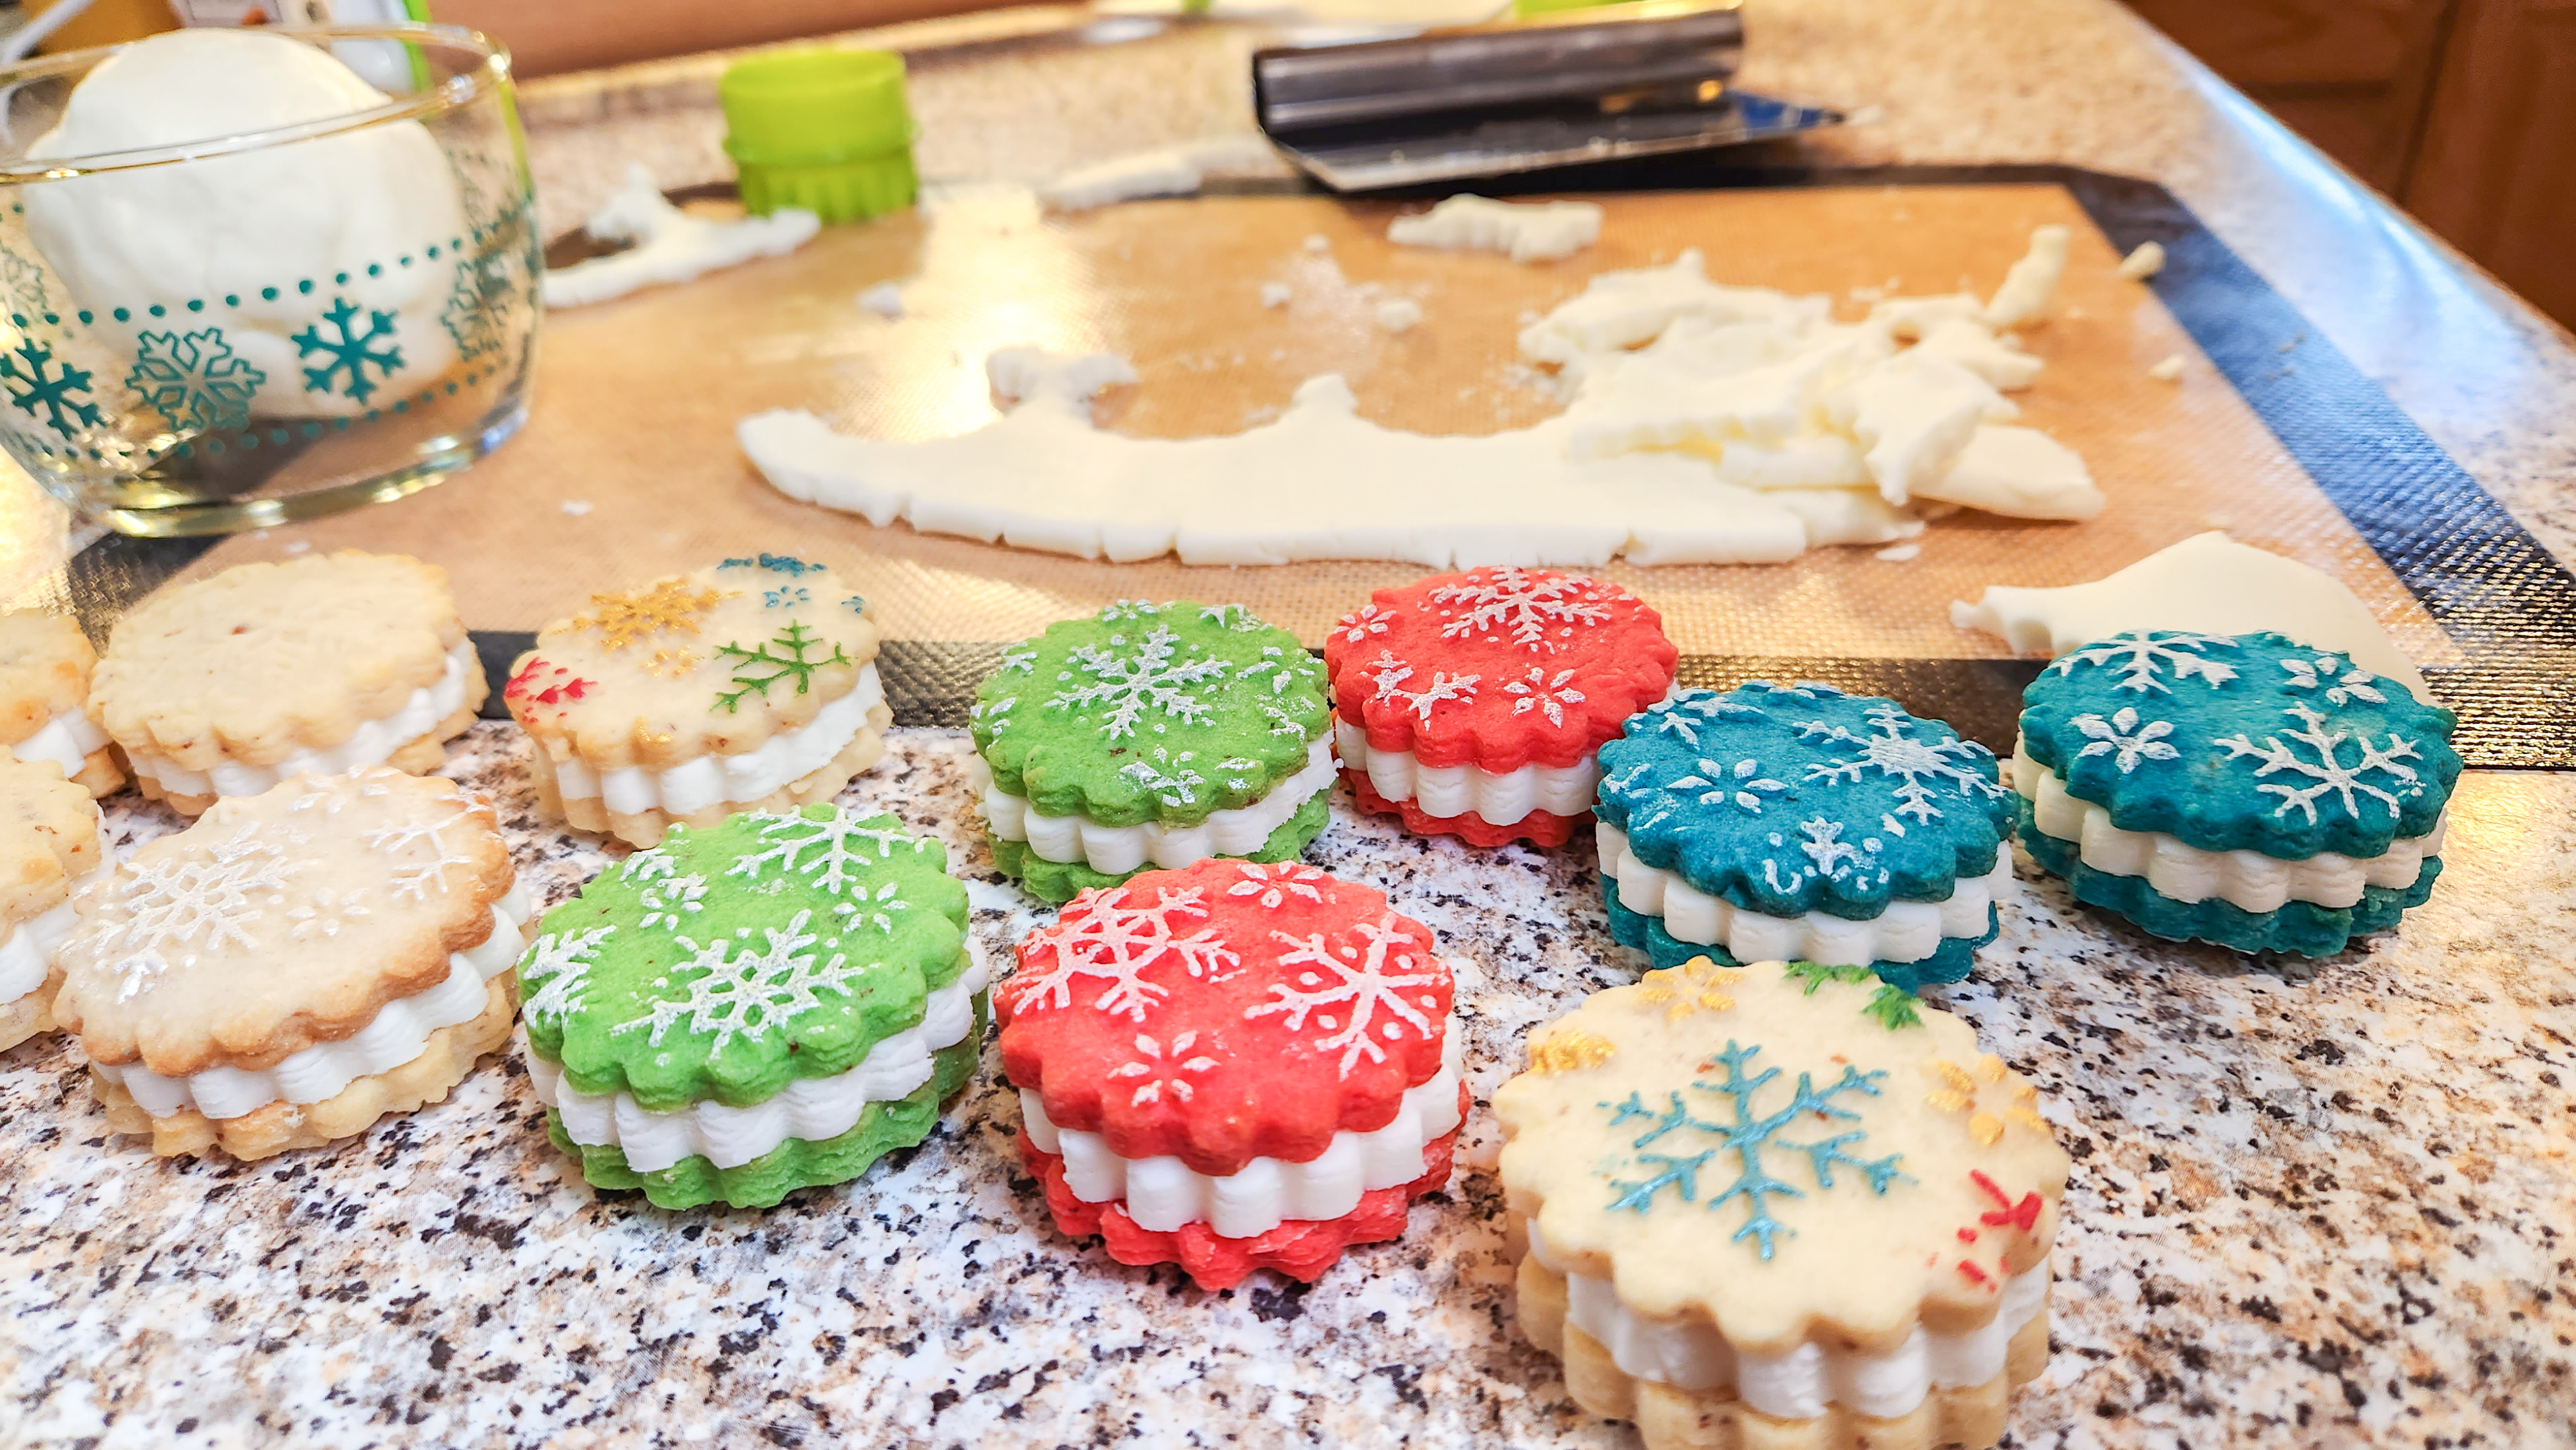
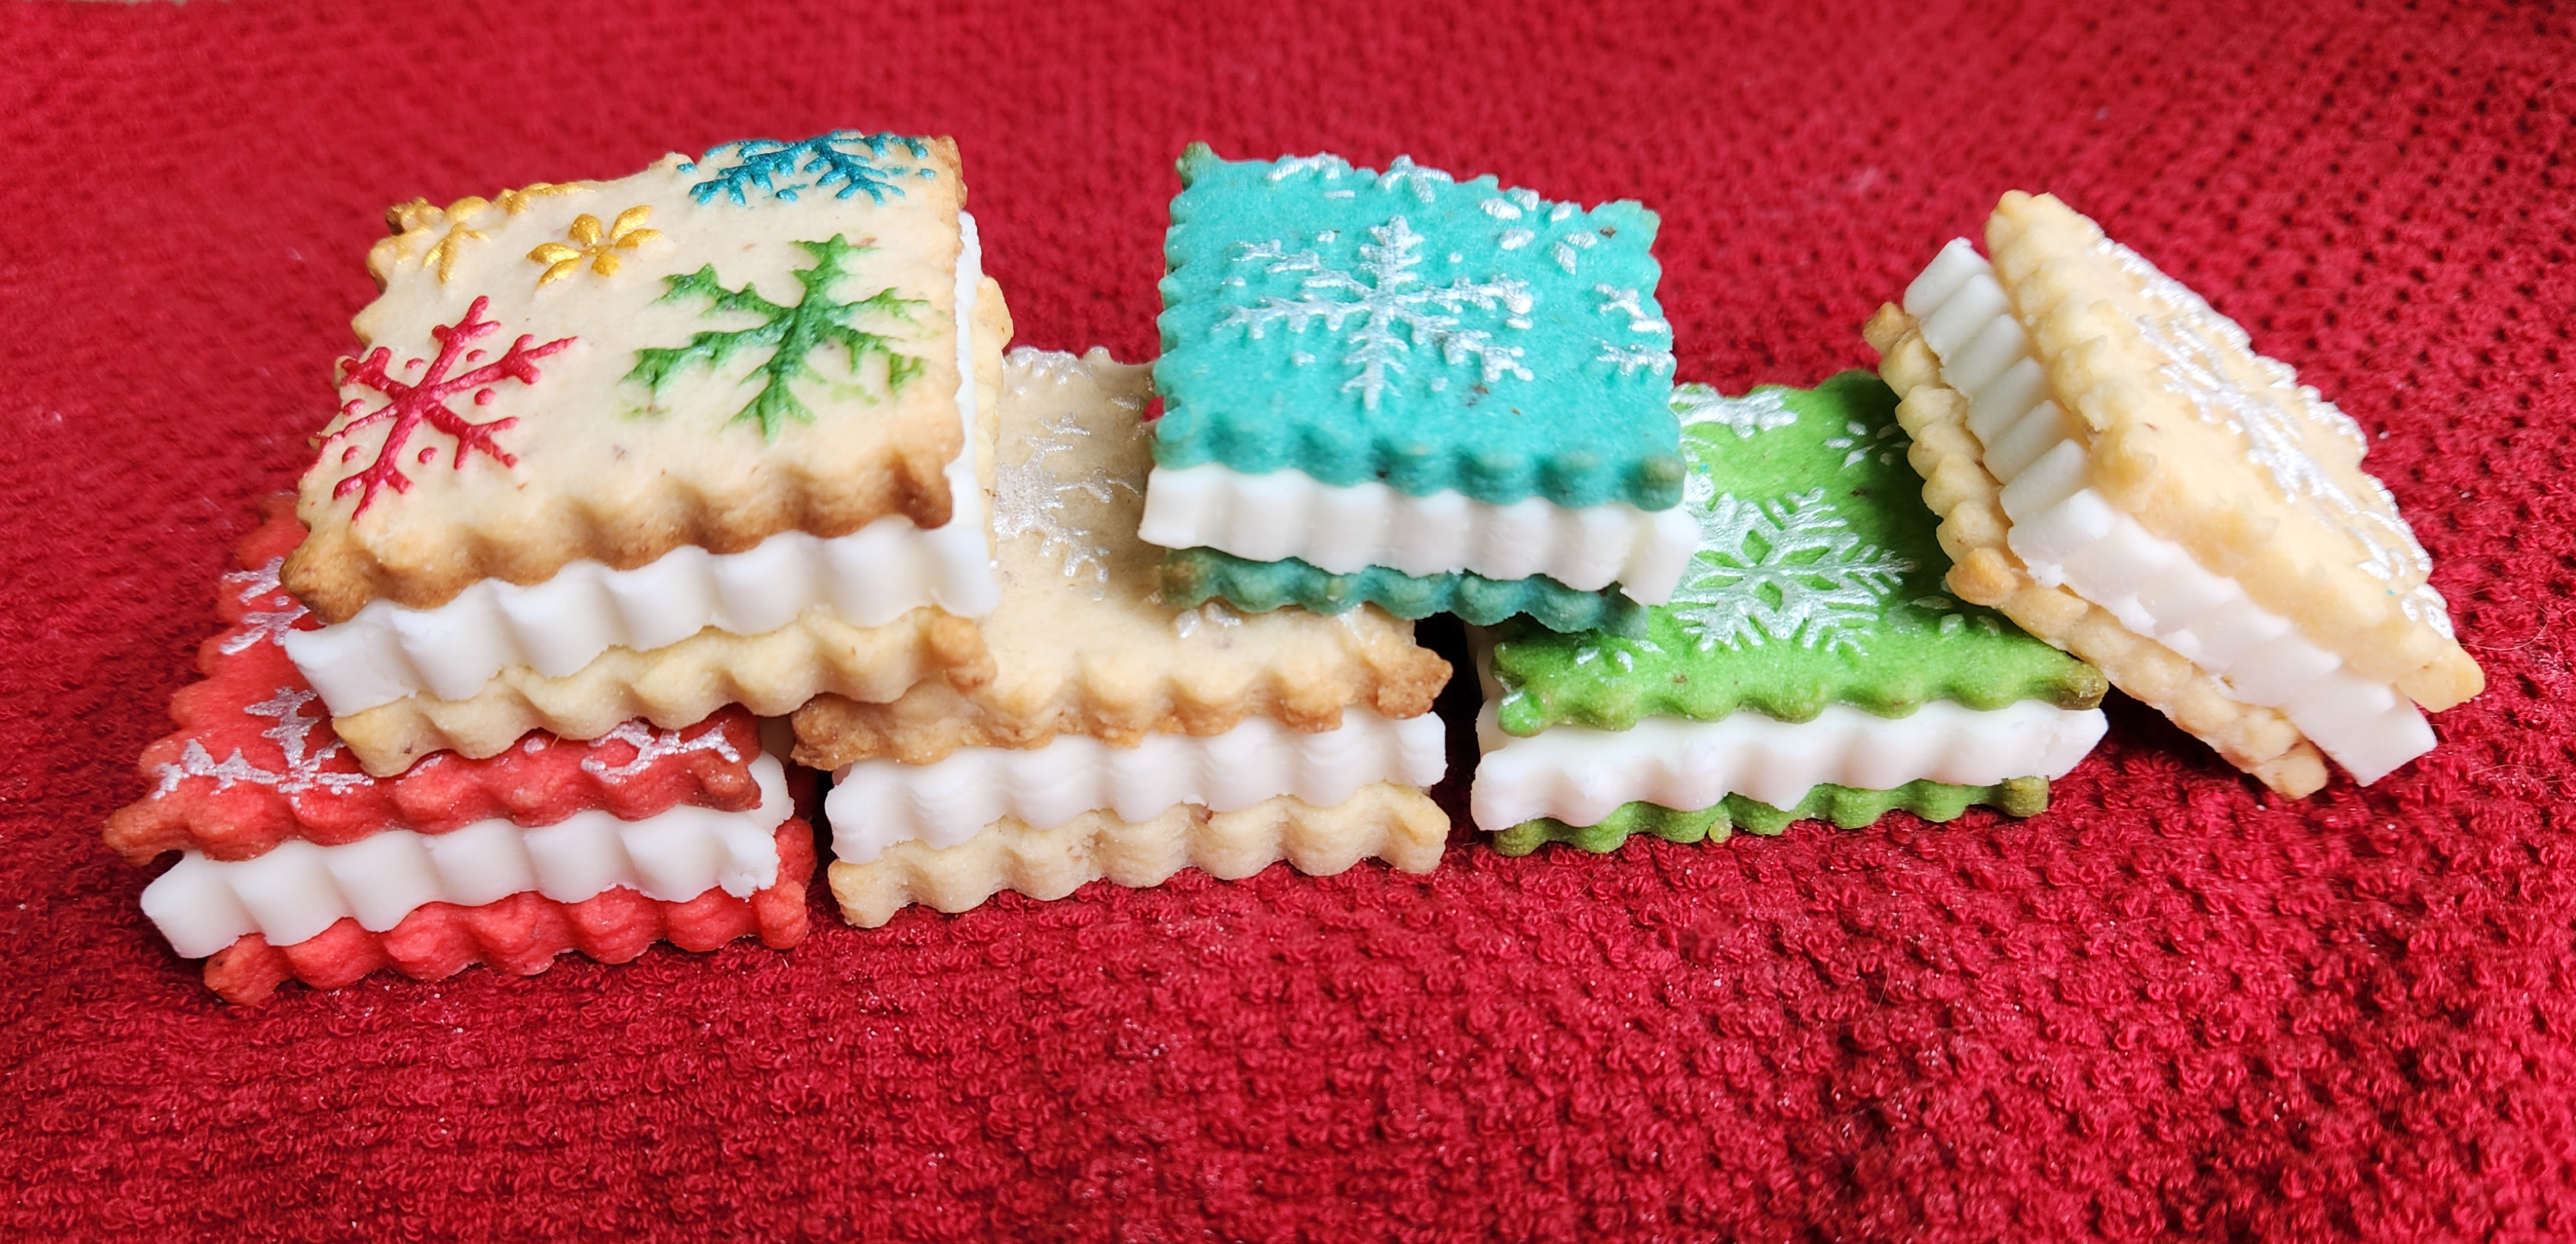
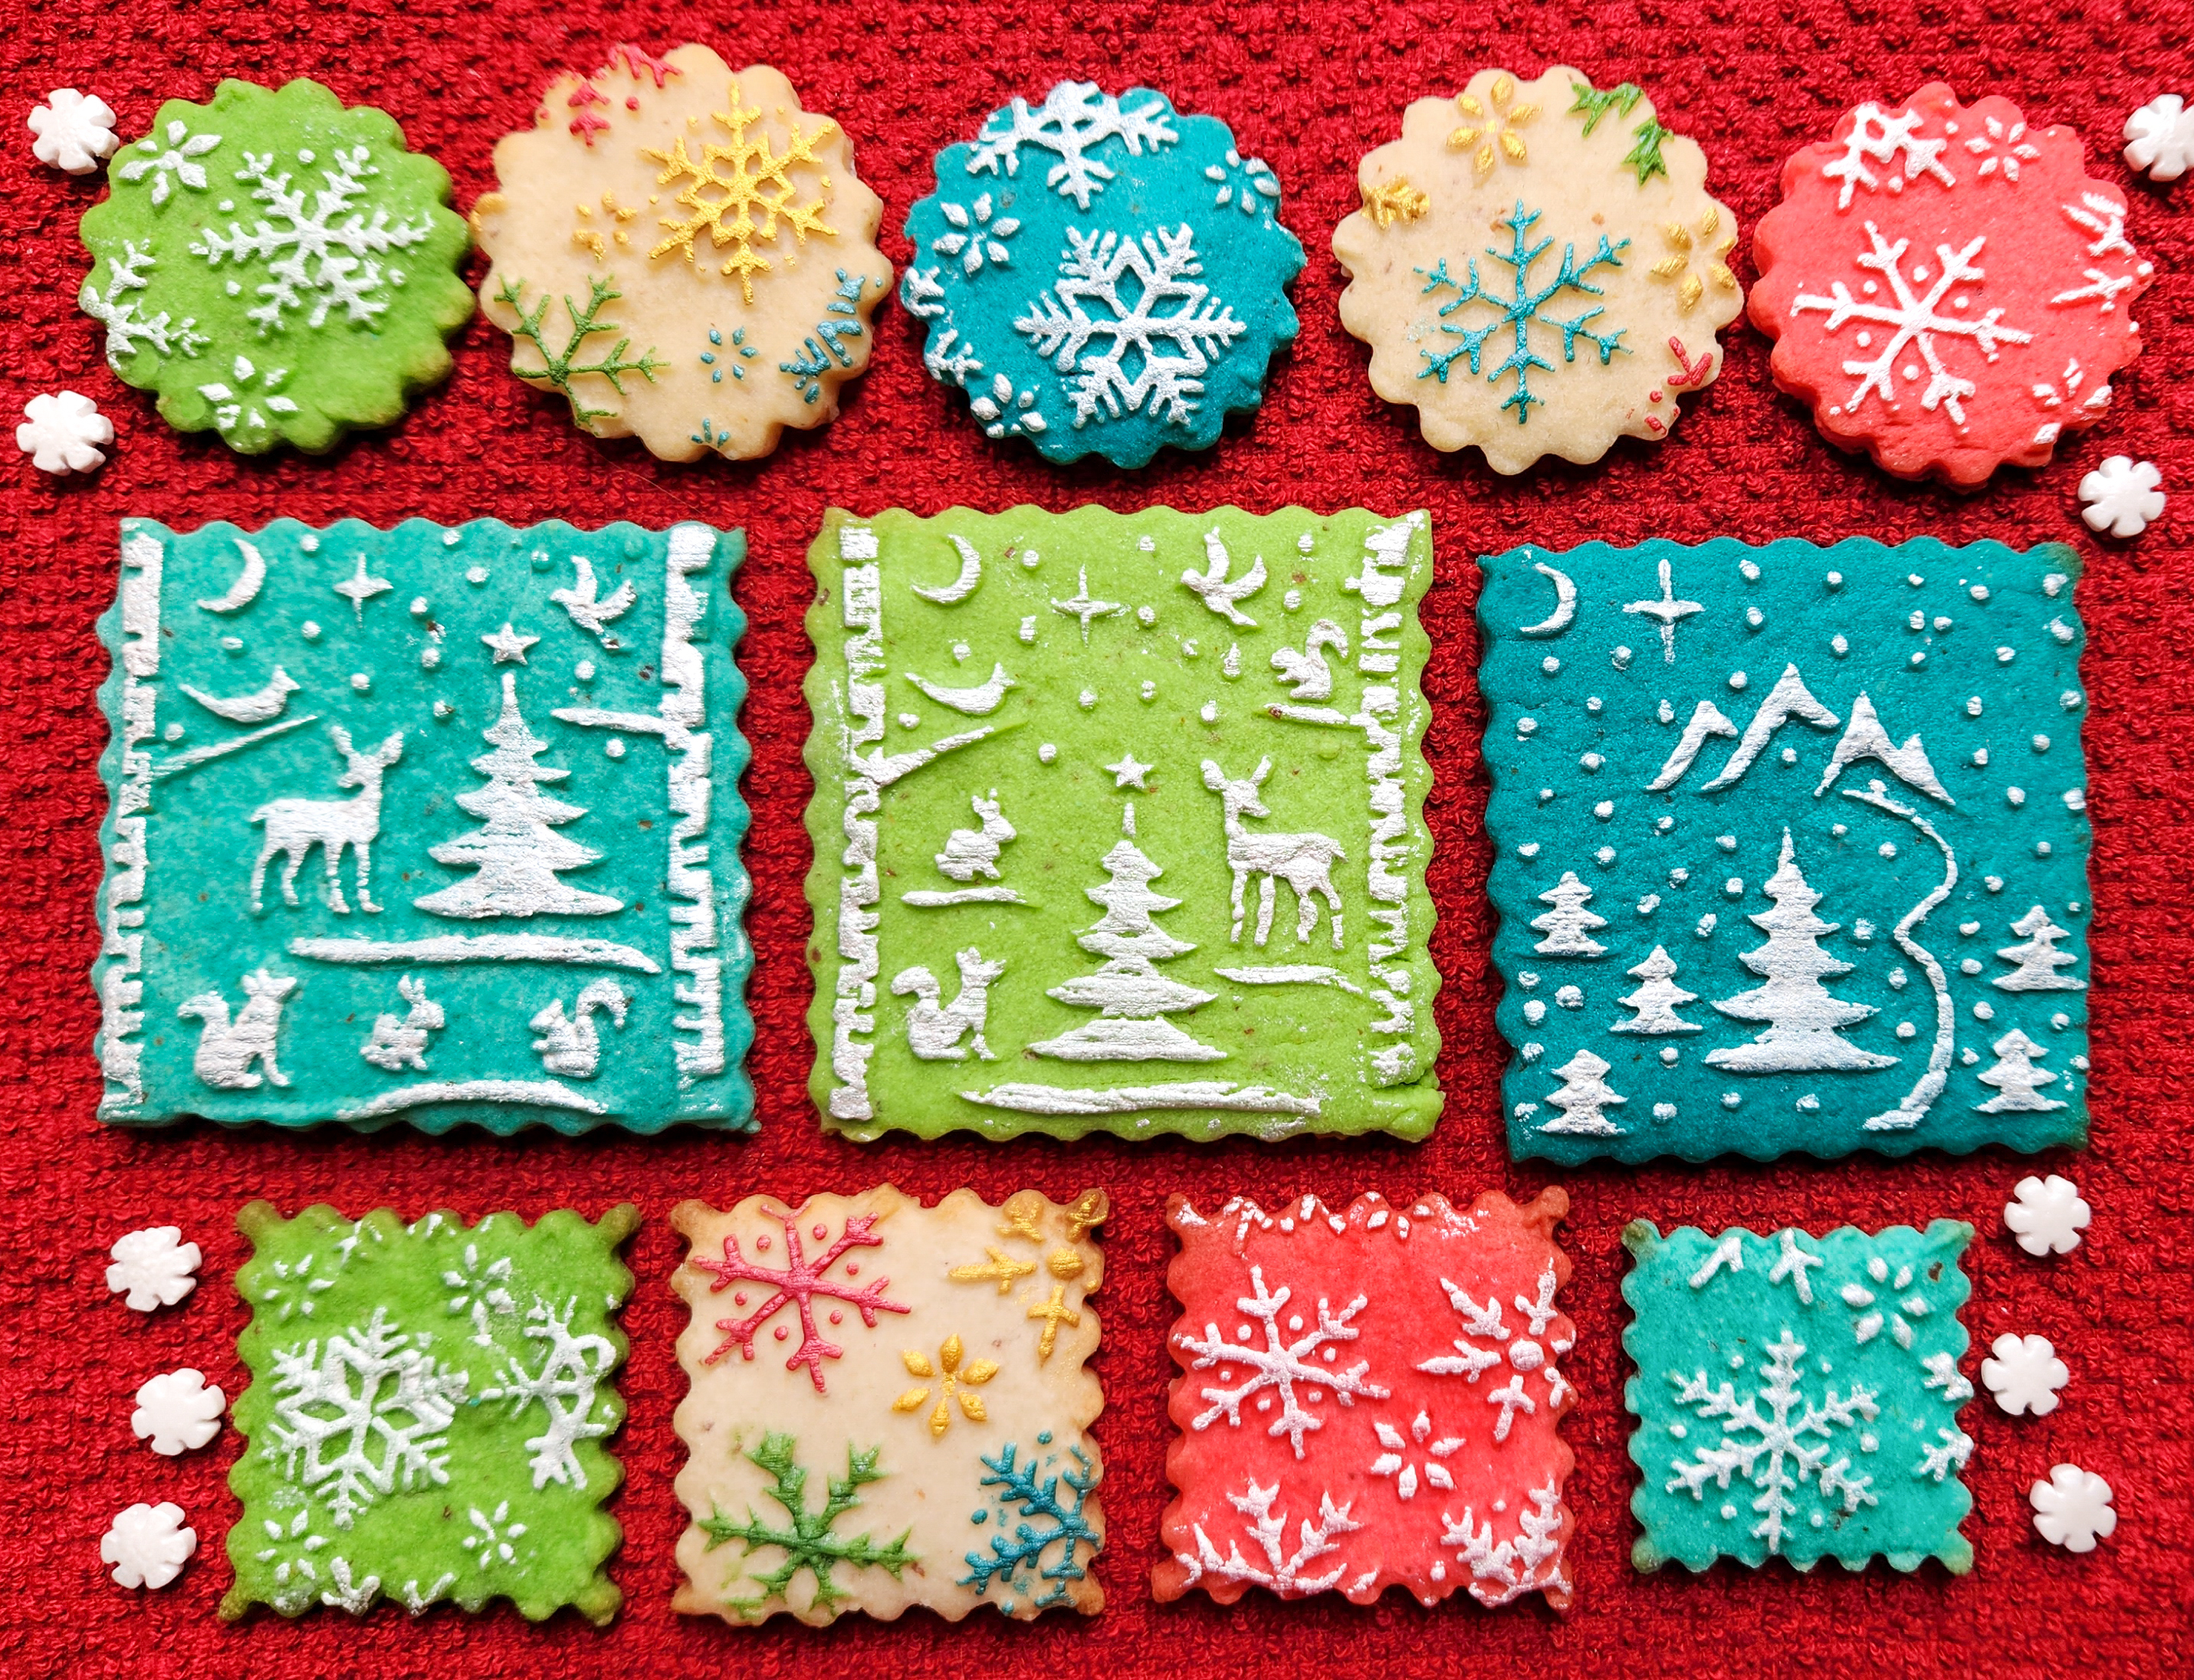
When my daughter Amanda saw the decorating on these cookies she squealed, “Mom they look like wrapping paper!” And I couldn’t unsee it! These cookies look like tiny gifts wrapped in shiny snowflake and winter scenes paper. They’re patterned with embossed rolling pins on colored dough, and the shimmery decorating is a touch of luster dust.
I adapted my “Incredibly Almond” cookie press recipe for rolling & embossing, and then had the audacity to add a super thick almond buttercream sandwich filling. 😂 If you like almond these will bring you immense joy. They are intensely rich, with almond pastry filling mixed right into the dough.
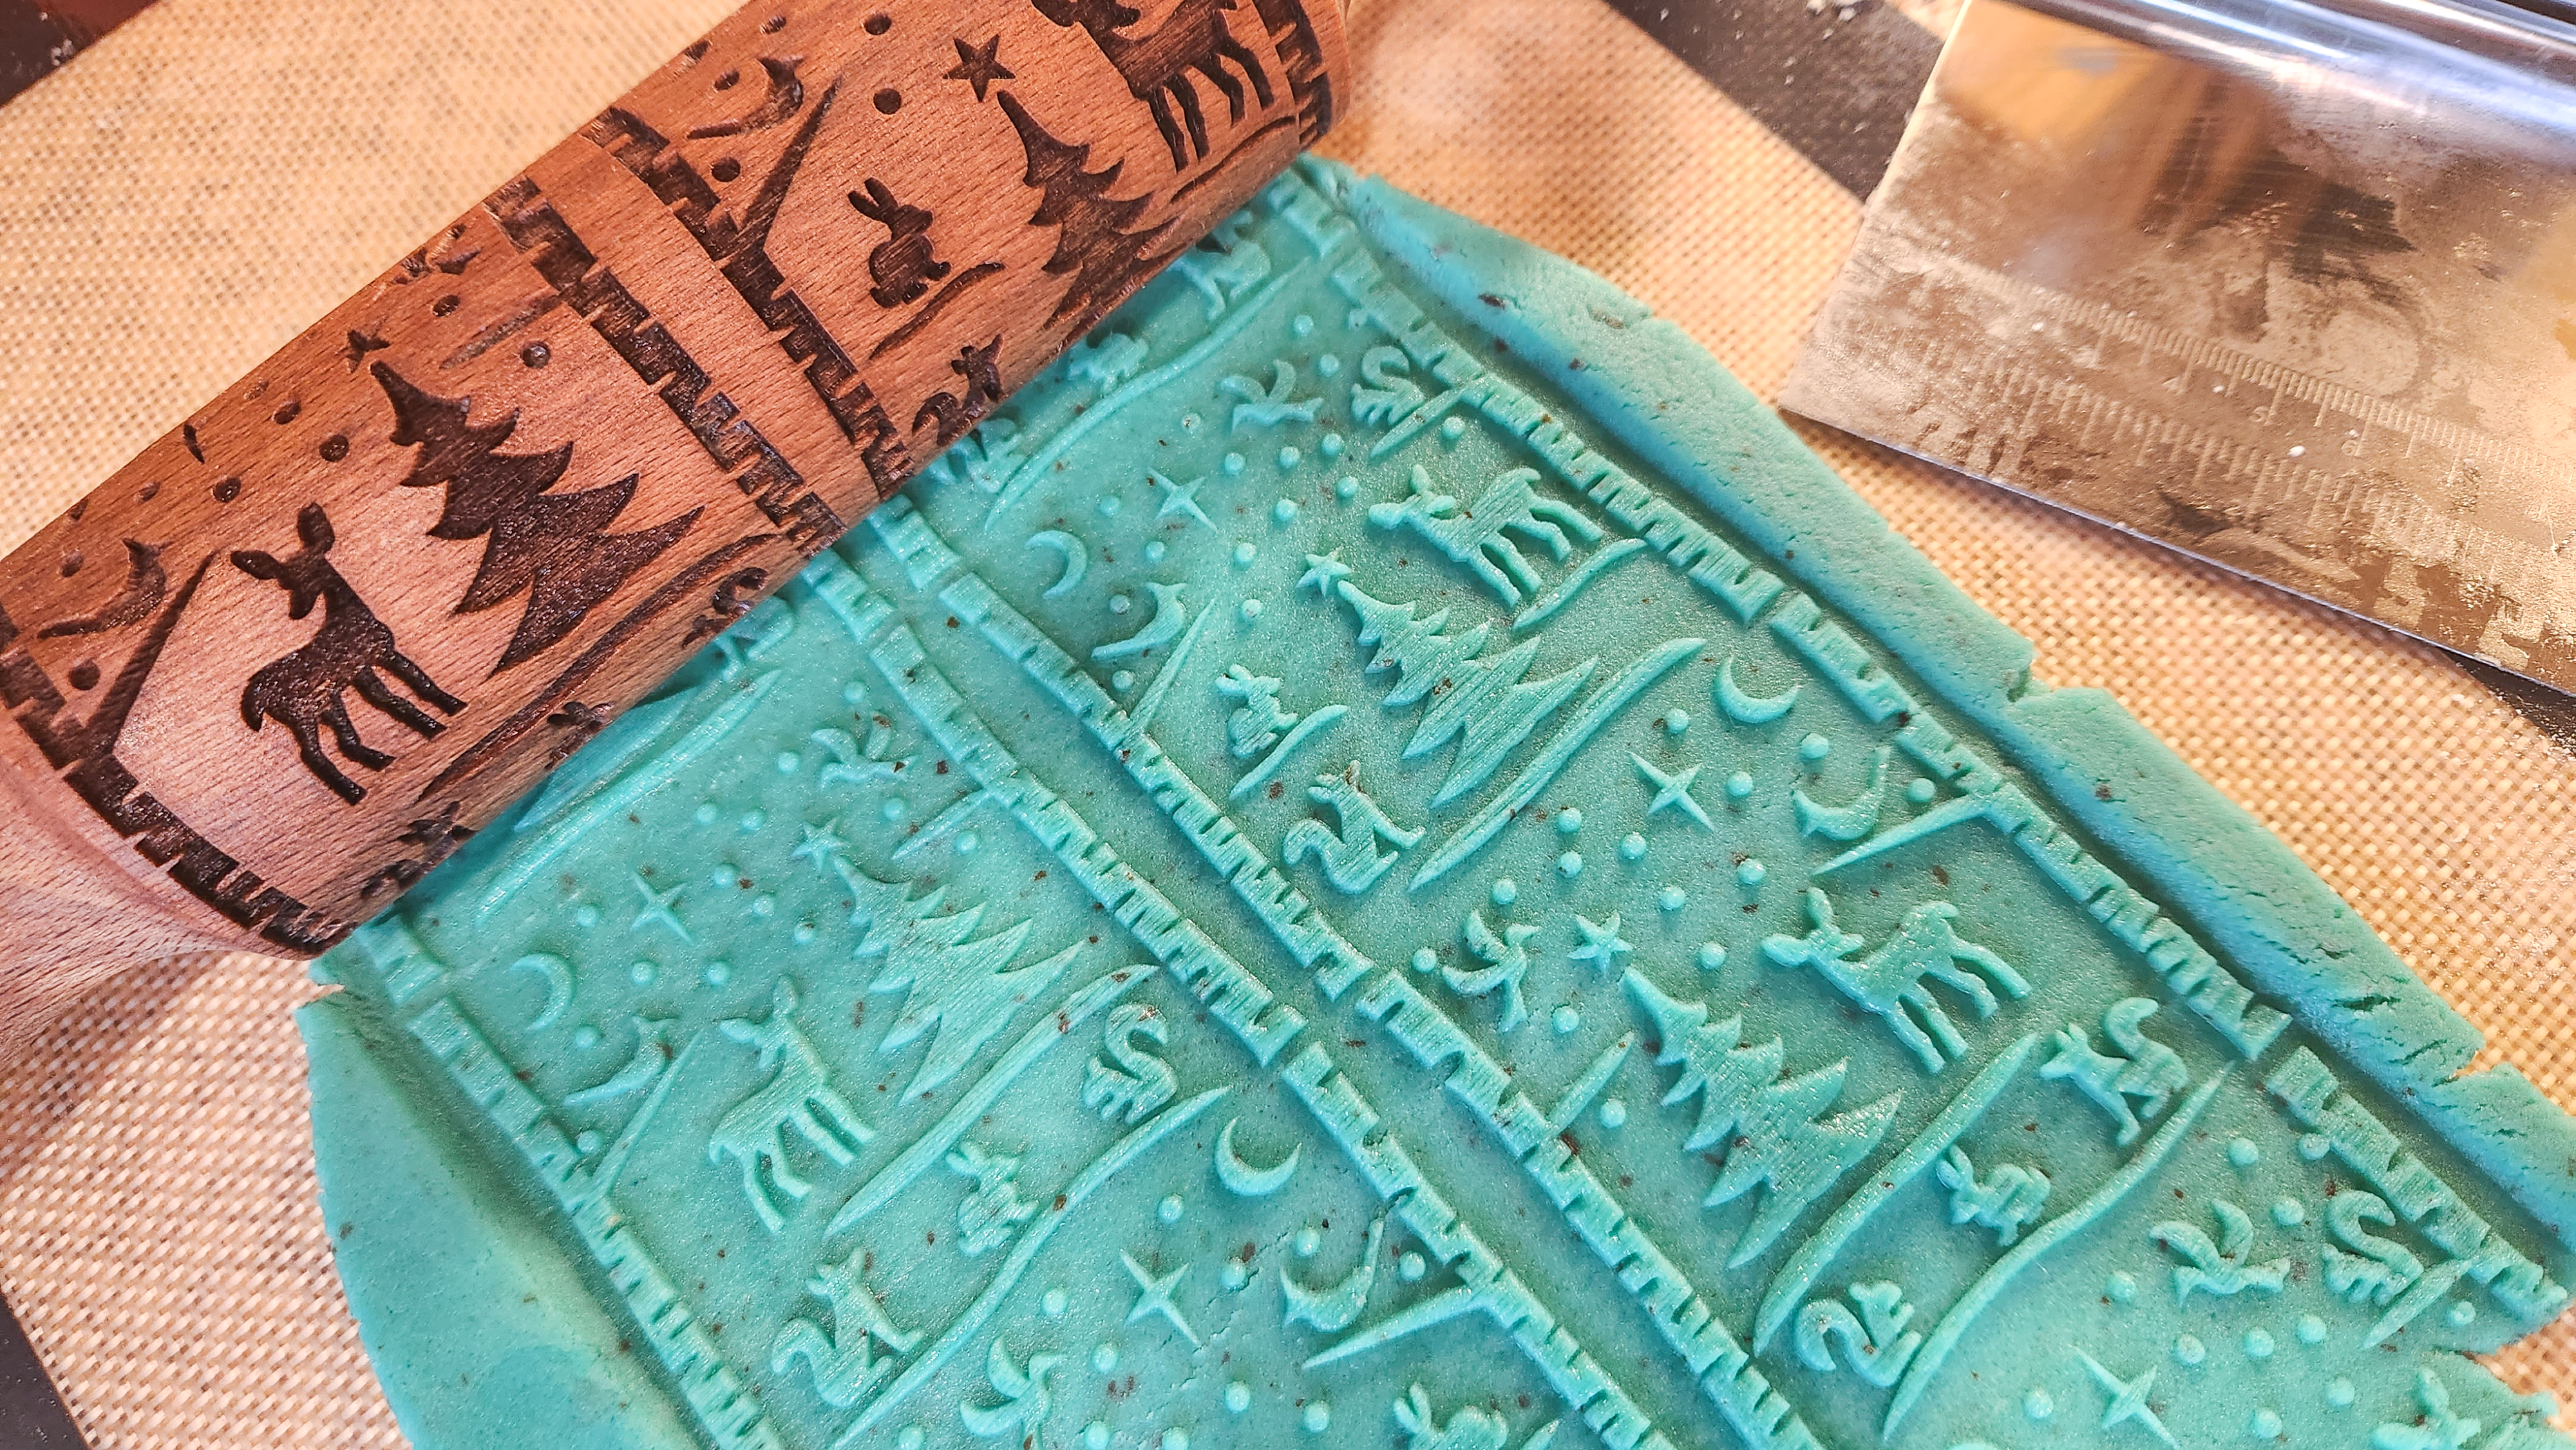
The patterns are made with 3 of our embossed rolling pins: Snowflakes, Winter Mountain Scene and Winter Animals Scene. The snowflakes were cut out with small round and square cookie cutters, and the scene cookies were cut with a wavy chopper/crinkle-cut knife to make ruffled edges. You could get a similar effect with a fluted pastry wheel.
We have a new Snowflakes Large Designs pin in 2024! It would be wonderful in this recipe, too, as the snowflakes are even bigger! We also added Snowflakes and Woodland Pine Trees. Always great to have options.😊

I only sandwiched the small snowflake cookies as the scenes would be way too much.
These pretty little snowflakes got their shimmer by finger painting using edible luster dust. The raised snowflake shapes on the embossed cookies stand up just enough that a fingertip with paint will only leave color on the snowflakes. How cool is that? There is a video clip below showing the technique.
If you also love spritz cookies, check out the cookie press version of this recipe, done in shimmering snowflake shapes: https://creativecookiepress.com/2016/12/07/sparkling-almond-spritz-snowflakes/
Our website has all of our 200+ disk shapes, cookie press, embossed rolling pins, baking accessories plus more about our Women/Family Owned company in beautiful Colorado Springs! Ordering HERE helps us the most and we appreciate it! 🙏impressbakeware.com
All products are on our Etsy shop.
Our Amazon shop has our cookie press and disks and embossed rolling pins.
🎉 “Tis the Season!” 15% off SALE❗ EXTENDED 🙂
🎄Make edible art for the Holidays, because baking should be fun!
Discount on our cookie press disks, cookie press, embossed rolling pins, luster dusts, cookie cutters & baking accessories. Sale November 26 – December 17, 2025, on our website and Etsy shops ONLY! (Links above) Sale excludes holiday gift sets and our recipe book.
Let’s bake! I have video below of how to roll with our embossed pins if you’re new to this!
Incredibly Almond Rolled Cookies
1 cup (2 sticks) butter, softened (not melted)
1/2 cup + 1 tablespoon granulated sugar
1/3 cup canned Solo® Almond Cake and Pastry Filling NOTE: STIR it well if it has separated! It should be smooth and creamy.
1 tablespoon almond extract
1 teaspoon vanilla extract
1 egg
3 1/4 cups + 1 tablespoon all-purpose flour
1/4 teaspoon salt
Note: For a gluten-free option simply replace the flour with a 1:1 substitute like King Arthur’s Gluten Free Measure for Measure.
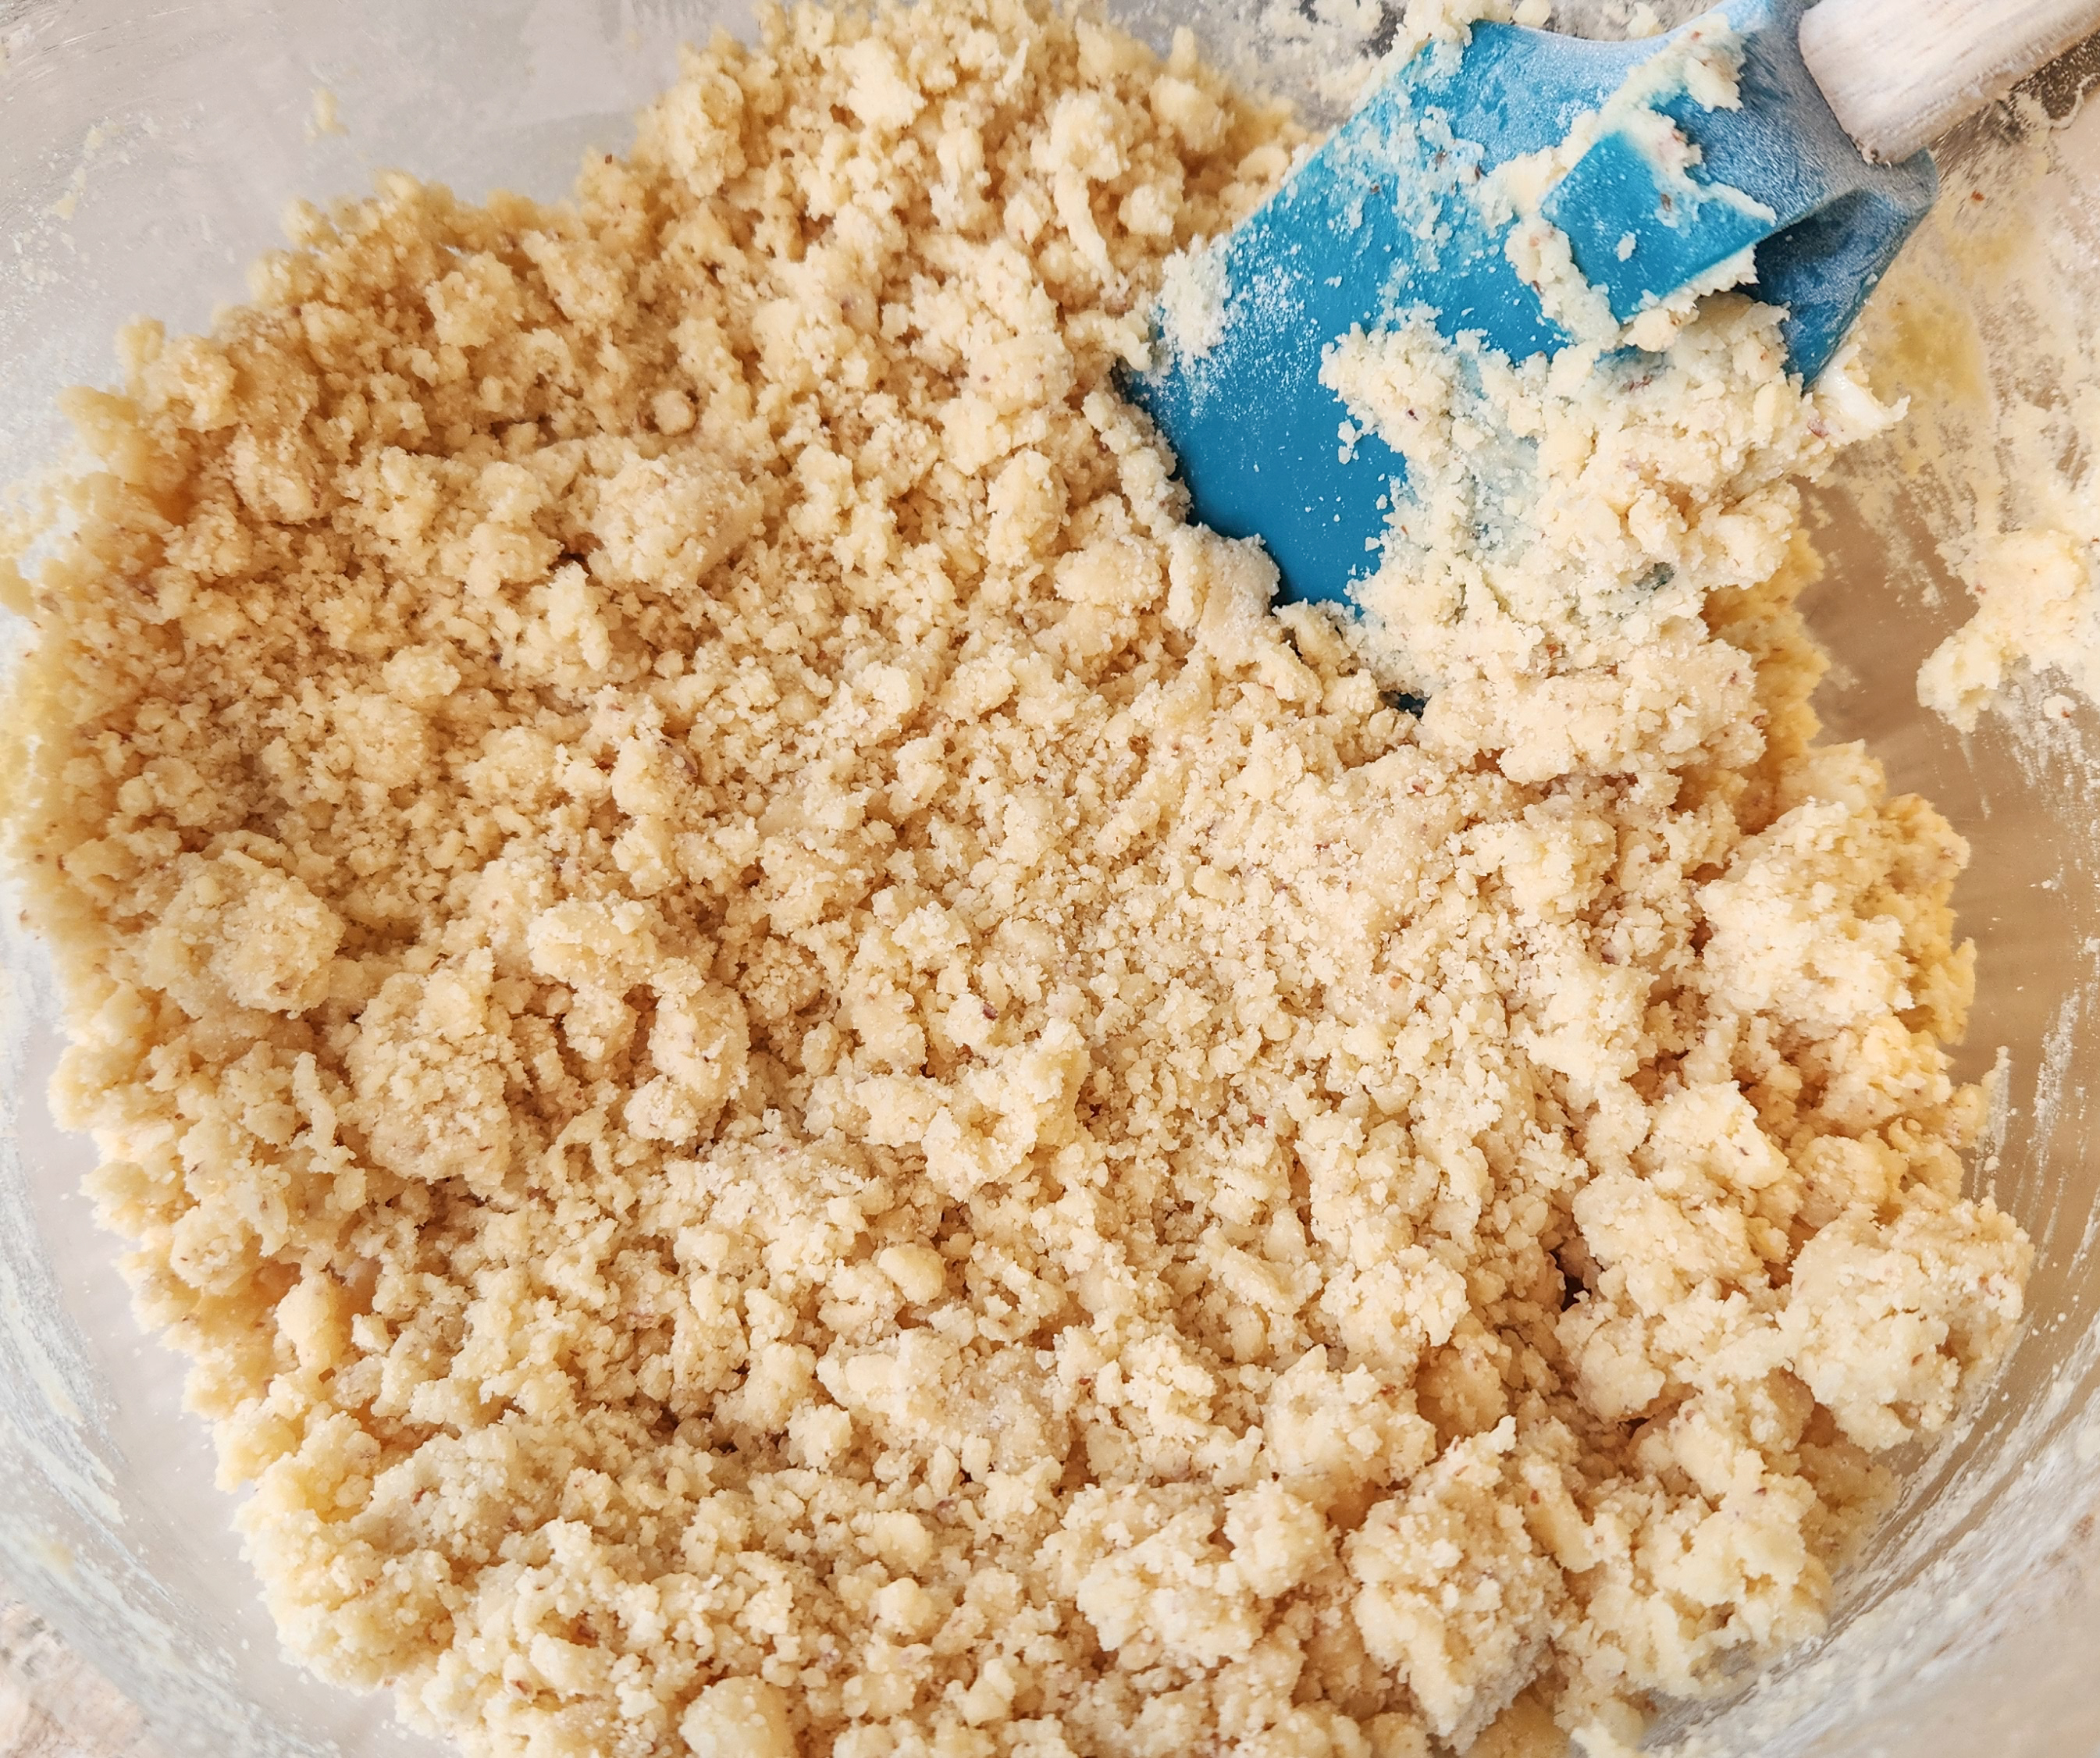
In a large bowl, combine flour and salt. Set aside. Using an electric mixer, cream the butter. Add the sugar and cream together very well, until it is light and fluffy. Add the almond filling, then the almond and vanilla extracts, and the egg, re-creaming the mixture after each addition.
I love the beautiful flecks of almond in the dough! The aroma of this as it comes together is exquisite!


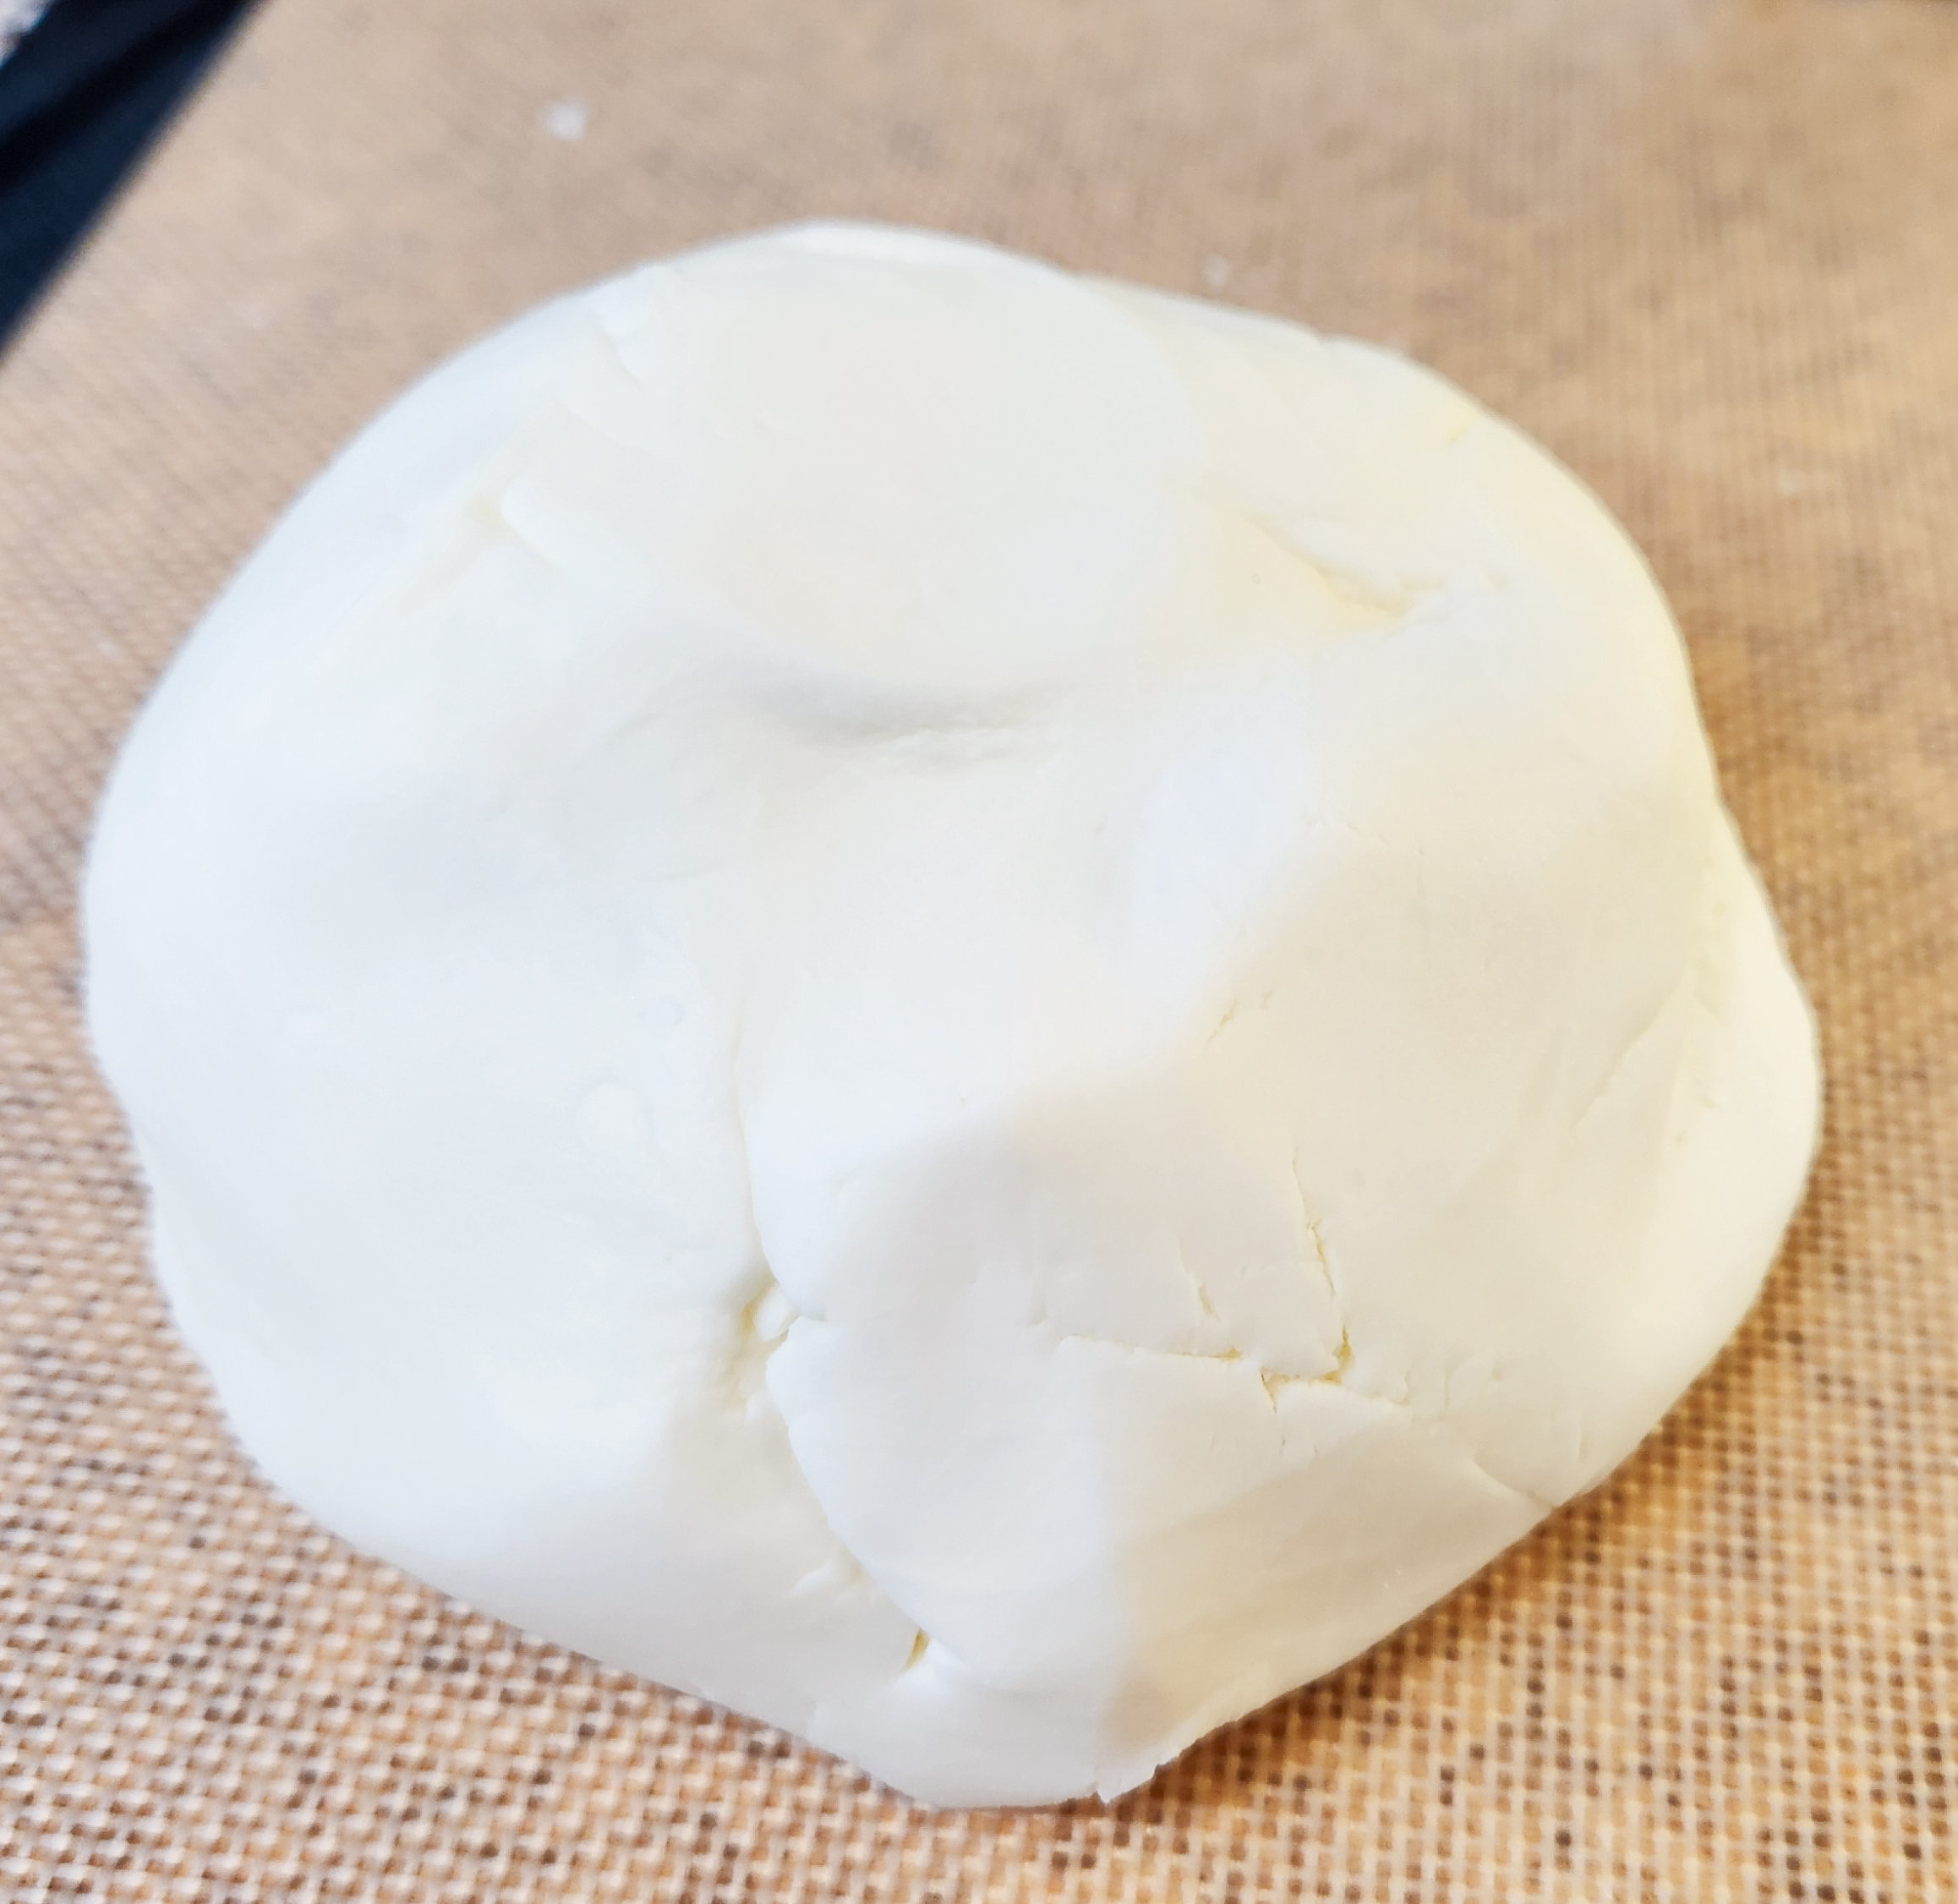
Add the flour mixture slowly, mixing on a slow speed until a workable dough forms. Make sure all of the flour is incorporated evenly. Knead it by hand until it is uniformly smooth and mixed. This dough can seem crumbly at first but it kneads together well. Perfect rolling dough has a clay-like, workable texture that is not too sticky or too stiff. If it feels incredibly difficult to knead, it is probably too stiff. Add a little water or vanilla extract a teaspoon at a time until you achieve a workable texture. It should be stiff, but not impossible! If it is too easy to knead or is sticking to your fingers, it is probably too soft. Add flour a tablespoon at a time until it is workable like clay. This recipe can be a little finicky with the flour amount, depending on how much moisture is in the almond filling, how dry the air is, etc. Don’t be surprised if you need to add some flour to get a good texture that holds up to embossing and cutting out!

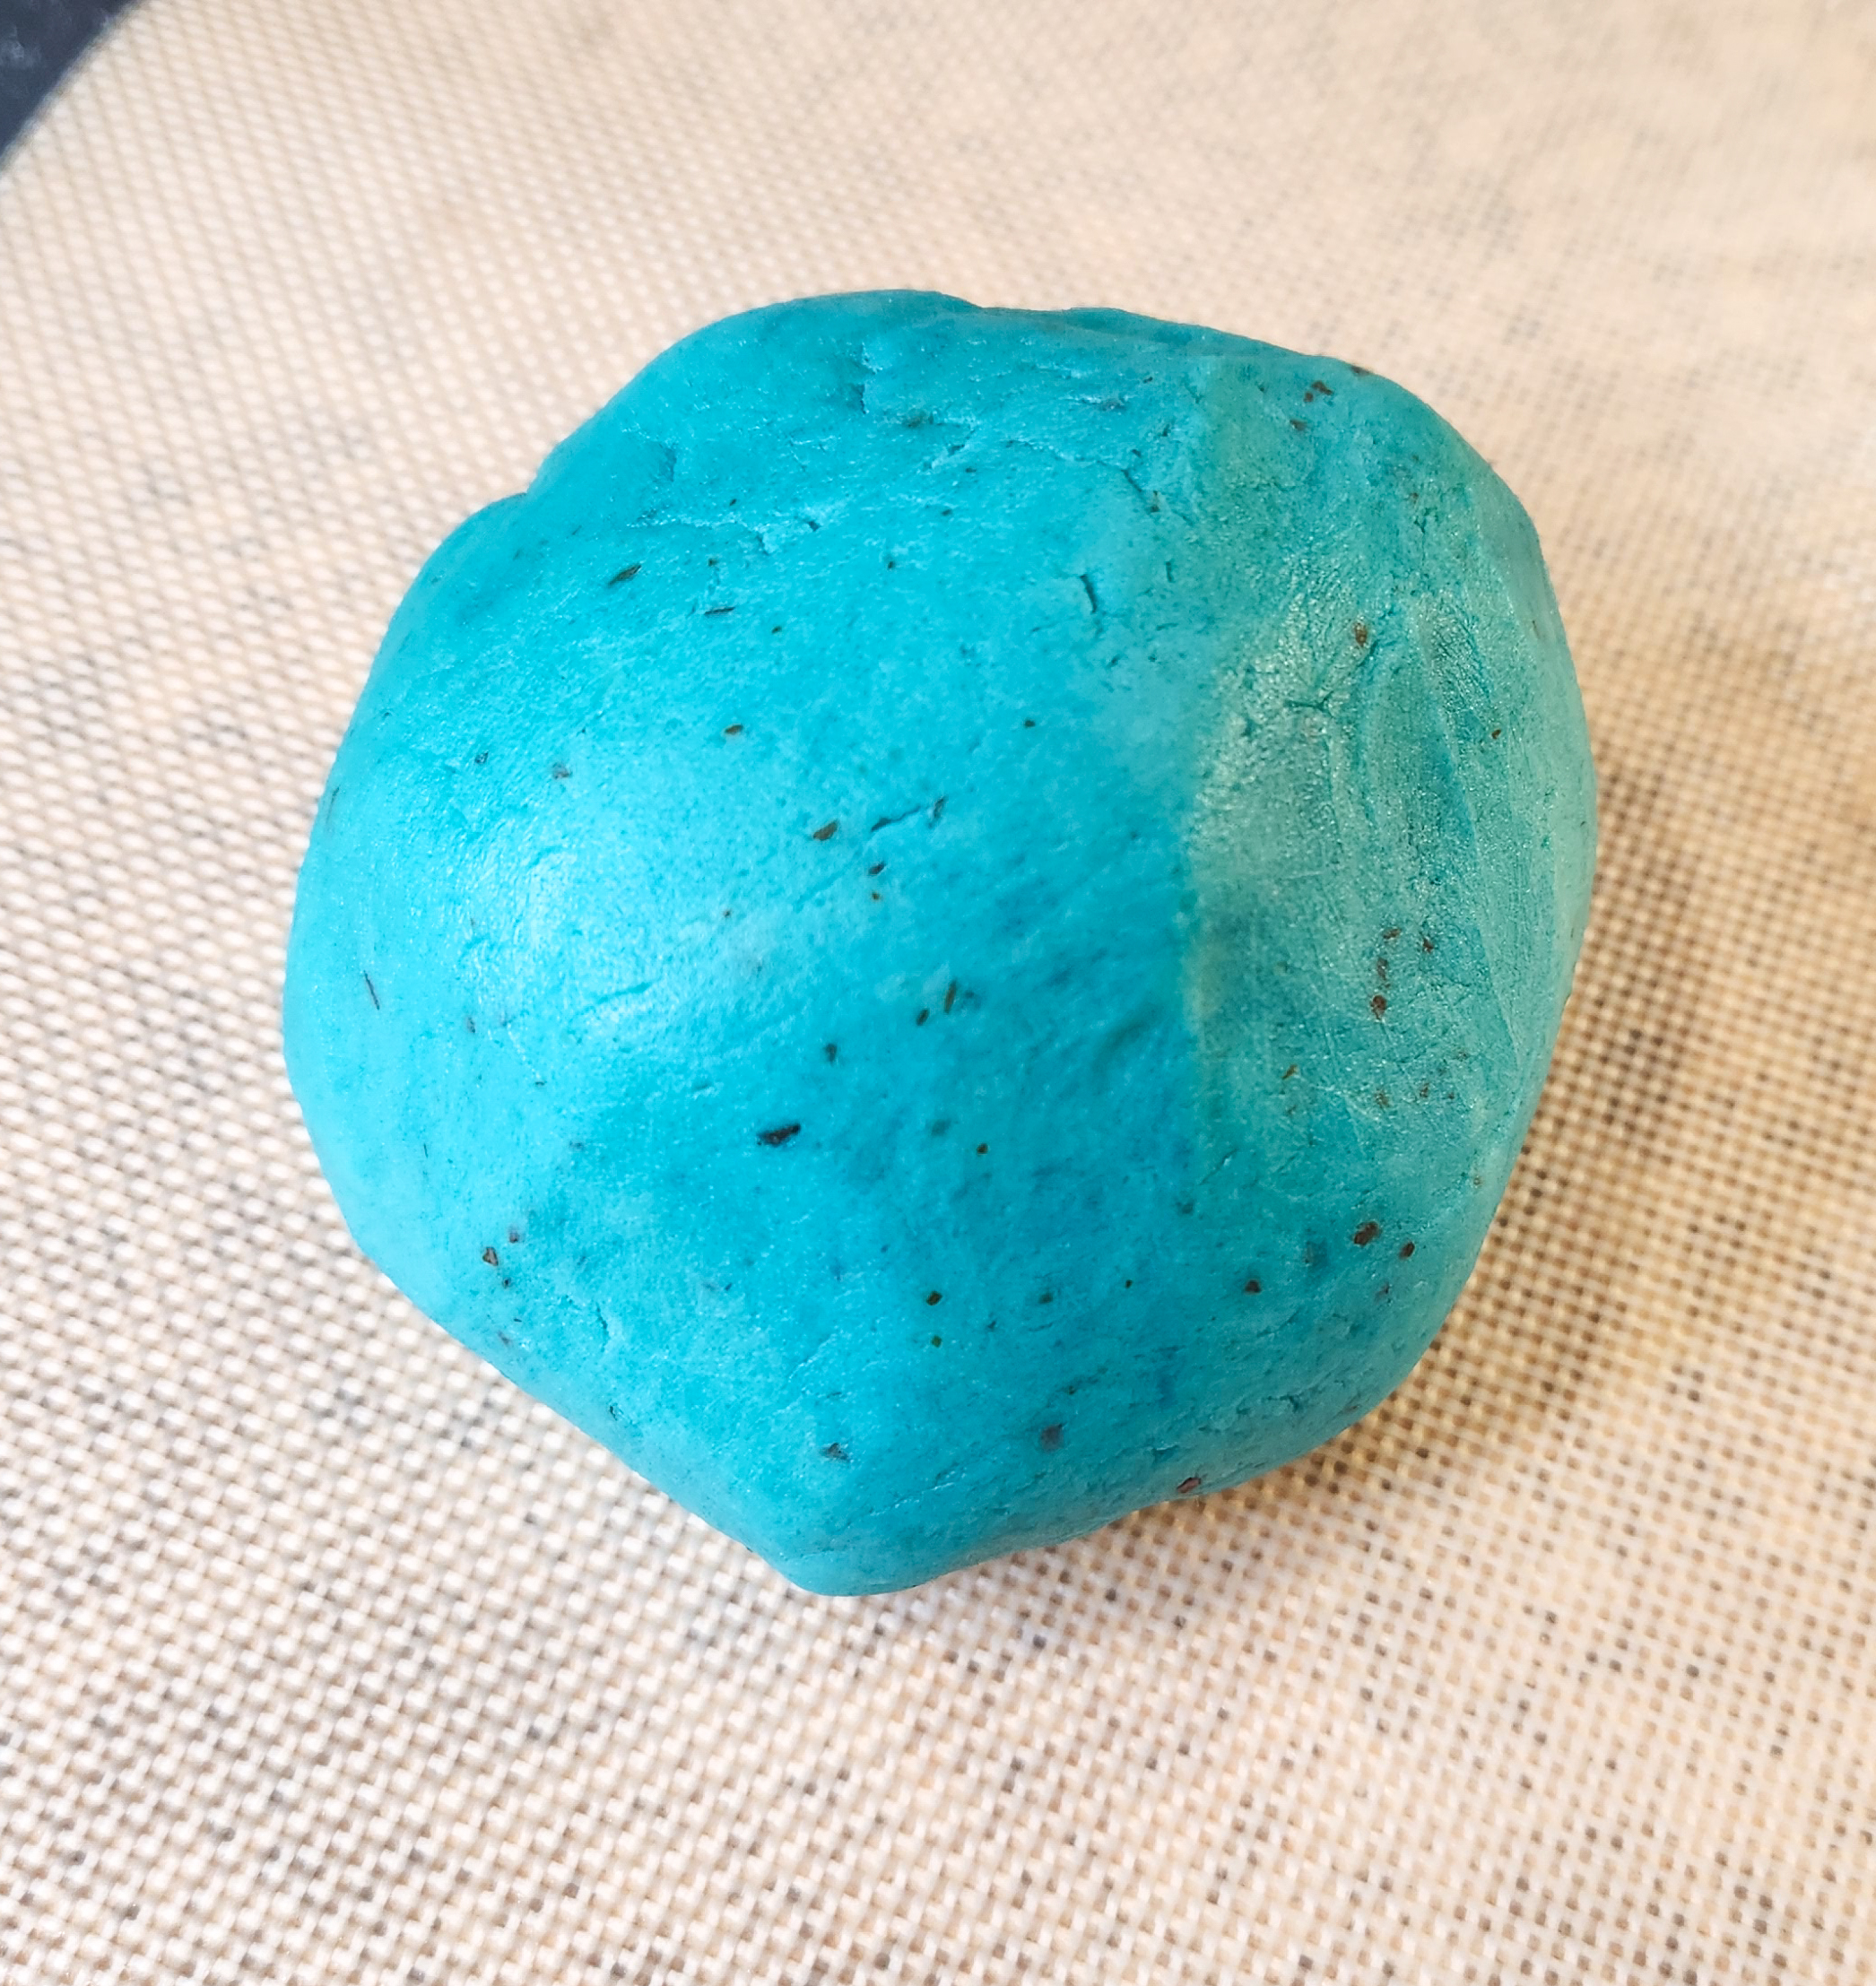
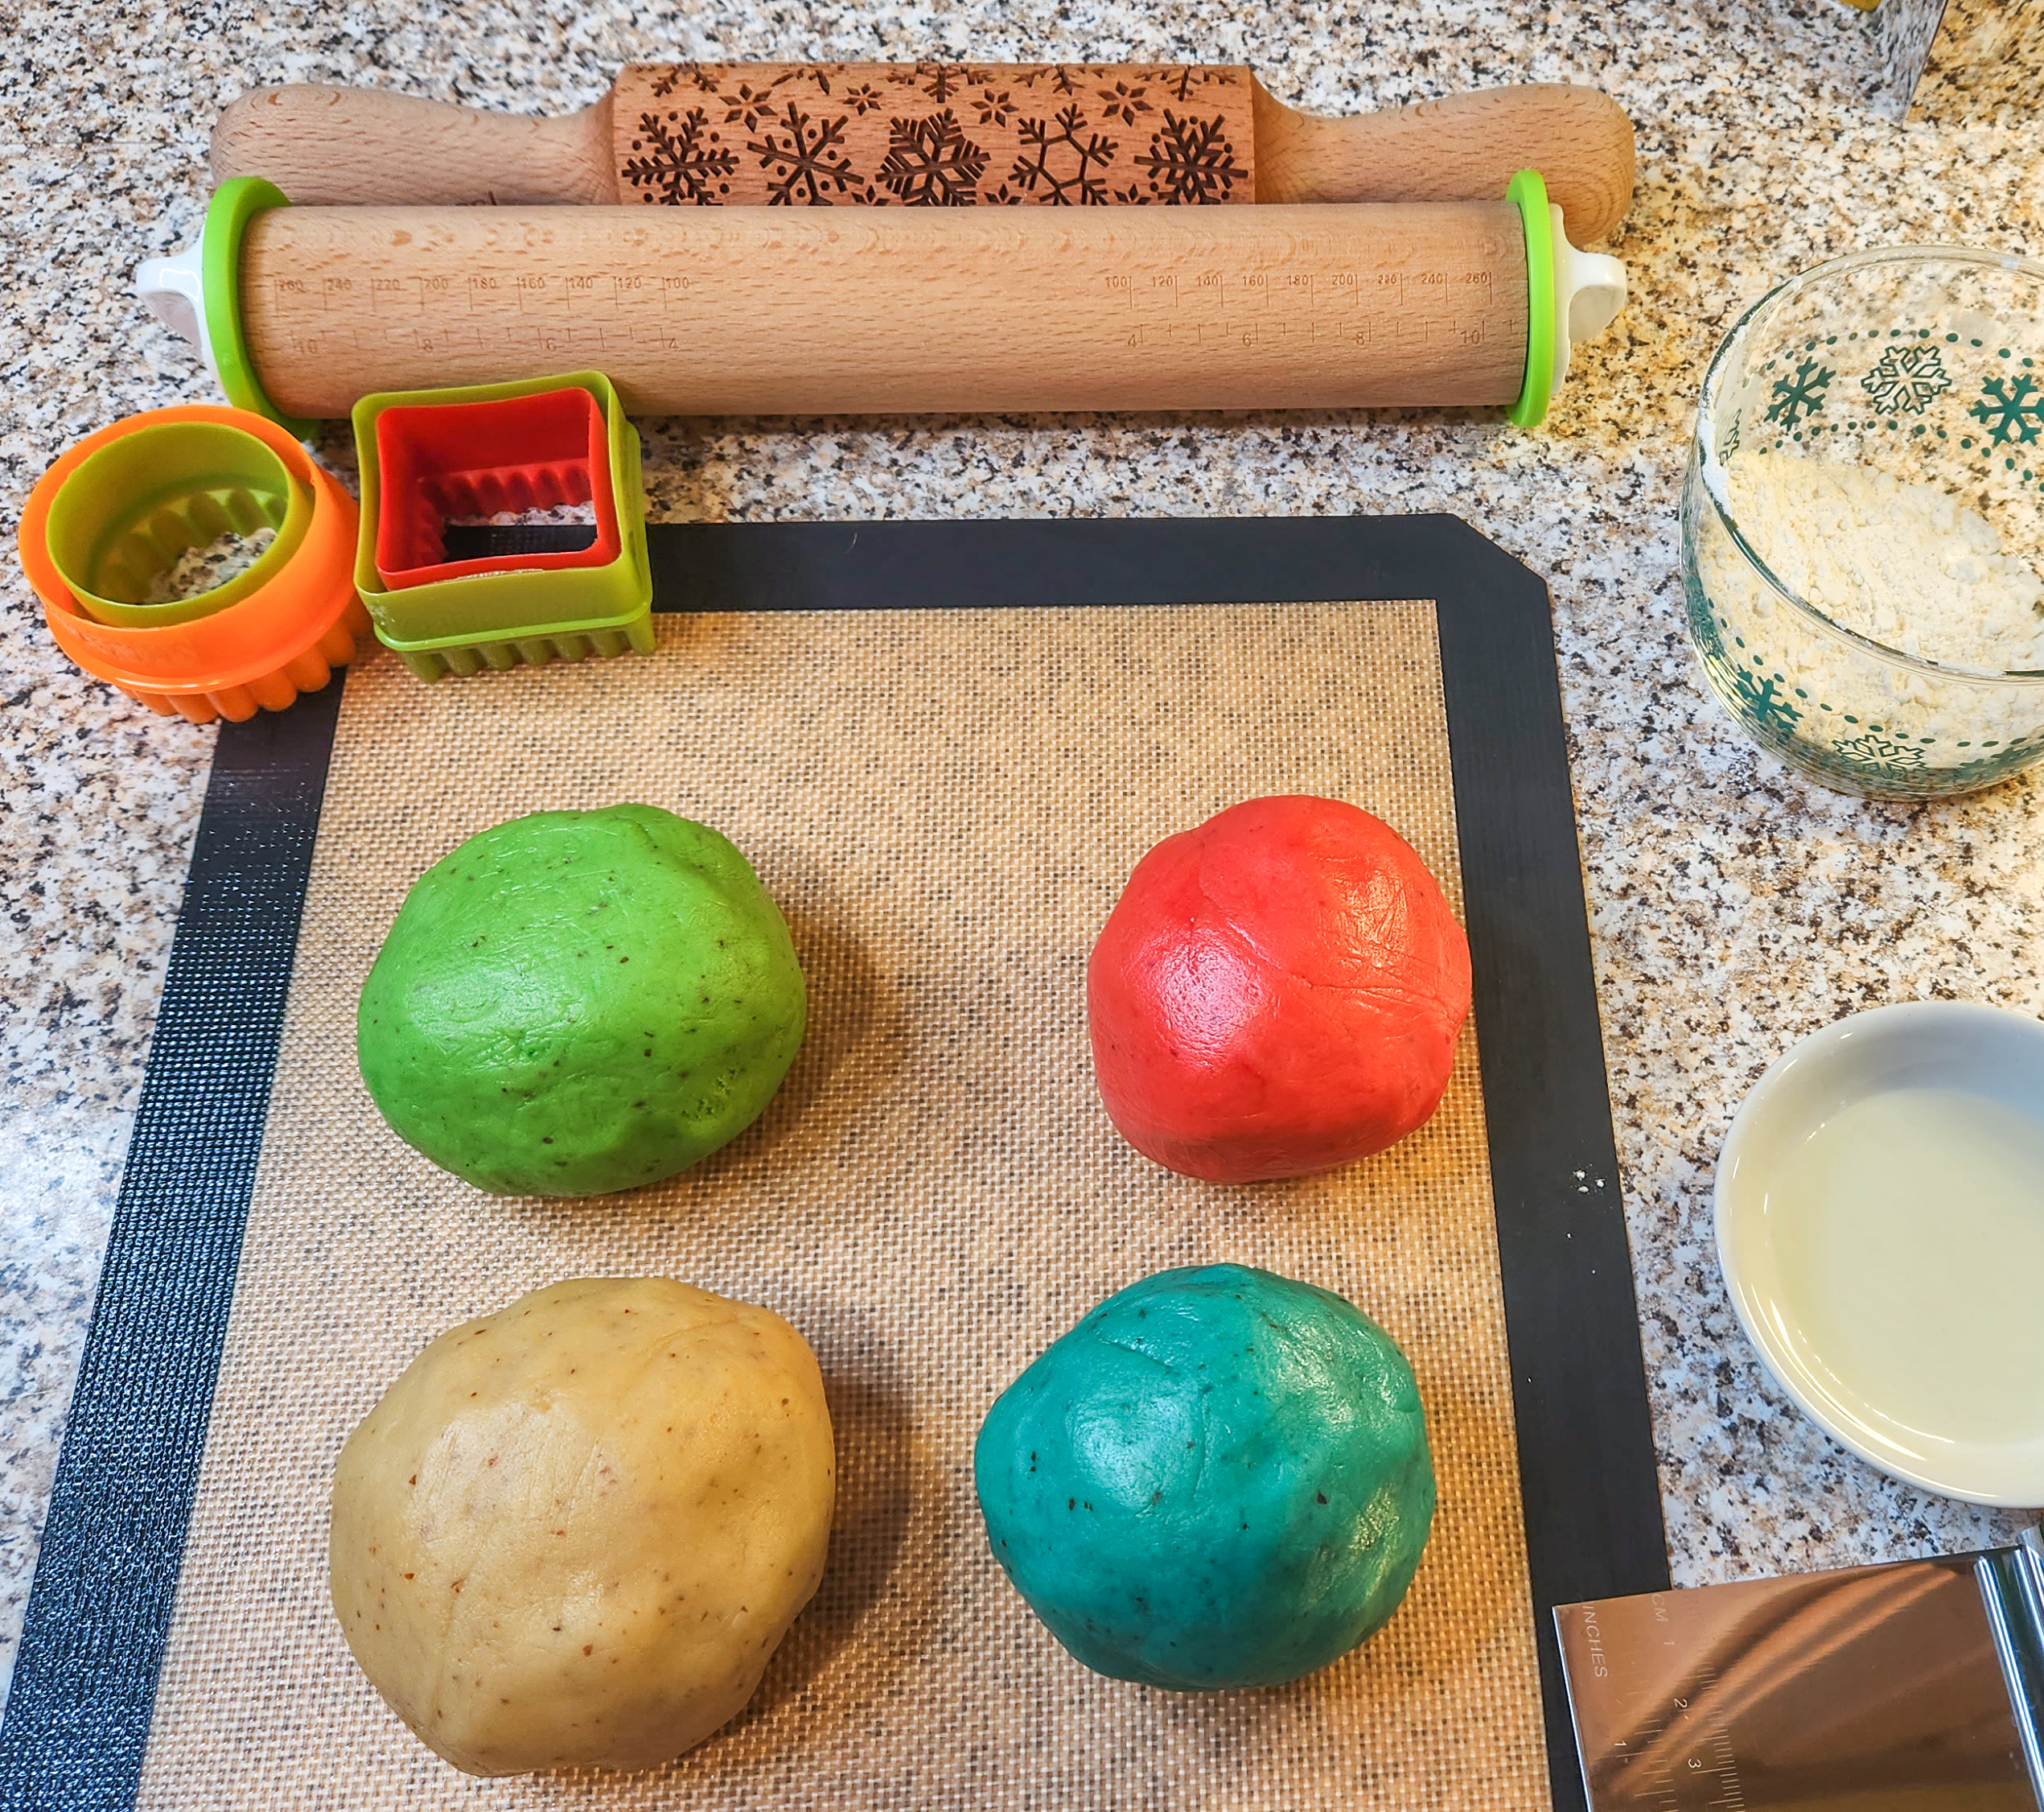
If you’re coloring this dough make sure you are using gel food colors as liquid affects consistency too much. I use a knife or toothpicks to add the color to my dough and knead it by hand. Remember to start with just a little color – you can always add more, but you can’t take it out! I love this teal color. With the almond flecks it looks like a robin’s egg.😊

With your dough tinted gather your tools to roll the dough. Keep the colors you aren’t currently rolling covered so they don’t dry out.
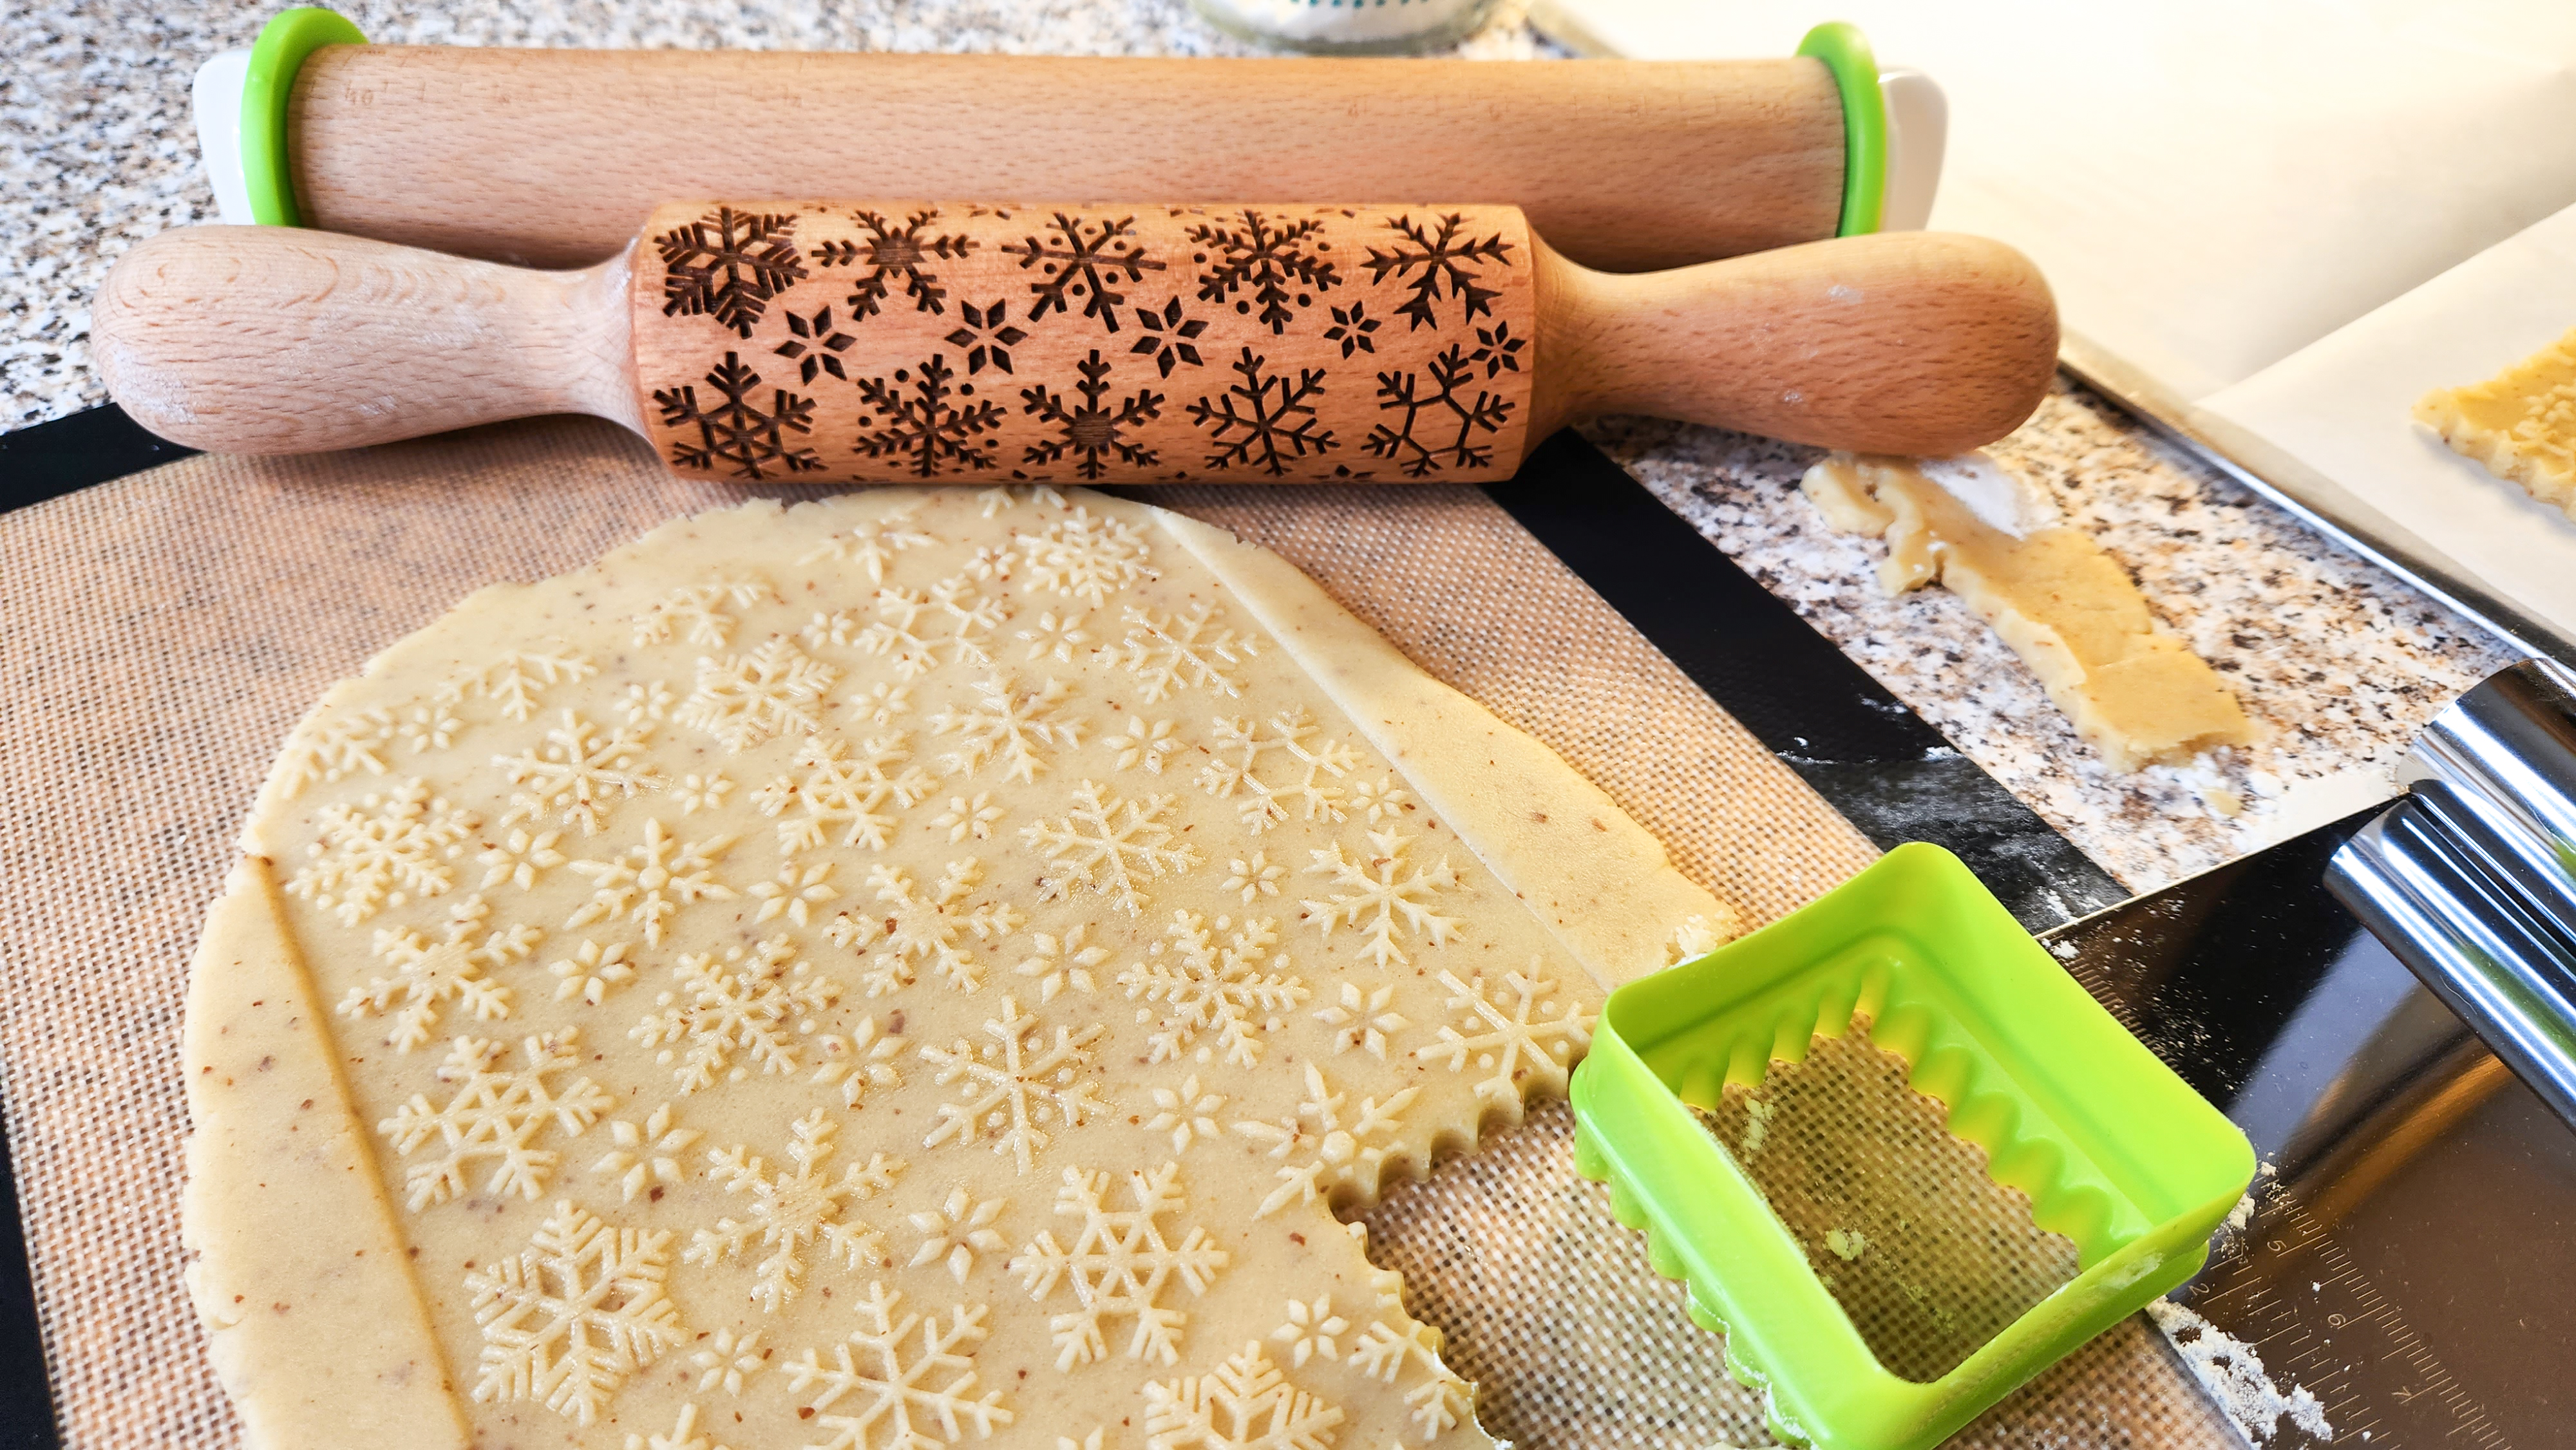
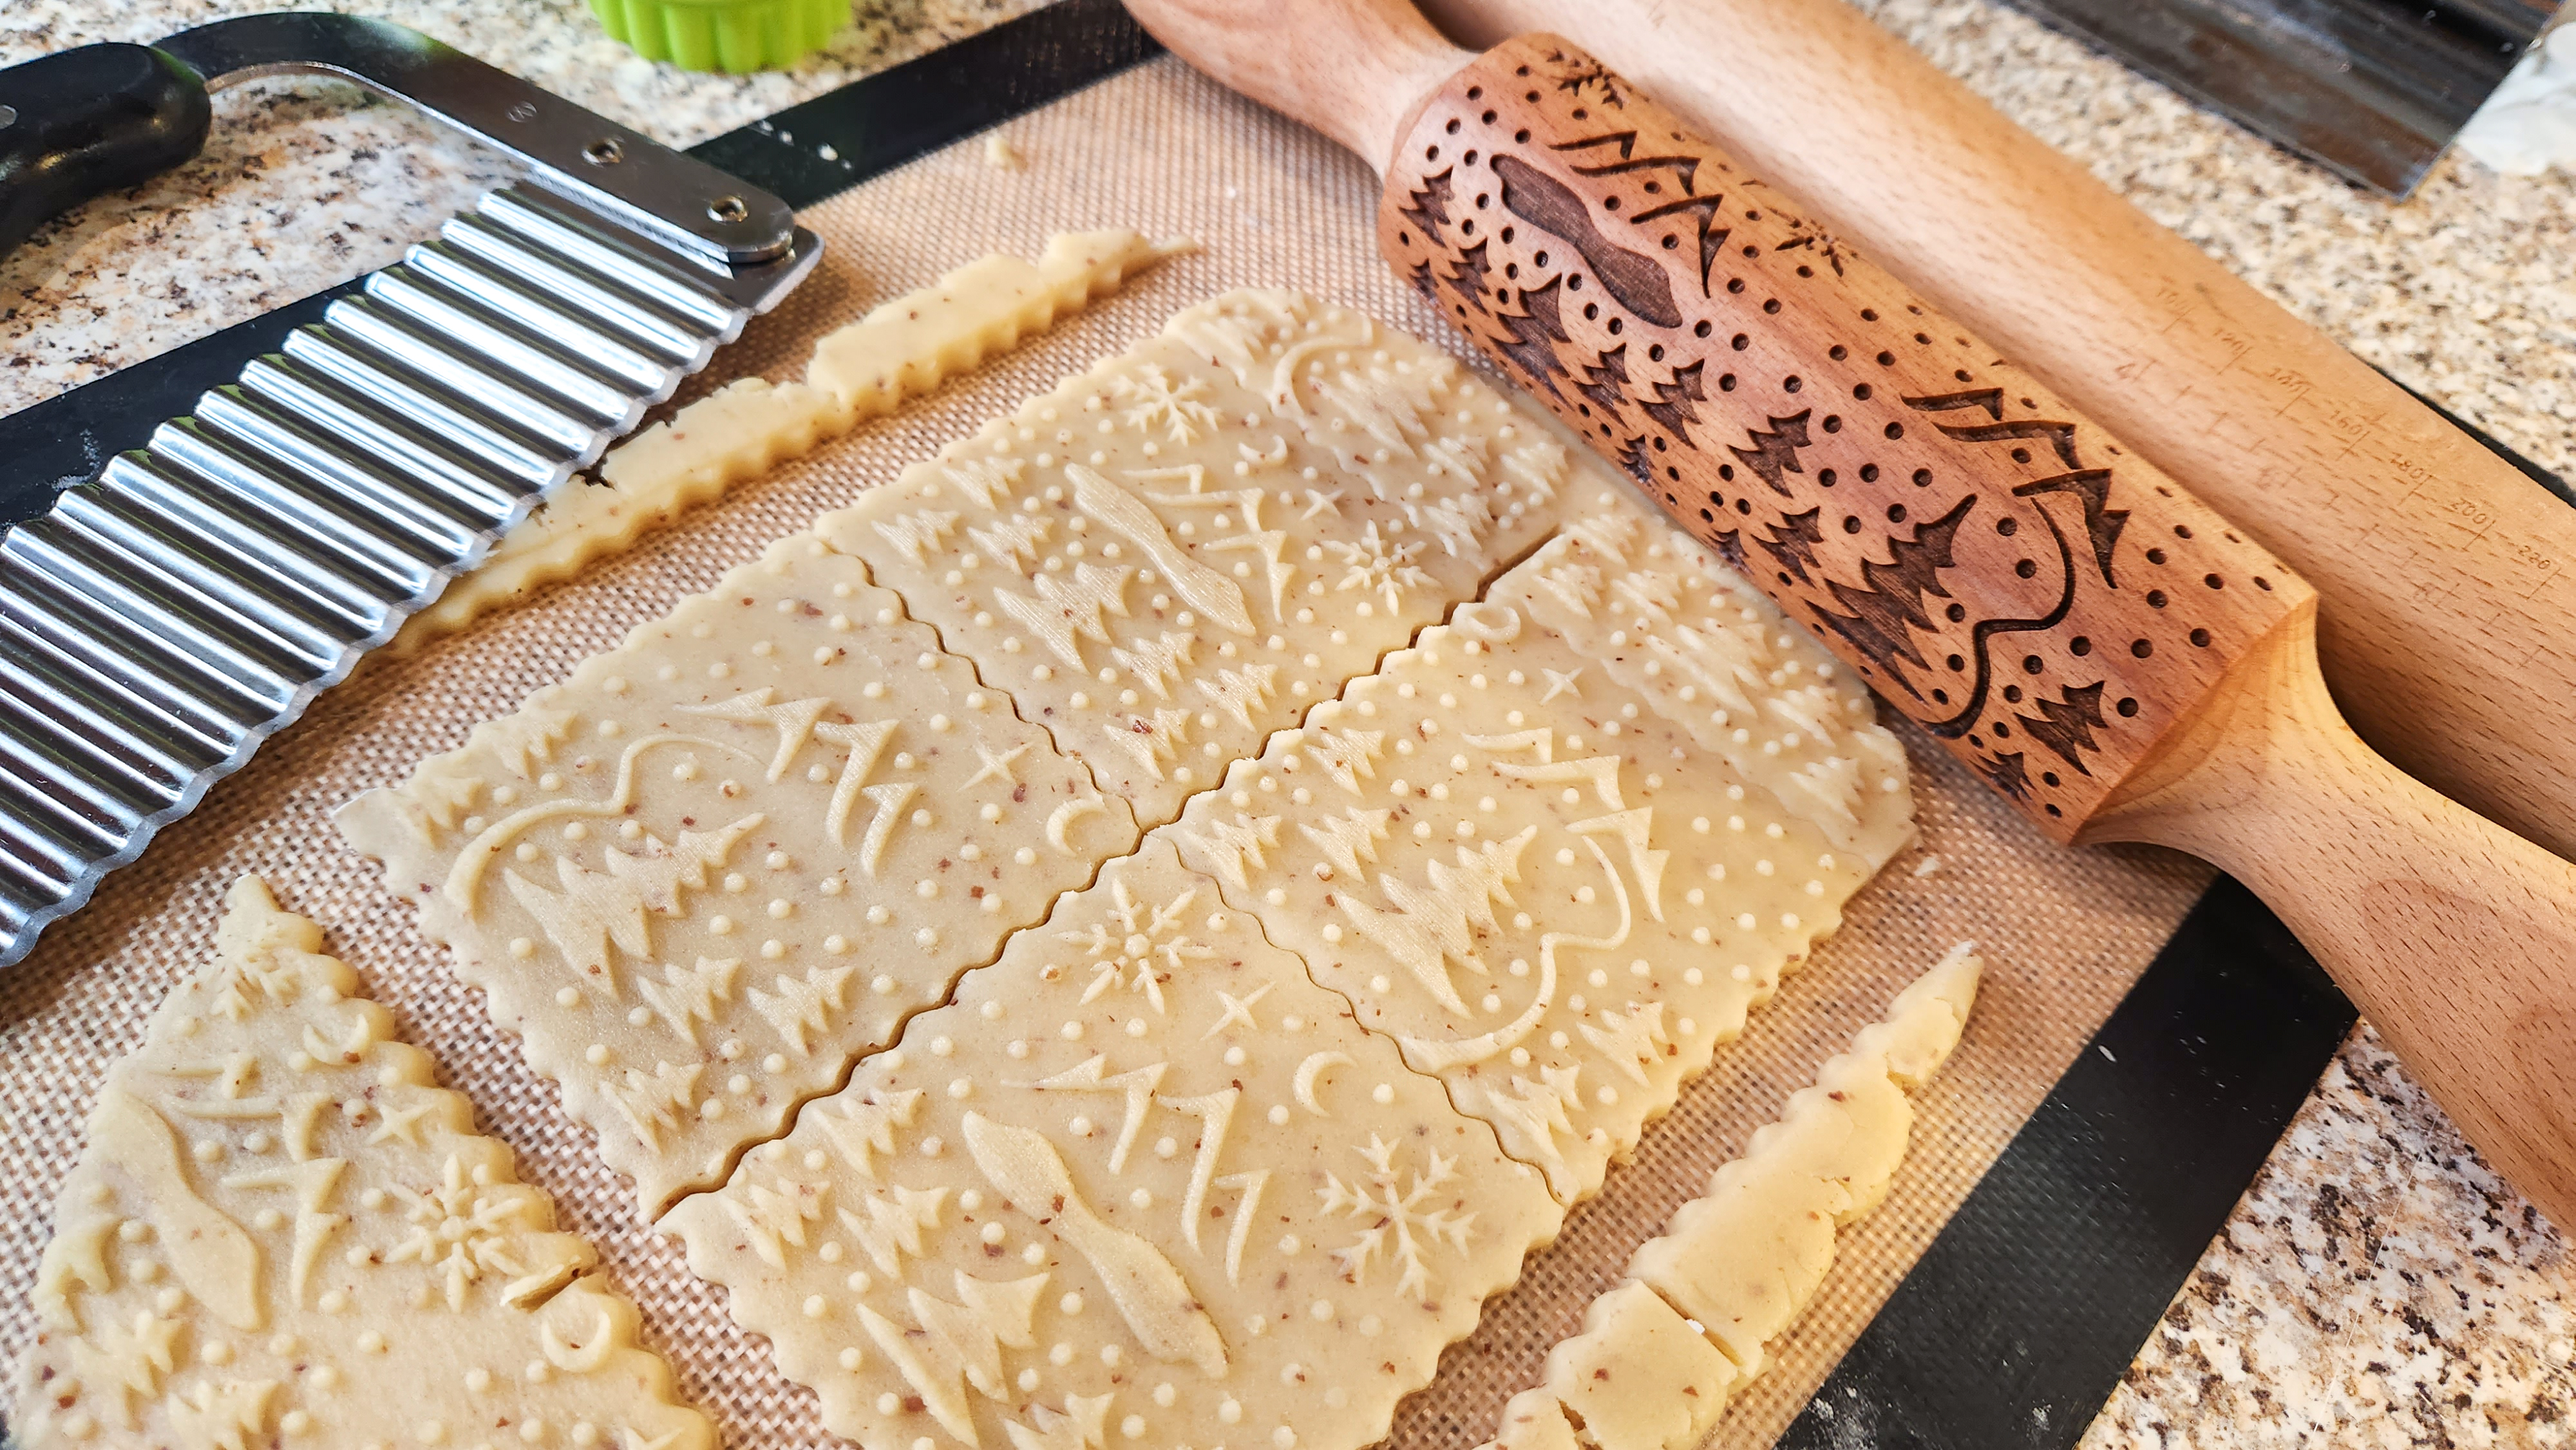
Use a regular rolling pin (preferably one with thickness spacer rings to make a perfect thickness, picture of ours at bottom of post) to roll your dough on to a silicone baking mat, glass cooktop, or lightly floured surface. Roll to a 1/4” thickness, and wide enough to accommodate the designed pin. Create a long rectangular slab of dough. The patterns on the embossed pins are designed to repeat, so you will be rolling a long rectangle of patterned dough.
Oil your embossed pin with canola (or similar) oil before rolling. Make sure to get it down into the engraved areas. Wipe off any excess with a paper towel. Oil should be down in the patterns, but not pooling in them! You can use a pastry brush or apply by hand, gently squeezing the pin to get oil into the shapes, and rubbing the surface to coat.
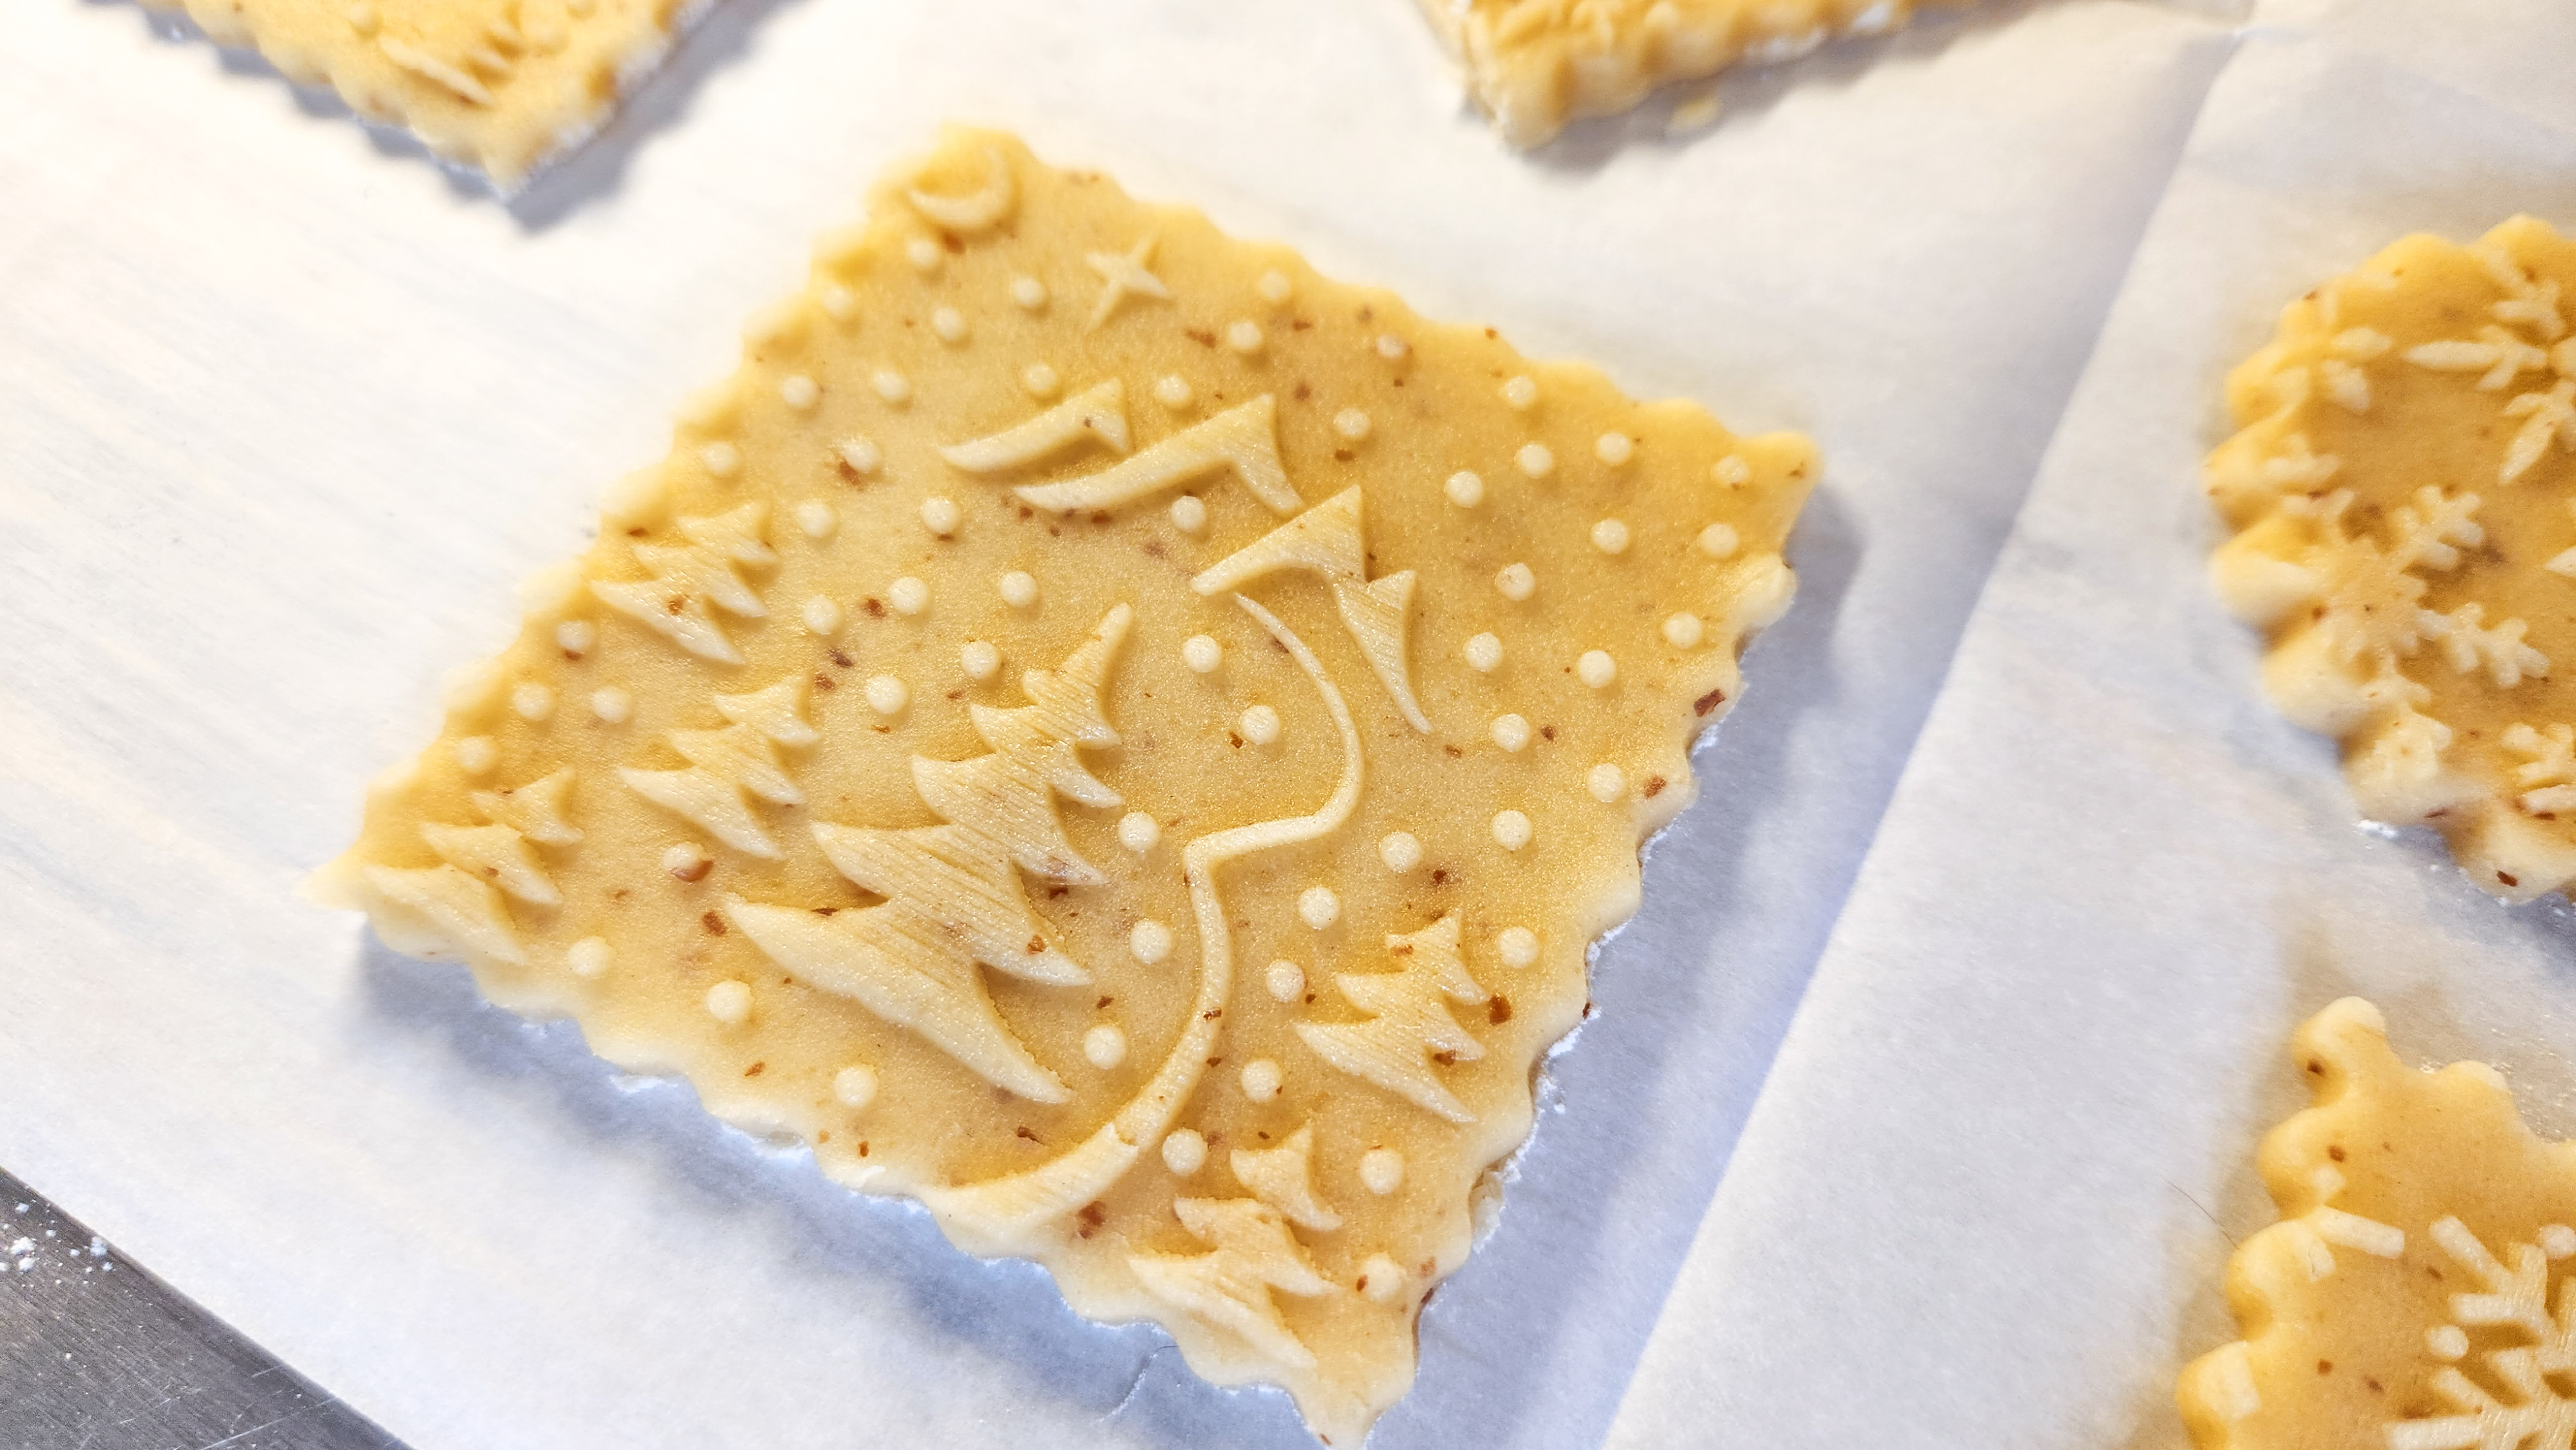
Roll with your embossed pin, pressing down with a steady pressure that leaves a deep impression in the dough. The designs should be as raised up on the dough as deep as they are in the pin. If the pattern is not deep enough it will disappear as the cookies bake and puff. As this dough is not cold or stiff, you do not have to press terribly hard! Just an even pressure.
Here’s a quick video clip of me oiling the pin, rolling this dough, cutting shapes and lifting them.
Once rolled, use cookie cutters to cut out shapes. Remove any excess dough around the edges. Keep your spatula/lifter flat, dust the end with a little flour, and lift the shapes, beginning by lifting one edge slightly first, then sliding the spatula/scraper under the whole shape. Transfer them to a cookie sheet lined with parchment paper, spacing them at least an inch apart. The rolling pin with thickness rings, bench/dough scraper and cookie cutters I’m using here are available at our website and Etsy shops. Links at bottom!
Here’s how some of the different colors/pins roll out, cut out, and look before baked.

The Winter Animals and Mountain Scenes were cut with a wavy chopper/crinkle-cut knife to make ruffled edges. You could get a similar effect with a fluted pastry wheel. You can easily see where the divisions are in the “panels” or “scenes” to guide you where to cut.
🥰The scene pins are near and dear to my heart, and inspired by our beautiful home state of Colorado!⛰️ I do a lot of wildlife & nature photography and I was inspired to share that beauty in my cookie art! 🦌

If you are making sandwich cookies roll out an even number of top and bottom cookies of the same shapes and sizes. You can leave the bottom ones un-embossed or emboss them and have patterns on both sides of the sandwiches.
TIP: If you’re wanting to make both the scene cookies and sandwiched snowflakes, you may want to use 2 batches of dough. The sandwiches take up a lot of cookies and the scenes being larger also uses a lot of dough.
Bake at 400°F for 6-10 minutes, checking at 6 minutes and every minute after as cookies brown quickly. They are done when the edges are barely, slightly brown. Cookies harden significantly the longer they bake, so bake just a few cookies first to test timing for desired doneness and hardness.
Move to a cooling rack after 5 minutes.

Decorating!
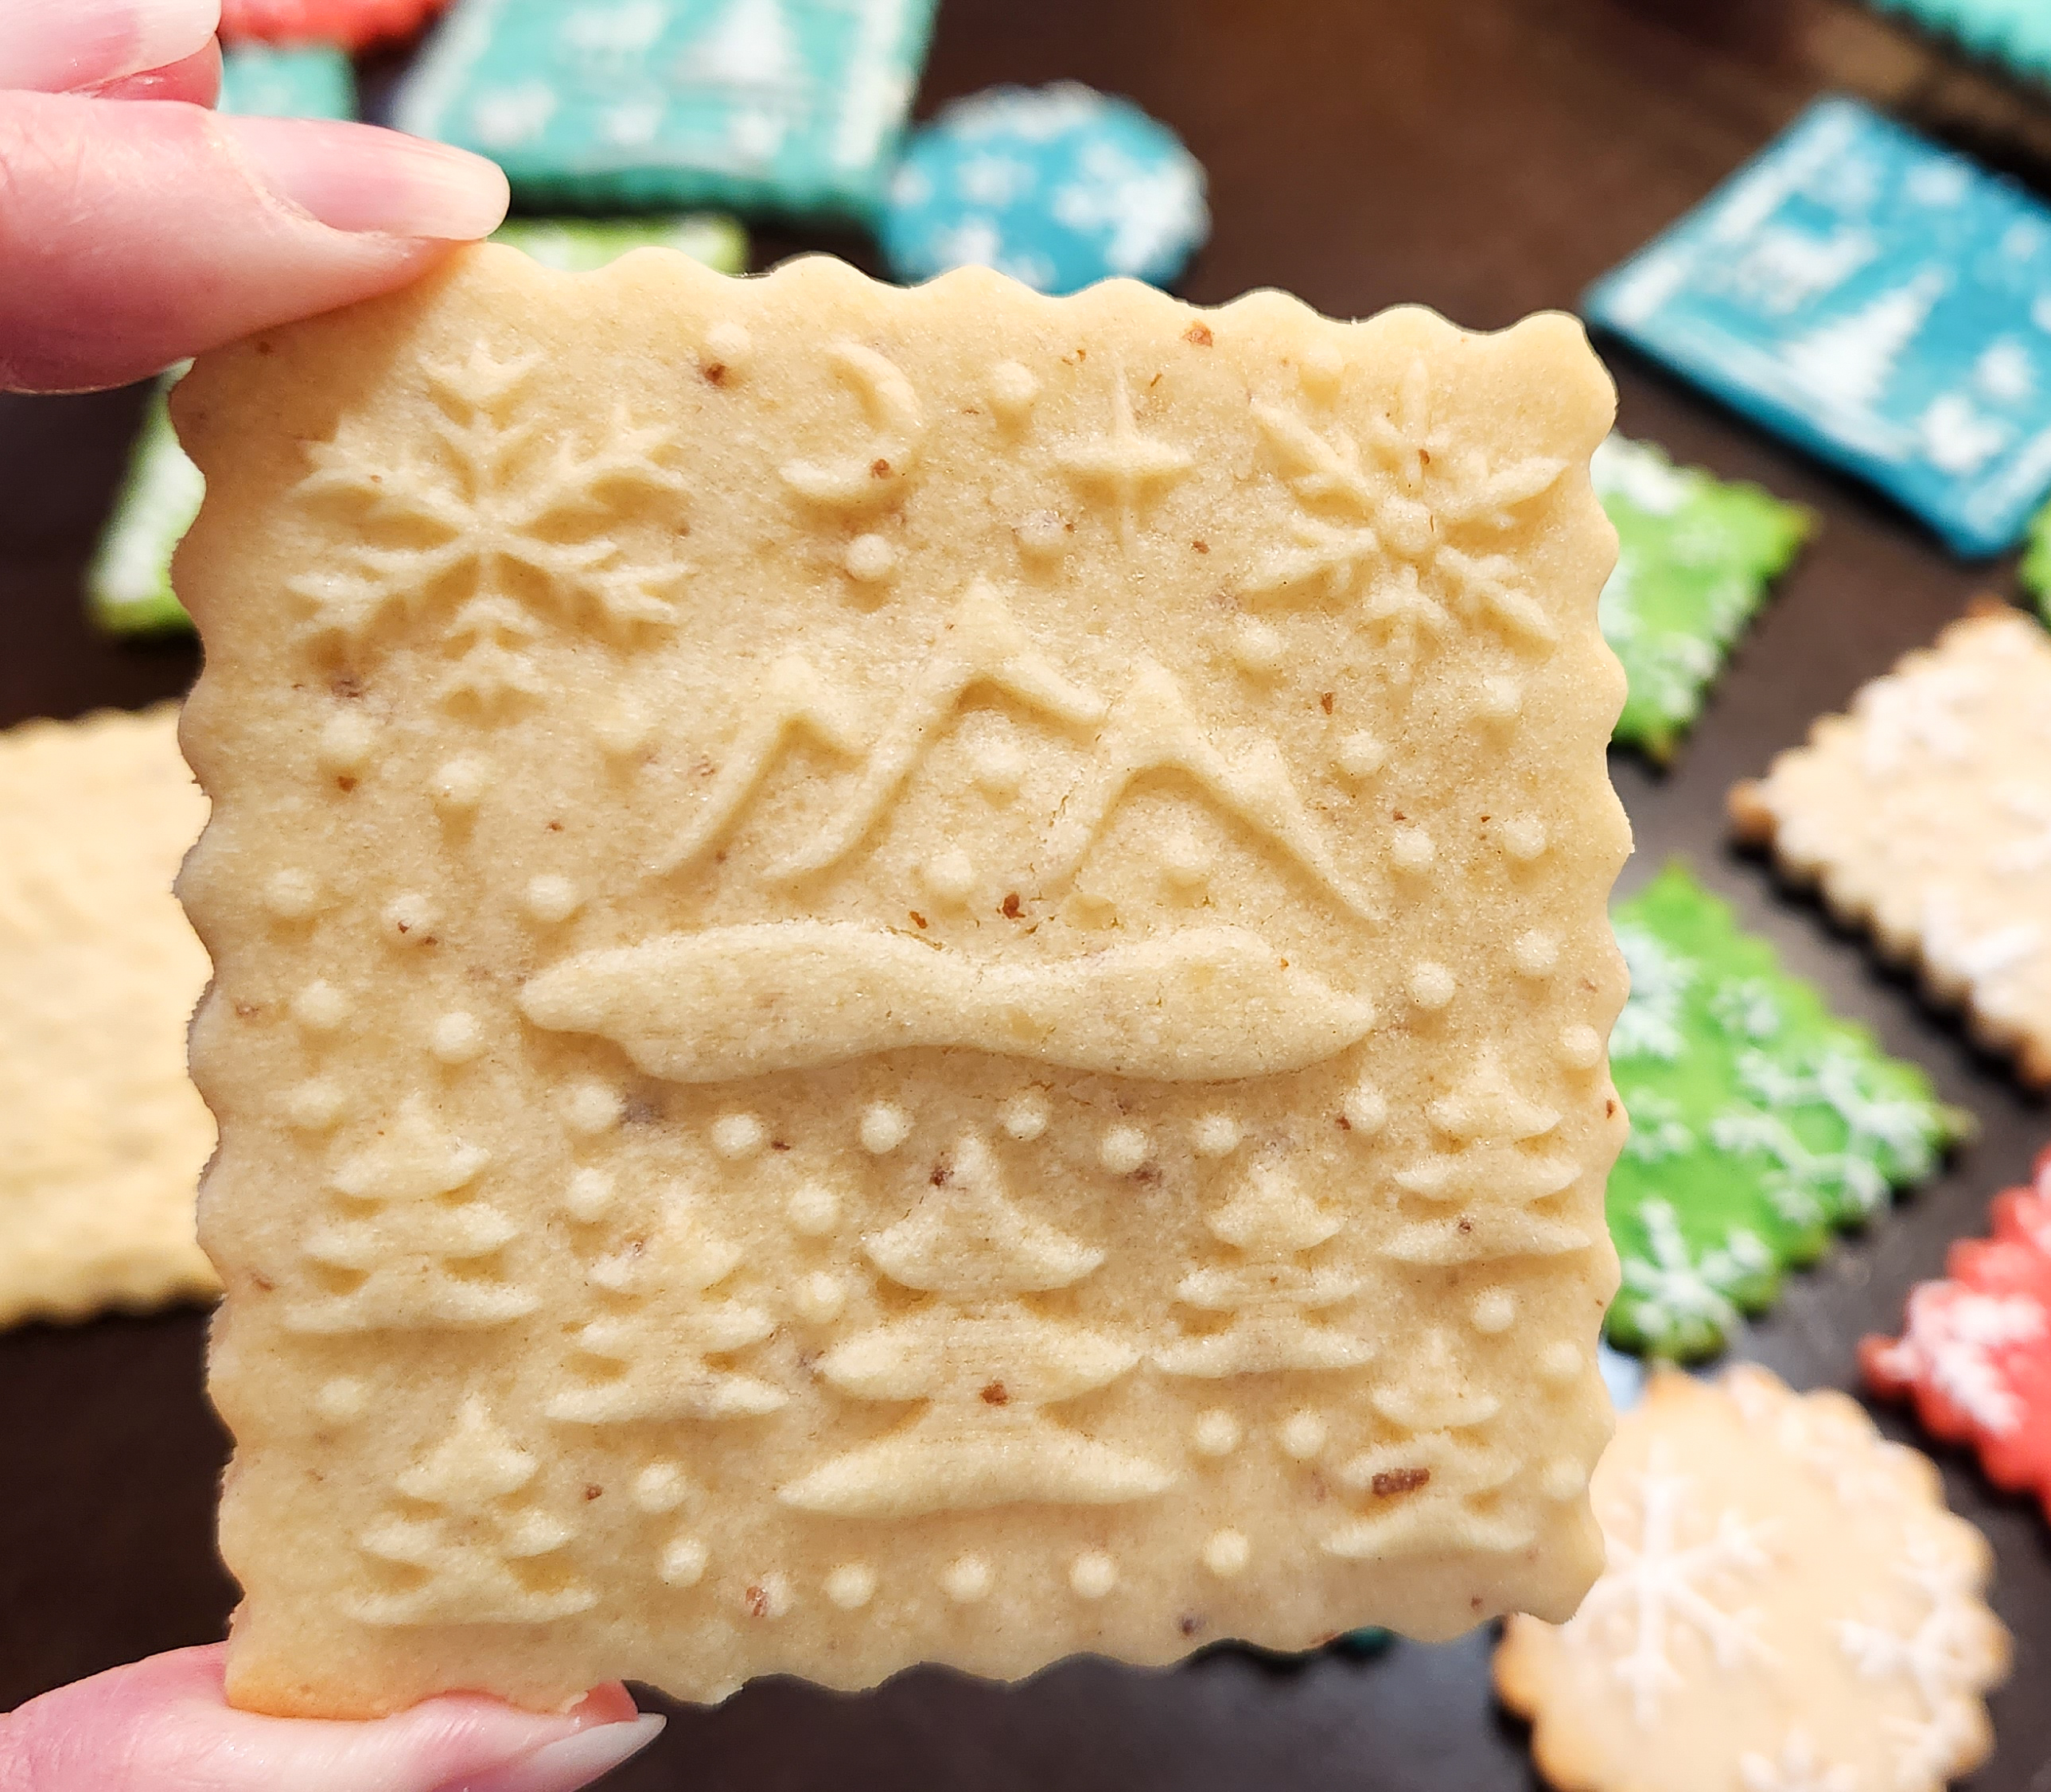
Luster dust is what makes this beautiful presentation possible. I use it so often in my cookie press posts that this year (2022) we’ve started selling it on our website and Etsy shop! We chose to partner with an American company, Bakell, that makes dusts here in the USA. They make gorgeous dusts that are silky, vibrant, and a joy to work with. Their 4 gram jars last and last. A little goes a long way!
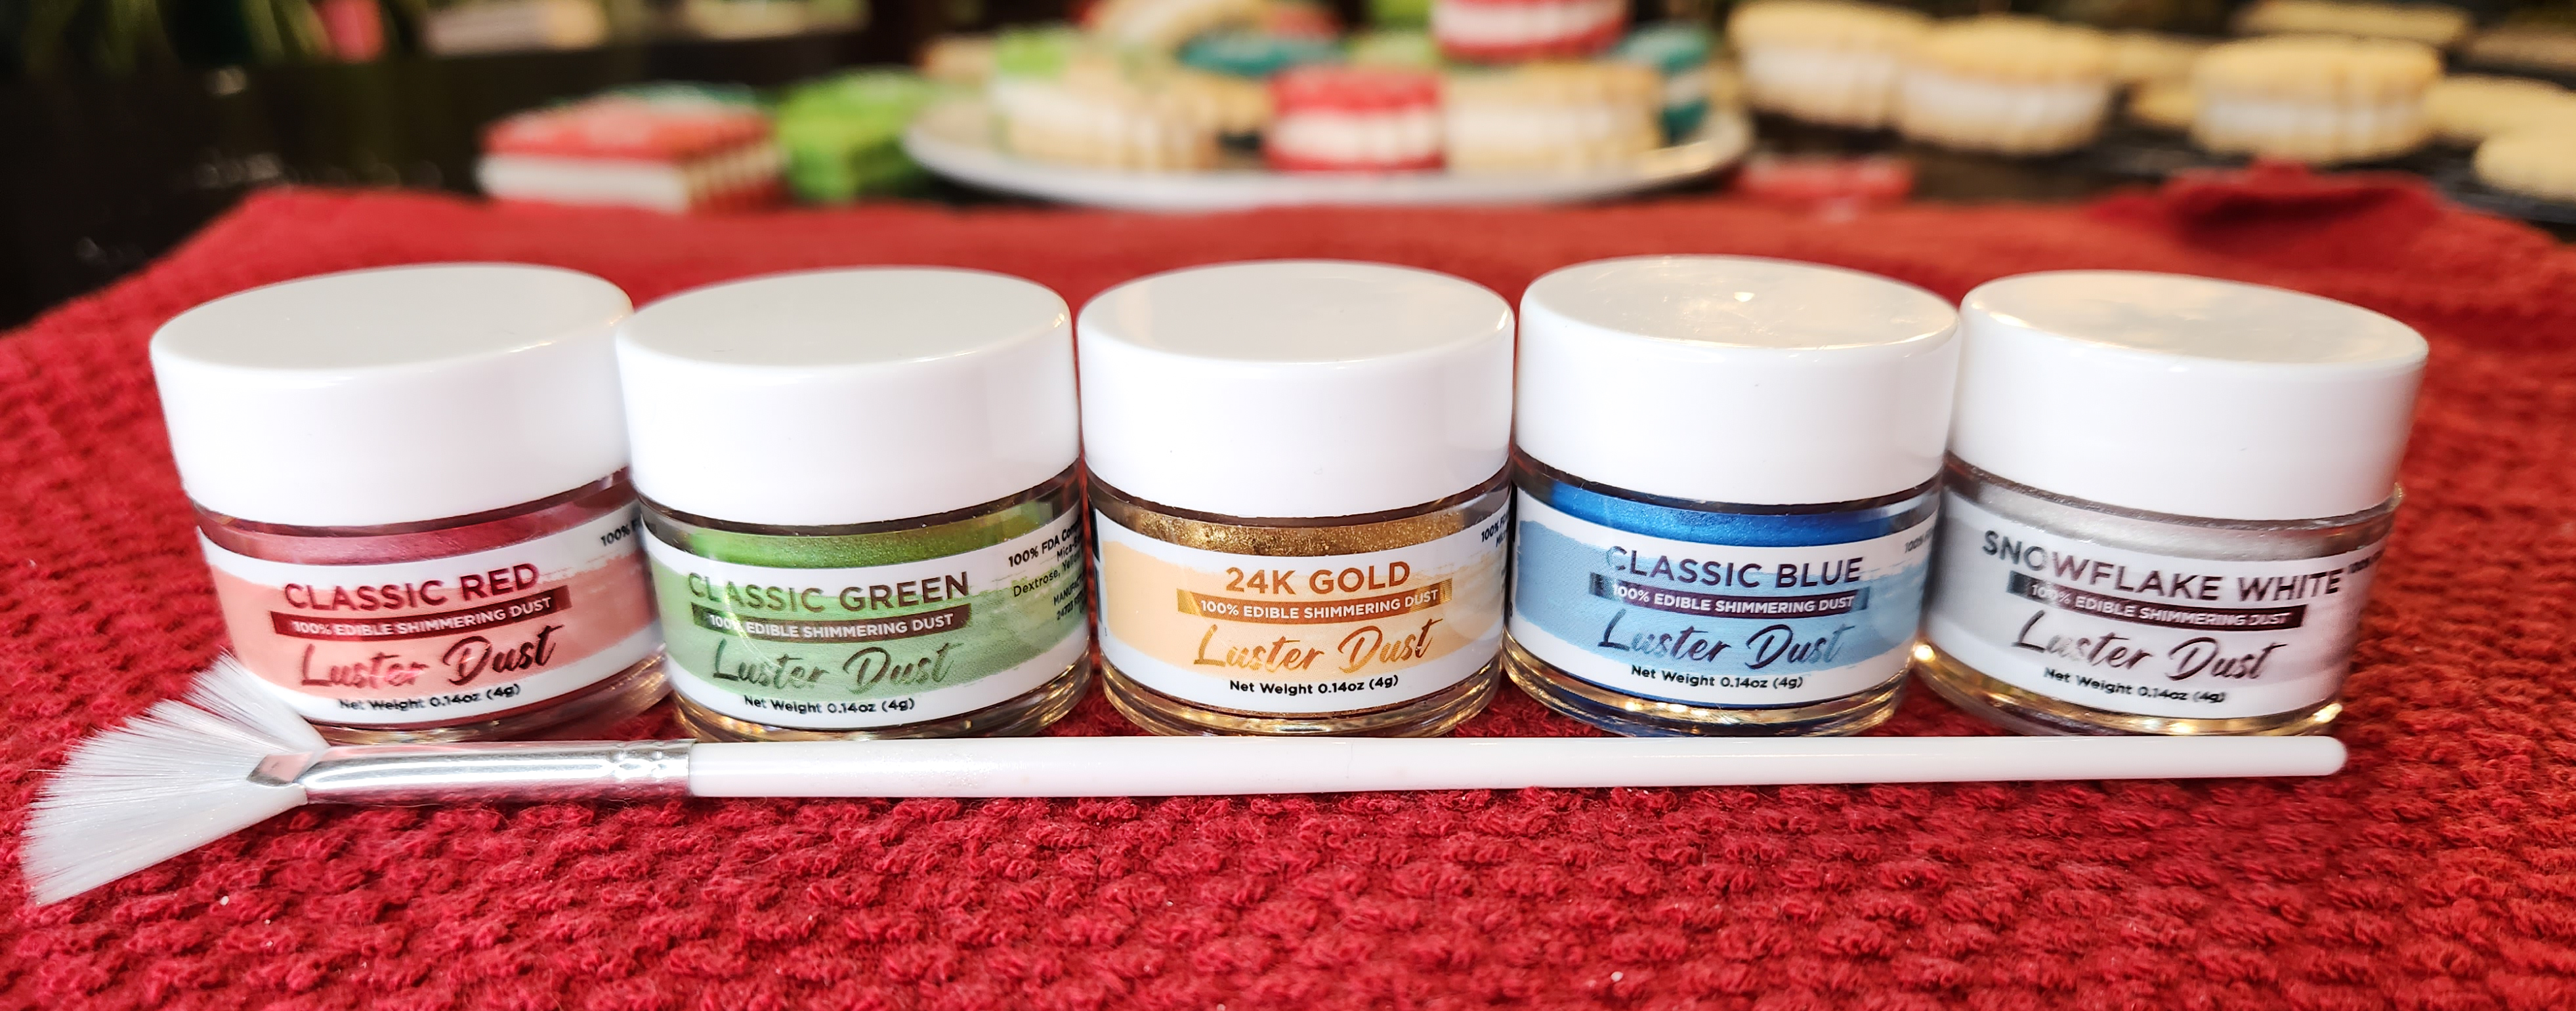
This technique is finger painting luster dust onto the embossed cookies. This is a “wet” technique, using vodka as the paint base. The alcohol evaporates quickly and dries with no taste! You can also use canola oil as your paint base. Using canola oil won’t stain your fingertips as much as the vodka does, if that’s an issue for you. I know it comes off in the next shower so it doesn’t bother me. LOL The white dust will not stain your fingers at all, no matter how you use it.

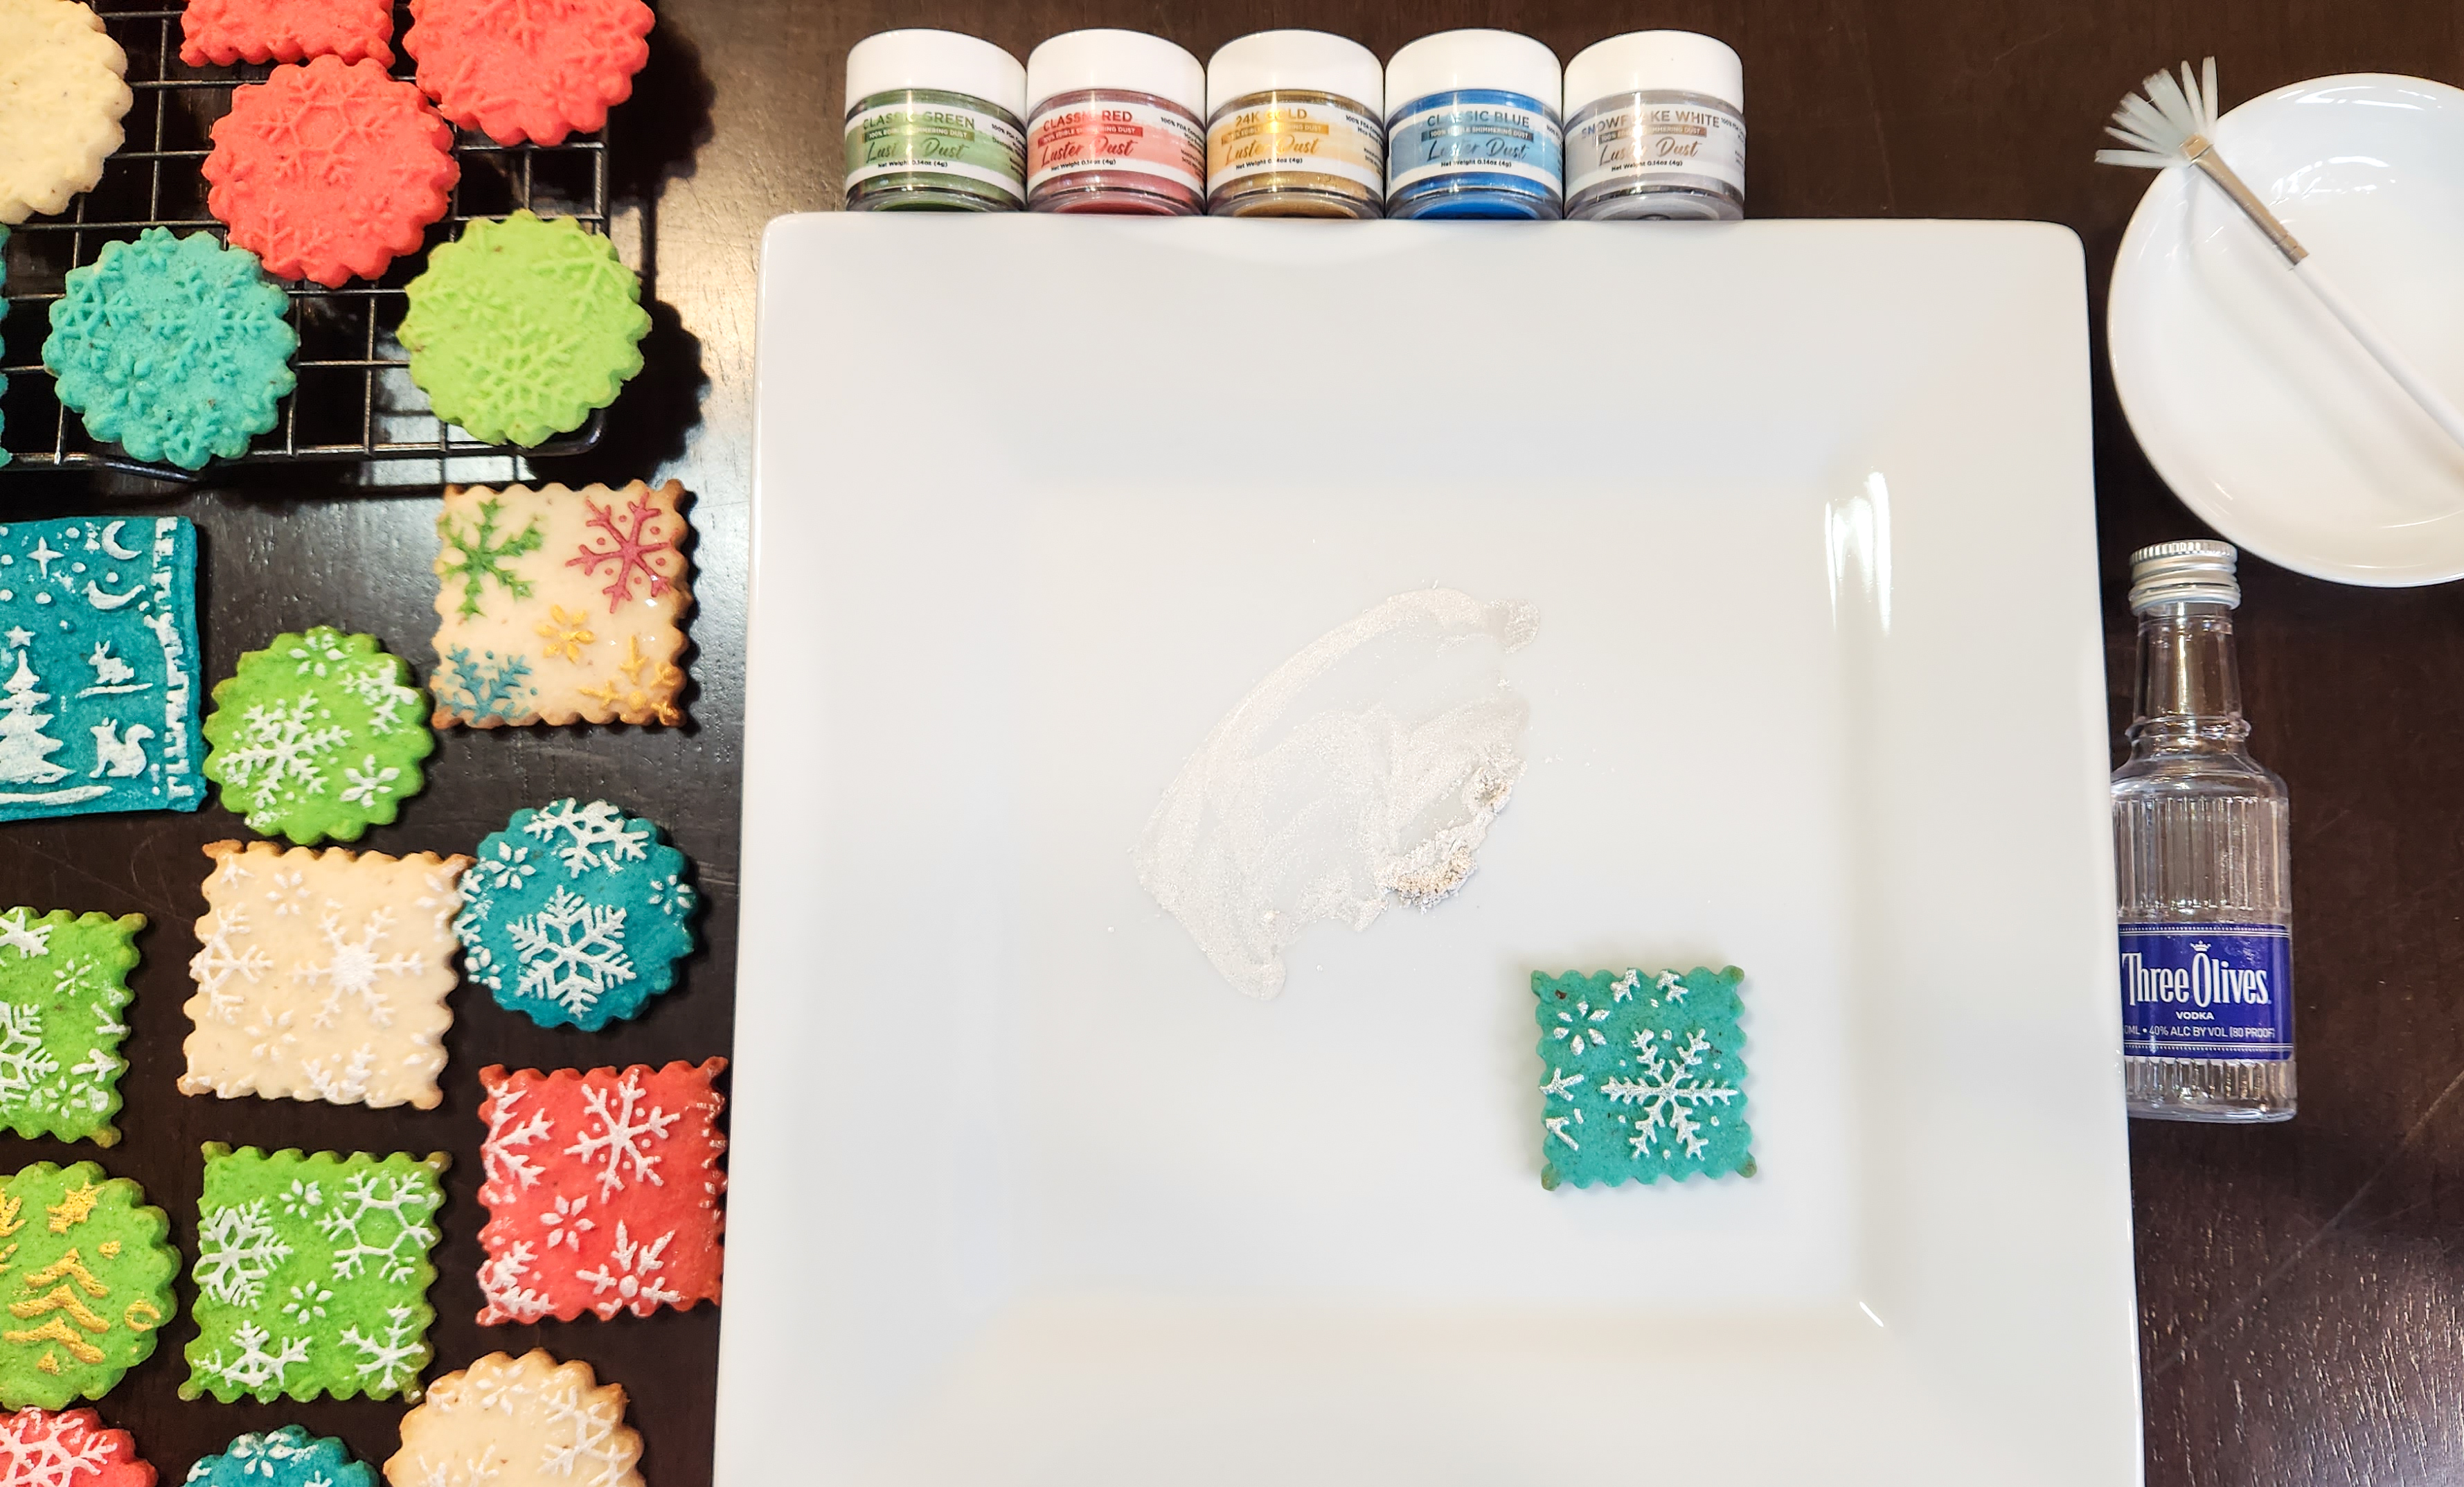
Here is a video clip of this technique. It’s much easier to show than to explain in writing!
An honest note about decorating this way:
These aren’t always “perfect”. Sometimes I nail it and there’s not a flaw, other times my finger slips or the paint drips, but for me at least, it’s ok. The look reminds me of doing art with stamps or stencils. Yes, it’s imperfect, but that’s part of its handmade charm. Its’s not meant to be precise, just pretty. Less showing off and more made with love and creativity.
Use a small brush for touch-up if you want, or to do the white snowflake dots on the winter scenes. Those can be tricky, depending on how flat (or not) your cookies baked up.
The winter mountain scene with the lake is harder! Be patient and maybe use a brush on the lake. You’ll be surprised that in general the brush is less precise. That’s because the little bristles extend over the edges of raised surfaces more easily than your fingers do!
Now Sandwiches!
The sandwich cookie stuffing is an almond buttercream so thick you can roll it out and cut it. This allows you to put perfect middles with beautiful edges on your cookies. Using a thickness spacing pin lets you choose precisely how thick you want your middles.
I went a little crazy with the sandwiches. Instead of being reasonable and rolling a thin layer of filling I rolled that stuffing out at a full ¼” thick. LOL If you don’t want mega-thick filling just roll it thinner. The cookies are honestly flavorful and sweet enough that they in no way need the filling to be thick. So do it your way, however it makes you happy! If that’s ridiculously thick like I did? HI! You’re my people. 😂
Super Thick Almond Buttercream
1/2 cup (1 stick) butter, softened
4 cups powdered sugar
2 1/2 teaspoons heavy cream
1 1/2 teaspoons almond extract
Cream the butter with an electric mixer, then add the heavy cream and almond extract and mix thoroughly. Add powdered sugar a little at a time. Do not be alarmed or surprised! This mixture will be very dry and crumbly, so finish kneading by hand until a smooth clay-like dough forms. It will be much stiffer than the almond cookie dough. Keep kneading even if it seems very stiff, until it forms a workable ball as pictured. It will warm and soften as you work it. Add cream to an overly stiff mixture, or powdered sugar to a soft sticky mixture, as needed to get a workable clay-like consistency. It will be fun to knead, though still quite stiff, when it’s the right texture.

Roll it out on a clean silicone mat or surface, preferably with a spacing pin. Then cut out the shapes you need to sandwich your cookies.

Lift them the same way you would lift cookie dough, getting under one edge first with your spatula/lifter. If needed you can use powdered sugar to keep your lifter non-stick the same way you use flour with cookie dough. As you go to put the filling on the cookie, wet the surface of the buttercream slightly with a fingertip and it will stick to the cookies.
OK I’ll admit it. These are crazy thick! But my goodness they’re delicious. 😋 My son Ryan and I are a bit obsessed with thick-stuffed sandwich cookies. He’s finishing his first semester of grad school and working on finals so I wanted to give him a special treat.💕
🙏We have a request💕 If you’re enjoying our recipes, *EVERY DISK & PIN PURCHASED helps us stay in business* & supports our families! Impress is a women/family-owned USA small business in Colorado. We design, make, & sell over 300 shapes of cookie press disks & dozens of embossed rolling pins. The recipes we share are free – we have no ads on this recipe blog – we make our money selling disks & pins. The recipes give our customers creative ideas and attract new customers!💕 THANK YOU! 💕~Susie the Disk & Pin Designer
As always, Happy Baking!
~Susie
Disk Designer/Co-Owner at Impress! Bakeware, LLC
Our website has all of our 200+ disk shapes, cookie press, embossed rolling pins, luster dusts, baking accessories plus more about our Women/Family Owned company! impressbakeware.com
All products are on our Etsy shop.
Our Amazon shop has our cookie press and disks and embossed rolling pins.
Follow us on facebook!
If you’re not familiar with rolling pins with thickness rings, here’s ours:
