The heavenly scent of cinnamon fills the house as snow falls out my window. We got snowed in today but inside it was toasty warm and cozy with the sweet smell of snickerdoodles baking.
This recipe is delicious, but it was a little tricky getting it to meet my standards. I didn’t want just a spritz cookie with cinnamon sprinkled on it, masquerading as a snickerdoodle. I wanted some of that authentic doodle taste, that slightly tangy chewiness and sweetness that’s more intense than a spritz.
After much fussing, some serious head-scratching and 5 attempts, I came up with a winner. Enough characteristics of spritz to make it press well, and the right ingredients to make it doodle name worthy. The secret is replacing my usual baking powder with a mix of cream of tartar and baking soda. That’s they key to the classic snickerdoodle taste. Because they’re sweeter, I also had some sugar adjusting to do.

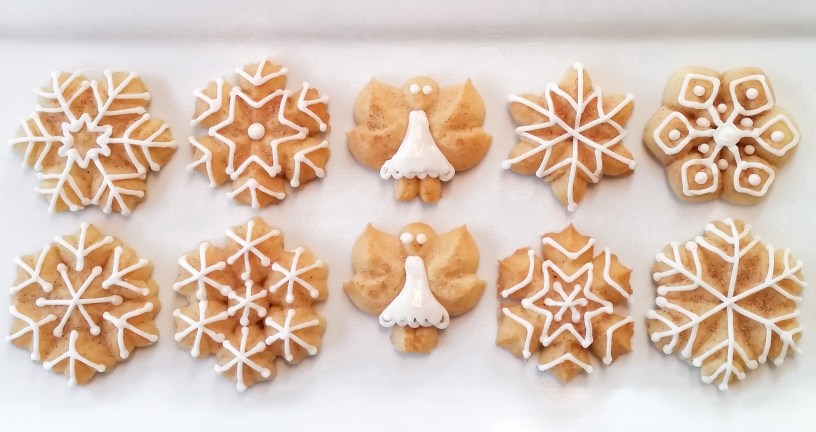
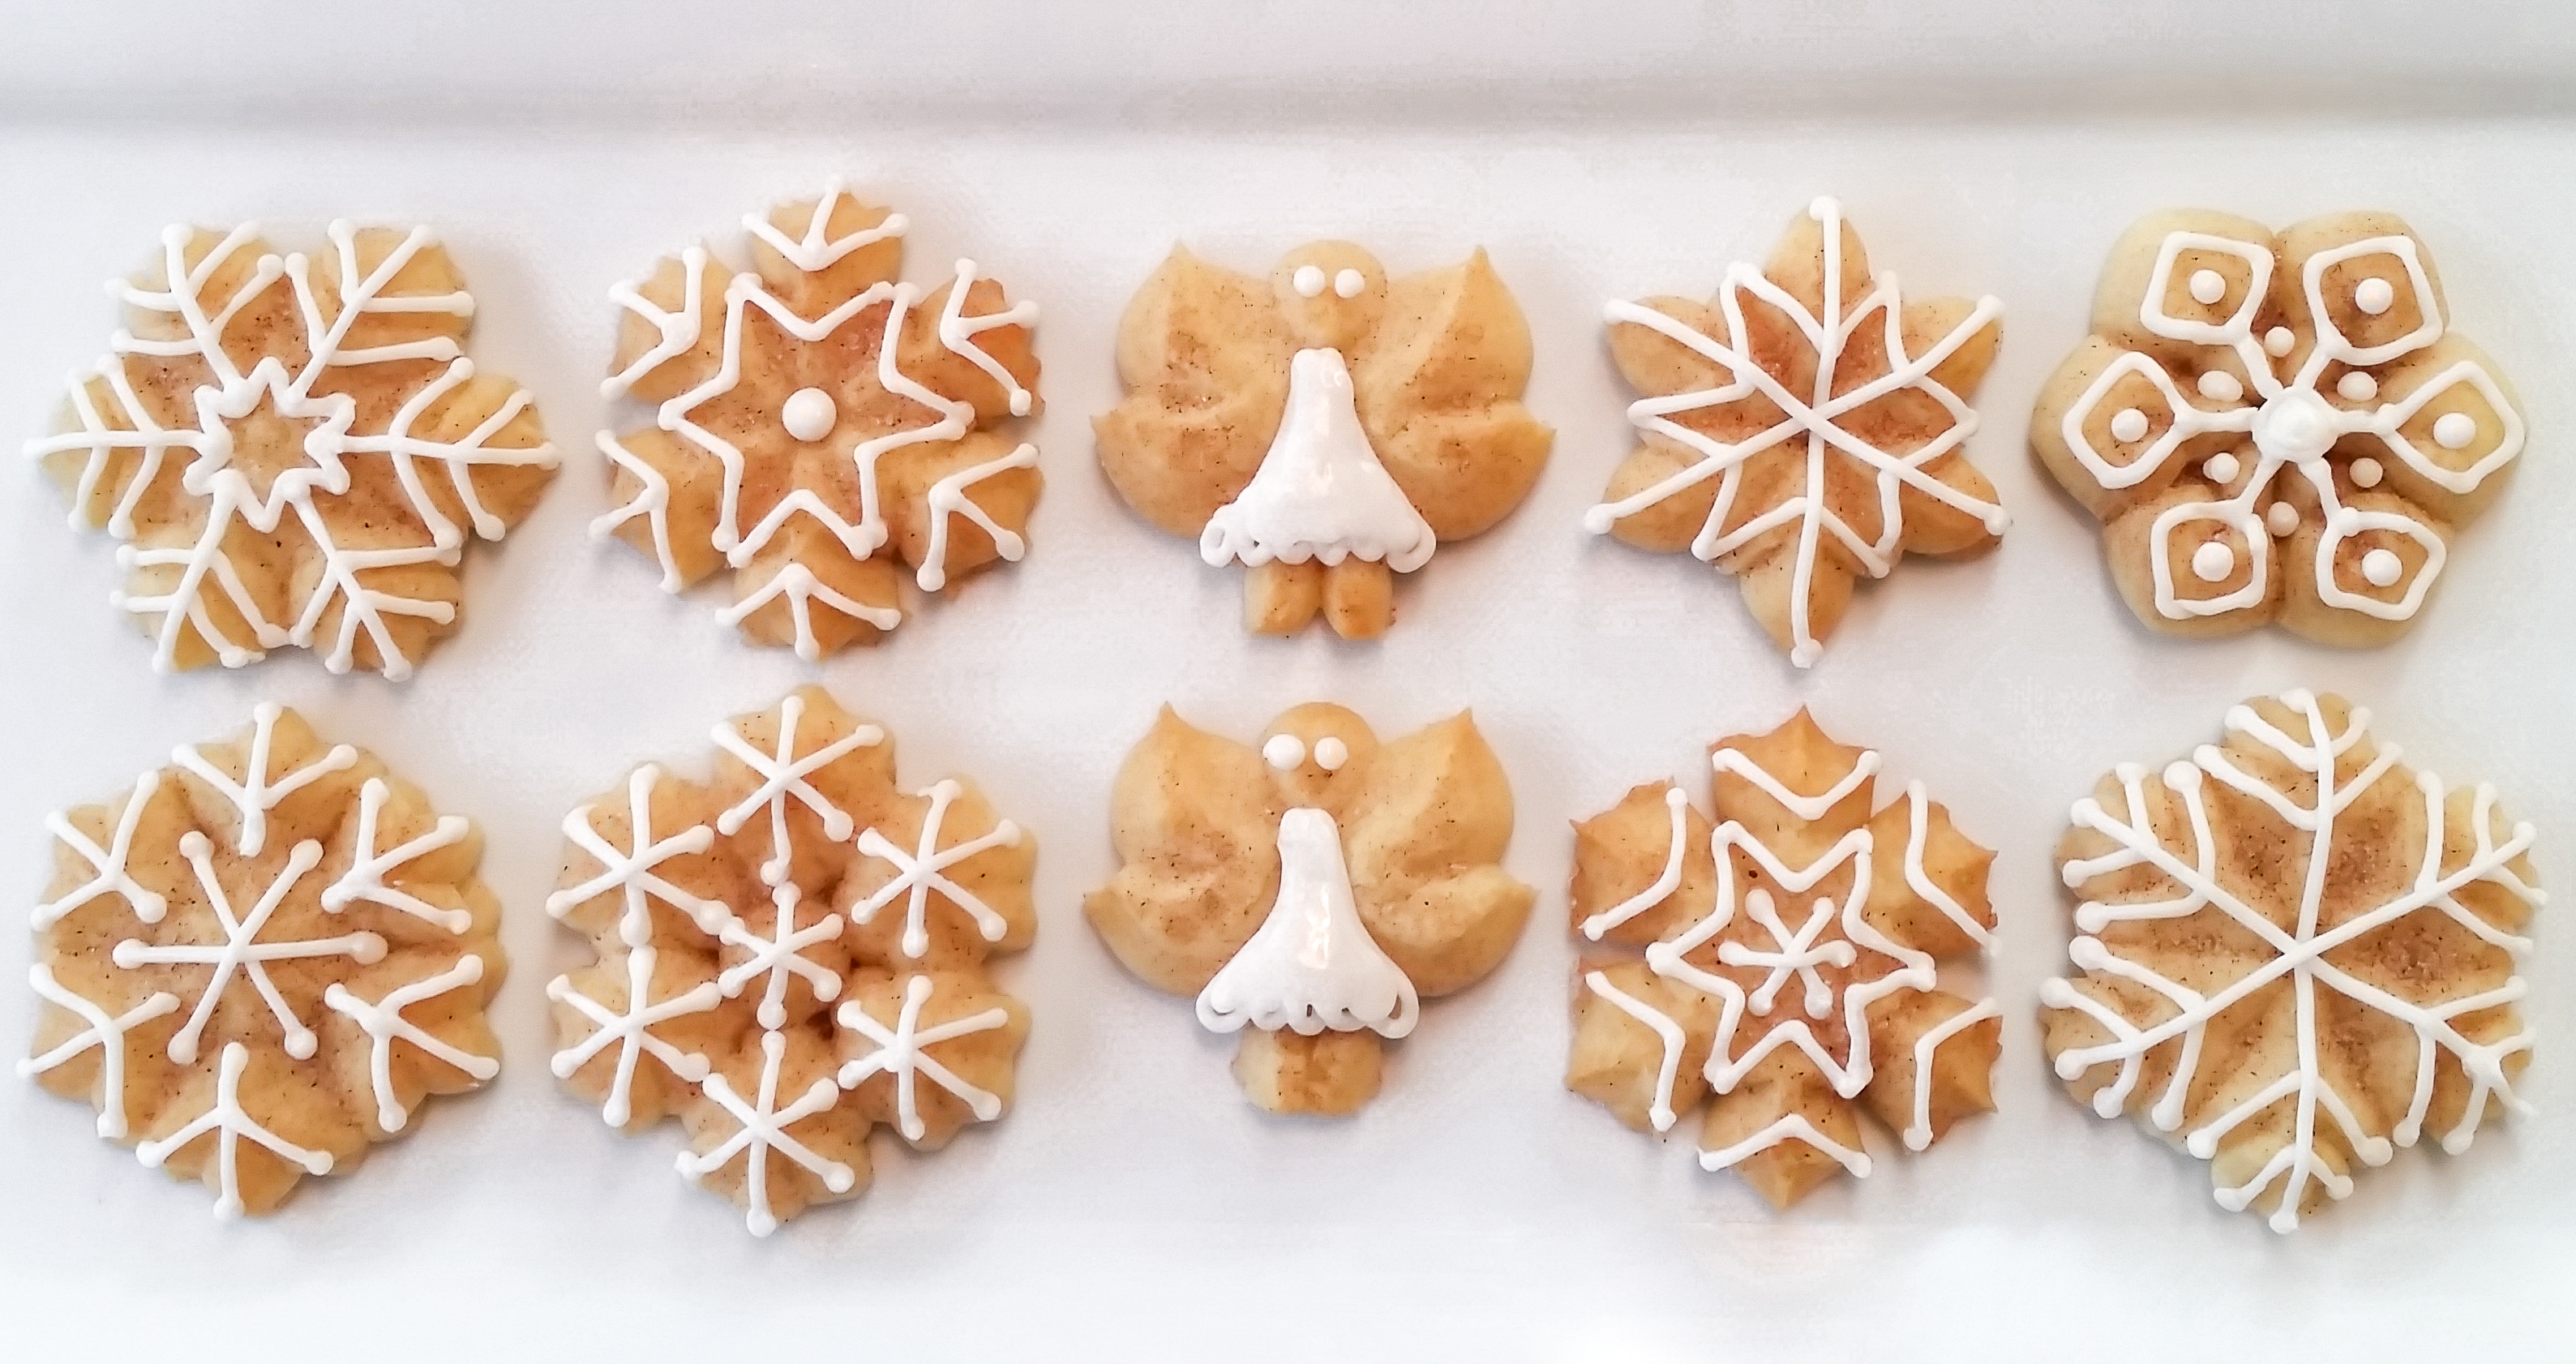
I used all 8 of the Snowflakes from our Snowflakes Disk Set and the Angel from the Christmas Disk Set.


NOTE: In 2024 we’ve added a “More Snowflakes!” disk set. They would be beautiful in this recipe, too!

Our website has all of our 200+ disk shapes, cookie press, embossed rolling pins, baking accessories plus more about our Women/Family Owned company in beautiful Colorado Springs! impressbakeware.com
All products are on our Etsy shop.
Our Amazon shop has our cookie press and disks and embossed rolling pins.
💕We make our money selling cookie press disks and embossed rolling pins! There are no annoying ads on this recipe blog. Every purchase keeps us in business.🙏 Thank you!
🎉 15% OFF Last SALE of 2025 ❗
🎄Make edible art for the Holidays, because baking should be fun!
Discount on our cookie press disks, cookie press, embossed rolling pins, luster dusts, cookie cutters & baking accessories. Sale December 26 – January 4, 2026, on our website and Etsy shops ONLY! (Links above) Sale excludes holiday gift sets and our recipe book.
Let’s bake!
Snickerdoodle Spritz Cookies
Two of your ingredients will need to be divided. You’ll see why soon.
1 cup (2 sticks) butter, softened (not melted)
1/2 cup granulated sugar and 1/4 cup granulated sugar, divided
1 Tablespoon vanilla extract and 2 teaspoons vanilla extract, divided
1 egg
2 1/4 cups plus 3 Tablespoons all-purpose flour
1/2 teaspoon cream of tartar
1/4 teaspoon baking soda
1/8 teaspoon salt
For sprinkling on top of pressed cookies:
1 1/2 Tablespoons granulated sugar
1/4 teaspoon ground cinnamon
Preheat your oven to 400°F
In a large bowl, combine flour, cream of tartar, baking soda, and salt with a whisk. Make sure they are evenly mixed. Set aside. Measure the cream of tartar and soda precisely. Too much and your cookies will puff up and lose their shape!
Using an electric mixer, cream the butter very well. Creaming your butter extremely well until it is smooth and literally creamy is the key to great spritz cookies. I like to pretend I’m making frosting and use the “whip” setting.
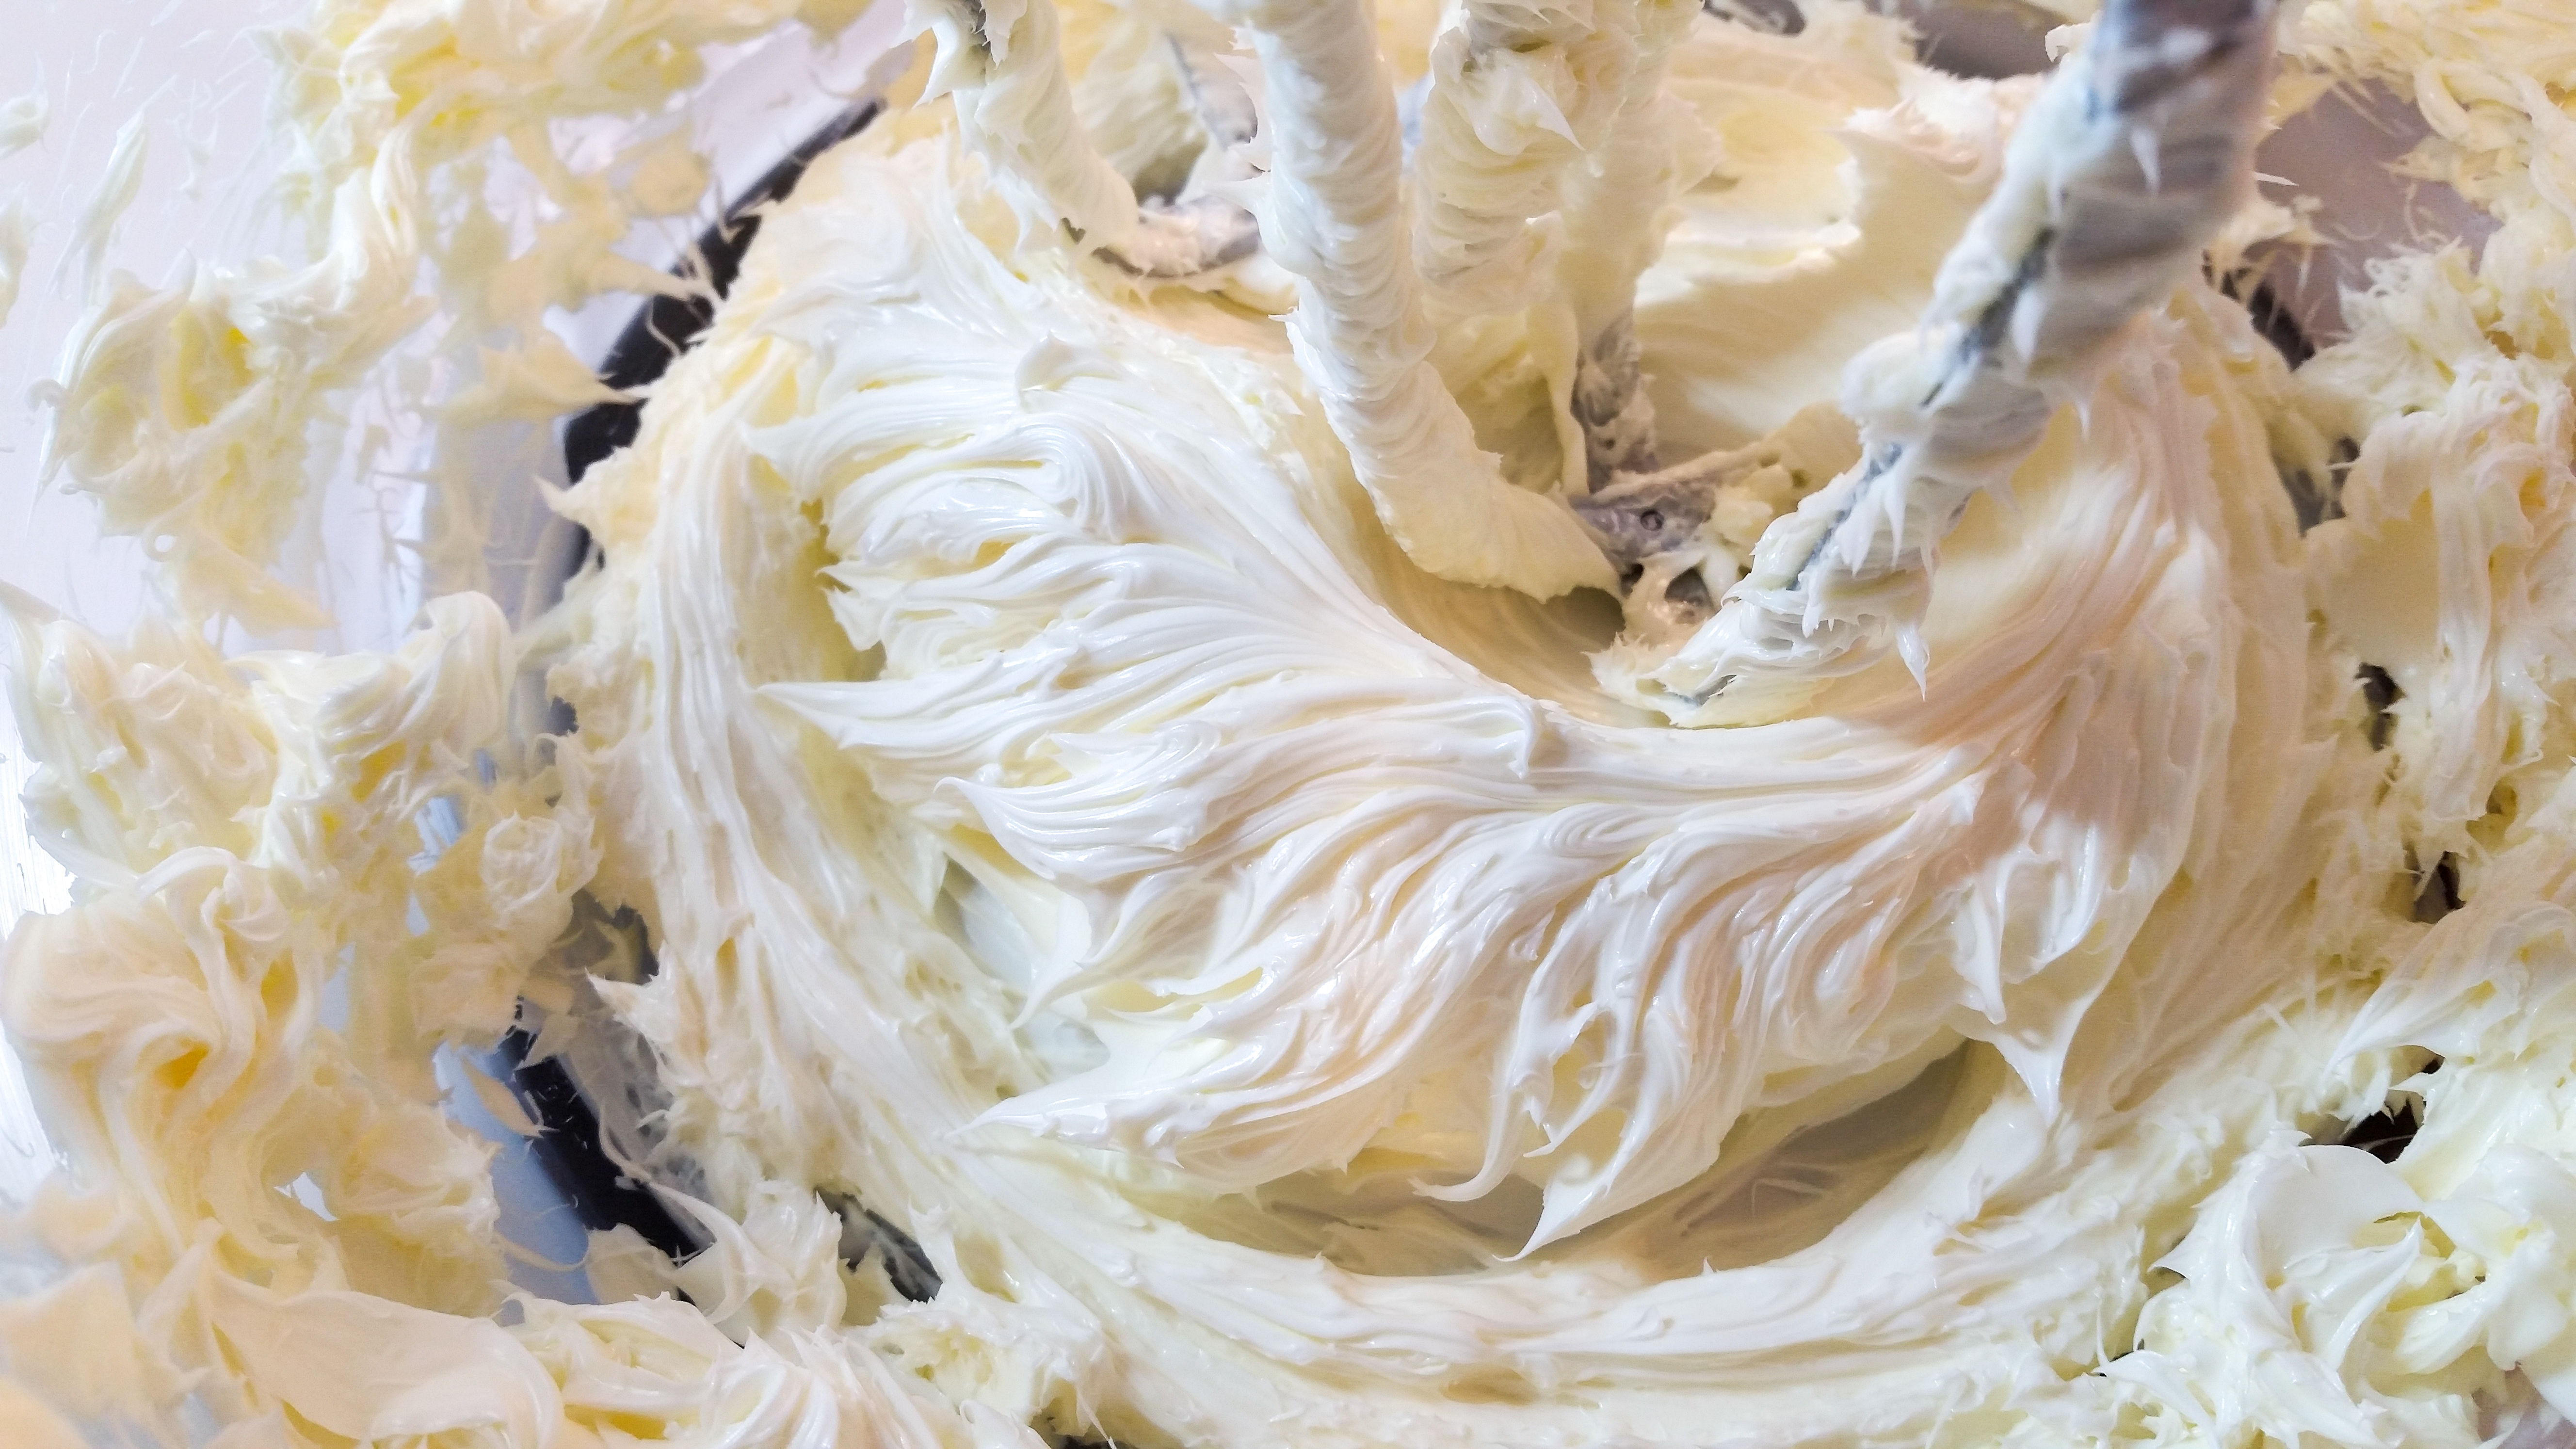
Add the ½ cup of sugar and cream it again very well. This butter-to sugar ratio is different than most of my recipes so the combination will be a bit less fluffy. Do your best to get the sugar smoothly creamed in before adding other ingredients. Next add the 1 tablespoon of vanilla extract and egg, re-creaming the mixture after each new addition.
Add the flour mixture to the butter slowly until completely incorporated and a soft dough forms. If you’re having trouble with it, or if it’s seeming a bit crumbly, don’t worry. Stop using the mixer and knead it with your hands. It will come together. Keep kneading until you have a nice even dough.

Ok so here’s the trick to this recipe! Now you have a perfectly pressable spritz dough. BUT, it’s not sweet enough to pass as a snickerdoodle. Every time I tried adding more sugar from the start at the creaming stage, it never creamed. There was just too much sugar for the butter to incorporate. The answer? Add the sugar now. The amazing thing is that by doing it this way, the last ¼ cup of sugar remains fairly granulated, giving a nice sweet pop to the cookies.
To make the dough soft enough to incorporate this sugar, either by kneading or mixer, add the 2 teaspoons of vanilla first. Once that’s evenly mixed in, add the sugar. Now you have a sweet spritz dough!
Always remember that you can tweak overly stiff dough by adding more vanilla a teaspoon at a time, or tweak overly soft or sticky dough by adding flour a tablespoon at a time. Perfect spritz dough has a soft malleable texture that is not too sticky or too stiff.
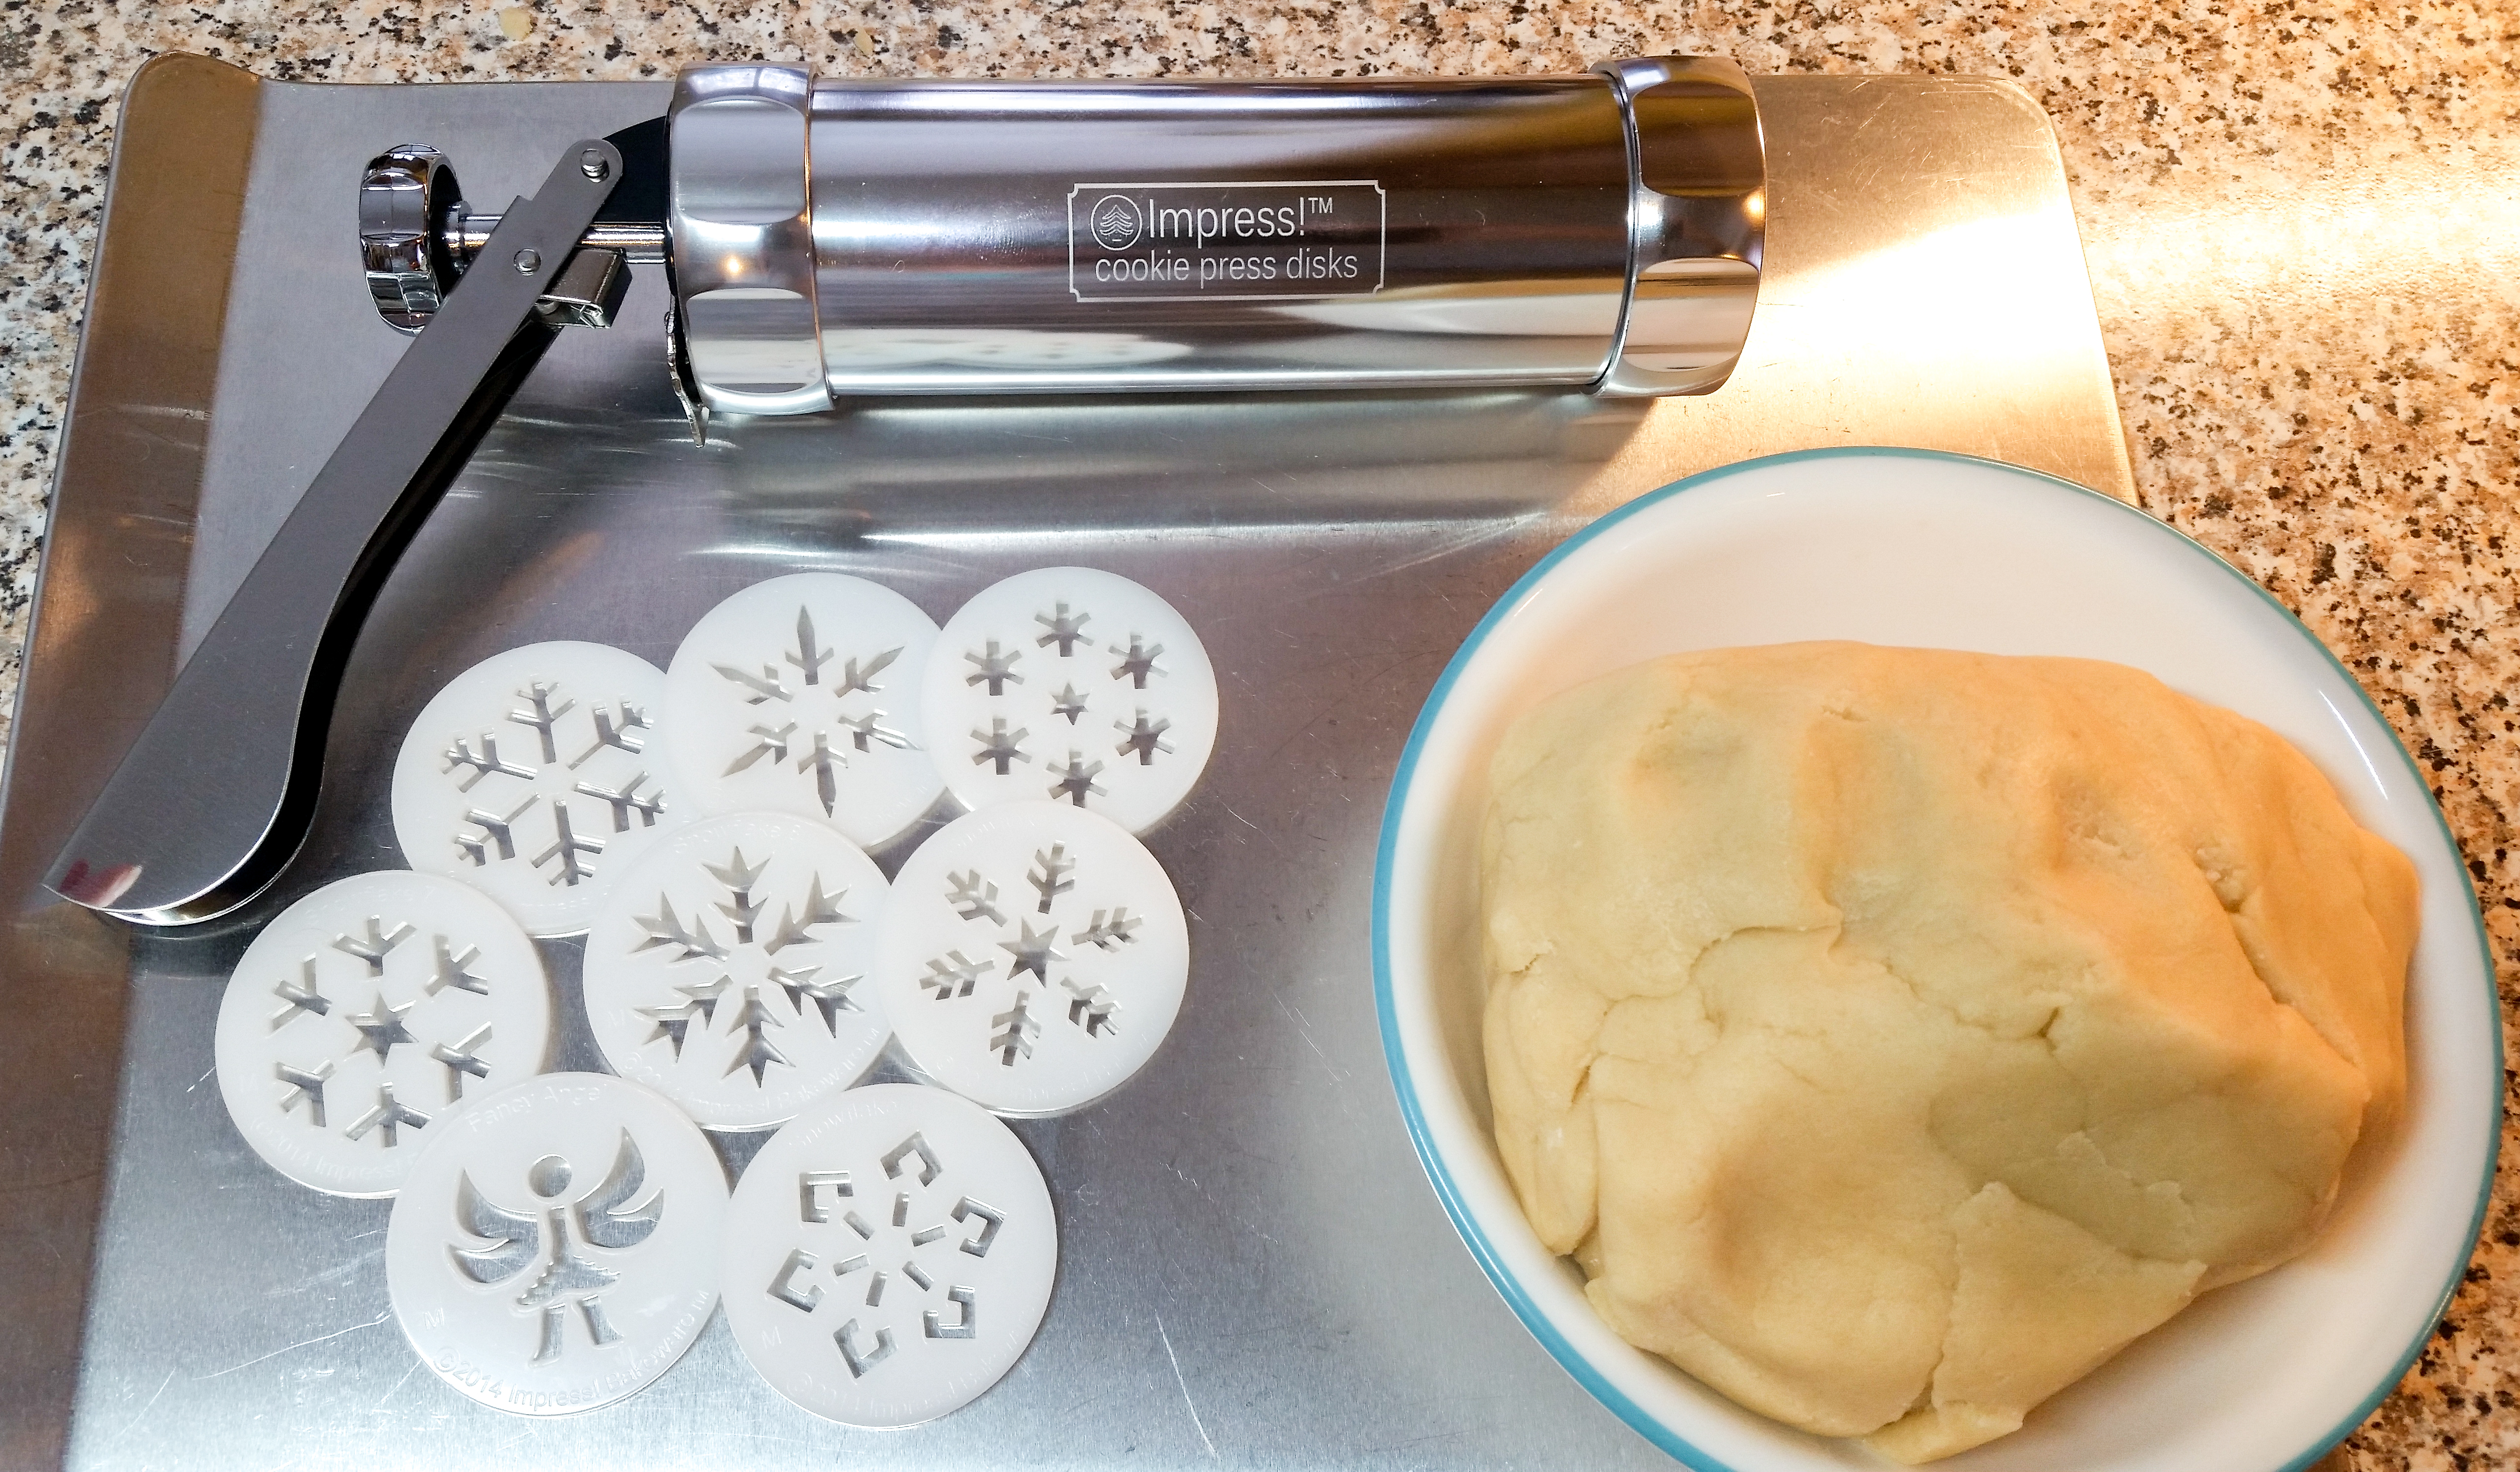
Get your disks and pack your dough into your cookie press barrel, using the back of a spoon to press the air bubbles out. This helps create consistent pressure to press with. I forgot to put snowflake 11 in this picture. Oops. 😉

Place the disk in the bottom ring, attach to your press, and start pressing onto an un-greased cookie sheet. Use a consistent rhythm to keep the shapes a uniform size. It’s not at all uncommon for your first few cookies sto be mis-shaped, as pressure needs to build in the barrel to make consistent shapes. It’s totally ok! Just throw them back in the bowl to be re-pressed. If you’re still having trouble pressing (mis-shaped cookies, trouble sticking to the pan, etc) press one cookie into the air and wipe it off and toss back into the bowl to re-set your pressure in the press. You can also refrigerate your cookie sheets for 5 minutes if sticking is an issue. (There are more troubleshooting tips on the Troubleshooting and Decorating Tips page- see the top menu on the homepage. 🙂 )

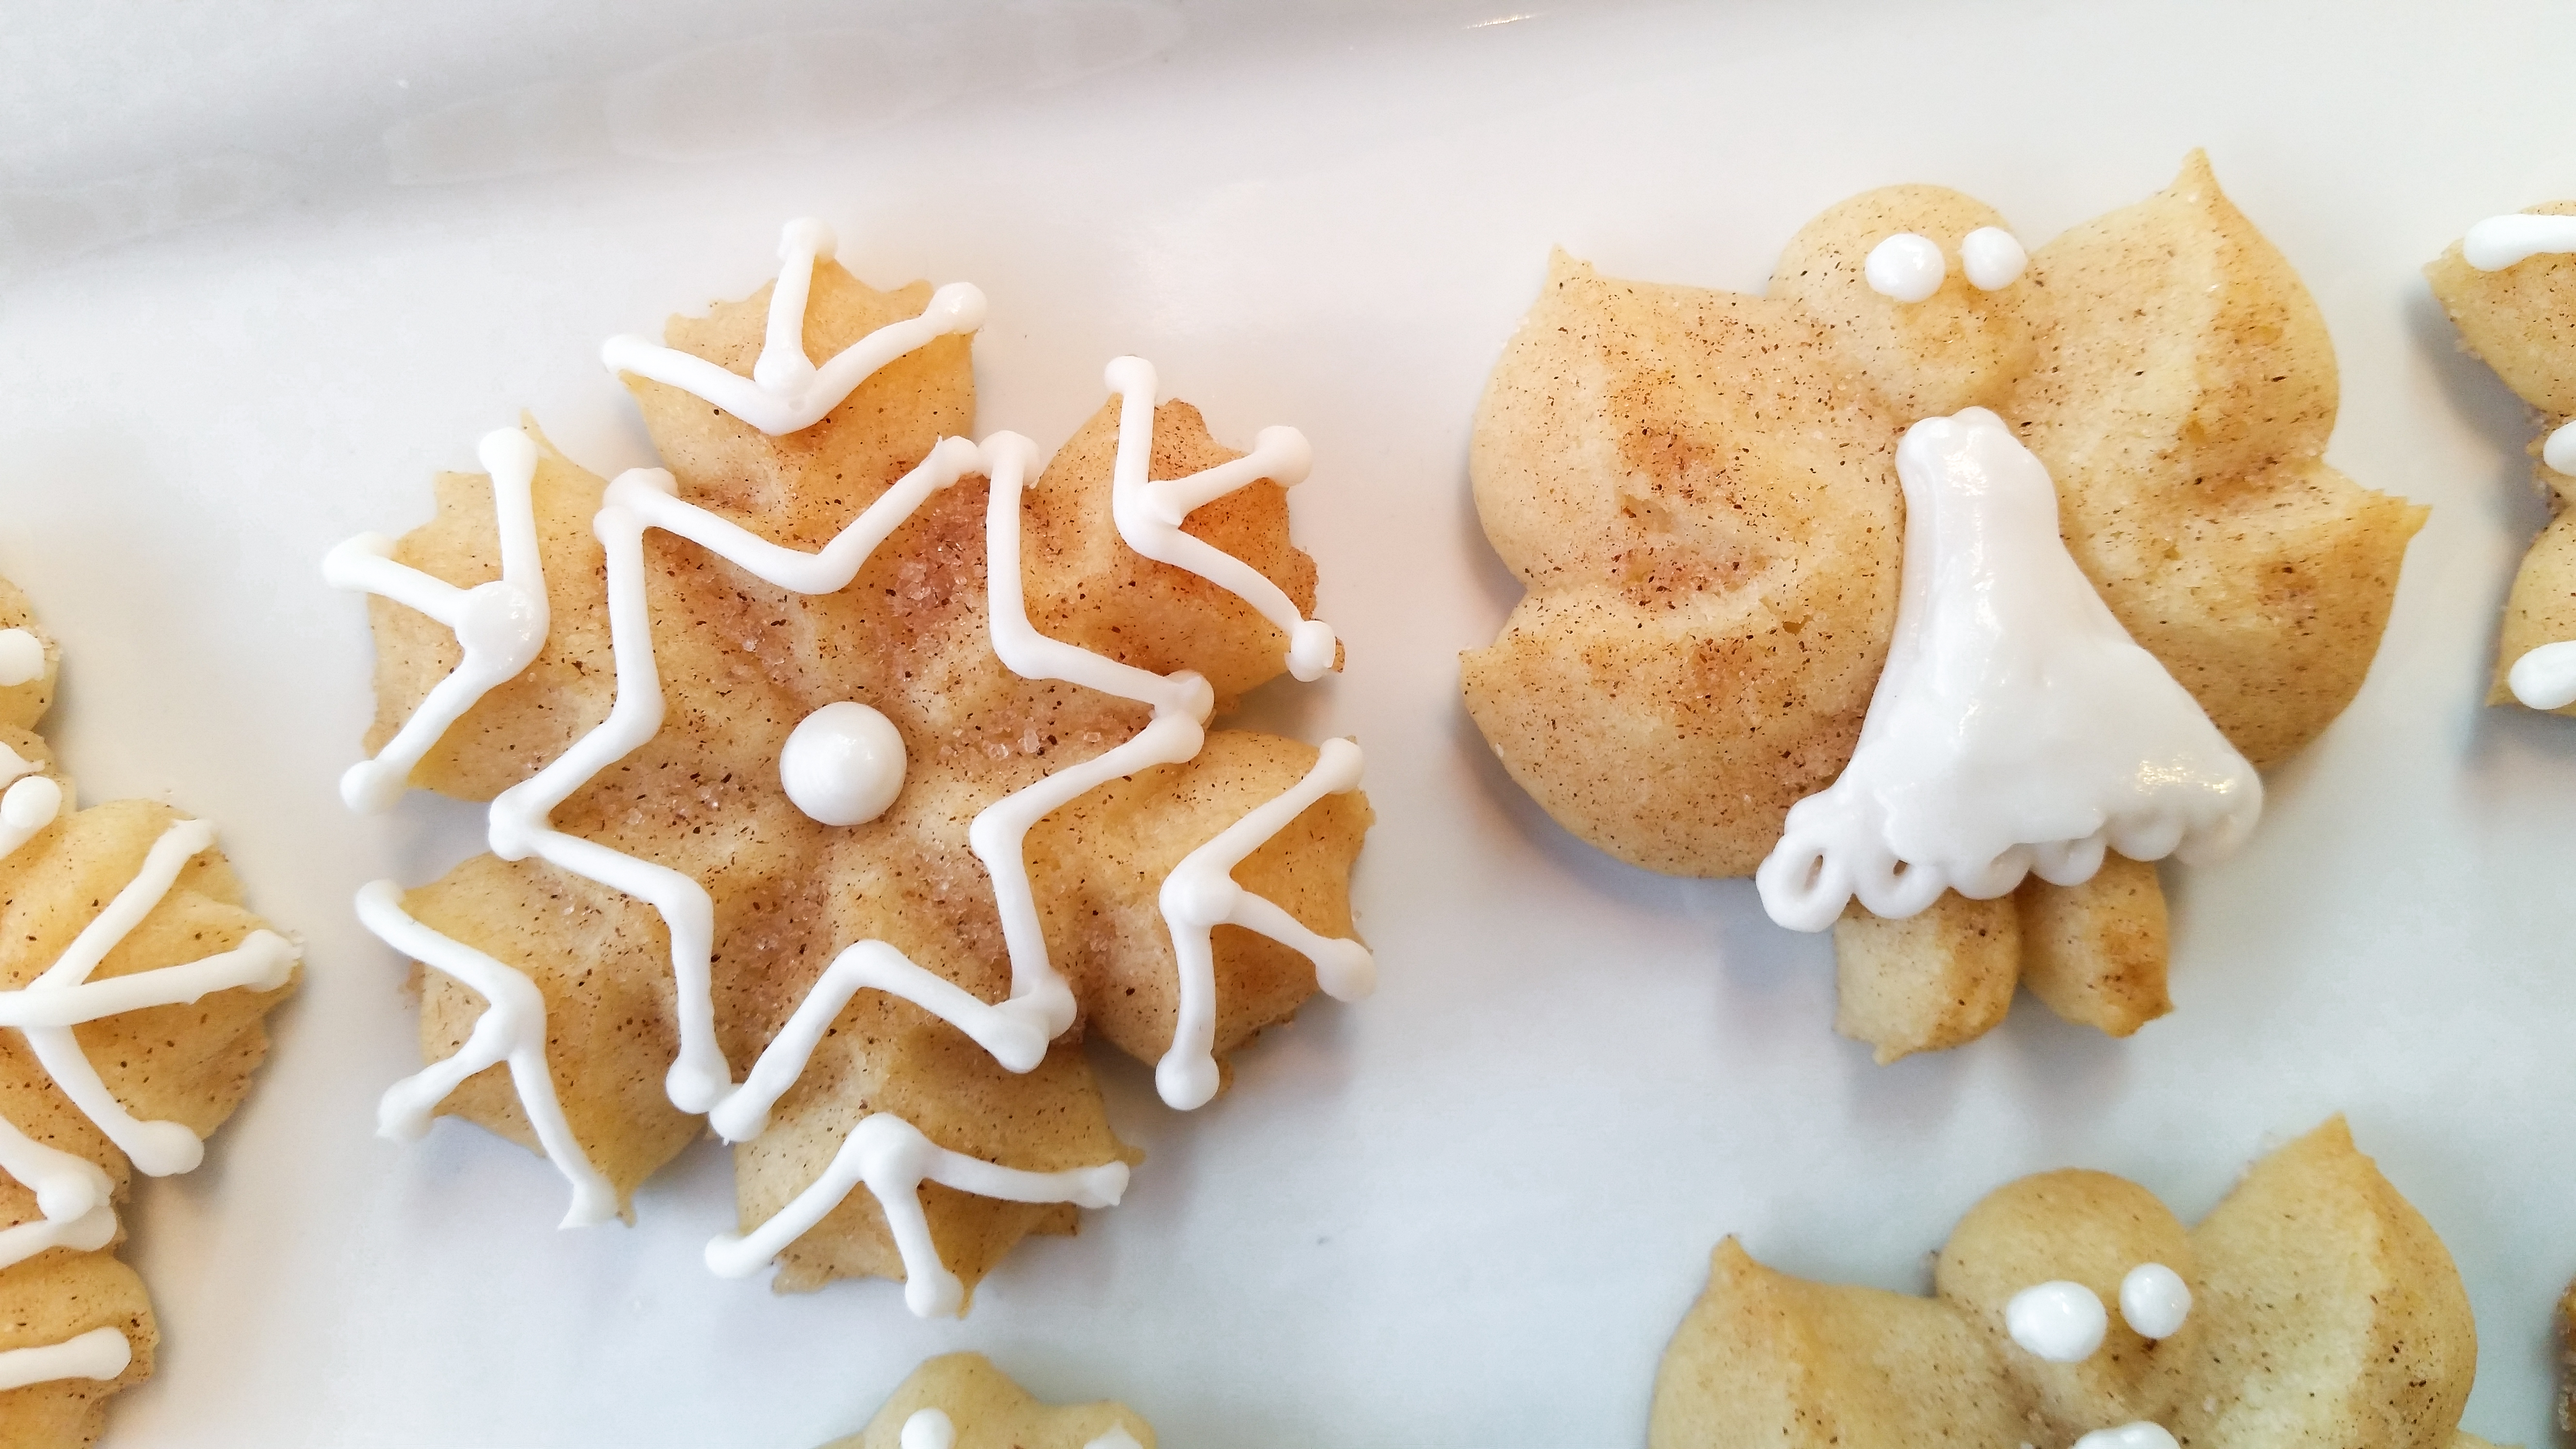
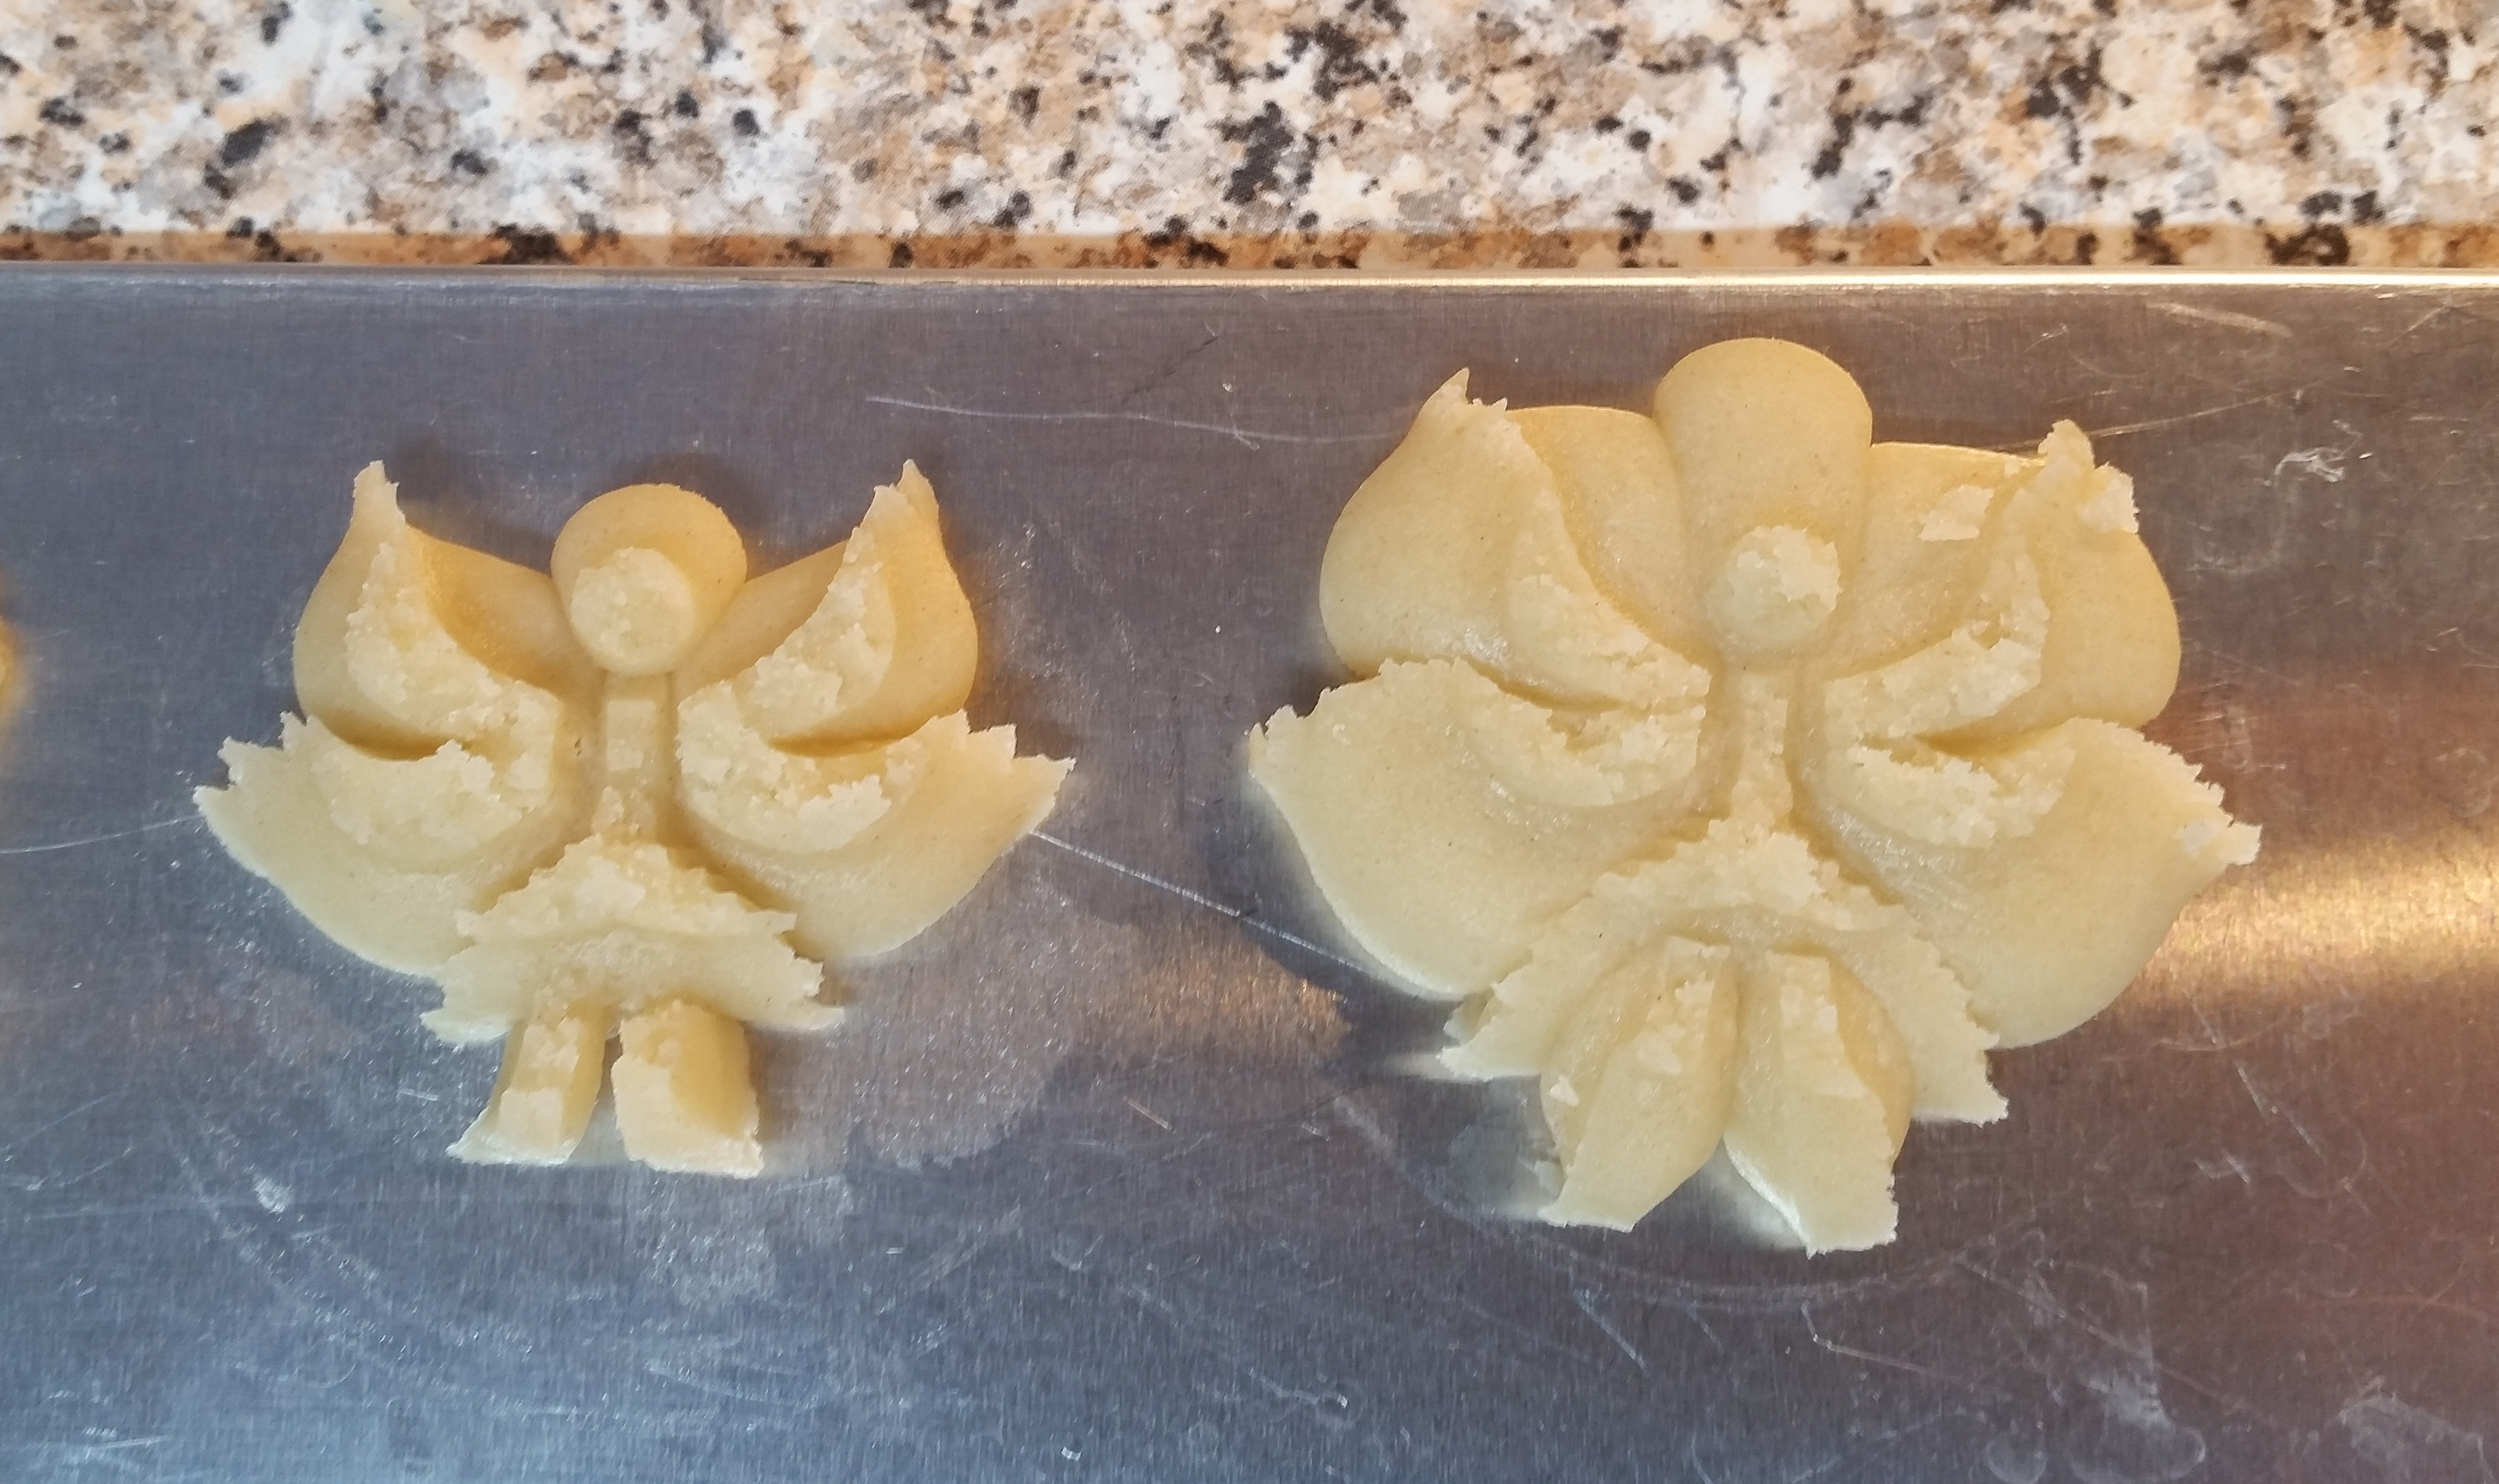
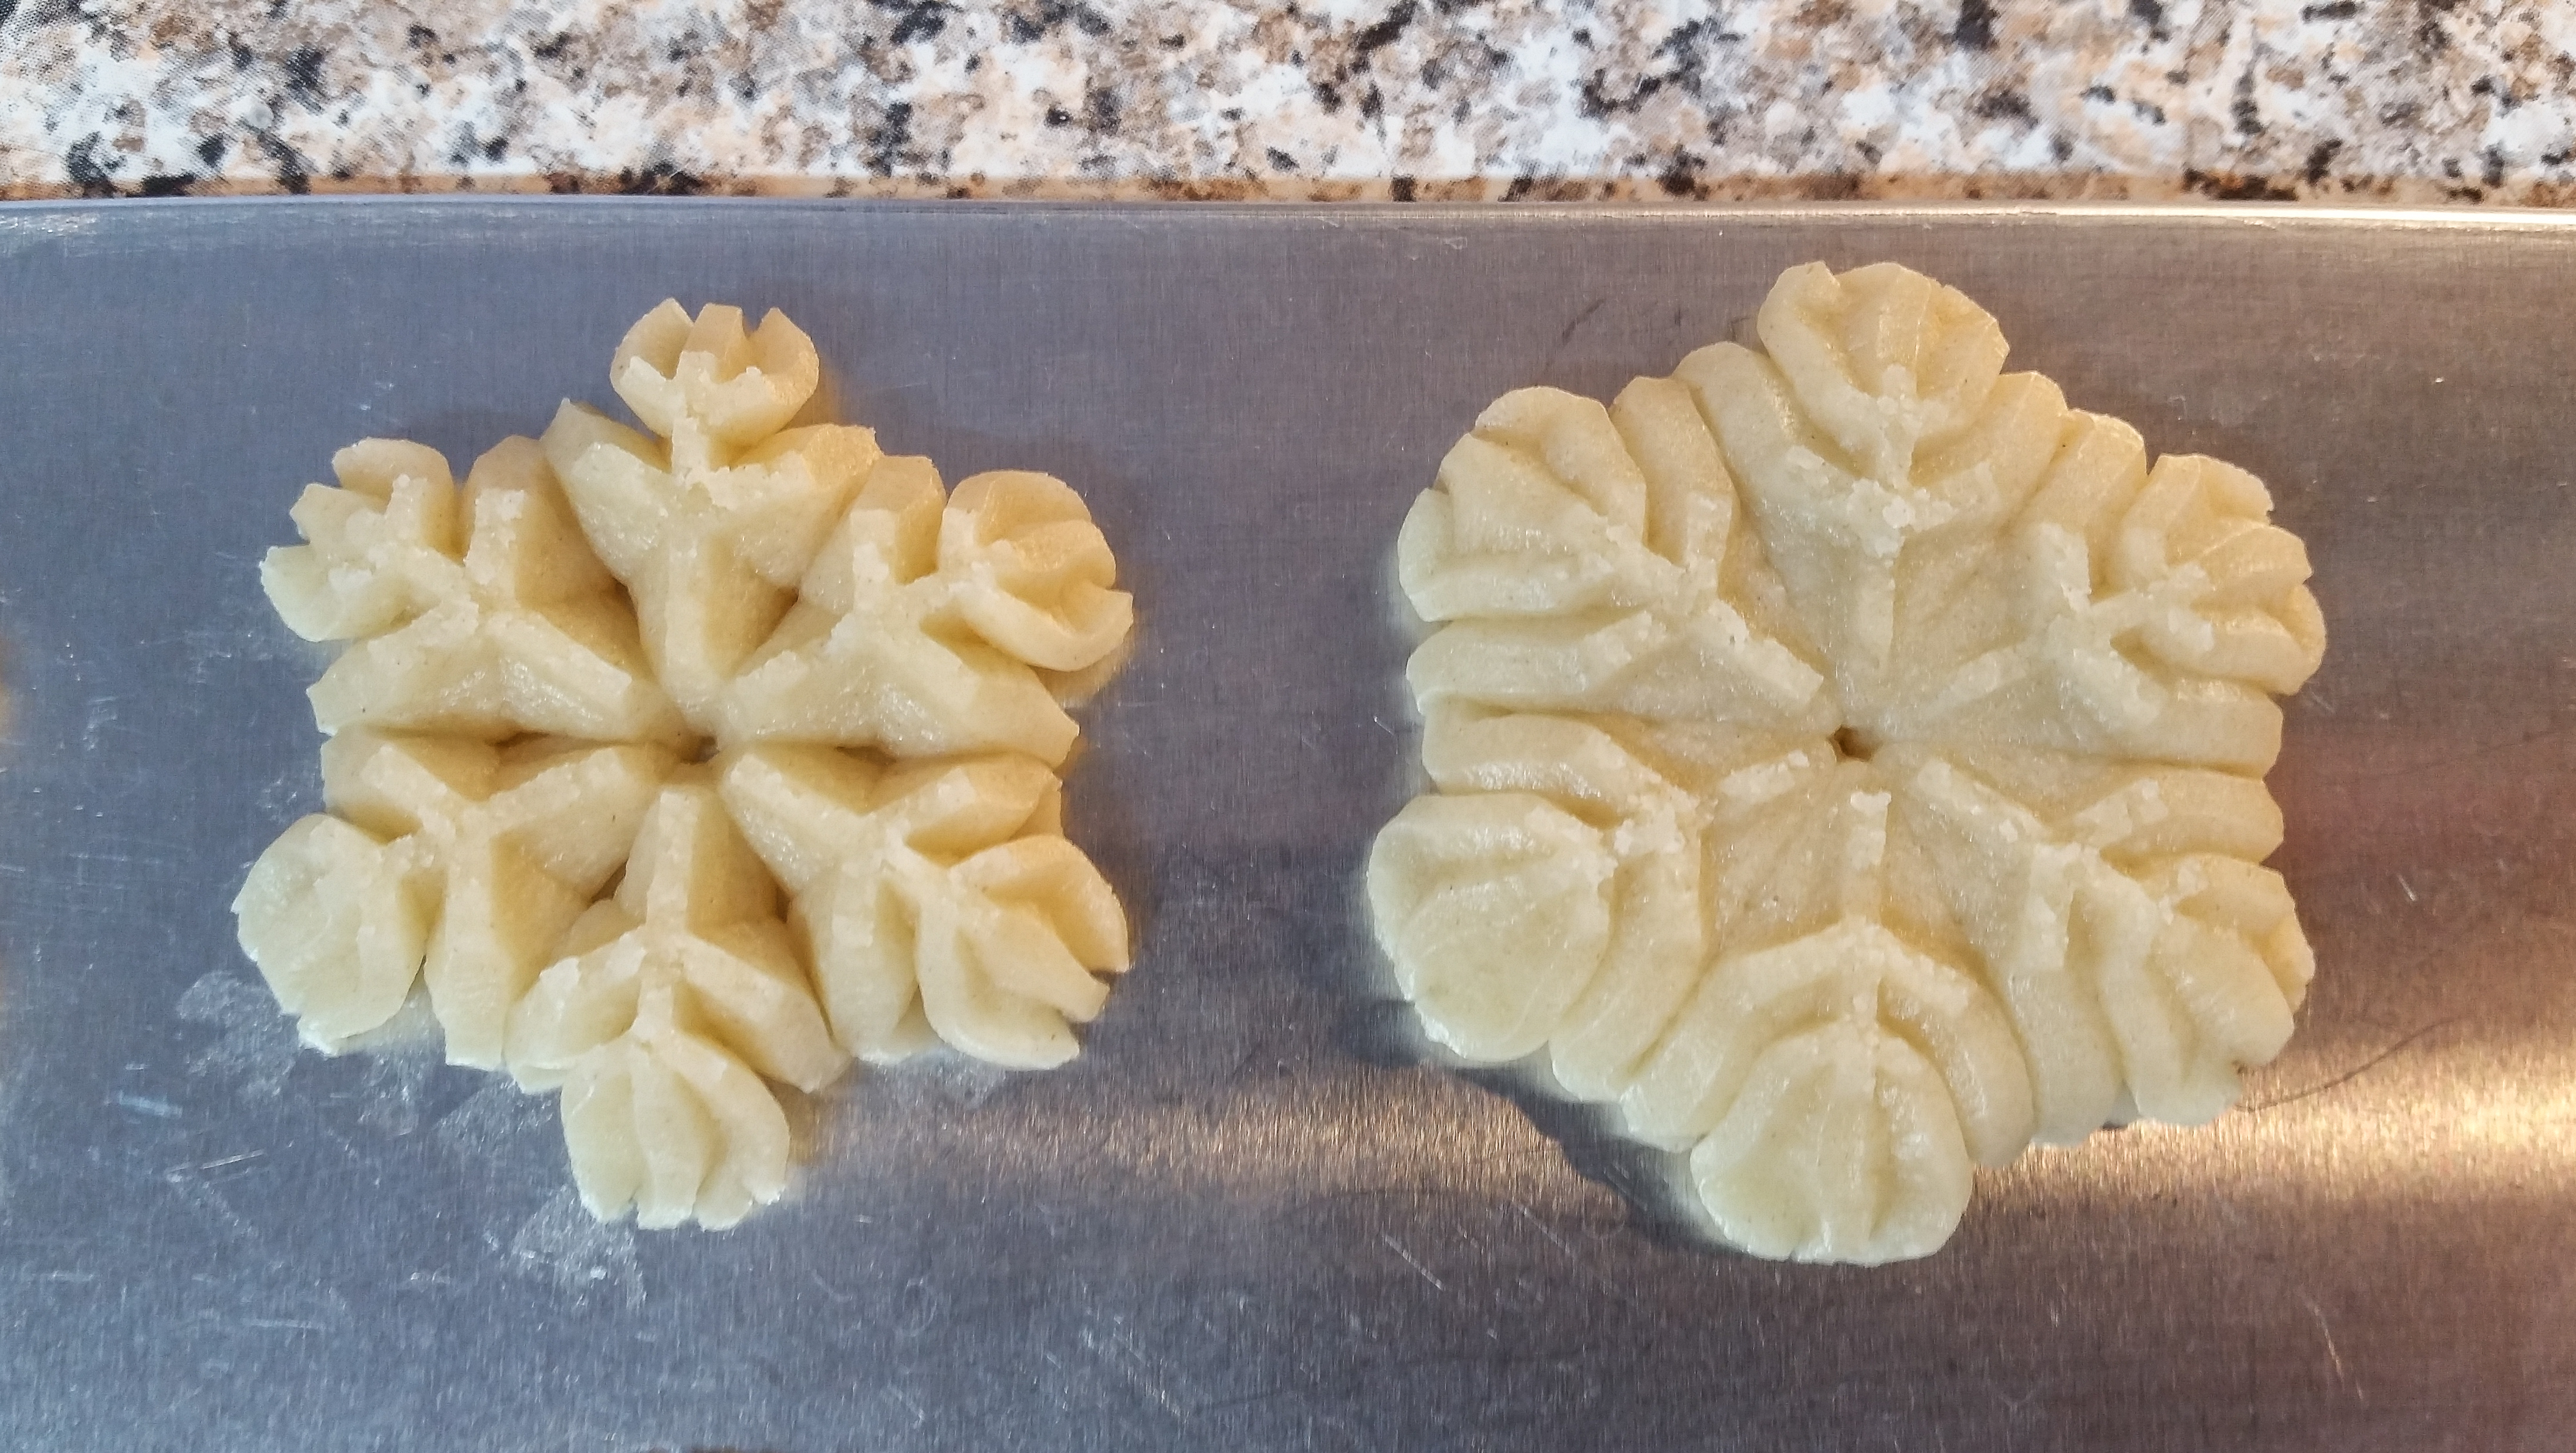
A quick tip on pressing, especially for these delicate, intricate snowflakes. Try to press them fairly small and precise. Don’t press big, detail-less blobs. I always say to think of your press as a dough pump. Whether it takes one click, half clicks, a click and a half, any type of press is just a mechanism for pumping out dough. See more tips on the website or in the videos on some of the posts here! Here’s two do and don’t shots. The little angel on the left is perfect. The one on the right will lose its shape and definition in baking. Same for the snowflakes.
Now combine the sugar and cinnamon for sprinkling. Make sure it’s mixed very evenly. Use a spoon and tap it with your other hand to shake the sugar onto the pressed cookies, coating them fairly well.

Baking time on these is significantly longer than for most of my other recipes. In my oven they take 8 to 11 minutes. I suggest checking them at 7 minutes and watching the first batch every minute or so. Then you’ll have a good idea on time for the next sheet. Let them bake until the edges begin to brown.
Allow the cookies to cool for 3 to 5 minutes then carefully remove them to a wire cooling rack. Mine came off easily, but there will be a lot of sugar on your baking sheet. So keep your spatula nice and flat as you lift to avoid any breakage. Again, mine came off fine, but always best to think ahead.
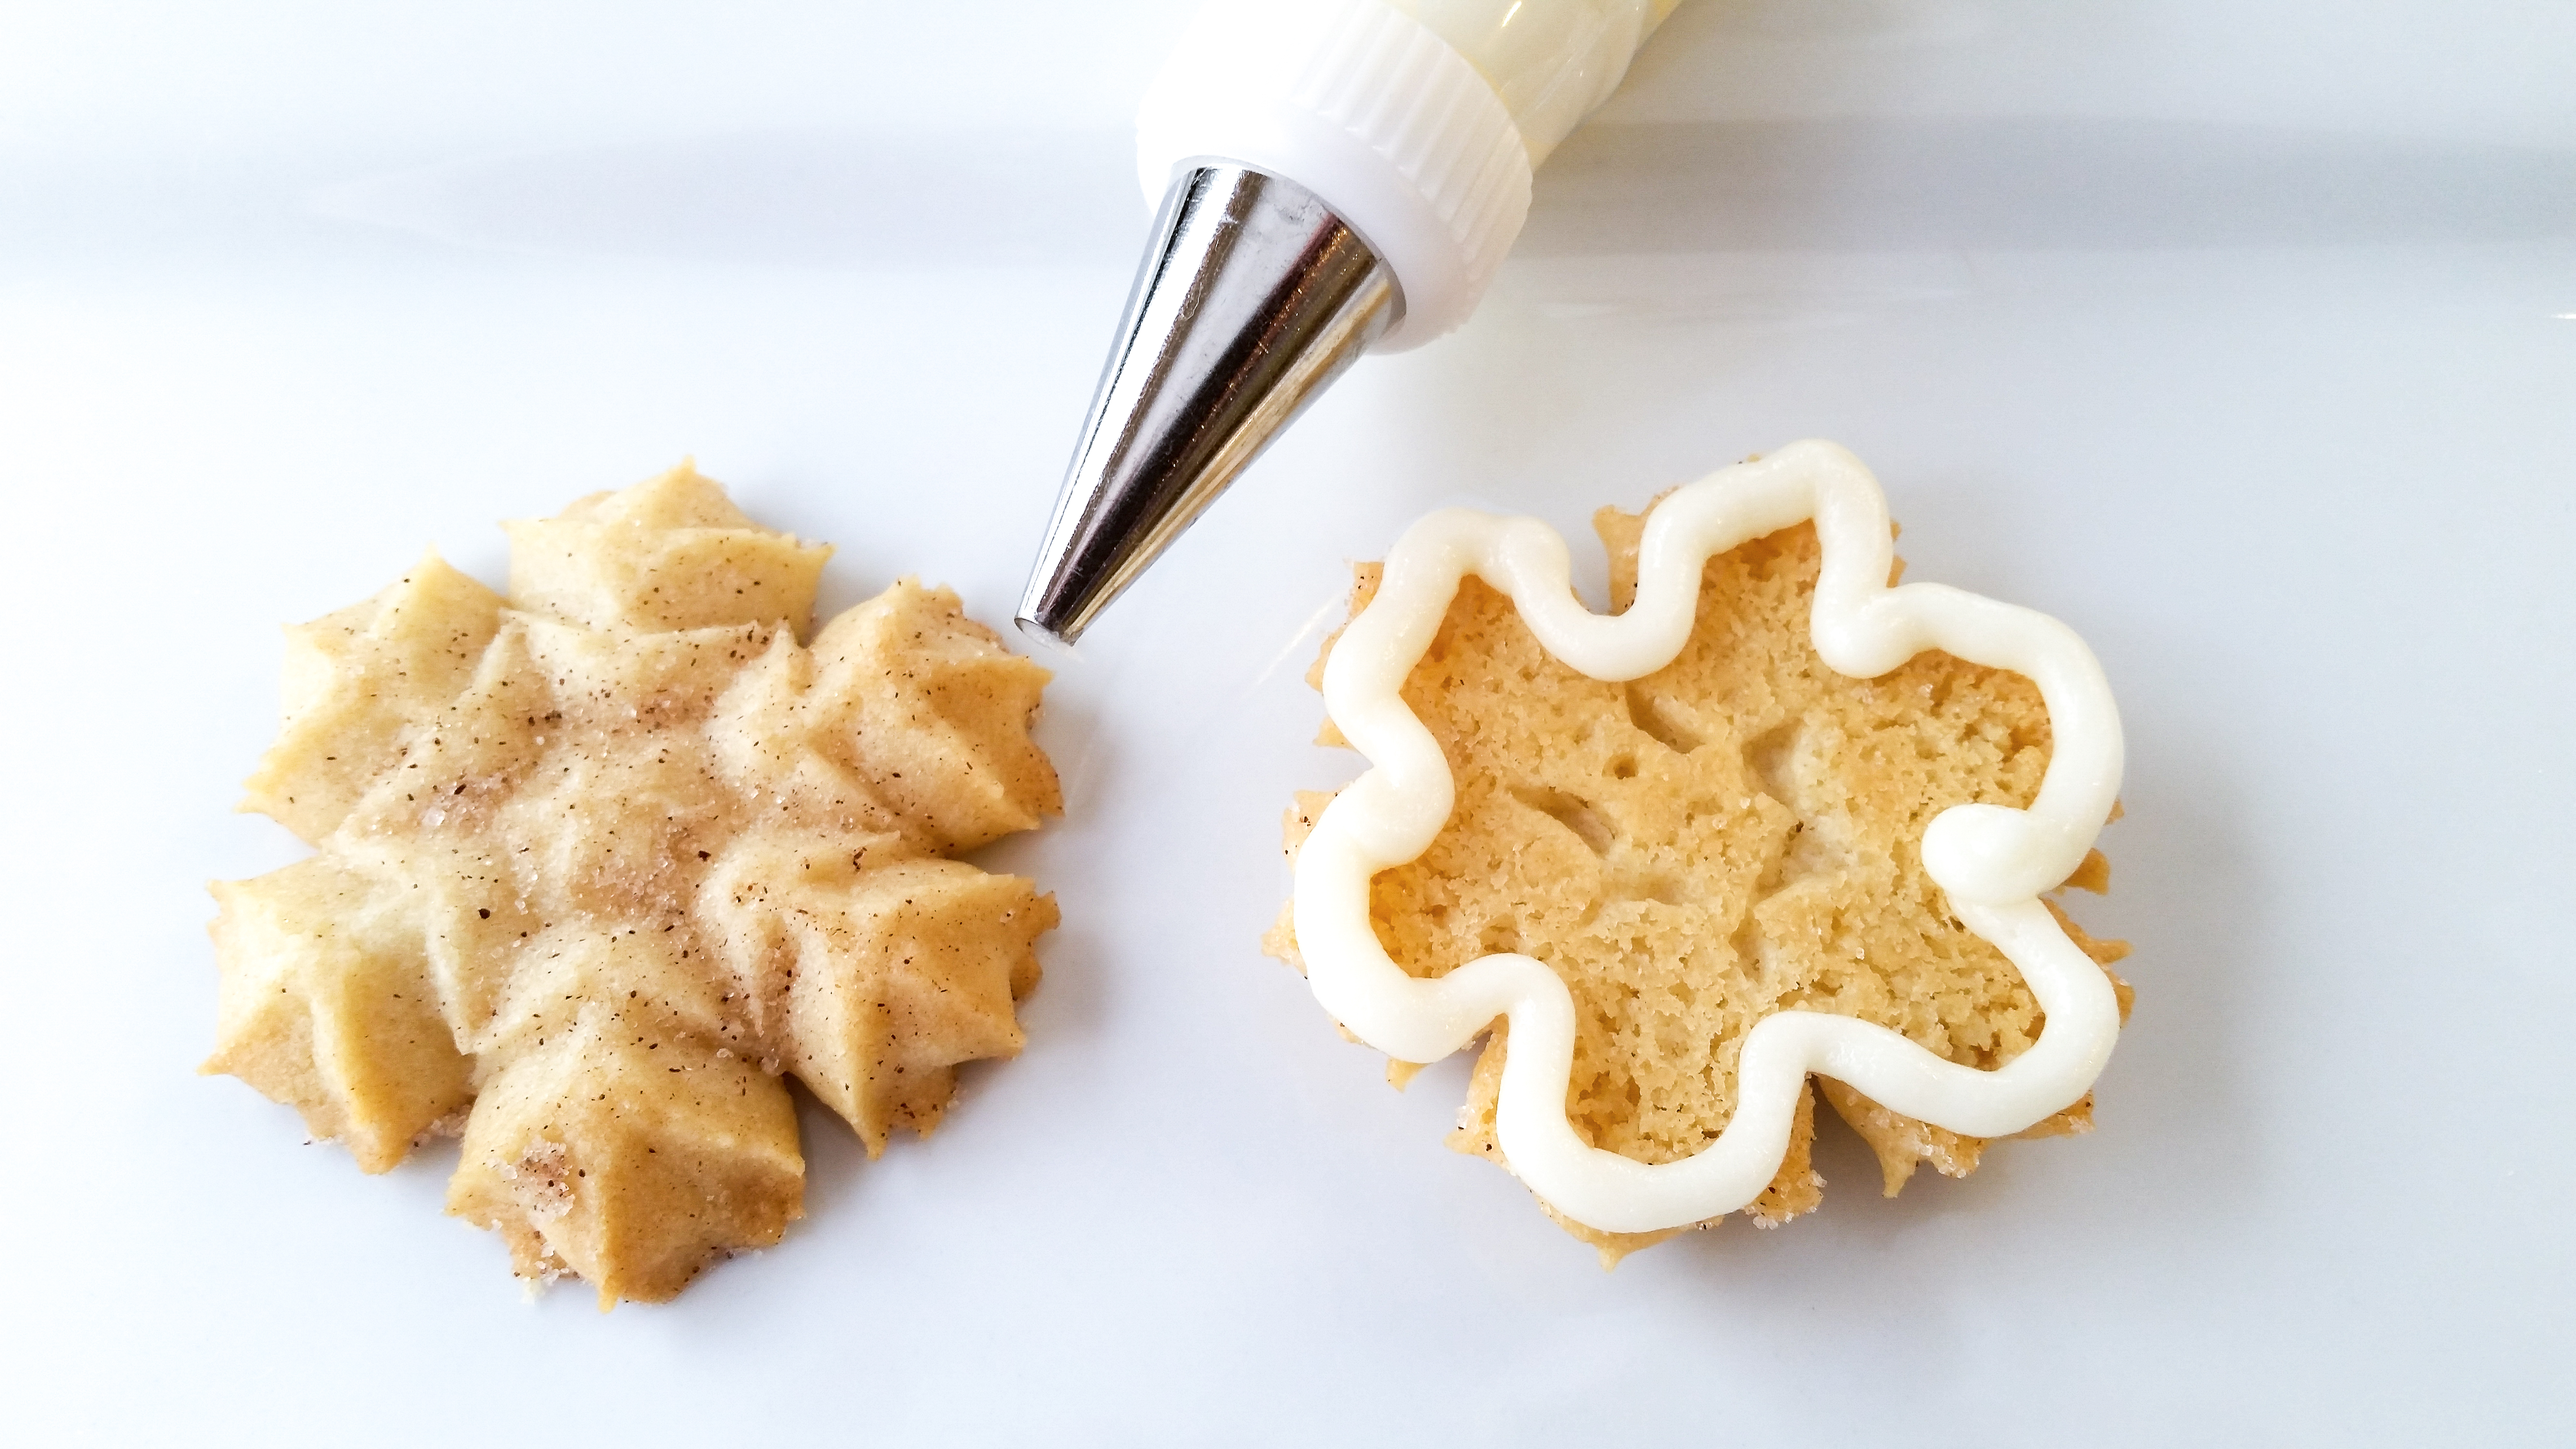
You could certainly leave these undecorated and they’d be a hit. If you have the time and inclination, though, they look amazing when outlined in icing. Over the years I’ve discovered that each of my snowflakes can be decorated multiple ways. Experiment!

In general I just follow the ridge lines of the snowflakes cookies. Check out the pictures for some interesting ideas. Use piping tips and decorating icing. Start each line with a small dot for a clean, neat appearance.
Snowflake 2 idea:
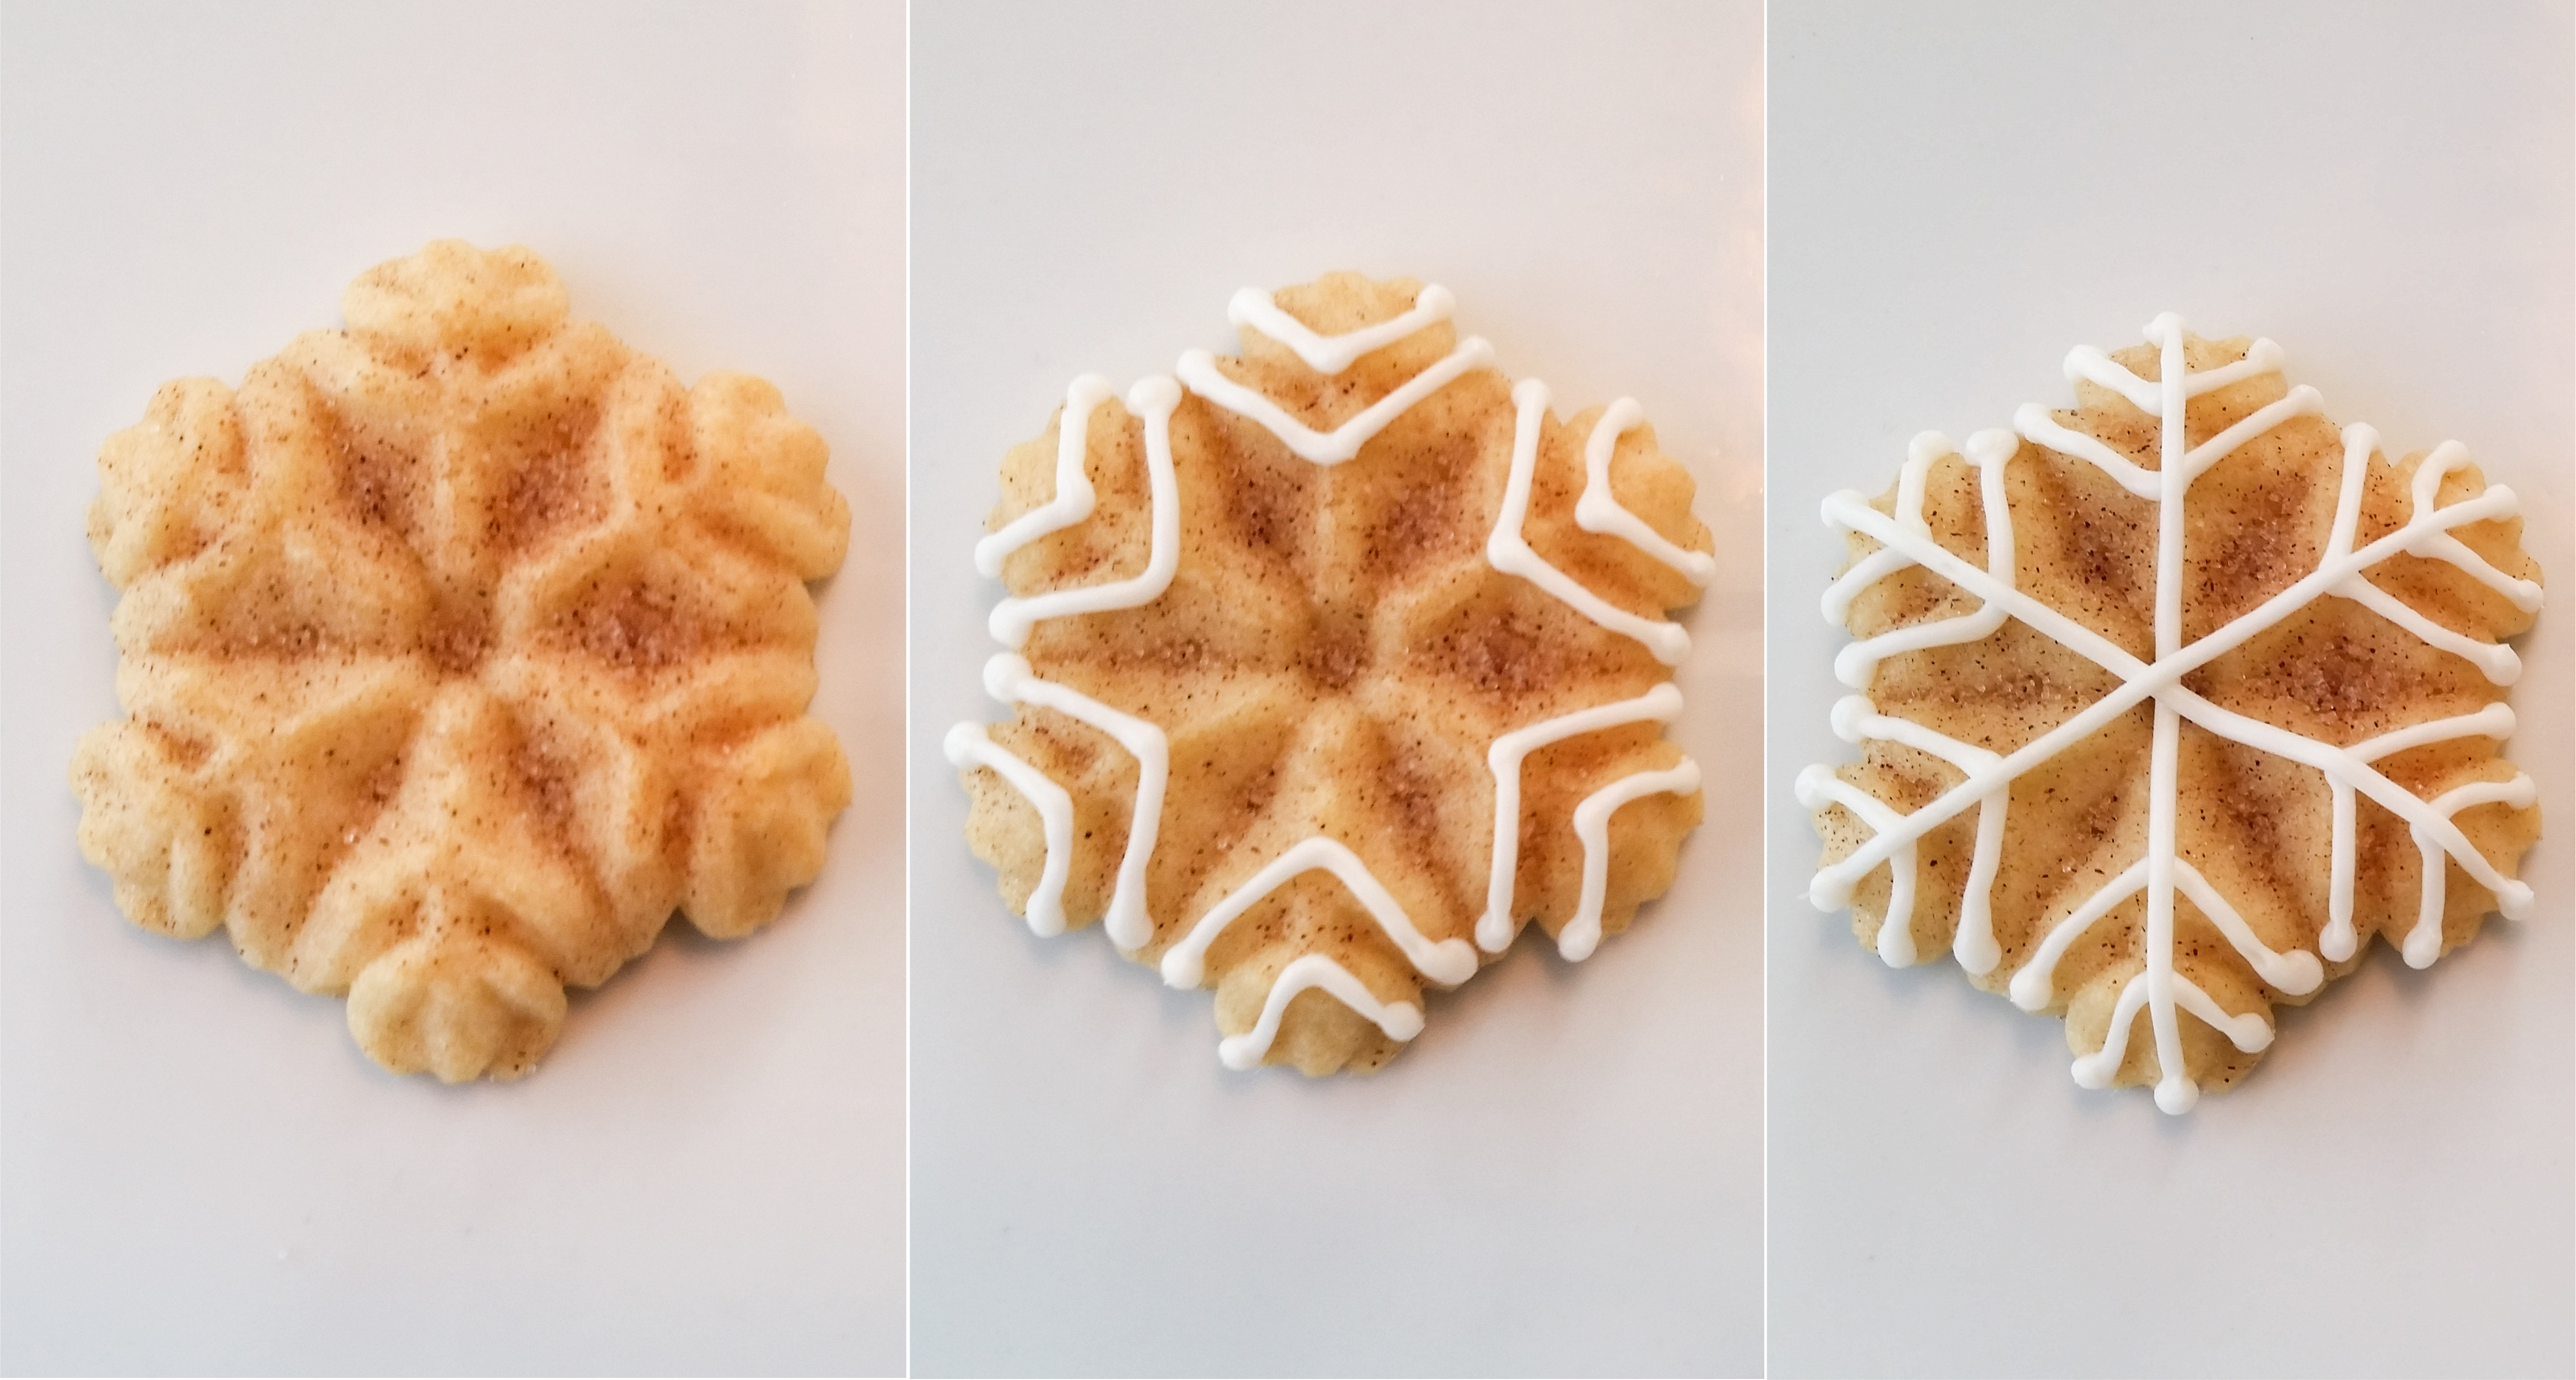
Snowflake 8 idea:

The angels are a breeze to decorate. I simply gave mine frilly dresses. Outline the dress area and make it “ruffly” on the bottom. Then fill in that area without covering the frilly ruffles on the bottom. Smooth the dress with a slightly wet fingertip. Then add two dots for eyes.

To be quick just go with store-bought icing. If you want an extra step, this decadent buttercream went really well with the flavor of the snickerdoodles.
1/2 cup (1 stick) butter, softened (not melted)
2 1/4 cups powdered sugar
1 teaspoon vanilla extract
2 Tablespoons heavy cream
1/8 teaspoon salt
Cream your butter then add the rest of the ingredients, and once incorporated whip this for 2 to 3 minutes to make it super fluffy. Tweak it with a little more heavy cream if it’s too thick for decorating or with more sugar if it’s too thin.
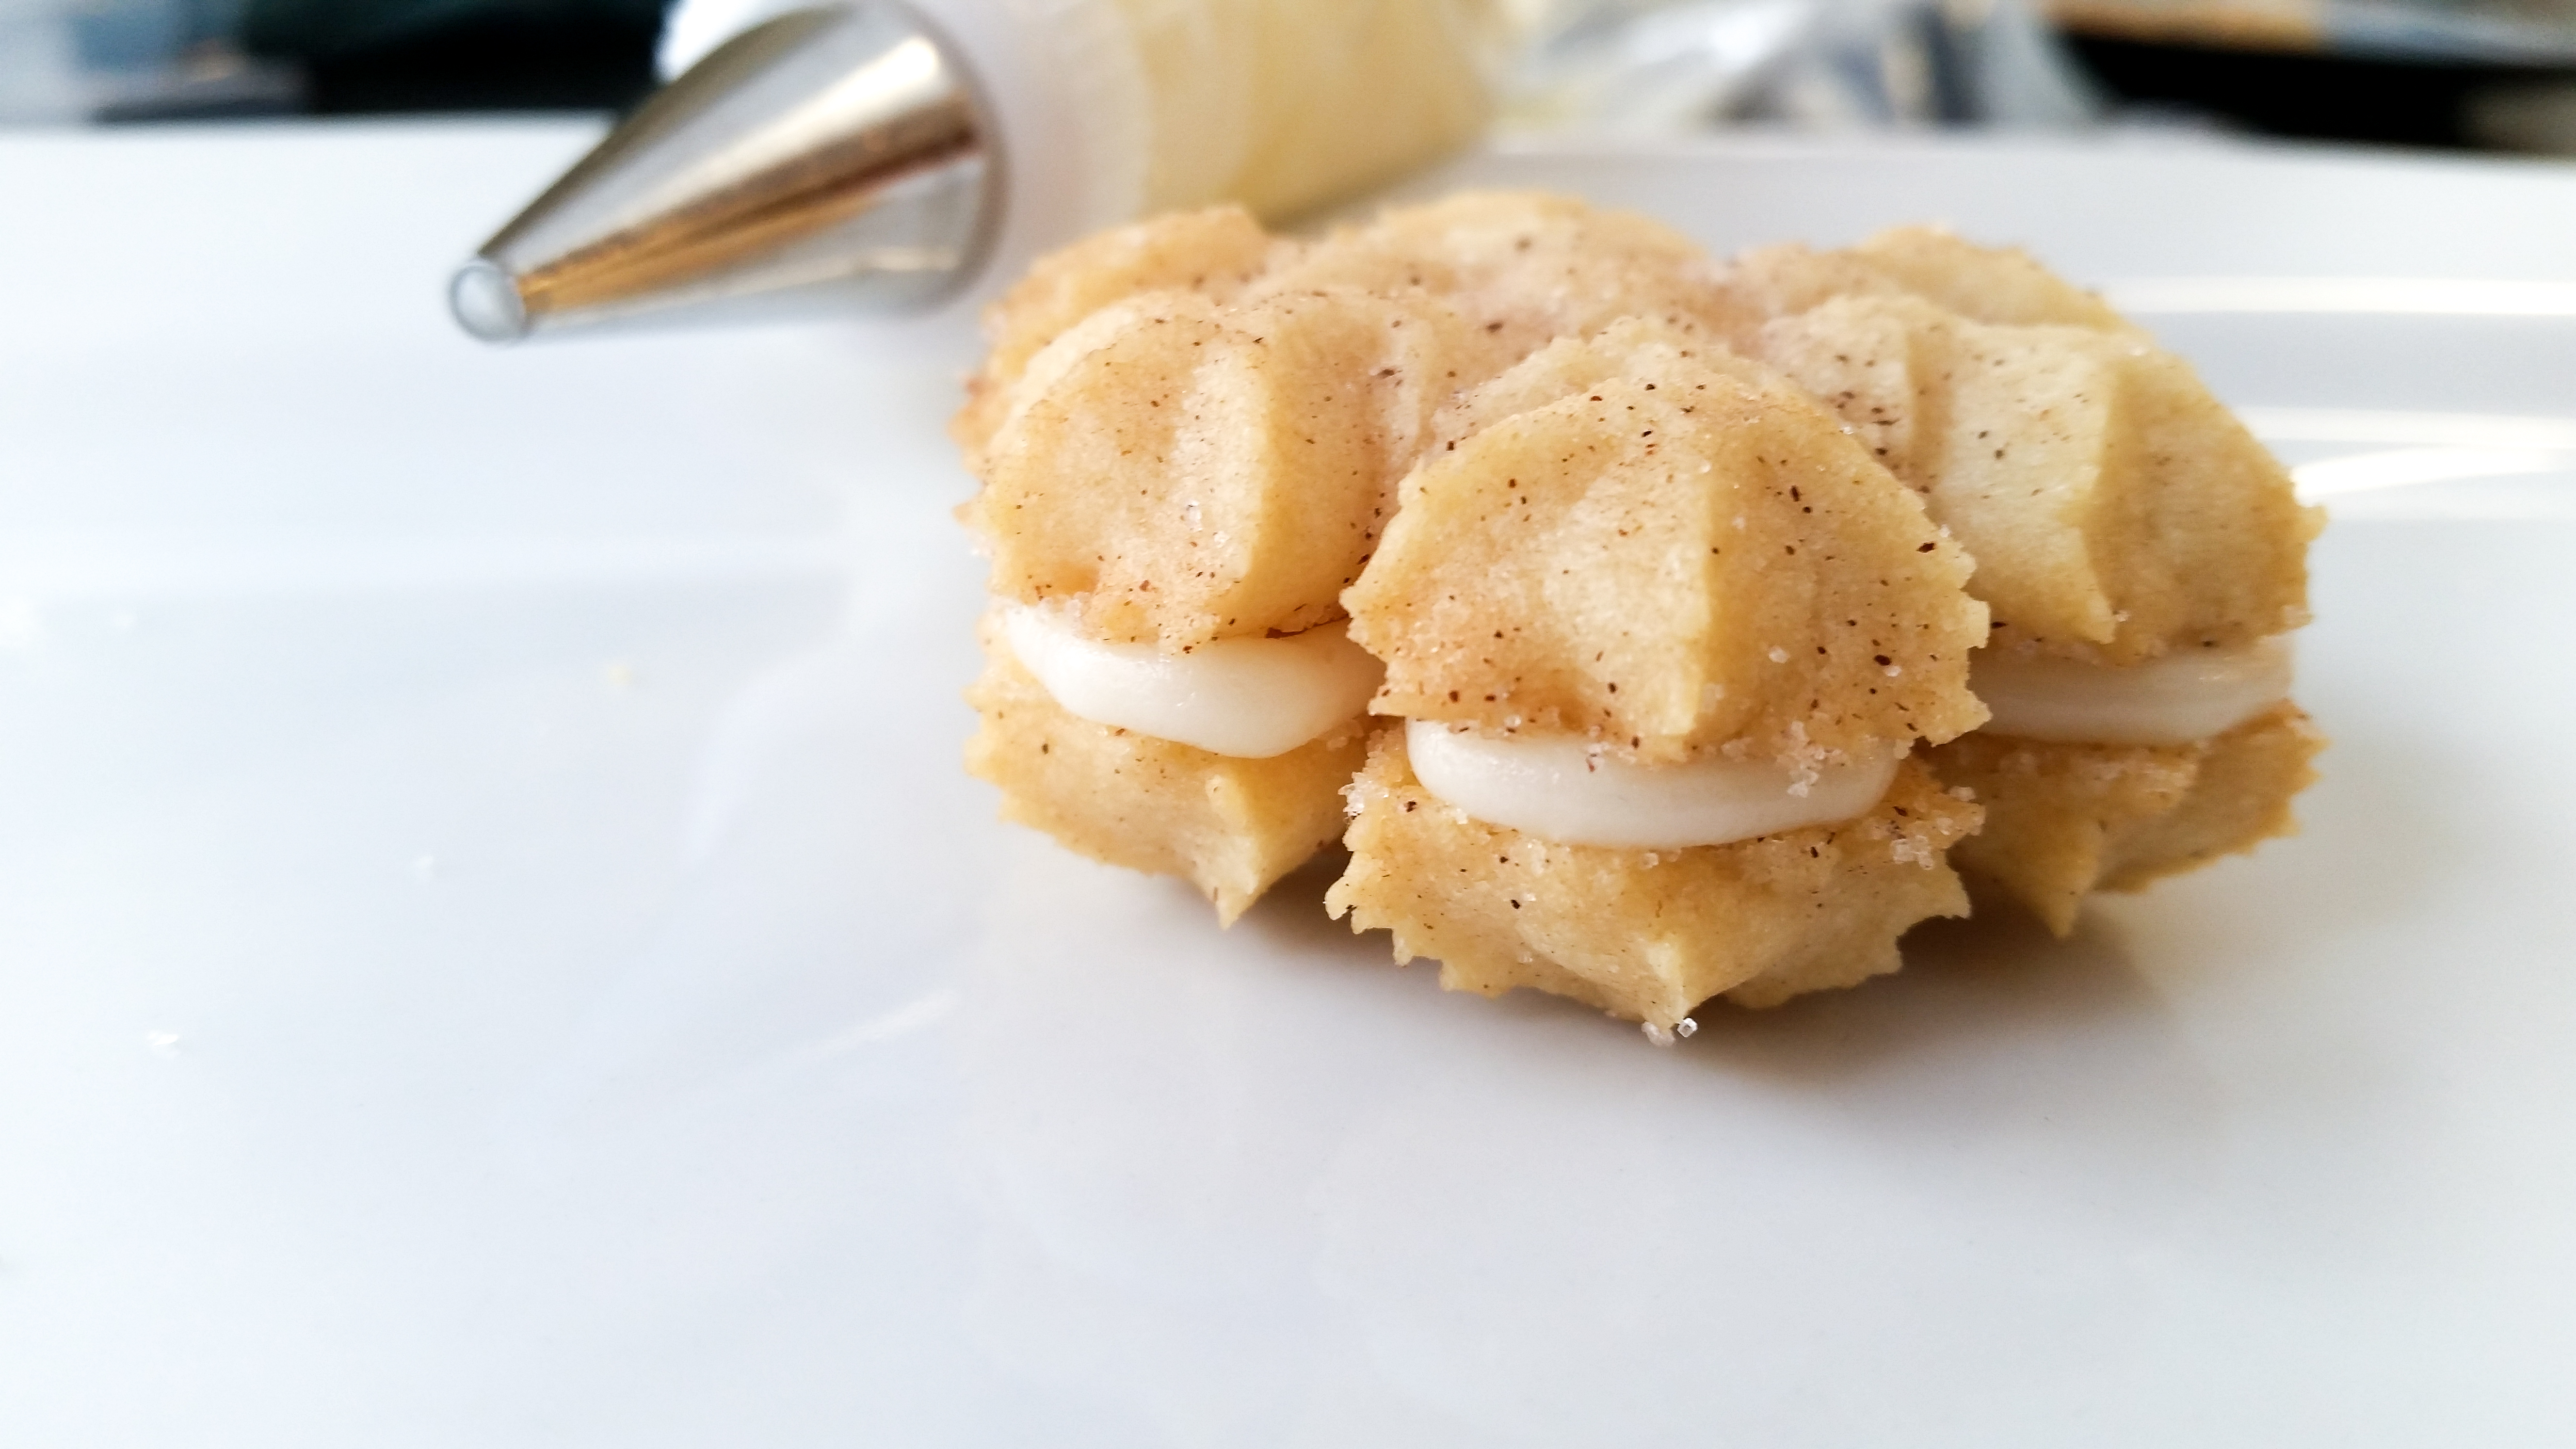
One last idea. Make sandwich cookies! For some this may be just too sweet, but if you’re like me and my kids, there’s no such thing! Even just try a few, just to say you did.
Use a big round piping tip like a #5 to neatly outline the underside of a cookie. Then fill it in and top it off with another same-sized cookie. Using the piping method gives the edges a much cleaner look than slathering icing on with a knife.
Below my sign-off I included a few more close-up pictures to let you see and copy the designs I did for this post. Disk set pictures and links below!
🙏We have a request💕 If you’re enjoying our recipes, *EVERY DISK & PIN PURCHASED helps us stay in business* & supports our families! Impress is a women/family-owned USA small business in Colorado. We design, make, & sell over 300 shapes of cookie press disks & dozens of embossed rolling pins. The recipes we share are free – we have no ads on this recipe blog – we make our money selling disks & pins. The recipes give our customers creative ideas and attract new customers!💕 THANK YOU! 💕~Susie the Disk & Pin Designer
~Susie
Disk Designer/Co-Owner at Impress! Bakeware, LLC
Our website has all of our 200+ disk shapes, cookie press, embossed rolling pins, baking accessories plus more about our Women/Family Owned company! impressbakeware.com
All products are on our Etsy shop.
Our Amazon shop has our cookie press and disks and embossed rolling pins.
Follow us on facebook!
The Snowflakes and Christmas disk sets:


Snowflake 8 & Angel

Snowflake 3 & 8

Snowflake 11 & 2

Snowflake 7 & 10

Snowflake 4

Sunshine on cookies after the snow. 🙂


My kids recently discovered they like snicker doodles. This looks like a fun recipe to try. And, I’m glad y’all are back!
LikeLike
Hi Marie! Snickerdoodles certainly are awesome. Hope you guys have lots of fun with this recipe. 🙂 And thank you, we’re glad to be back! ~Susie the Disk Designer
LikeLike
It would be really helpful if you included the weights for the flour (preferably in grams). There are many ways to weigh flour and not all flours have the same density.
LikeLike
Hi Sherry I’m sorry I never got a notification about this comment! There are many things that affect how flour incorporates into cookie dough, including humidity, temperature, brand, etc. SO even a perfect measurement can end up feeling off. I have found that these measurements are a good starting point. Many of my videos and blogs mention that you can tweak any recipe if it is too stiff or too soft by adding more flour or water. Even when I make spritz cookies (every week!) I encounter those issues, and “perfect” measuring won’t stop them from happening. (I do this so often I’m pretty darn consistent with measuring.) So I prefer to begin with a basic measurement and tweak from there. Spritz dough is all about old-fashioned “feel”. Tweak it till it feels right. But I appreciate your comment! ~Susie the Disk Designer
LikeLike
The directions mention sprinkling a cinnamon and sugar mixture on top, but this isn’t mentioned in the ingredients. Should it be assumed that it should be the standard ratio of 1 part cinnamon to 3 parts sugar (eg. 1t cinnamon, 1T sugar)?
LikeLike
Hi Sherry I’m sorry I never got a notification about this comment! Thanks for catching my oversight! Yes, I’d say use any ratio you like. I just mix cinnamon in to the sugar till it tastes right to me. ~Susie the Disk Designer
LikeLike
Sometimes, if you know at press time you intend to make sandwich cookies, you may choose to press cookies which are thinner. Most modern presses have one “setting” without any way to change the distance from the design plate to the cookie sheet, but some of the older presses have clip-on height gauges. Choosing a shorter gauge makes pressing a little tricky sometimes (probably why no one has height adjustments on modern presses), but results in a finished sandwich cookie that isn’t as high as it is wide and you may not need to add as much icing in the middle to get your desired icing to cookie ratio!!
If you do this, some reminders which most bakers won’t need, but just in case:
Compared to regular thickness cookies, you have to shorten your baking time for the thin cookies. Definitely test the first sheet or two of thin cookies to find the optimum time.
You may need to adjust where you set your oven rack to move the sheet higher or lower than where you have it for normal thickness cookies. This may help if you cannot find a time which fully bakes the cookies without burning the bottoms.
You cannot mix thin cookies and thick cookies on the same sheet at the same time. You will end up with one being burnt or the other being under-cooked.
Thin cookies may need to cool a little longer to get a little firmer than normal thickness cookies so they do not break when being lifted off the sheet.
LikeLike
Interesting! I’ve never seen a press with a height gauge. Thanks for the cool comment! ~Susie
LikeLike
How many cookies does this recipe make? I know this can vary depending on how thick you press them, but some estimate would be great!
LikeLike
Hi Nicole! That’s the one thing I always forget to say! That recipe makes about 100-110 little snowflake cookies. Happy Baking! ~Susie the Disk Designer
LikeLike
Nicole it might be a bit less than I said. I forgot this is a 2 sticks of butter recipe. So maybe 85-100 depending on which shapes you use. Some shapes are bigger so it makes a difference! ~Susie
LikeLike