
 I’ve always wanted to do a Woodland Christmas recipe, and now that we’ve revamped the old Mountain Cabin Disk Set into the Woodland Set, I have more shapes to play with. So it’s time for frolicking forest Christmas cookies! I know this may look intricate, but I promise you, it is easy.
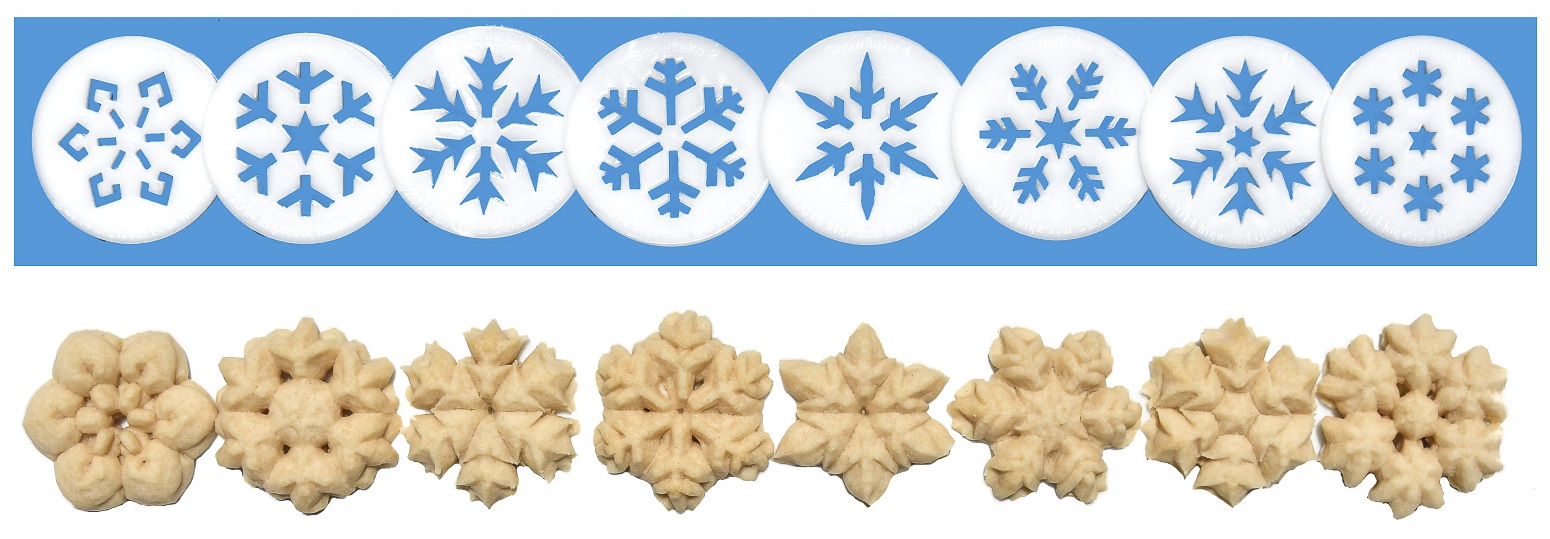
Today I’m going to keep it simple and focus on decorating, seeing as I’ve already blogged how to make, press, and bake this dough. Look at the Sparkling Almond Spritz Snowflakes post and it has the step-by-step on this almond spritz recipe. The decorating idea in this post could be done with any tint-able spritz recipe, i.e. not chocolate or gingerbread, etc. So bake this with your favorite. Keep it plain white-ish dough and the cookies will decorate well. Use whatever makes you happy! I just felt like almond today, so I whipped up my Incredibly Almond spritz recipe.
(If almond isn’t your thing there are a few recipes on here you could choose from: How to make Christmas Trees Cookies post has my gold standard spritz recipe, vanilla-honey spritz; Chicks & Eggs, Bunnies & Carrots- Easter Spritz has a cream cheese spritz recipe; and Colorful Fall Leaves… has a powdered sugar spritz recipe. They are all tasty and press great!)

After you make your dough and press the cookies, you can cover them with a light sprinkling of table sugar before baking if you want them nice and sweet. The sugar won’t show much but will add a little sweet pop to the taste.
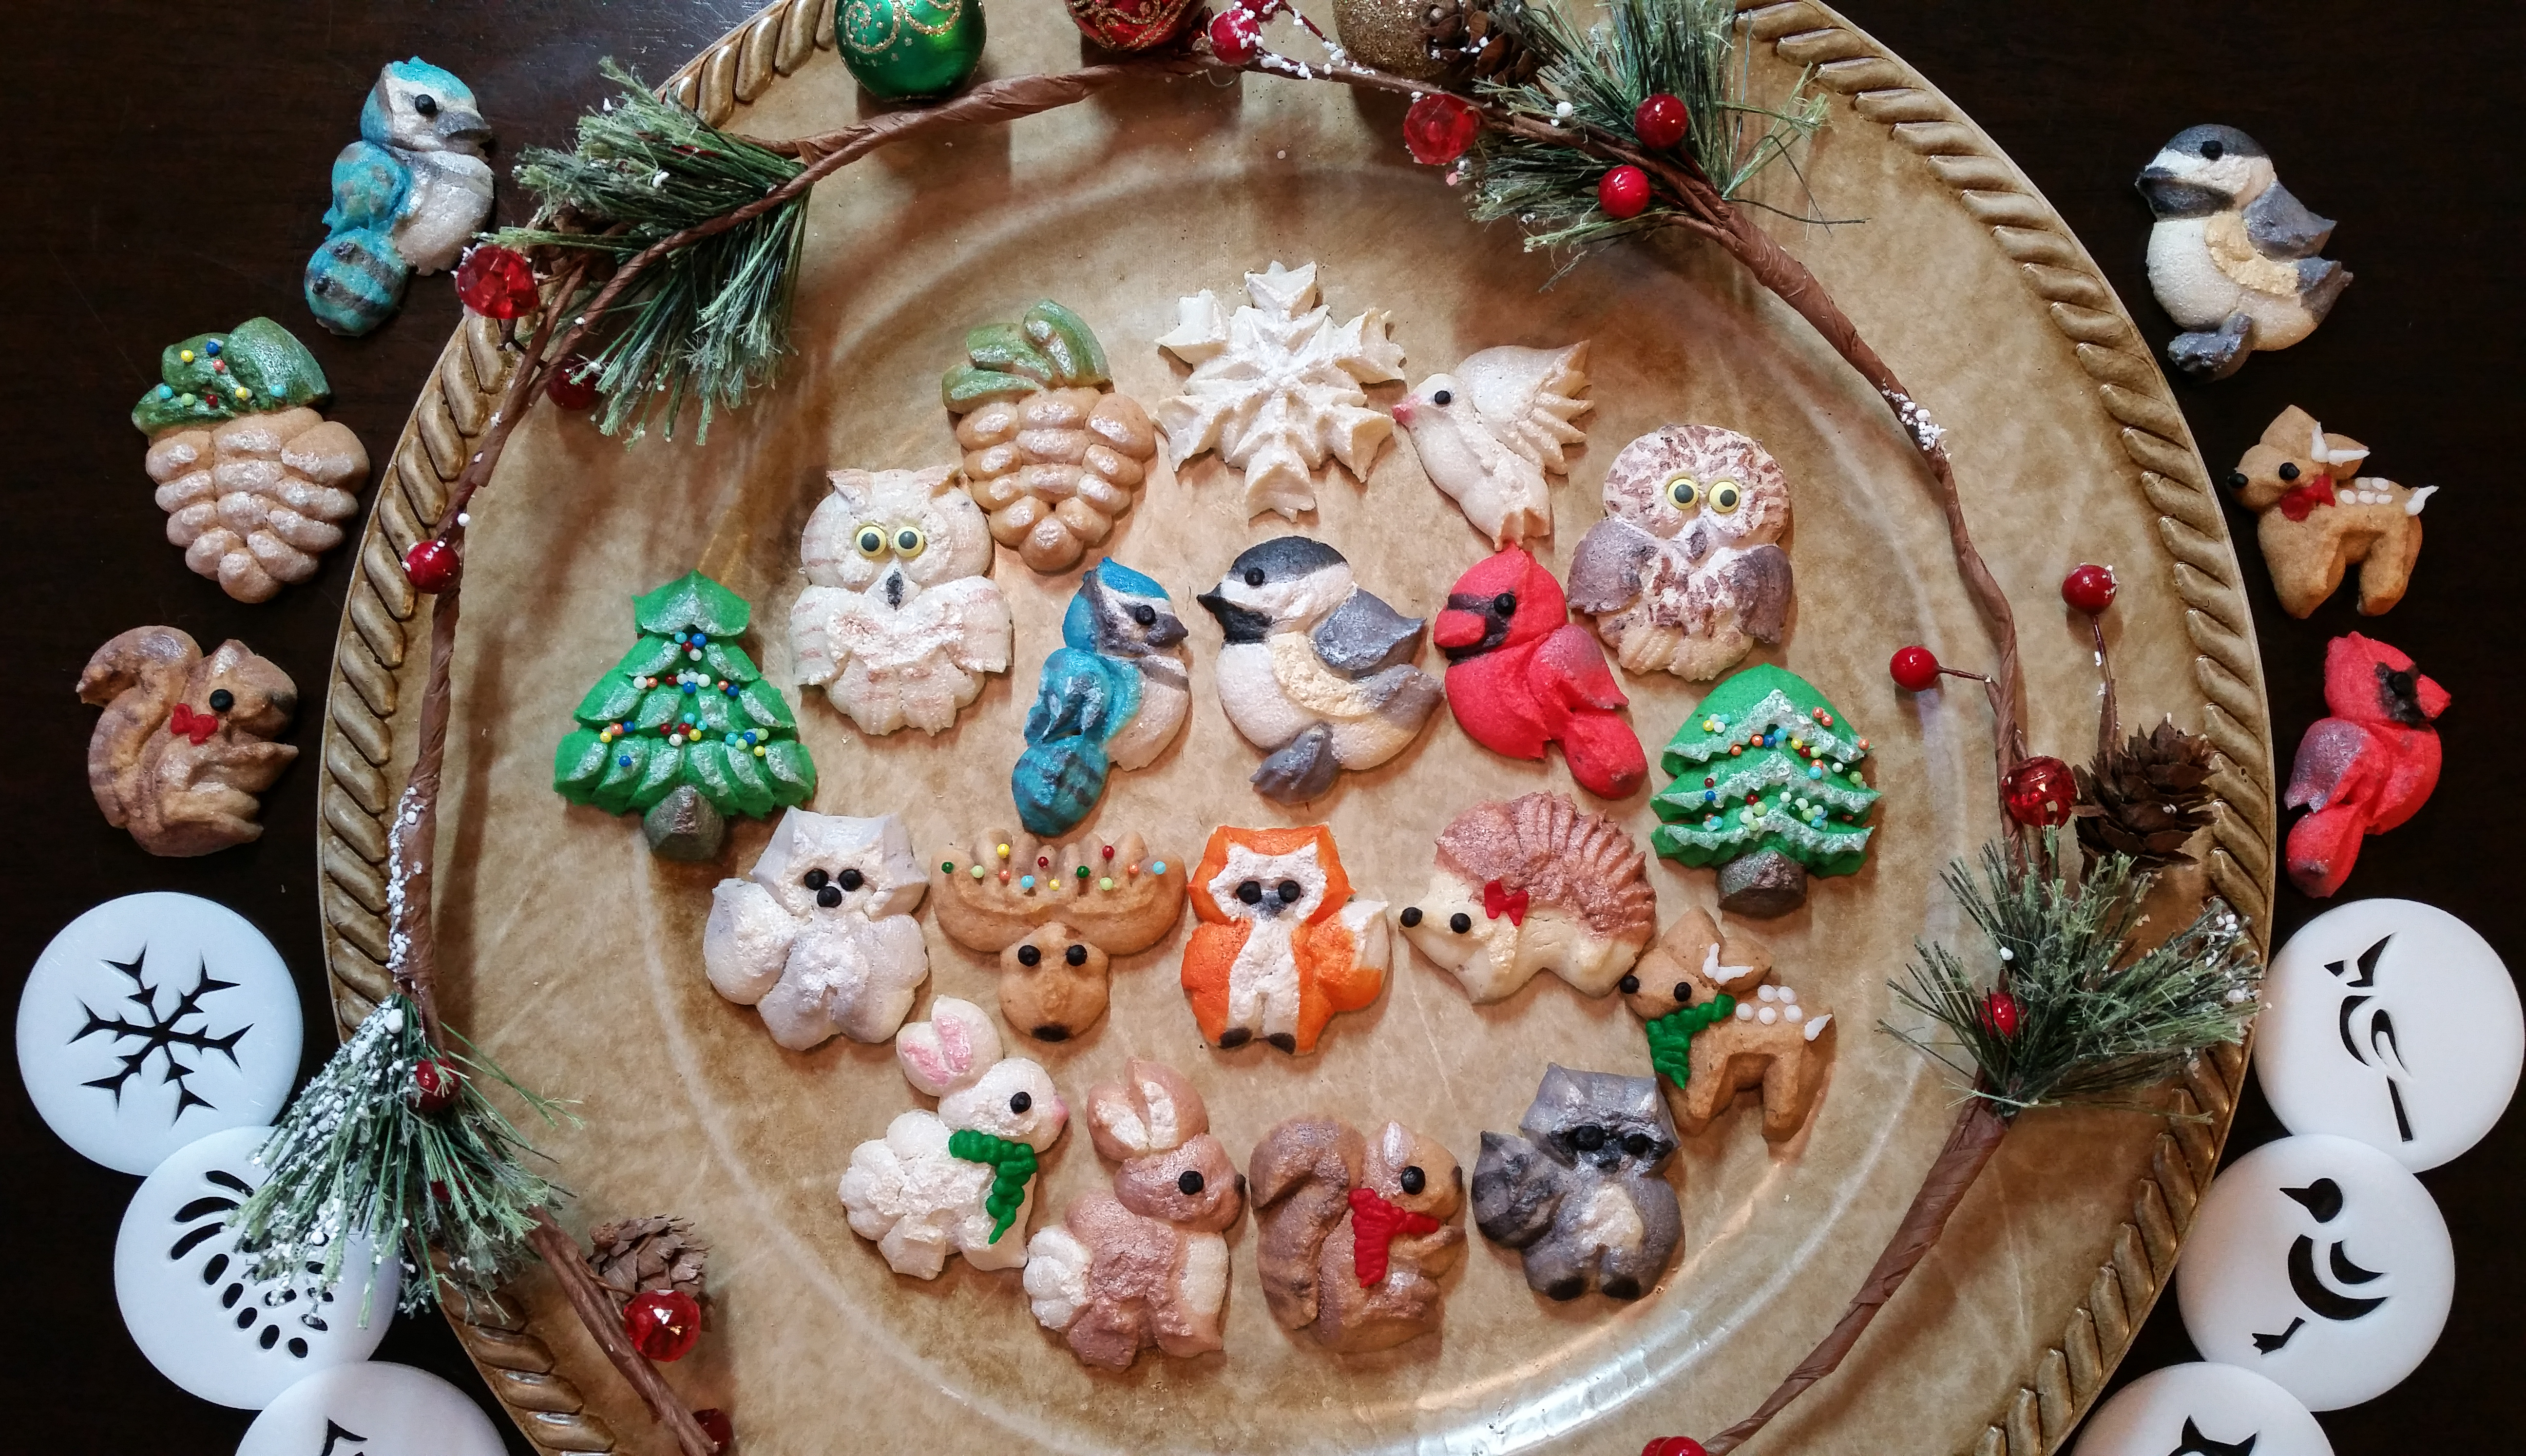
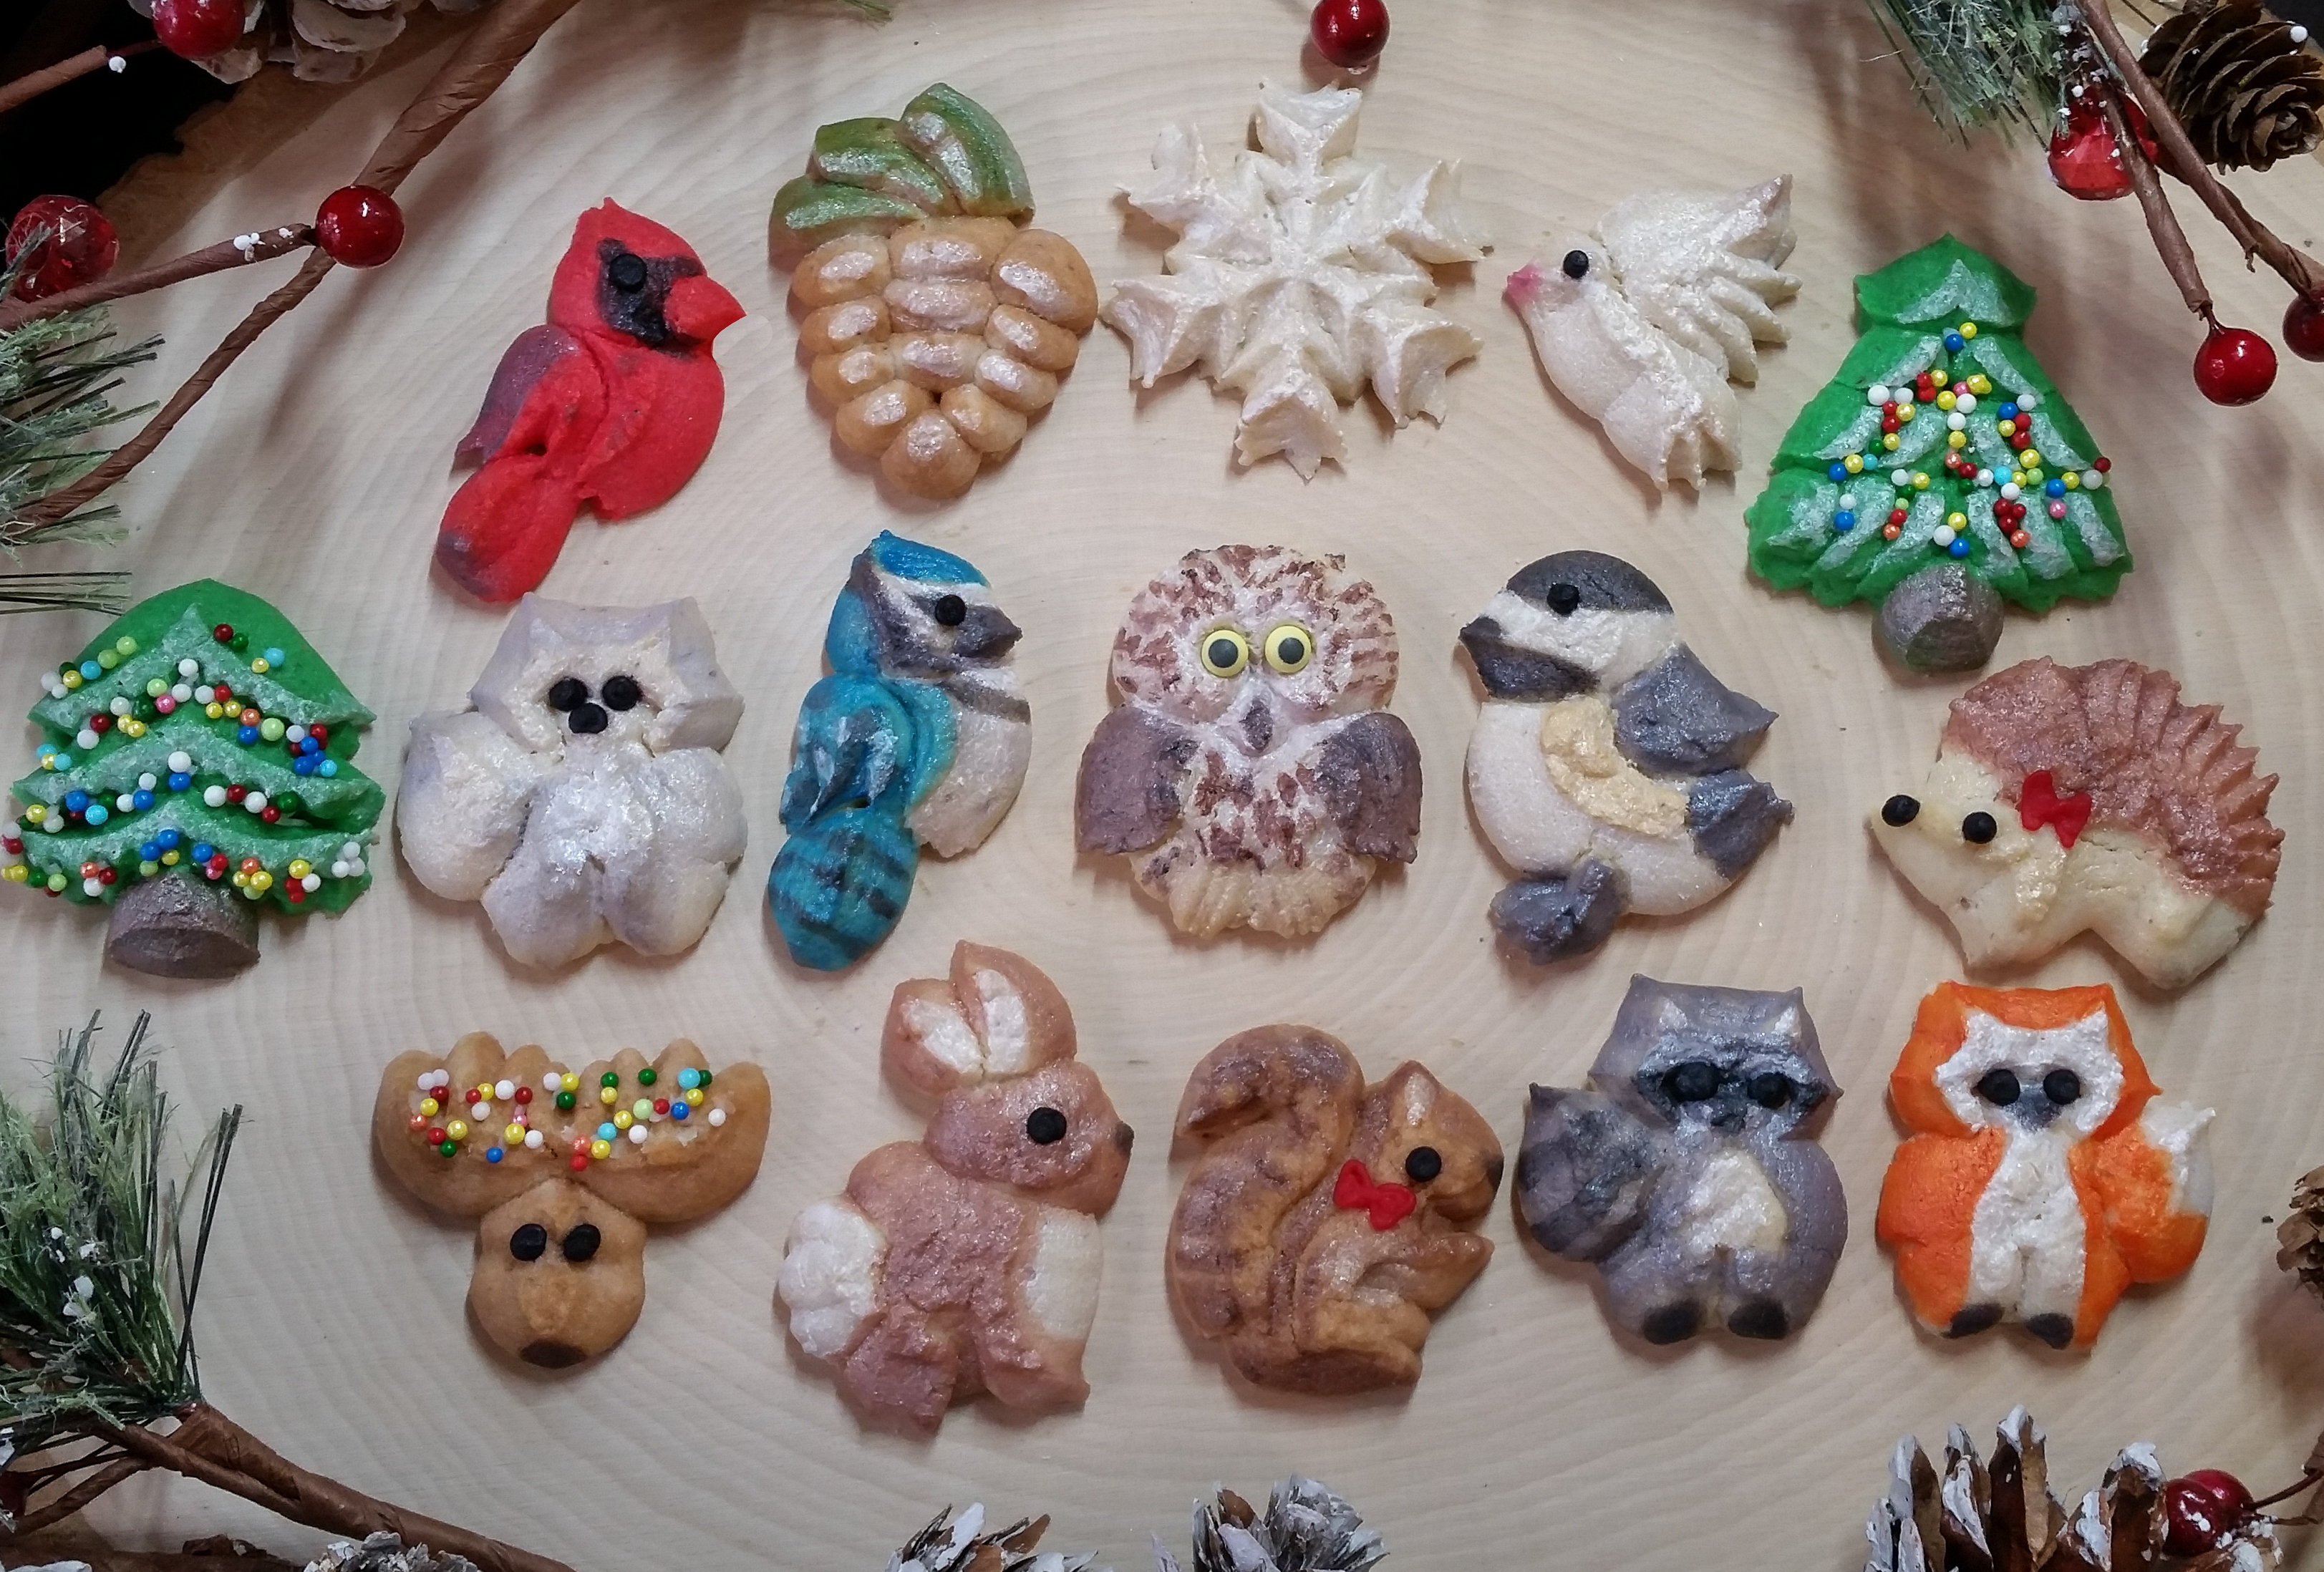
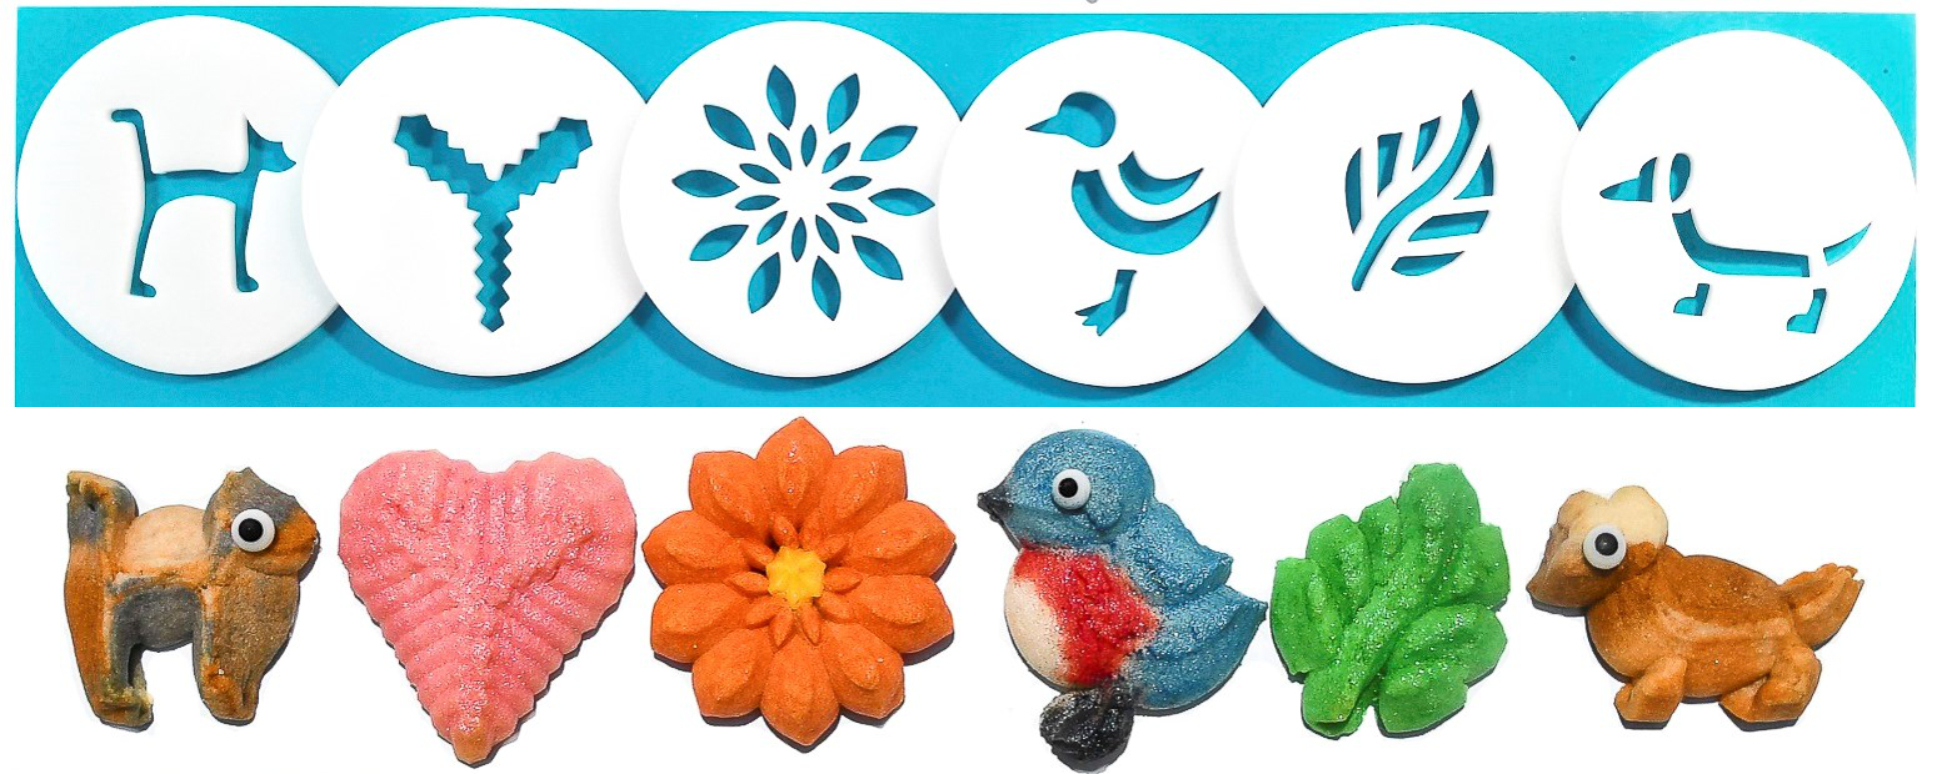
I pulled from several of our sets as there are critters scattered about in many of our collections. I used all of the shapes in the Woodland Set, some from our Impress Cookie Press Box Set, the cardinal/bird from the Christmas Ornaments Set, and the dove from the Wedding Set (these sets shown at bottom of post).
Here’s the Woodland disk set plus Christmas, Snowflakes, & More Snowflakes! sets. They’re our most popular this time of year!


2022 NOTE: Due to the popularity of this post, earlier this year we added a Birds Disk Set and a second Woodland Set! They’re also shown at bottom of post. Now you have more options for this recipe!
Our website has all of our 200+ disk shapes, cookie press, embossed rolling pins, baking accessories plus more about our Women/Family Owned company in beautiful Colorado Springs! impressbakeware.com
All products are on our Etsy shop.
Our Amazon shop has our cookie press and disks and embossed rolling pins.
💕We make our money selling cookie press disks and embossed rolling pins! There are no annoying ads on this recipe blog. Every purchase keeps us in business.🙏 Thank you!
🎉 “Tis the Season!” 15% off SALE❗ EXTENDED 🙂
🎄Make edible art for the Holidays, because baking should be fun!
Discount on our cookie press disks, cookie press, embossed rolling pins, luster dusts, cookie cutters & baking accessories. Sale November 26 – December 17, 2025, on our website and Etsy shops ONLY! (Links above) Sale excludes holiday gift sets and our recipe book.

I know this looks like it has to be hard but I assure you, it is anything but!
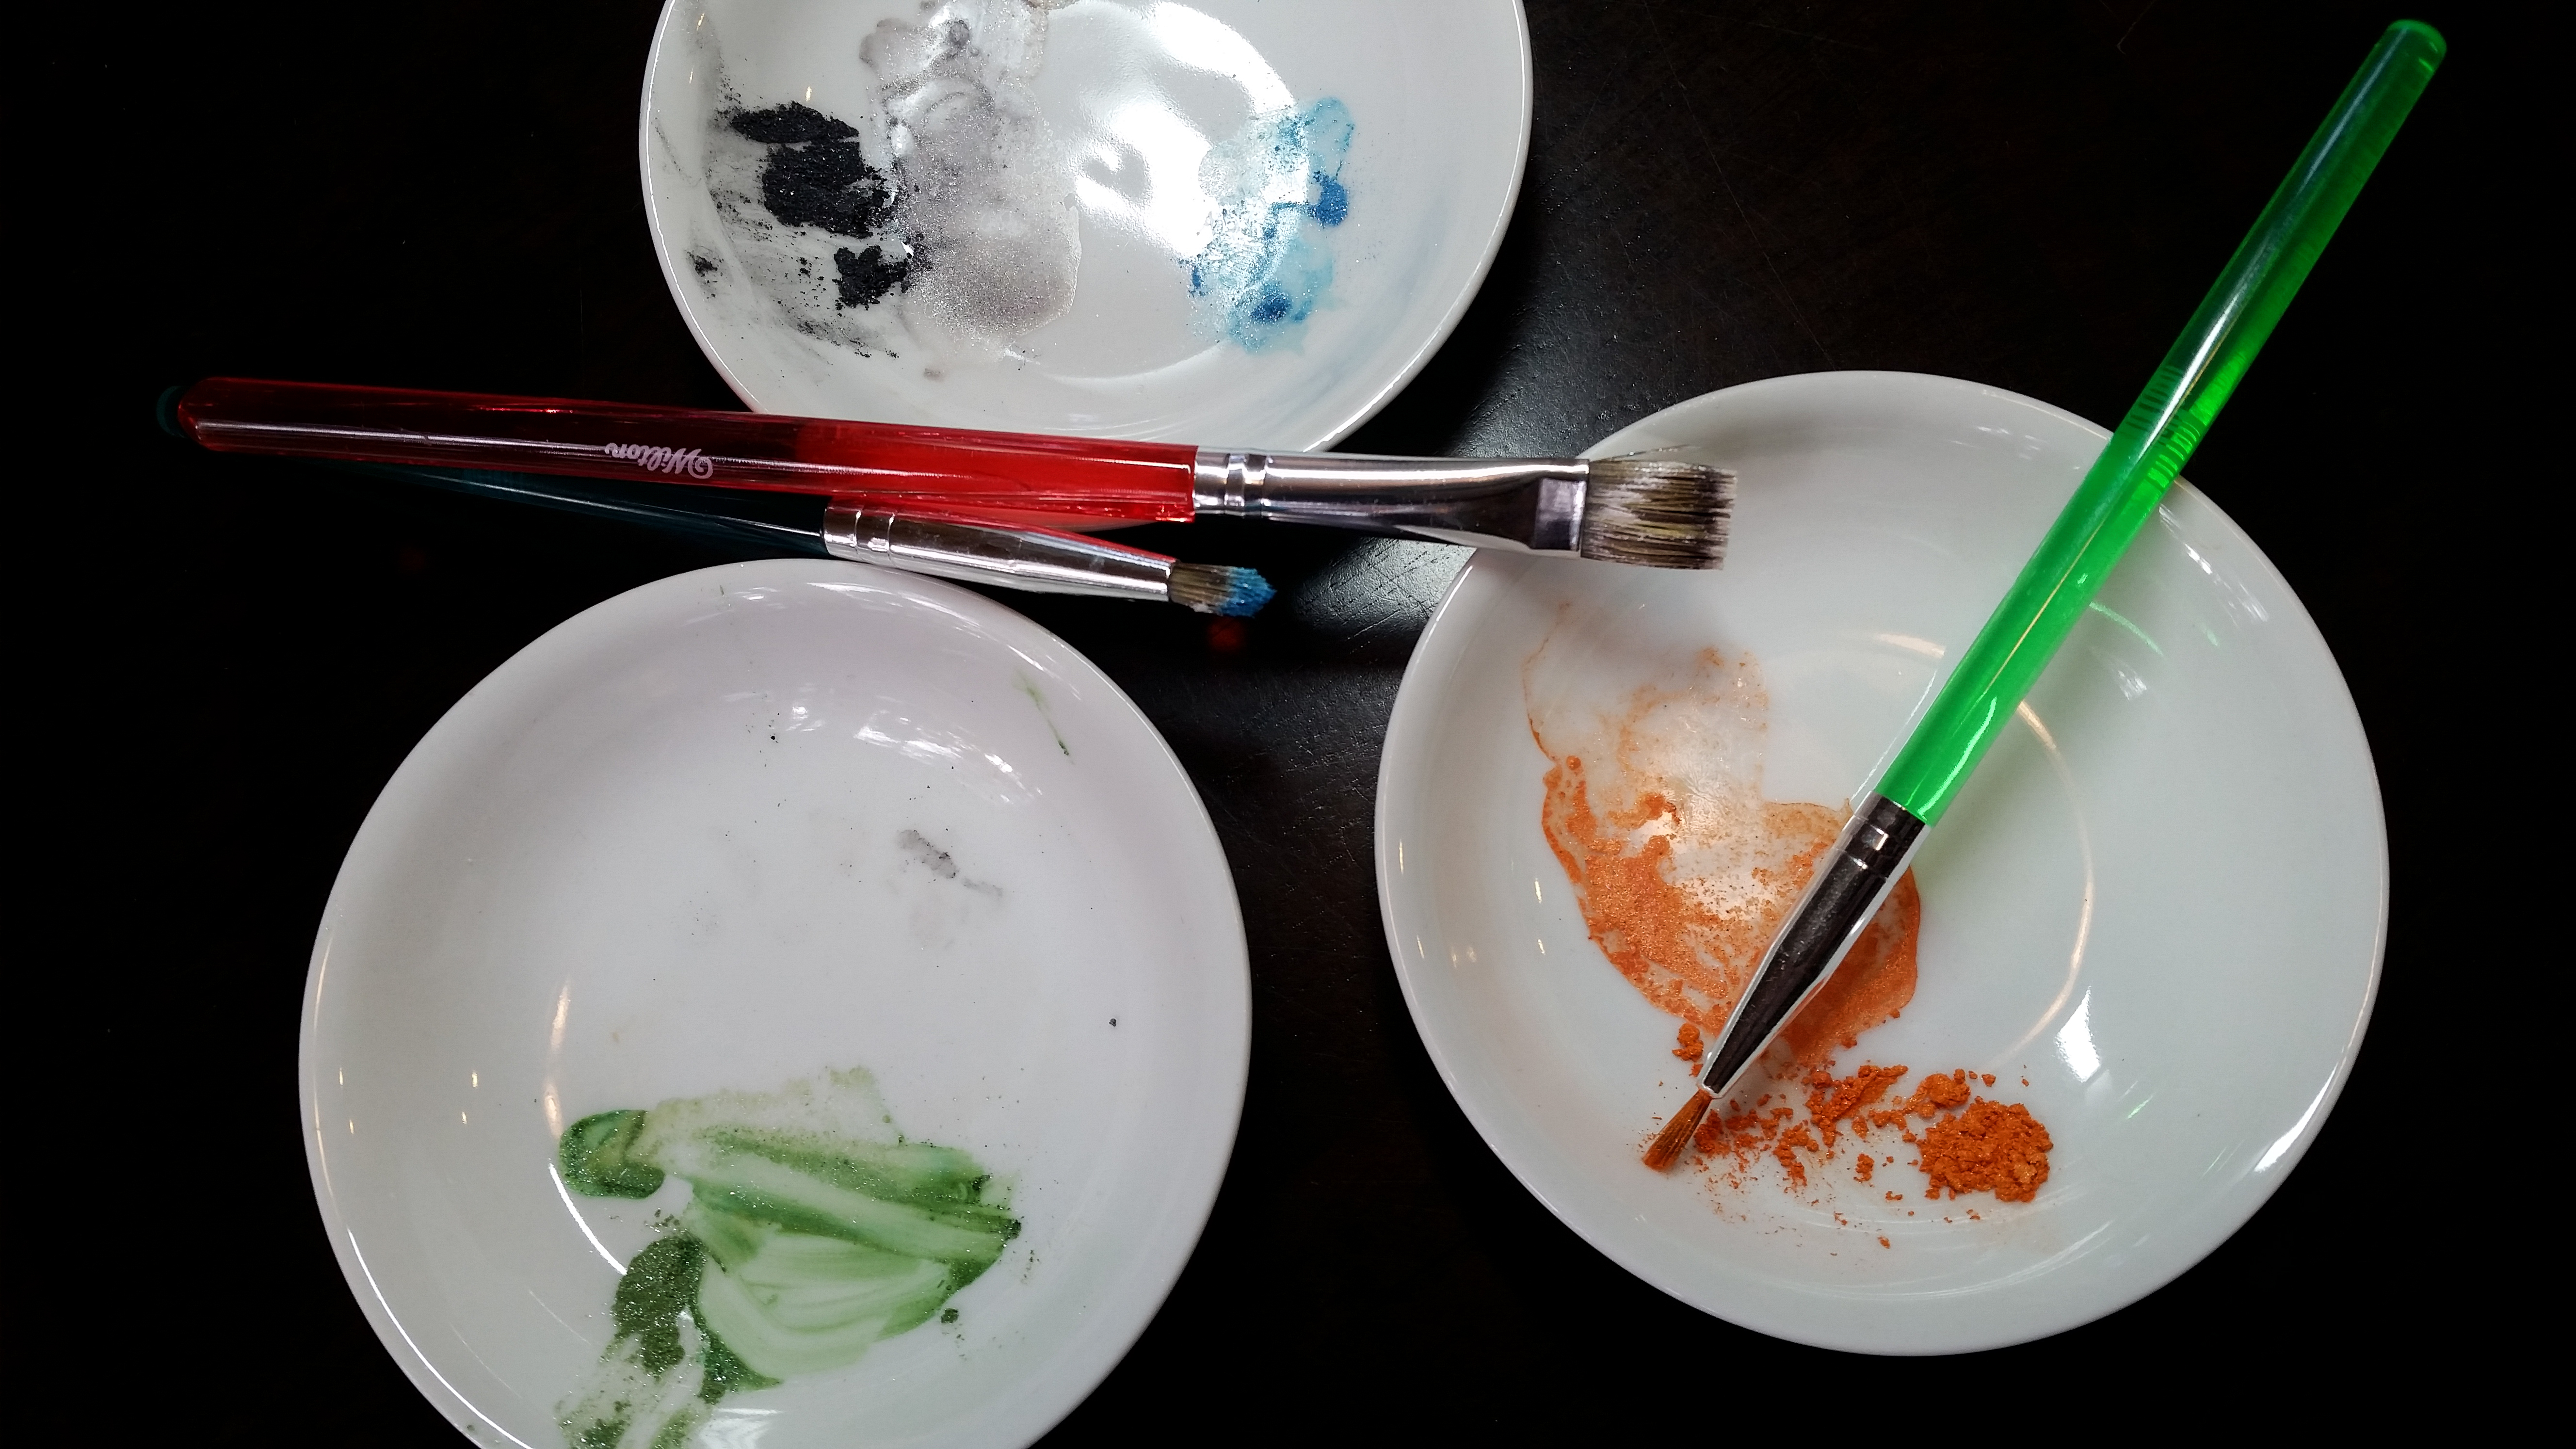
My decorating technique is first to tint some of the dough, such as green trees and brown critters, red cardinal, etc. (Always use gel food color to tint dough! Good examples of this are in the posts suggested above.) On both the tinted and plain cookies I then used edible pearlescent or luster dust mixed with clear alcohol. You could alternatively use any clear extract. Vodka is definitely the best choice and makes the smoothest, fastest-drying paint! The taste disappears. As you experiment, you’ll get the hang of mixing dust and liquid. Piece of cake… or cookie. 😉
NOTE: Always make sure you are using EDIBLE dusts! Some lustre/pearl/glitter dusts on the market are “non-toxic” but that does not mean they are edible. Plenty of brands have actual food ingredients and are marked “edible”. ONLY use those for safety’s sake! And thanks to my reader Hilary for reminding me that I hadn’t mentioned that in this post!
2022 NOTE: We are now selling luster dusts! We’ve partnered with Bakell, who makes exquisite dusts here in the US. Their colors are luxurious and the dusts are fabulous to work with. They’re on our website and Etsy shop. 🙂

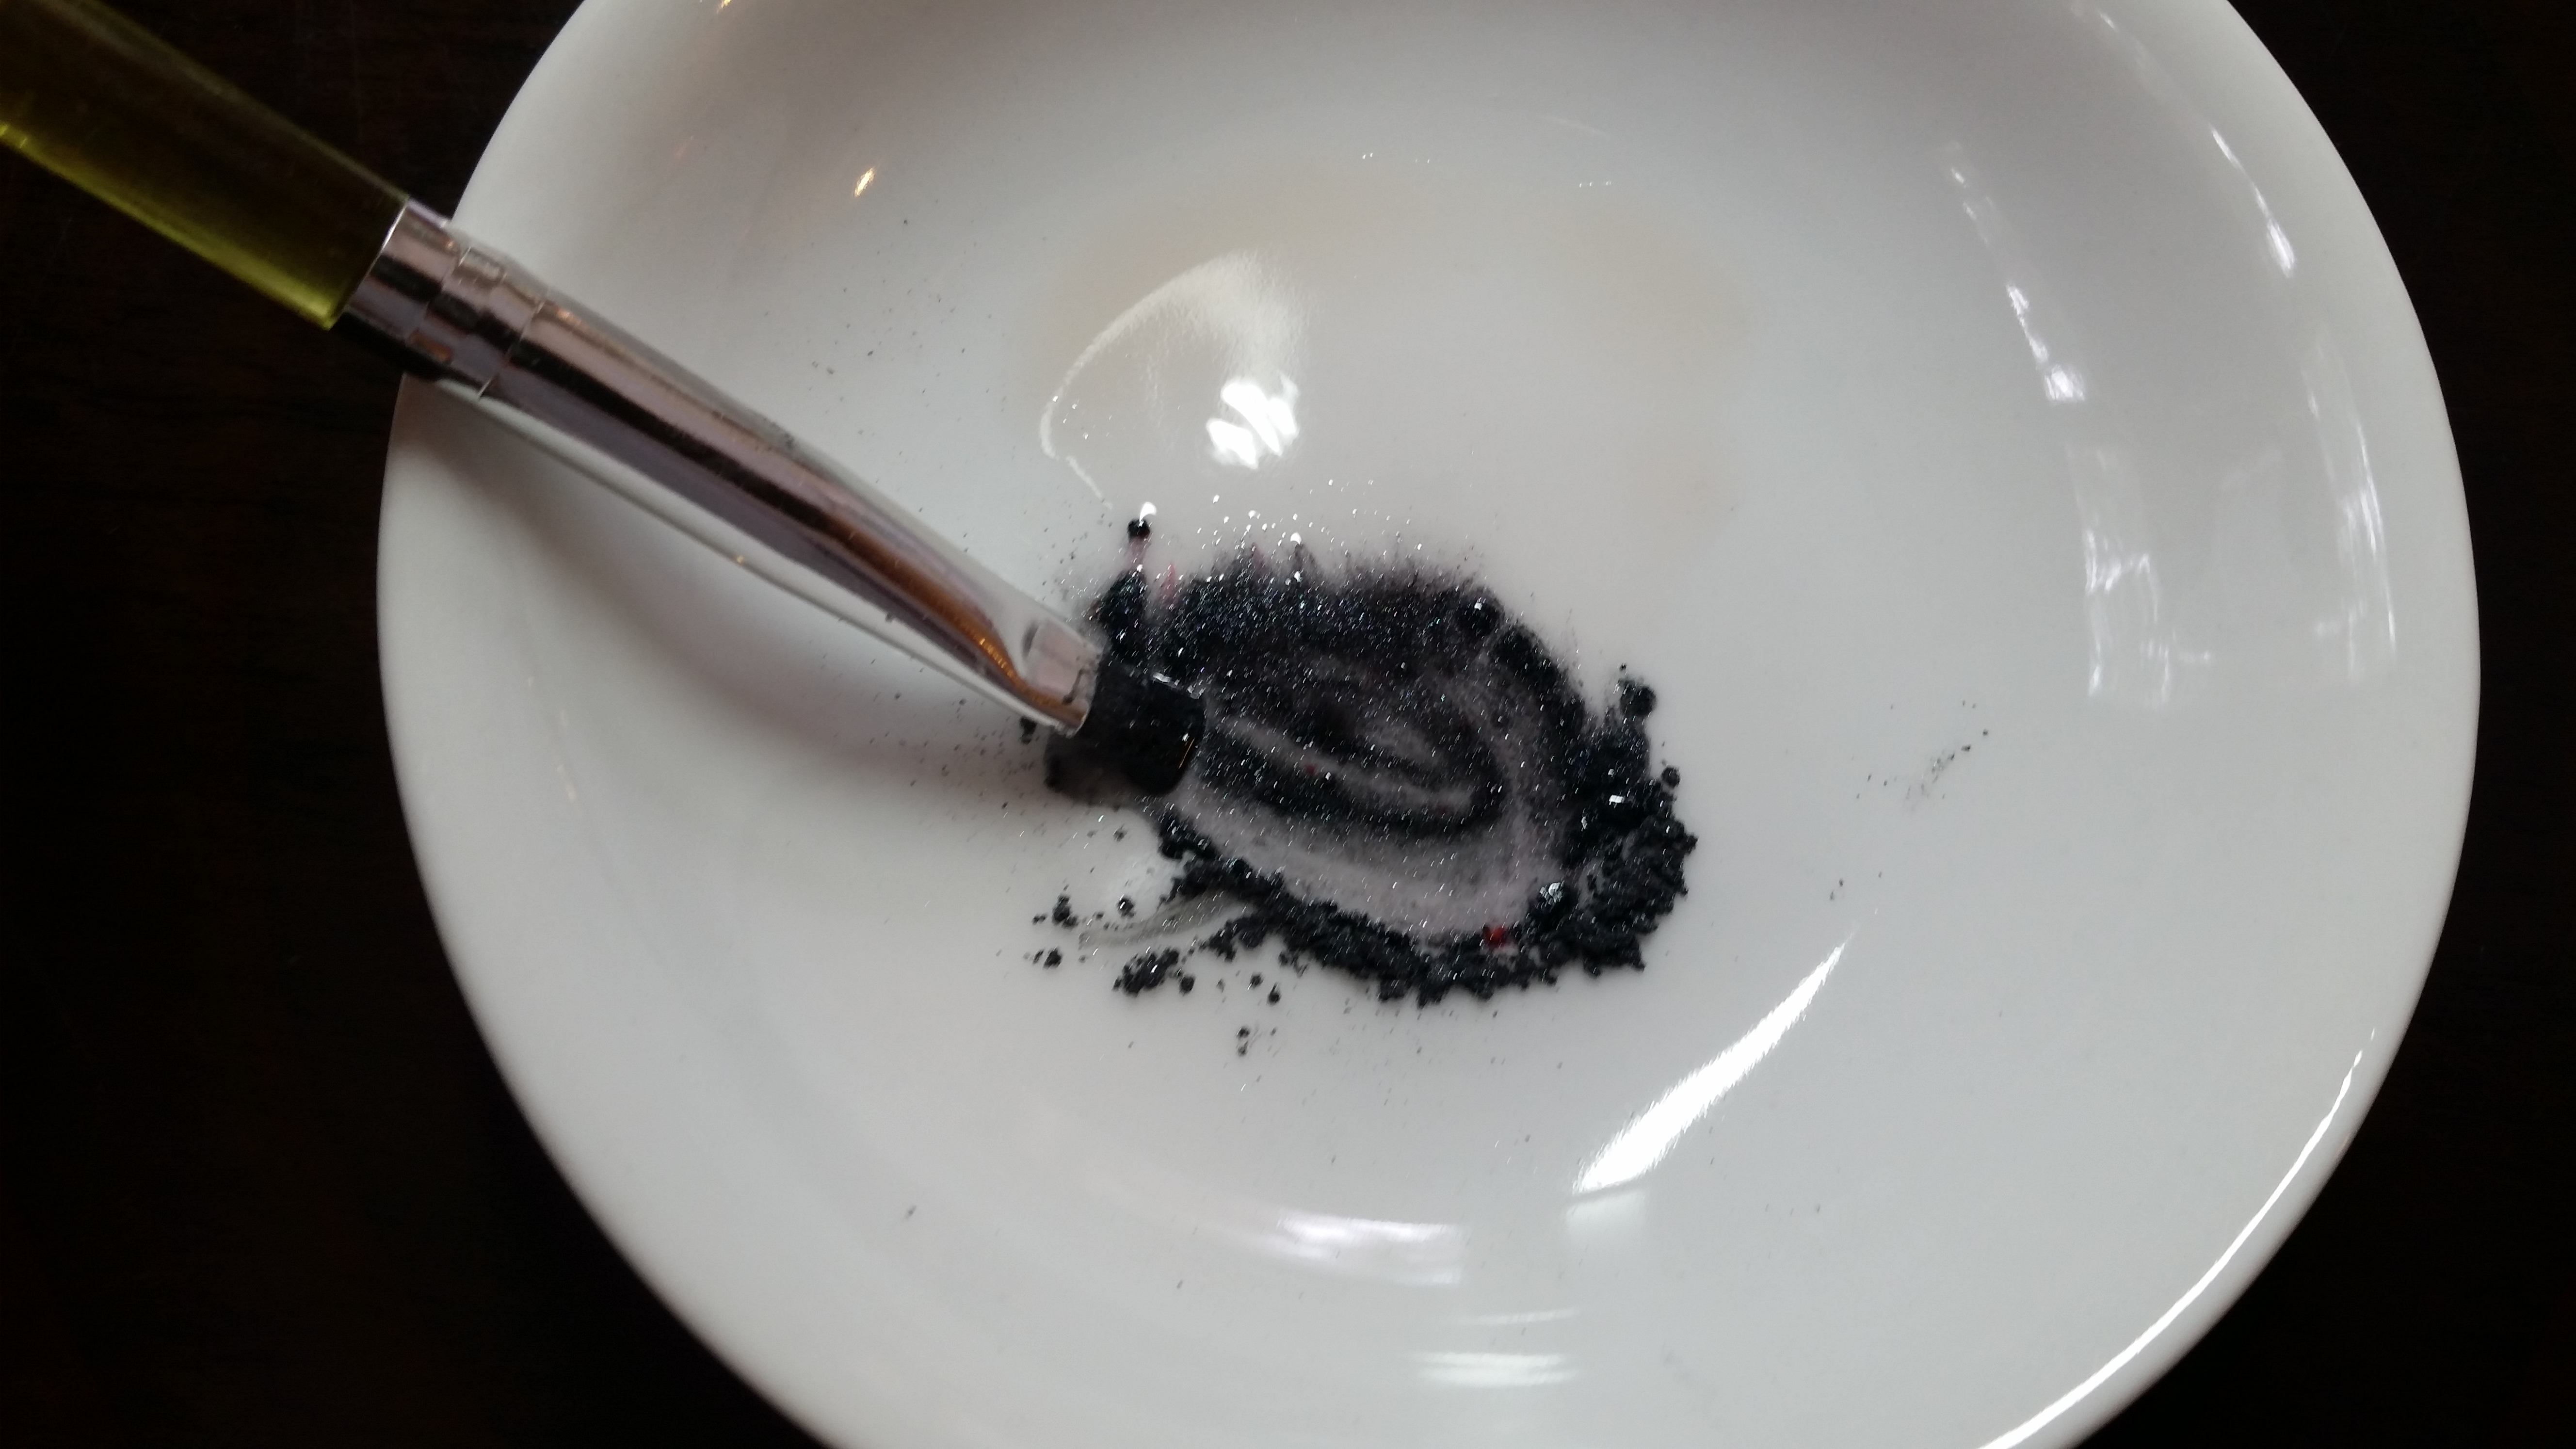
I often use dusts to decorate in my blogs, but I usually use it dry as I like the texture it gives. But for this post I really wanted control and precision so I could literally paint with it.
This may come as a surprise, since I design these disk shapes and decorate cookies, but beyond this creative realm, I’m a pretty lousy artist! I cannot paint at all. I mean *at all*. However, spritz cookies aren’t flat featureless shapes that would have to be free-handed on. They have ridges and lines and sections and bumps. They’re more like cookie paint-by-number or coloring books. I know the fad is over, but for those who enjoyed the whole adult coloring book thing, you might find this equally zen. I sure did! And hey, then you can eat your work. Yum.

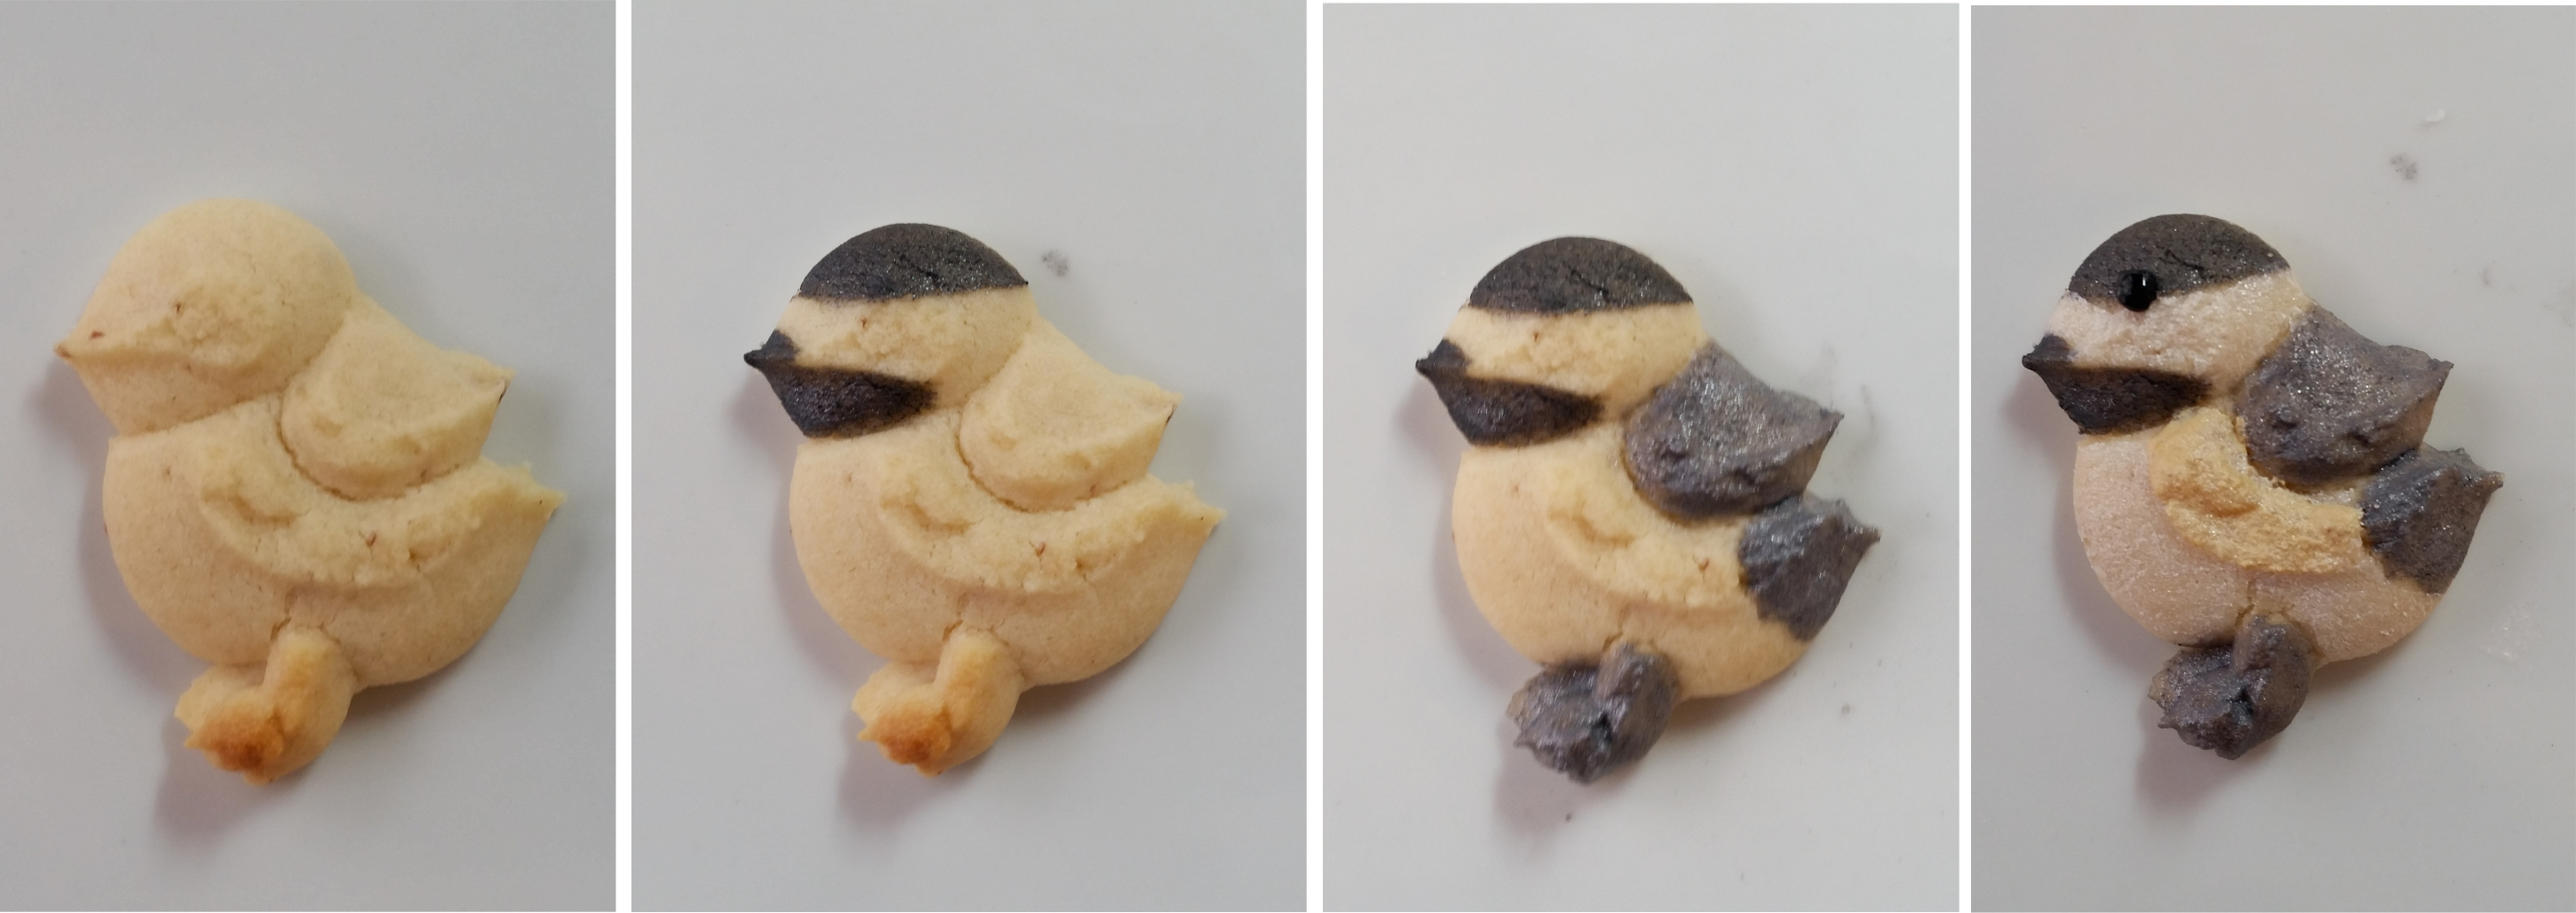
The shapes are so easy to paint because the lines are already there, so you’re not drawing the object or animal, you’re simply giving it some color and accents. I needed a touch of guidance on the blue jay and chickadee, so I simply looked at photos and copied where the colors went. It was SO easy.

I have to admit I’m pretty enthralled with this technique. You’re probably going to see a lot more of this here. I have to thank Necia, one of our repeat, epic customers who sent me pictures and encouragement last month when she painted like this on cookies made with our turkey disk (Thanksgiving set if you’re wondering. 😉 ). I was inspired to give this wet technique a go and I am delighted!

The neat thing about the bluebird/songbird and cardinal/bird disks is that they make a nice general bird shape silhouette, so you can decorate them as several different kinds of feathery friends. I made the bluebird into a chickadee and the cardinal into a blue jay!
Our fox/raccoon disk makes a shape that can be decorated as multiple critters as well. Here I did the red fox, raccoon, and a white arctic fox. I think the arctic fox is just too dang cute. I made her white with a touch of gray and deep black eyes. Adorable.

I used red and green icing to squiggle on scarves and draw little bows.
For all of these critters except the owls I used black decorating icing and round writing tips to make eyes. For the owls I used 3/16 inch yellow candy eyes from The Baker’s Kitchen online. I keep boxes of their eyes handy. I use them a lot.
You’ll notice there are two owl cookies. I used the same disk for both, but I removed the tufted ears from one. I painted both of them white then added subtle marks on one and bolder brown and grey on the other. Not exactly real-to-life but they looked cool! Like a snowy owl and a saw-whet owl LOL (Yes, I’m kind of a bird nerd!)

White decorating icing made a great glue for attaching nonpareil/sprinkle ornaments to the trees, moose antlers, and a pinecone top, and to add spots and accents to the fawn.

Like the fox/raccoon I made the bunny in two colors, all white like an arctic hare and brown and white like a cottontail. SO easy.
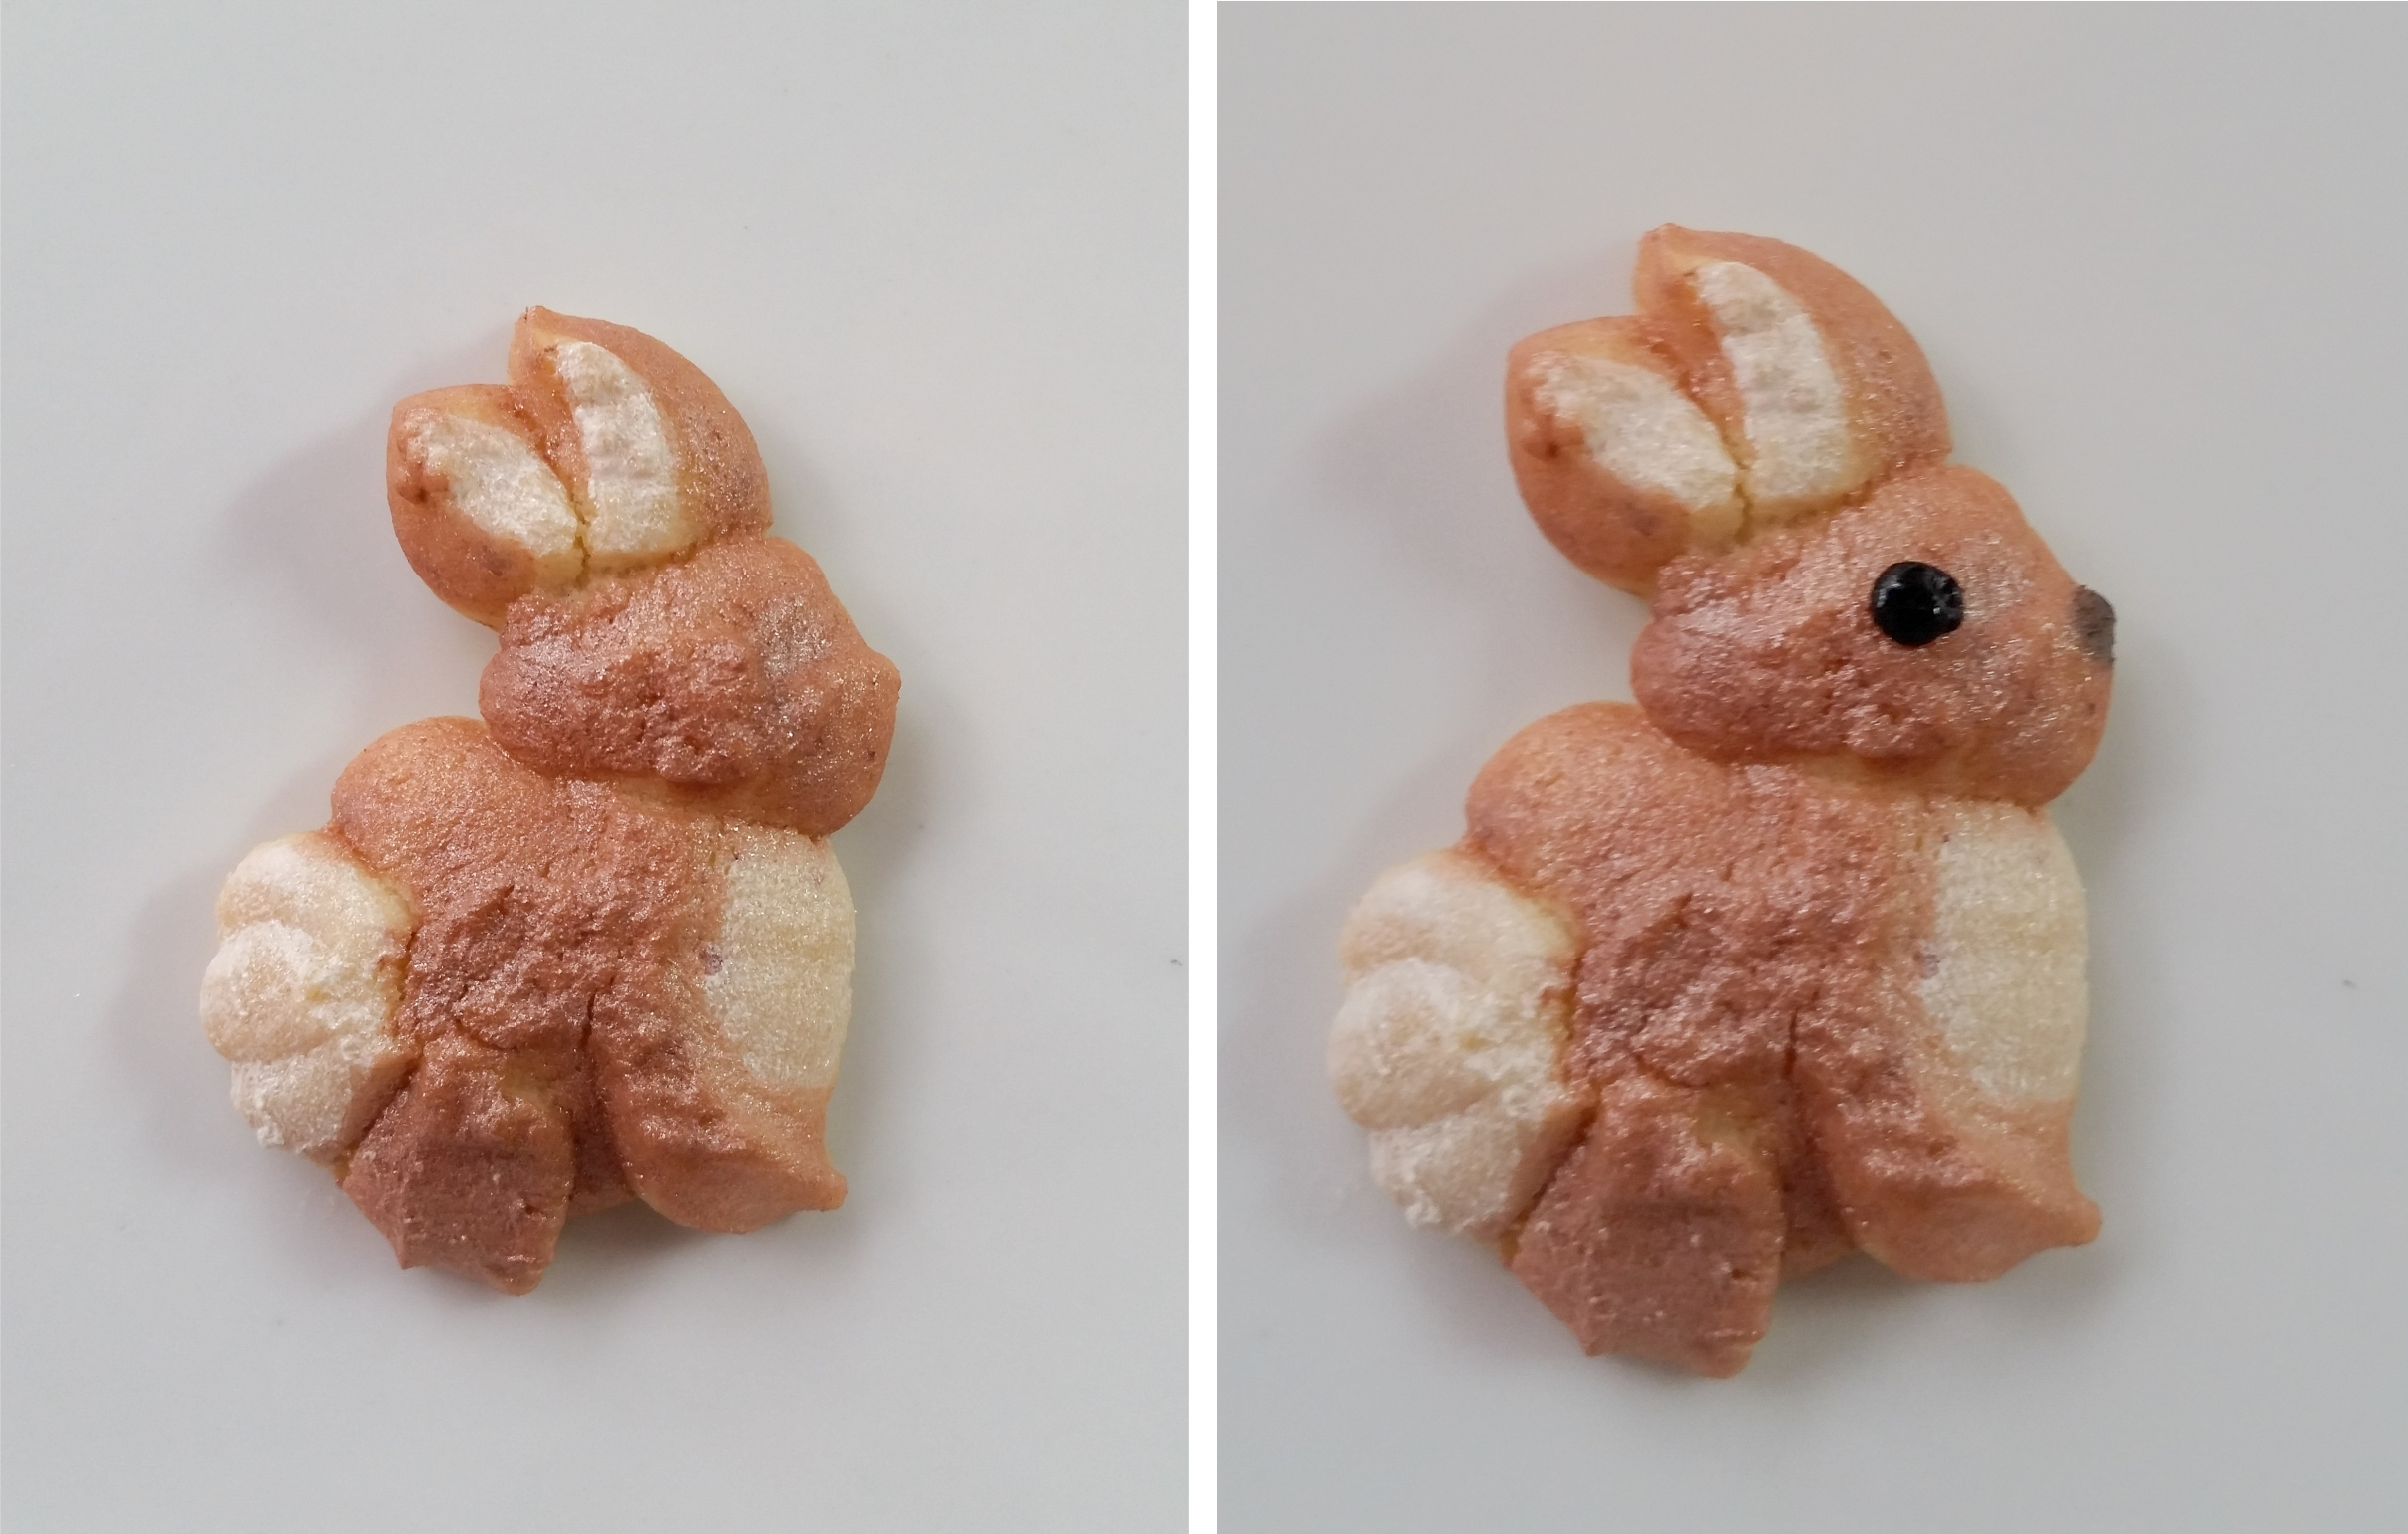
One last close-up picture to share and that’s it! Woodland Christmas.
As this is likely my last post of 2019 I want to thank everyone who hung in there with us through the closure last year, who cheered us on and touched our hearts with kindness. Your response to our re-opening has been amazing, and we are thrilled to be back.
Merry Christmas, and as always, Happy Baking!
~Susie
Disk Designer/Co-Owner at Impress! Bakeware, LLC
Our website has all of our 200+ disk shapes, cookie press, embossed rolling pins, baking accessories plus more about our Women/Family Owned company! impressbakeware.com
All products are on our Etsy shop.
Our Amazon shop has our cookie press and disks and embossed rolling pins.
Follow us on facebook!
The sets I used:
Woodland Disk Set:

The NEW Birds Disk Set:

The NEW Woodland Two Disk Set:
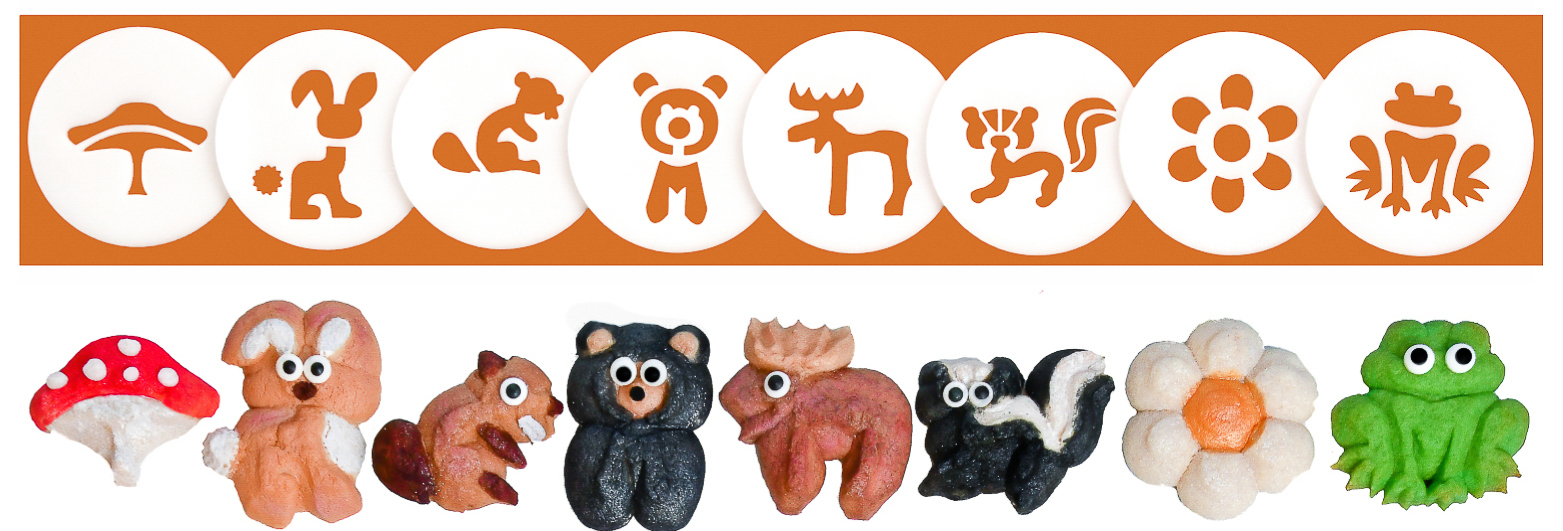
The 12 Disks that come with our cookie press- also sold without the press on our website and Etsy shop:

The Christmas Ornaments set:

The Wedding Set:


Lovely cookies!
Please use care when using lustre dusts on food items. While some lustre dusts are listed as non-toxic, many are not intended to be consumed and can make you ill if eaten.
https://www.usnews.com/news/health-news/articles/2021-10-29/pretty-poison-luster-dust-sprinkled-on-cakes-can-be-toxic
LikeLike
Hi Hilary! I agree completely. I always use the ones that have food ingredients. There is a big difference between “non-toxic” and “edible”. I usually highlight that point in posts where I showcase dusts. If I didn’t this time I should edit! Thanks for the comment, great for people to know! ~Susie the Disk Designer
LikeLike
I just edited to add that info! Thanks again Hilary! Happy Baking to you! ~Susie
LikeLike